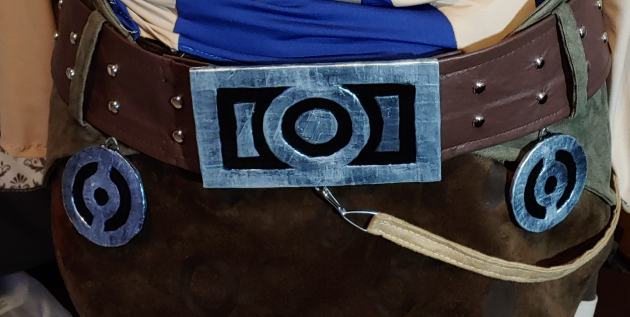
Sometimes you need a belt buckle. A really big one with decorative designs. Unless you want it chunky, foam probably won’t cut it. Worbla is expensive, though it does work. So why not paper mache? It doesn’t sound like it would work for a buckle, but with a little bit of creativity and digging in the recycle bin, it definitely does.
The trick to making a paper mache belt buckle is the strength of the base cardboard. I dug an amazon box out of the recycle bin for this, and it takes little more than a flap of it to make the buckle.
This belt buckle won’t be load-bearing, but it is pretty secure and stable. I’ve had it sitting on the dress form for several days, letting gravity do the strength test for me. The buckle works best for a soft fabric belt that you can fold in half pretty easily around the wire that sits on the back of the buckle. Soft vinyl and faux leather work great for a leathery look. If you have that, it’s time to dig in the recycle bin and make a buckle!
Skill level: beginner-friendly
Cost: relatively budget-friendly (more budget-friendly if you have knives and pliers already!)
Materials:
- Corrugated cardboard box. I used an amazon box from the recycle bin
- Food box for raised details. I used a chicken nugget box, but any food box will do.
- Newsprint, non-shiny. You can use the weekly ad from the mail, a discarded newspaper, purchased newsprint, or the like.
- Mod Podge (glossy or matte) or white school glue
- Heavy gauge wire. I used 16 gauge wire
- Soft cosplay belt
- Set of 2 snaps. Large 3/4″ snaps are great for this project.
Supplies:
- Small box cutter or XActo knife
- Cutting mat or cutting board
- Poster paper or printer paper for patterning
- Pens and pencils
- Rulers, compass, triangle, etc for creating designs as needed
- Masking tape
- Scissors. Large ones for the overall shape and small ones for any detail pieces
- Towel for fingers. Paper mache is messy
- Table cover
- Small bowl for paper mache glue mixture
- 2 Pliers. Needle nose works great.
- Wire cutters
- Acrylic paints, paintbrushes, gloss varnish. Can also use spraypaints or airbrush paints
- Hand sewing needles and polyester thread
I recommend checking out my primer on paper mache: Paper mache for props and accessories
Creating a pattern
Before you start cutting into the cardboard, it’s best to make a pattern and plan out any raised designs. This ensures you have the right size buckle before you set out to work
For my buckle design, I needed something wide and rectangular, only slightly larger than the belt. In general, the buckle should be wider than the belt you’re working with to hide the connectors underneath, but how much wider it is, is honestly up to you and your design. Remember that buckles do not curve around your body, so make sure the size is comfortable and not so ridiculously large, you can’t sit down.

The buckle also needs to be wide enough to connect both sides of the belt with some overlap which you’ll need when attaching the belt to the buckle later. The belt shouldn’t sit tightly, just comfortably, as the buckle probably won’t support too much tugging.
After deciding on a size, it’s time to add any raised patterns or details. My buckle is has a geometric mirrored design. I used a compass and ruler to create the design, marking the center of the buckle for reference. Sketch your design out with a pencil, using any rulers, compass, or glass from your cabinet as needed to make the pattern you want.
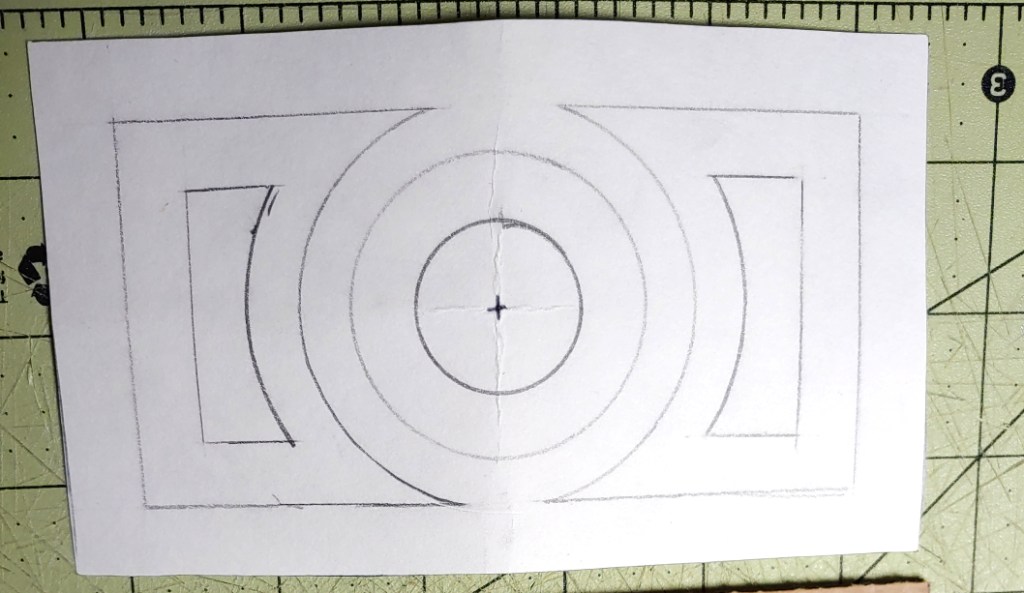
By drawing both the base and the details on the same pattern, you can ensure both pieces line up evenly when taping them together.
Don’t want to make your own pattern? No worries. You’re welcome to use mine. Link’s belt buckle is made for a belt about 3″ wide.
Once you’re satisfied with your pattern, cut around the outside border, leaving any internal designs intact for now.
Building the buckle
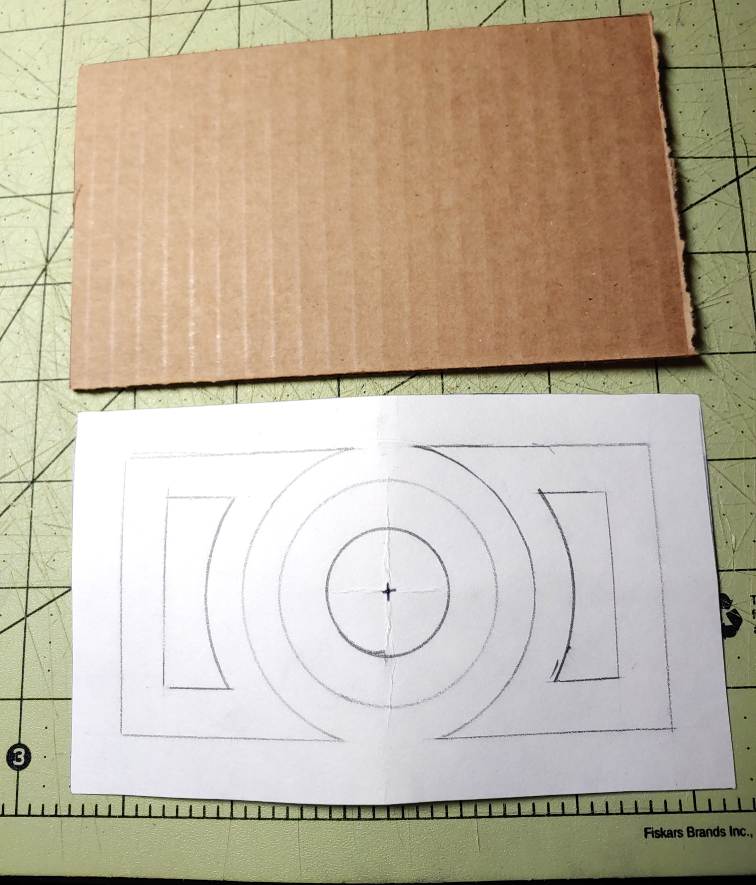
Start by cutting out the base from your corrugated cardboard box. Trace the shape onto the box using a pen, but don’t cut it out with a pair of scissors. This actually crushes the little pockets inside the cardboard which’ll make the edges of your buckle appear to slope and sag.
Instead, you’ll want to use a scoring method. Be careful of your fingers while doing this. Set the cutting mat down on a hard flat surface, placing the cardboard on top of it. Using the box cutter or XActo knife, score the cardboard along the pattern lines, that is cut only about halfway through the cardboard. After scoring the design, cut along the design once again, tracing your scoring lines as you cut all the way through and free your design from the rest of the box.
Set the base aside for a moment.
Cutting out the details
Creating designs is much easier in food boxes than it is in corrugated cardboard. Cardboard does not like little patterns while the food box has no problem with them. Grab your recycled food box, and let’s make some details.
Start by cutting the details out of the pattern. If you’ve used poster paper, you can use your box cutter or XActo knife to get smaller details if little scissors aren’t working for you.
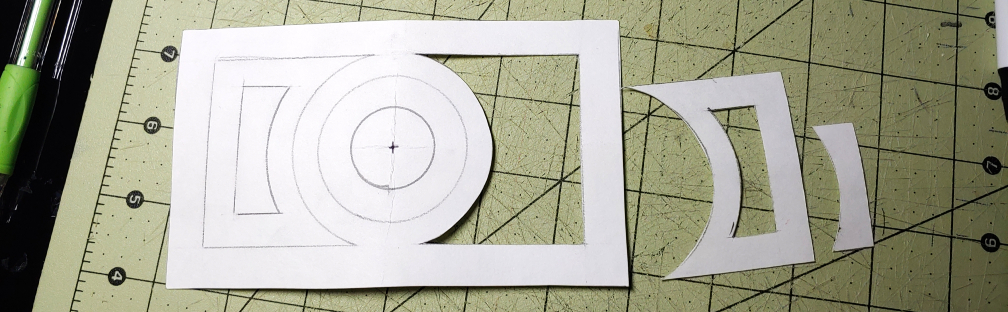
If you have floating details not attached to a border like with my pattern, keep all your pattern pieces to make placement easier later.
Transfer the pattern to your food box using a pen and cut the pattern out. I find it easier to cut the interior designs with a box knife first before cutting the border out. The method is up to you, honestly, as long as you get your pattern pieces in the end.

With the pattern freed from your food box, it’s time to tape it to the base. Start with the frame for the best placement. When taping the designs, use a fingernail to push the tape into the edges of the food box. This will prevent the tape from showing when adding paper mache later.

You only need to tape in a few places to secure the frame. You don’t need to tape the entire frame.
After adding the frame, it’s time to add any interior pieces. You can use the poster paper pattern to determine exactly where to place the interior pieces without guessing. Place the discarded pieces (the pieces you didn’t use to cut out raised interior pieces) onto the pattern, tracing the cutout with a pen or pencil to determine where to place the raised interior detail pieces.
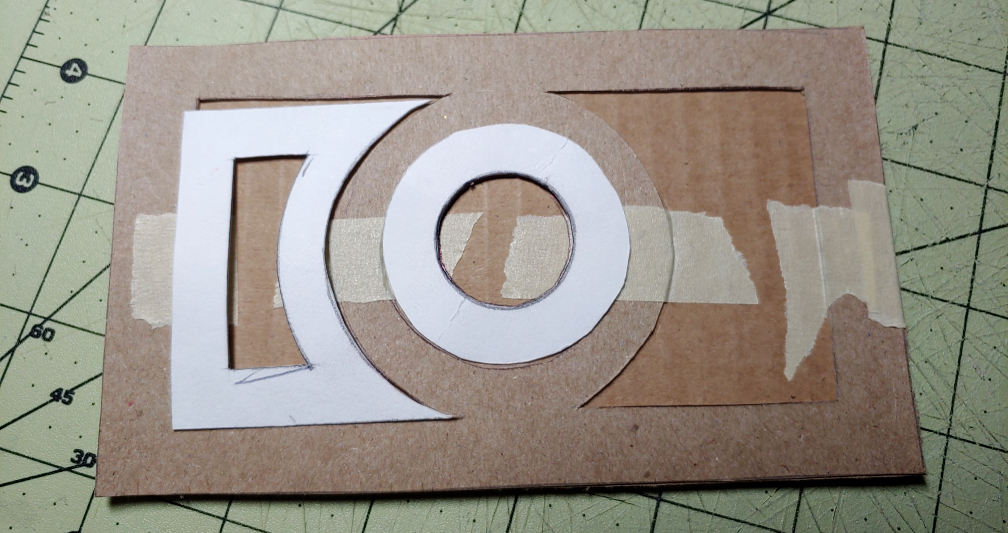
Remove the discarded pattern pieces and tape the raised interior details down onto the base in the marked locations, using a fingernail to push the tape into the edges much like with the frame.
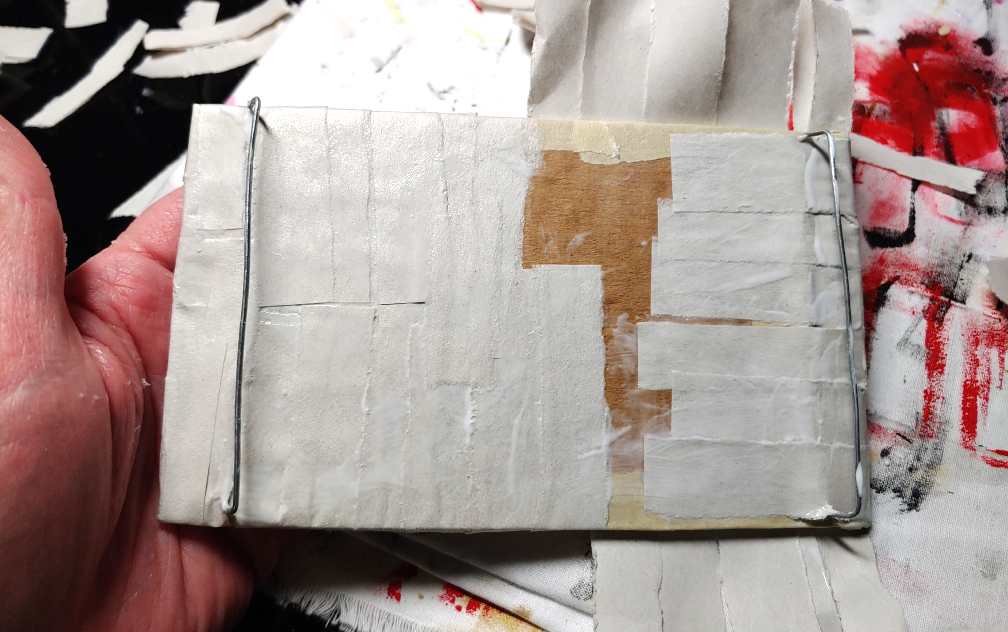
For extra stability, wrap tape around the frame to the back of the buckle to secure both pieces. This also wraps the edges of the corrugated cardboard so paper mache won’t accidentally slip inside while you’re working.
Adding wire
The wire along the back of the buckle serves as the attachment point between the buckle and the belt itself. Velcro and snaps are difficult to paper mache, and a belt tugs too much to use magnets. So good old wire will do the trick. You’ll want your pliers and wire cutters here. Be careful of sharp wire edges.
Flip the buckle face down. Mark about a quarter to half an inch from the edge where you want the buckle to meet the belt.
Cut a length of wire that’s about double the width of the buckle. Doesn’t have to be exact, but we want it long to secure it to the buckle itself. It’ll probably be curved from being wound on the spool, so straighten it out a bit with your hands (watch for sharp cut ends!).
Now we’ll want to bend it into a box shape. It’s easiest to show the end result first:
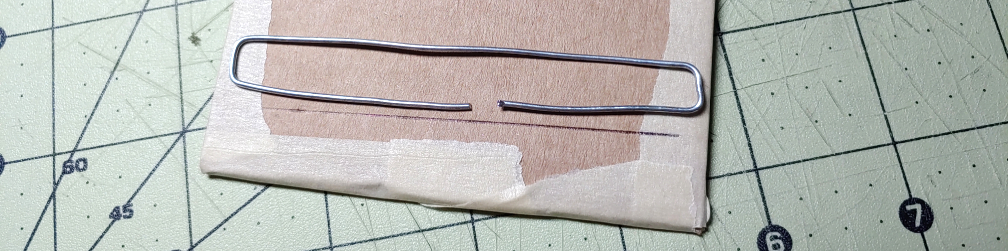
The final shape looks kind of like a giant staple. The gap in the back doesn’t have to be exactly in the center (neither of mine were exact, but they were close enough), but the farther away from the edge, the easier it is to secure this wire to the backing.
The width of the box shape should be slightly less than the width of the belt buckle but wider than the actual belt itself. The height is about 1/4″.
To bend the wire, you’ll want two pliers (it’s much easier on your fingers!). Grip the wire with both pliers near each other. Move one plier in the direction you want to bend the wire while keeping the other hand stationary. This will create a rounded corner as you work. Bend all 4 corners of this giant staple box shape until you have something similar to the photo above.
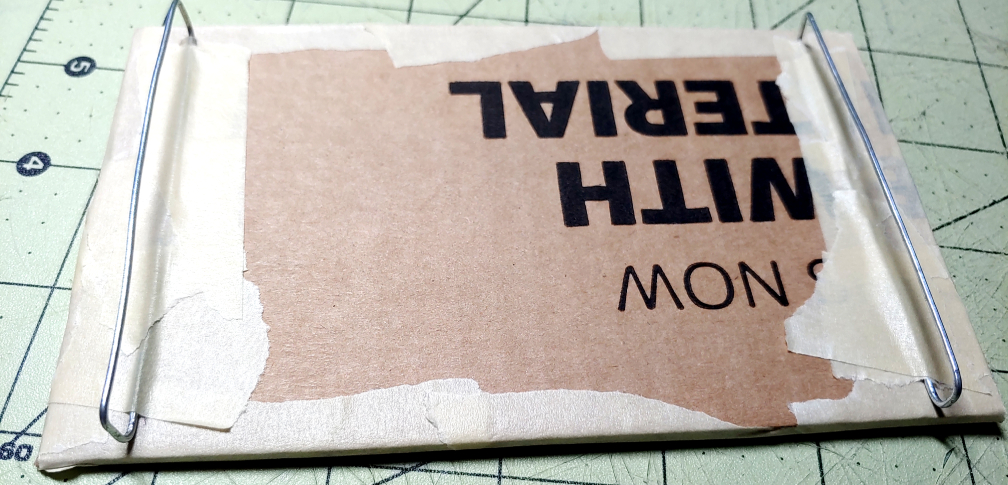
Now it’s time to secure your staple, and sadly we can’t really staple it. Instead, we’ll tape it! And it needs lots of tape. I used about three layers of tape to get this wire to stay put. This will serve as the main strength of this connector and reinforce the paper mache that’ll go over this.
Repeat this for both wires.
Paper mache time!
Now that you’ve built your buckle, it’s time to make it something more than cardboard and tape. If you aren’t familiar with paper mache, I recommend reading my primer: Paper mache for props and accessories. This will cover the paper mache recipes, techniques, and even how to prepare your paper for use.
In addition to the basics, here are some tips and tricks to help you with your buckle.
Raised details
When adding paper mache, you want to preserve the edges and details you’ve made with your food box. Wrapping paper over the edges will create slopes and the details quickly disappear. To keep those details, push your nail into the edge between the two layers to push the paper up against the cardboard edge.

It’s much the same technique as when applying the tape, though you don’t want to dig your nail into it. That can tear the paper.
If you have a lot of details to work with, Making raised details with paper mache may help you out!
Covering the edges
You could feasibly paper mache just to the edge of each face, but then you’re left with raw edges of cardboard. It’s best to paper mache these and for this, the easiest method is to wrap strips around the edge and to the back. While you could wrap each strip one at a time, that’s a lot of flipping! The best way is to paper mache strips only on one side, leaving the extra hanging over the edge first. Applying to the front face first is easiest because of all the details on the front.
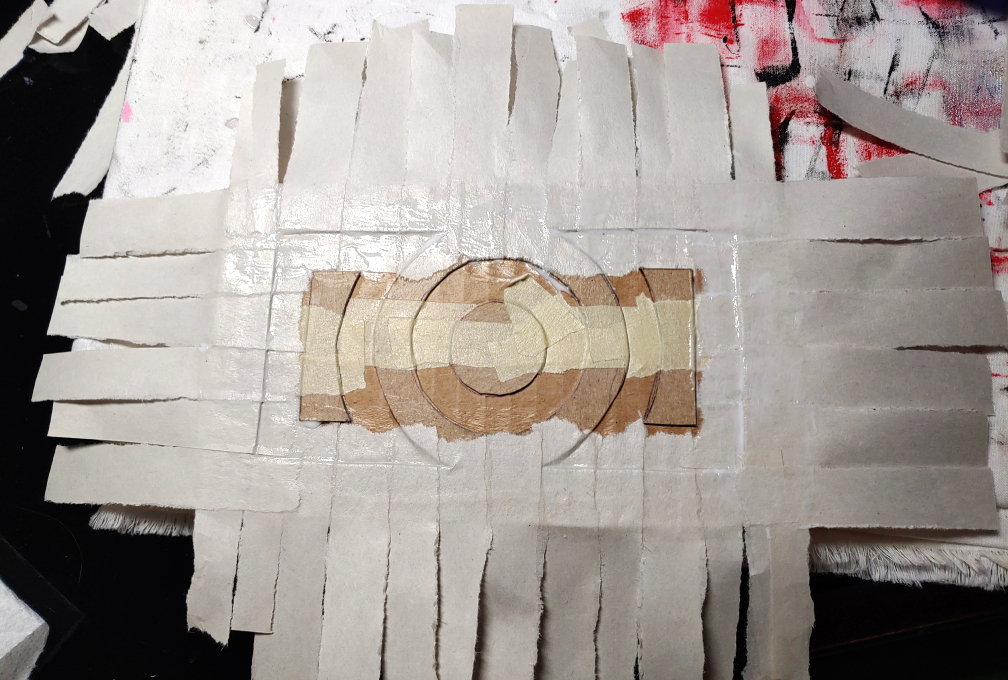
After the front face has dried a little, flip the belt buckle over. Starting on the sides next to the wire, glue the paper down, slipping it underneath the wire. Once the sides are glued, work on the top and bottom of the buckle, using the longer strips to secure the side ones and the wire.
If you end up with any gaps where the paper mache doesn’t cover the cardboard, simply glue some extra strips down to completely cover the back.
Drying and sanding
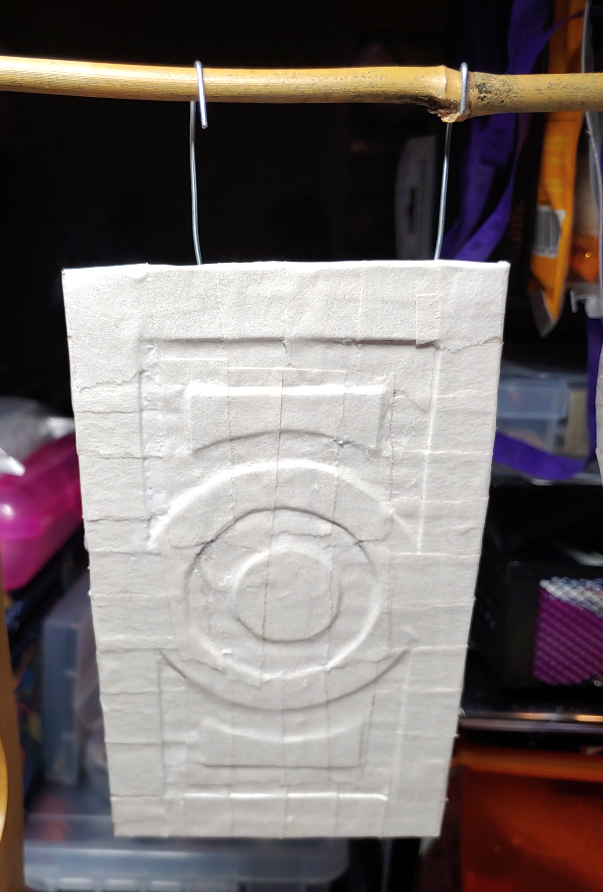
Paper mache dries in about 15-20 minutes but does not truly set and becomes permanent until about 12 or so hours. If possible suspend the buckle on something. You can hang it on a display hook, on a stick between some cups, or anything that will give it adequate airflow. If you don’t have anything that would work, lean it against something and rotate the belt buckle to give it time to dry.
Once dry, it’s time to sand the paper mache. Sanding is important as it lessens the visibility of the individual paper strips. You can skip this step, but it helps make the paper mache look more like metal instead of cardboard and paper.
Sanding produces a lot of dust, even when done by hand, so make sure to work in a safe space and wear a dust mask if you’re sensitive!
You can read about the basic sanding techniques here: Paper mache for props and accessories. For sanding, you’ll want to use a smaller strip, rubbing the edges of the paper to make them less noticeable. You won’t be able to see the difference, but you can generally feel it once you’re done. The lines don’t completely disappear, but you can lessen their appearance.

You’ll want to sand all sides of the buckle, though the back doesn’t need as much attention. It will be against your body while you wear it, so the lines won’t be noticeable. Make sure to sand the sides too to reduce any bumps or lines created when wrapping the strips around the edges.
Painting
Now, of course, we want to finish off our buckle with a nice coat of paint. Since the paper mache recipe used glue or Mod Podge, both of these are actually sealants so we don’t need to do any extra steps to seal the paper and protect it. It’s already done! You can paint right on top of your current work.
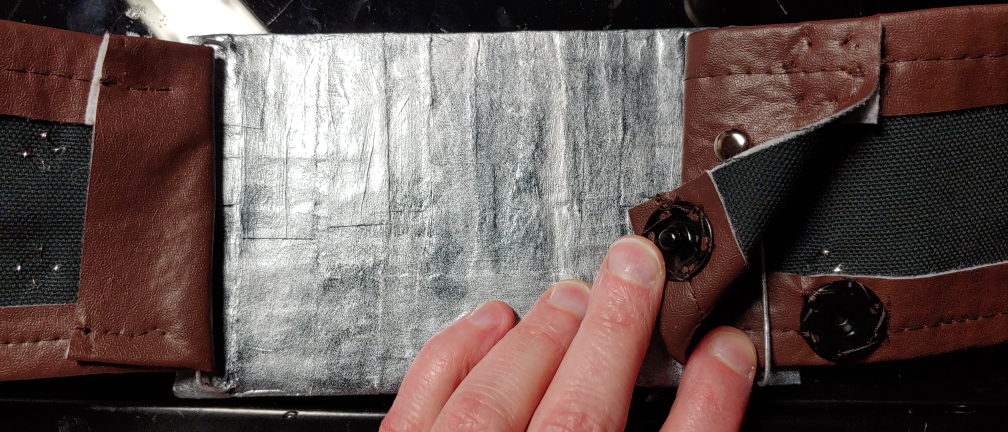
You can paint by hand with acrylics, use spray paint, or even get fancy with an airbrush. I personally paint by hand as I work primarily indoors in an apartment. To get the metallic effect for Link’s belt buckle, I used Painting weathered metal with a makeup wedge. It’s a fun technique that makes the metal look like it’s been out on Hyrule Fields and used against Guardians for a while.
If you need some tips and tricks with painting details, check out the painting section in Making raised details with paper mache. It talks about techniques like masking or filling in sections, the latter of which was used to create the black and silver look of the belt buckle.
Once you’ve painted your buckle, you’ll want to protect it. Cons beat up paint jobs badly, so a varnish will keep that paint protected. You can use Mod Podge as a varnish. Glossy works really nicely to make a metallic belt buckle shine. I use DecoArt high gloss varnish. Any finisher will do. Apply 2-3 coats on each side, allowing each coat to dry before applying the next.
Attaching the belt
You made a buckle, now it’s time to add the belt!
Lay the buckle face down on your table, threading the belt face down through the metal loops. Fold it over on itself and pin the belt down. Sew the belt down on itself either by machine or by hand. I wanted to hide my stitches, so I sewed the belt by sewing hand stitches over my machine stitches on the belt.

Once the belt is sewn on one side, try the belt on and see where the buckle sits in relation to the belt. Remember this isn’t a real belt buckle, so don’t pull on the buckle. You want it snug and comfy, not tight and tugging. Mark the location of the wire with a pen on the inside of the belt and take it off.
Thread the belt you marked through the wire, folding it at the wire where you marked it with pen. This is how you want to sew the snaps for your belt. Sew the snaps about 1/2″ or so away from the wire so that the belt has enough room to wrap around the wire and close shut.
You’ll want at least 2 snaps, one at the top and the bottom. If you are using small snaps, you may want 3-4 snaps to secure the belt. It depends on how thick and strong your material is.
Once you have your snaps sewn, add the belt to your cosplay and admire your work.

I hope you enjoyed this fun tutorial about how you can make your own custom belt buckle from supplies in your recycle bin. It requires a few tools, but if you have them already, this is a relatively cheap project for your next cosplay. You can make belt buckles in all sorts of shapes. As long as you can get a wire on the back to hold the belt, you can make it!
Let me know what buckles you make with this tutorial! @ me on social media so I can admire your work!
