
As cosplayers, we do a lot of weird stuff with our sewing machines. We shove strange materials through it, make humongous outfits and giant petticoats, and change thread faster than you can change socks. Becoming a master of your machine is important as you improve your skills and work with new materials and techniques.
I started out making Halloween costumes and clothing, eventually doing theater costuming. I transitioned into cosplay sometime later and had to learn how to wrangle all sorts of bizarre materials and shove an obscene amount of material through my machine. I also learned how to properly maintain a standard machine after using a vintage Singer for much of my life. I love my modern Janome and I hope you’ll come to love and master your machine too.
Here are some of the most important I’ve learned, from everyday sewing to theater costuming to cosplay, from trial and error, that should help you become a sewing machine master.
Using the right needle
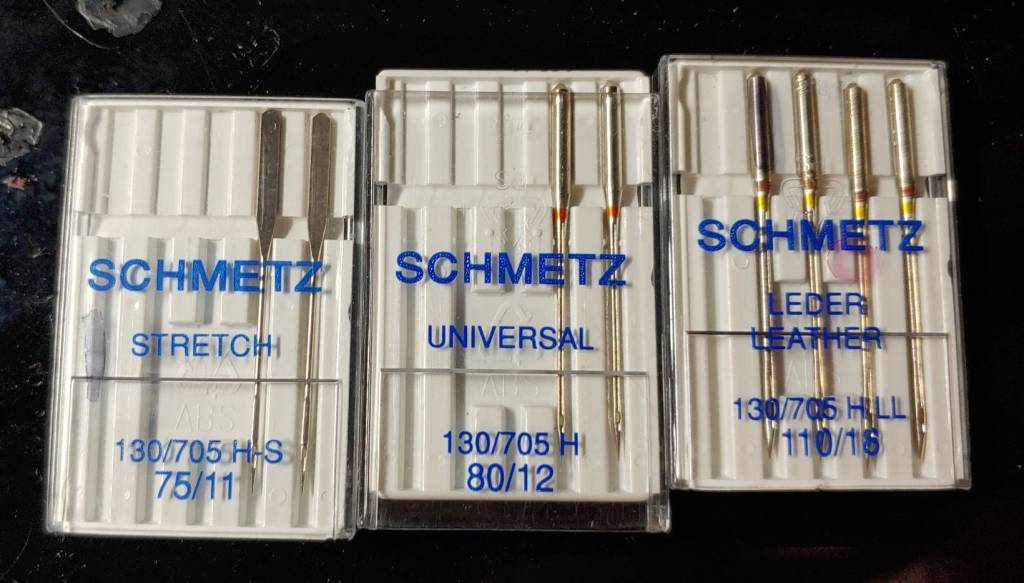
Always use the right needle for the right job. If you only work with cotton and polyester fabrics, you’ll likely only put universal needles into your machine. They’re a sharp general-purpose needle that can handle basic woven fabrics. It can sew through a few layers of cotton or polyester and can even sew through materials like duck canvas, 2mm EVA foam, tablecloth vinyl, linen, satin, and light to medium weight woven materials
But what happens when you use other types of fabrics? You’ll need a specialized needle to do the job and work properly with your fabric.
Stretchy fabrics
When working with stretchy fabrics, you’ll need a stretch, jersey, or knit needle. This type of needle has a rounded point instead of a sharp one and is sometimes referred to as a ballpoint needle. The ballpoint allows the needle to push the weave of the fabric to the side and wedge between it. If you puncture the fabric and break the weave, it causes bunching and loose stitches, but by wedging between the weave, the stitches are even and secure. It also ensures the fabric moves properly along the feeder dogs without the assistance of a walking foot and does not snag.
In general, a stretch needle will get you through most stretchy fabrics including spandex, knits, jersey, and neopreme. A jersey or knit needle will work as well, but a stretch needle is pretty much the equivalent of a universal stretchy thing, so it’s a good needle to keep around if you like stretchy things like me.
Heavy duty and leather fabrics
For heavy fabrics including stiff vinyl, leather, thick suede, and other thick or bulky fabric, you’ll need a leather needle. Leather needles, sometimes called heavy-duty needles, are thicker than universal needles and are incredibly sharp. This allows them to pierce through thick fabrics without needing extra force or power from your sewing machine. If you notice your machine having trouble punching through a large number of layers of cotton or polyester, you can swap to a leather needle for the extra strength to punch through all those layers.
Needle maintenance
While you can’t go sharpen a needle, you do need to make sure your needle is in good working condition. This means the needle should be straight and not bent. Sharp needles must be pointy and not dulled. Your needle should be changed every few projects or when you notice dropped stitches or tangled thread. Damaged needles can cause stitches to drop and tangle and may potentially snag threads in your fabrics, causing runs. Always keep your needle in proper working order!
Only use good thread
This seems like an odd thing and you might say, “Sammy, why should I be a thread snob?” Well here’s why.
Thread has a twist to it. You can’t see it with the naked eye, but you could feasibly see it with a good magnifying glass. Thread is twisted to give it strength and to make it run easier through the machine. The better the thread quality, the better the twist.

Twist is important because of its strength. I used to use poor quality thread and my cosplays never lasted more than a con. Seams would be popping in the middle of a con and I’d be sitting there with a needle and thread, trying to stitch up that hole in my pants. And this was before cosplay repair stations were common! It’s embarrassing and annoying. As soon as I’d stitch up one hole, I’d find another. There was nothing wrong with my machine or how I was sewing. It was the thread. Cheap thread breaks. It isn’t made to last.
Your second reason is thread shed. When thread runs through the machine, it moves fast. It has to run through the top of the machine and into the bobbin casing to latch onto a shuttle hook to make the stitch. It rubs against levers and mechanisms and passageways as it moves. If the thread doesn’t have a tight twist, it sheds. A lot. And shed means more dust in the machine and more shed on your fabric. It also has a tendency to fray and may even break when run through the machine. This aspect is especially important when using a serger. Thread moves at incredibly high speeds and loopers are very difficult to clean.
When I learned about thread twist, I became a thread snob. It fixed a lot of my issues with breakage and dust and I have yet to have seams fall apart. So which brands are good?
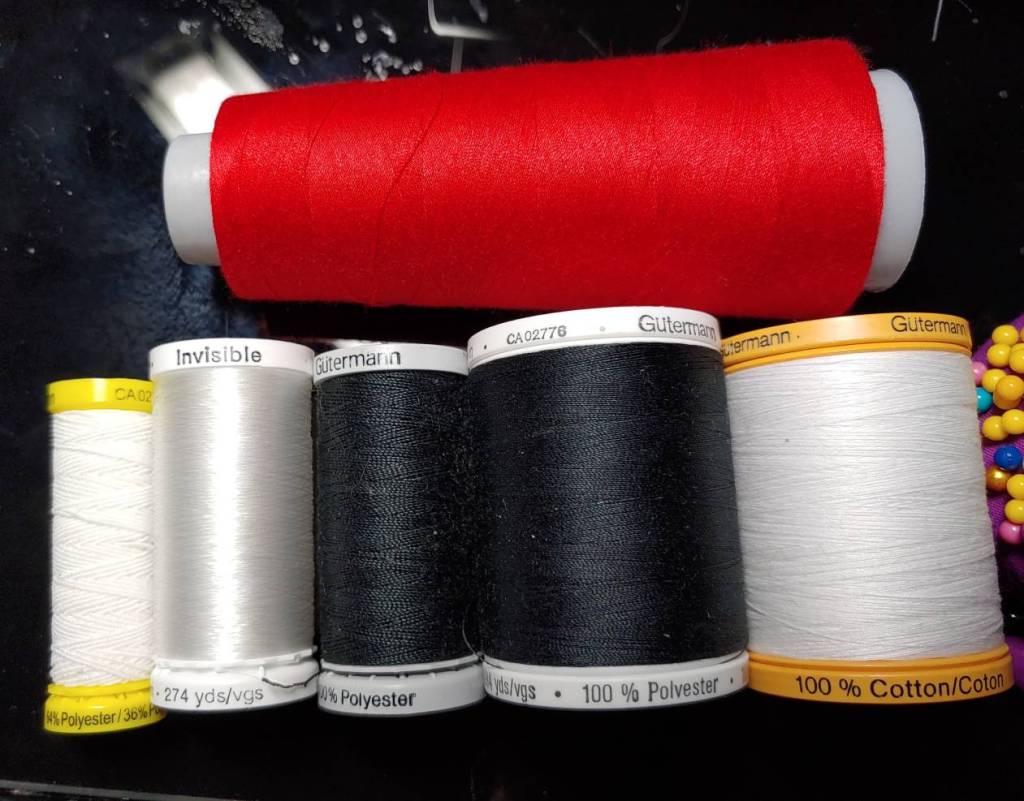
Gutermann gives you the best bang for your buck. They are a premium thread line for a pretty budget price. You can buy a giant 1000m spool for a few bucks and this spool will last you a very long time. Joann has the best selection and usually has sales on thread. Sometimes you can find a cleaner or tailoring supply store and get them even cheaper. Their polyester thread and serger spools have yet to fail me. And they’re cheaper than the super high-end threads.
Coats & Clarks takes the biggest fail and unfortunately is literally everywhere thread is sold. This used to be a very reliable brand, but in recent years, it’s been going more and more downhill. Sure, you can buy a spool for $1 at Walmart, but you’ll find yourself repairing holes far too often. Is it really worth that $1 if you have a lot of trouble?
Use the right thread for the job
Like needles, thread is specialized. If you use the wrong kind of thread, you’ll find it breaking in the machine or popping a seam.
Sew-all thread
For most of your projects, you’ll likely find yourself using polyester or poly-cotton thread. This is a standard universal thread that comes wound on a spool, sometimes called standard, sew-all, machine, or universal thread. It’s found in a number of colors and is the easiest to find when thread shopping. It is generally matte, though there are some that come in shinier colors.
This type of thread can sew through most fabrics. Spandex, cotton, polyester, light vinyl, suede, 2mm fun foam, honestly most things. It is good for seams, hems, even topstitching. This type of thread makes up the bulk of my thread drawer. You can use it in your sewing machine and on the needles of your serger.
Some companies are now making PET thread. This type of polyester thread is made from recycled plastic bottles and works much like any other polyester thread.
Serger thread
This thread comes in cone-shaped spools that fit on your serger. This particular thread has a very tight twist and is good for both the loopers and the needle on your machine. It’s recommended to use this instead of sew-all thread for the loopers due to thread shed.
Technically you could use serger thread on your standard sewing machine. It works perfectly fine and won’t cause any issues with your stitches. The challenge is that most machines don’t fit the cones, so it’s generally best to stick with the spools.
Heavy duty thread
Sometimes called extra-strong thread, heavy duty thread is used for those thick fabrics that take a lot of stress. Things like leather, denim, thick suede, heavy upholstery fabrics, and thick vinyl. Heavy duty thread ensures that your seams do not snap when put under pressure and that the thread doesn’t snap when the needle is punching through the fabric to make the stitches.
Sometimes you might find a specialized heavy duty thread called denim or jeans thread. It only comes in a few colors and is usually blue or a topstitch color like gold. You can use this or heavy duty thread on jeans.
Invisible thread
Sometimes called clear or transparent thread, invisible thread is a strong plasticky thread that is completely translucent. It’s very thick and difficult to rip with a seam ripper without a little effort. This thread is good for more than just machine sewing. I use it to attach accessories to cosplay by hand or tack seams where I’m worried that the stitches might show. You can also run it through a machine, though sometimes it will fight you when trying to wind it around a spool. I’ve definitely had entire spools unwind because invisible thread is a little unruly. It’s best used by hand or on the topstitch.
Embroidery thread
No matter how shiny this thread is, you’ll only want to use this in an embroidery machine. It isn’t suited for hems or seams and may snap if put under pressure.
Cotton thread
Cotton thread works much like sew-all thread except that it’s cotton instead of polyester. If you’re sewing a garment made of natural fabrics and are aiming to dye it, use cotton thread so that the thread dyes with the fabric.
Other specialized threads
There are probably about a dozen other specialized threads, especially when you start rolling into the realm of high-end thread. Elasticized thread, topstitching thread, quilting thread, linen thread, etc etc etc. Some of these are more decorative, and some are more practical.
For the most part, you can get away with using other types of thread in cosplay before delving into the more specialized threads. You can use polyester thread for topstitching, quilting, and with linens and similar fabrics. You can replace elastic thread with an overlock or a serged stitch. Some patterns, however, will call for specific threads to make things look fancier, like using silk thread for decorative stitching. Look to the instruction papers for more details if you want to use something fancy.
Clean that machine!
Fabric is dusty. All kinds produce dust when you send a needle through it, some more than others. Fleece and any pile fabric are easily the worst, but cotton is a serious shedder. Even stretchy fabrics will shed to an extent.
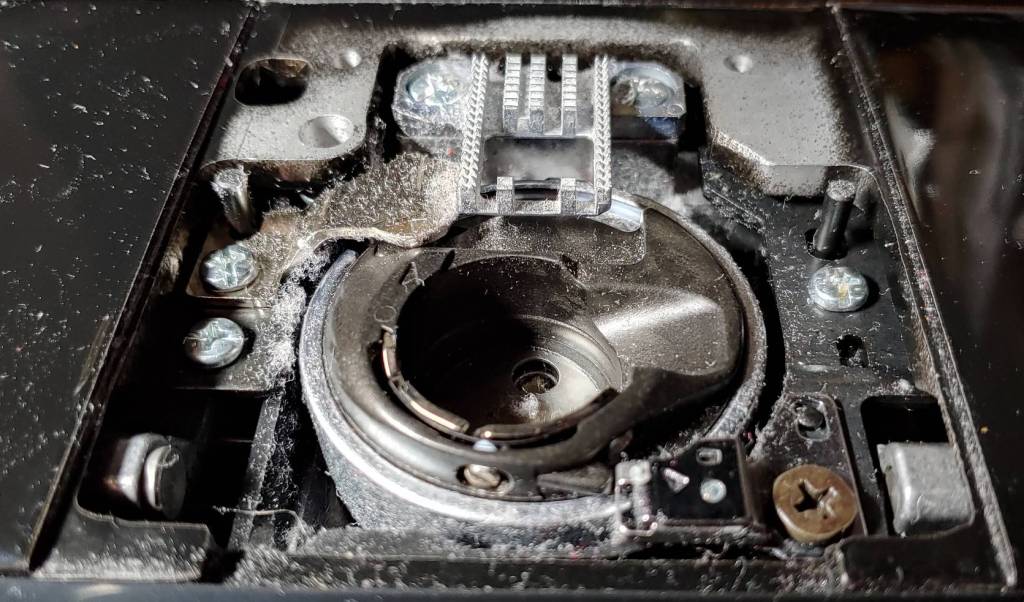
Fabric dust is a problem in your machine. It jams the threads and gums up the mechanisms. So cleaning your machine is crucial to keep it healthy and in working order. When you don’t maintain the machine, the bobbin thread is often the first to lock up and start mangling the bobbin thread. You might also see dropped stitches or dirty thread. This means it’s cleaning time!
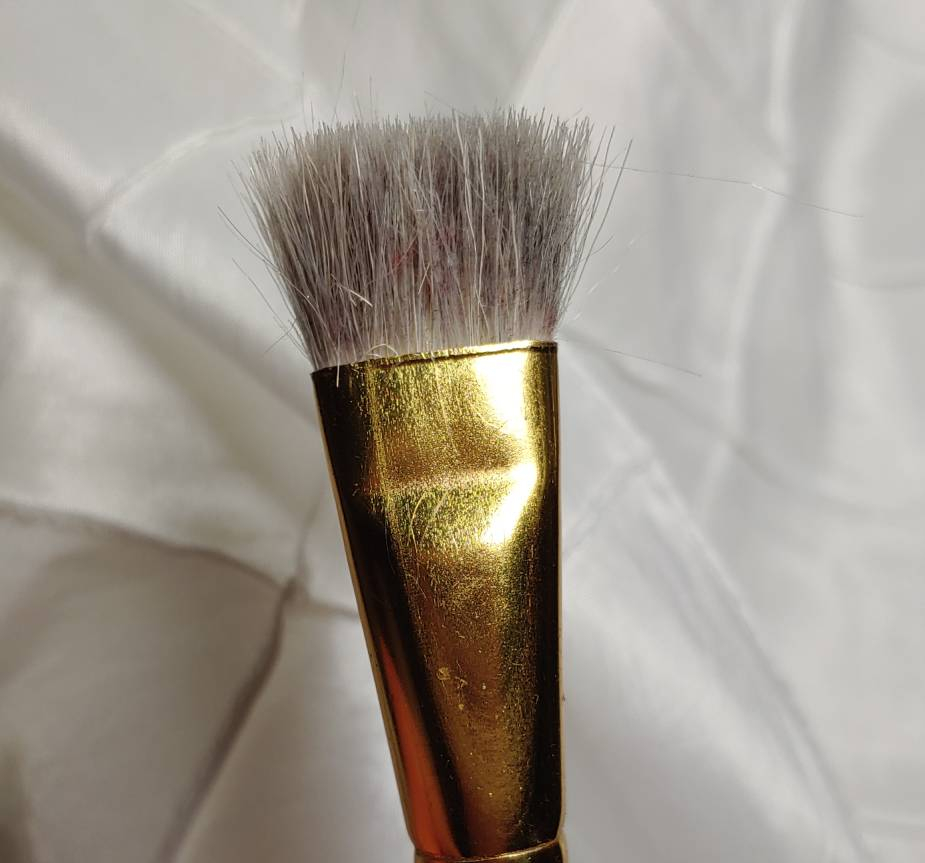
Anything underneath the needle plate and the bobbin case are the dustiest of them all and will require regular maintenance. You don’t need anything fancy to clean your machine. I use a fluffy paintbrush (free of paint or any oils) to pick out the dust and dust the mechanisms. Sometimes machines will come with their own small brushes, but I never found them to be very effective in dusting. Avoid things like swiffers and fluffer dusters as those can get caught in the mechanisms and cause more dust! If you find more dust in the machine, a pair of curved tweezers are very good at picking dust bunnies out of the mechanisms.
In addition to dusting, you’ll want to oil your bobbin case. You can lift the basket out of the mechanism and dot machine oil underneath it or on the shuttle. The location will depend upon whether you have a front-loading bobbin or a drop-down bobbin. Your manual should have the proper location.
Any sewing machine oil should do. You can pick it up at any store that sells sewing supplies. Make sure to get one that has a straw to make it easier to get inside the machine. Oiling the bobbin ensures that the bobbin, the shuttle, and the case all move properly and without resistance.
A healthy machine is important for sewing and will make even the most basic of budget machines last a very long time.
The storage tray is removable
It sure is. The storage tray is a section of modern sewing machines that holds your tools. It has a door that usually flips forward so you can access whatever you’ve stashed in there. I keep my spare needles, feet, extra scissors, and thimbles in there.

This tray can actually be removed from the machine. Often it slides to the left or pops upward and can be set to the side. This transforms the sewing area into a sort of arm shape. Now, why is this important? It’s how you sew sleeves, cuffs, and round things that are too narrow to fit over the machine!
Unless you’re sewing bellbottoms or wide sleeves, cuffs are generally pretty small. If you try to sew the cuff without removing the storage tray, you’ll probably find yourself fighting with the presser foot and the position of the fabric to try to get the stitch straight, and even after that fussing, it’s probably crooked anyway.
Removing the storage tray means you can slide the cuff over the arm. The arm allows for unhindered movement underneath the machine so that when you sew, you don’t have to worry about the fabric getting stuck around the machine’s structure.
You can use this arm for anything that is a narrow circle beyond simply sleeve and pants cuffs. Fabric bracers, wristlets, boot edges, and gloves are just a few examples of other projects that can take advantage of the narrow arm.
When sewing round things, the fingers of your right hand will often be inside the cuff. Use your fingers to steady the cuff as you sew. You can let the fabric roll over them or walk your first two fingers along the inside of the cuff to keep the fabric from slipping.
Working with seam allowance

When you sew a seam, you have to pay attention to the seam allowance. This is the distance between the raw edge of the fabric and the actual stitch itself. But since you don’t go and draw the allowance on every seam you need to sew, how can you tell where your seam allowance actually is?
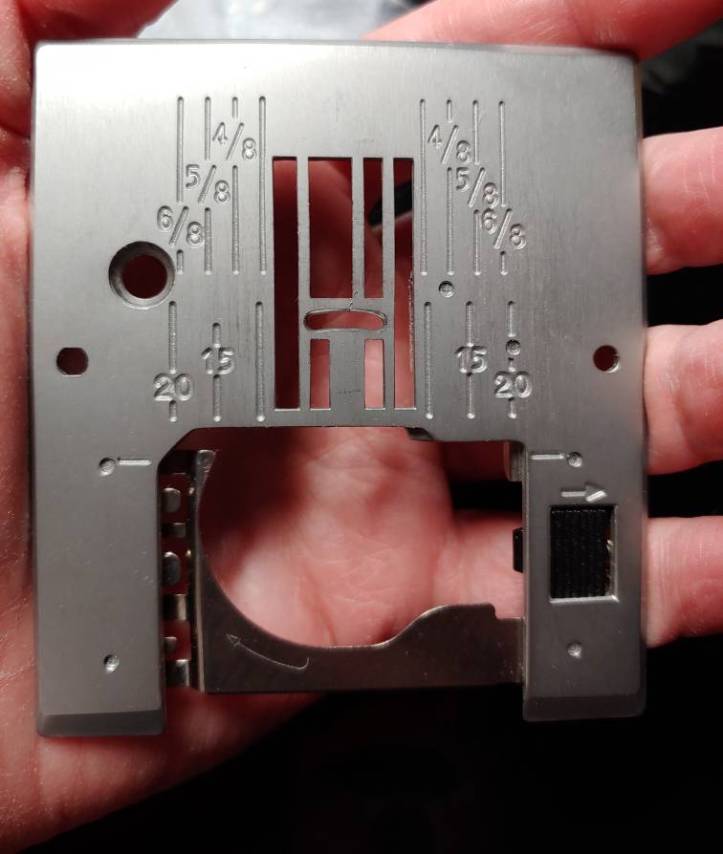
Modern machines will have standard seam allowances marked on the needle plate. These markings show the distance from the straight stitch needle position to where the edge of the fabric would sit. The most common seam allowance is 5/8″ and the edge of the feeder dogs and a standard presser foot is shy of 1/4″.
For vintage machines and some basic machines, you might not have markings. In this case, you don’t need anything fancy. All you need is some masking tape, a ruler, and a pen. You can tape the section next to the feeder dogs then measure the distance from the needle to 5/8″ and mark it on the tape with the pen. You’ll probably want to remove the presser foot to get an accurate measurement. As 5/8″ is pretty standard, you can get away with only this marking for most of your projects. You can always add more if a pattern calls for it.
When working with seam allowance markings, align the edge of your fabric to the appropriate line. When sewing your stitches, you’ll be aligning with this mark instead of a pen line on your fabric. It’s the same concept as when practicing your stitches, but the line is in a different location. Practice with this alignment. The more you do it, the easier it will be to keep your seam allowances even.
You can also use these seam allowance markings on hems. If you match the hemmed edge to one of the markings and keep the fabric along that mark, your stitches will be even along the hemline.
Smoothing out the fabric

When working, you want your fabric smooth. If it bunches up, you’ll be sewing those bunches into your seams and hems. This will cause unwanted folds and pleats and you’ll probably be finding yourself ripping the seam and redoing it. To save yourself some trouble, you’ll want to smooth out your fabric.
Bunches also make it difficult to see your work. It can block your vision and hinder your hand movements.
I’d love to tell you that all your sewing projects will be like your practice ones. You sew a line, nothing bunches up, and you keep your hands in a working position. But in practice? That’s pretty far from the truth. You’ll find yourself stopping to fix the position of your fabric and straighten out bunches on a fairly regular basis. Unless you have a desk where it’s open both front and back, this will constantly bug you. But no worries. This is actually a normal part of sewing.
When fixing your fabric and straightening it out, the fabric will likely slip. Fabric is heavy and projects are big, and slipping is bound to happen. This causes the stitches to be uneven and may even cause threads to be loose. Instead, when adjusting the fabric, you’ll want to use the handwheel and drop the needle to the lowest position, much like when doing a corner stitch. This keeps the fabric where you want it when you work.
Keep your presser foot lowered and firm on the fabric. Use a supporting hand if needed to keep the fabric from twisting. Both your hands are available to straighten things out, and sometimes you really do need both of them. When you use both hands, make sure to be gentle. The foot and the needle will generally keep the fabric stationary, but you still don’t want to tug in case the fabric shifts just slightly and now you have a crooked stitch.
Make sure to move your foot off the foot pedal since you’ll be working close to the needle. Safety first! Smooth the fabric out or adjust it as needed. Then once you’re done, move your hands back to a working position and continue with your stitches!
Large and bulky fabrics
At some point in your sewing projects, you’ll be sewing a large amount of fabric or really heavy fabric. It’s inevitable, even with sewing your own wardrobe. So how do you handle bulky and heavy fabrics?
Support that Heavy fabric
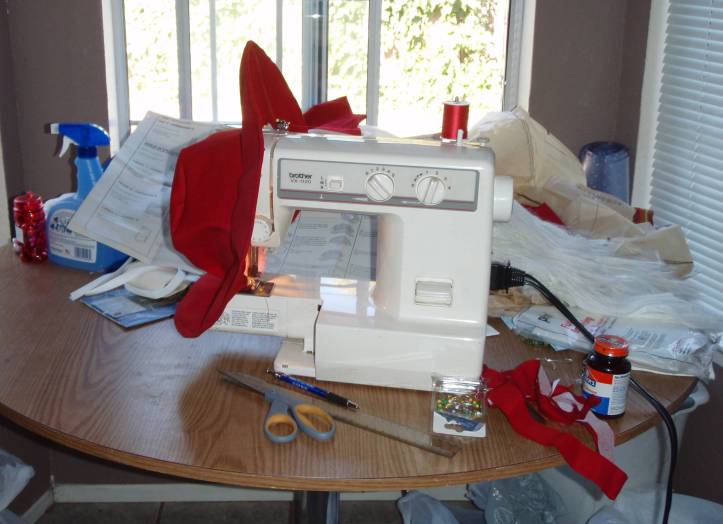
Aside from very delicate fabrics such as tulle or chiffon, fabric is really heavy. Coats, cloaks, and dresses will attempt to slip off your desk and resist your hold while you work. When sewing, you want the fabric not to pull against you and drop your stitches. If you work on a desk like me, you’ll generally find the fabric attempting to spill all over the place, but you can control it.
There are a few places you can support heavy fabrics. Your best location is your lap. You’re sitting right at the desk, underneath the sewing machine and it’s very good fabric real estate. Resting a large amount of fabric on your lap supports the fabric weight and reduces the amount of pull it does against the sewing machine.
While you work, you will need to periodically pause in your work to adjust where the fabric is resting. Make sure to lower the needle and move your foot off the pedal before you make any adjustments. If you’re working with a particularly large or long garment, you may have to shift how much fabric is on your lap and how much is on the floor every so often.
Another good place to support that heavy fabric is the desk around your machine. You can rest fabric behind the machine or to the side. If your desk is pressed against the wall, you can use the space to the side of the machine to stash that extra fabric and make sure it doesn’t start piling up behind the machine. When working with wide fabrics, you can rest the fabric to the side of the machine as well to make sure it doesn’t knock things off your desk or slip off the side.
Wrangling fabric bulk on the right side
Sometimes you’ll find yourself stitching near the middle of a garment. Whether it’s for topstitching, handling wide seams, or just that there’s a lot of fabric, you’ll have to find a way to shove it through the right side of the machine without it tugging, bunching, or pleating in the process. The main part of your machine is on the right, which gives you a little room to work with and can make maneuvering difficult.
When wrangling fabric, you’ll want to take your foot off the foot pedal and turn the handwheel to move the needle to the lowest position much like you would any time you want to adjust your fabric. At this point, you’ll find the fabric beginning to bunch at the front of the machine, and eventually, this is going to start tugging.
With the needle down, place your left hand on the fabric to keep it stable and start shoving the fabric through with the right. You don’t have to be gentle but certainly, this isn’t a violent act against the fabric. You just need to shove enough to get it through the opening in the machine. You’ll want to shove the fabric a bit further than where your needle currently is so that more fabric is behind the machine than in front of it.
Once you’ve sufficiently shoved the fabric through, straighten it out to give yourself a smooth place to sew. You don’t want to add extra pleats and folds into your stitches after shifting the fabric. Once the fabric is straight, continue stitching along your way.
When working with large and bulky garments, you’ll need to repeat this process a few times to ensure your fabric doesn’t wiggle and pull.
Sometimes you have to do weird things
Cosplay requires a lot of “weird things” and they don’t always follow what you expect sewing to entail. You sew everything from boots to hats to odd accessories that shouldn’t make any logical sense. But what’s even weirder than the weird things is how you sew them.
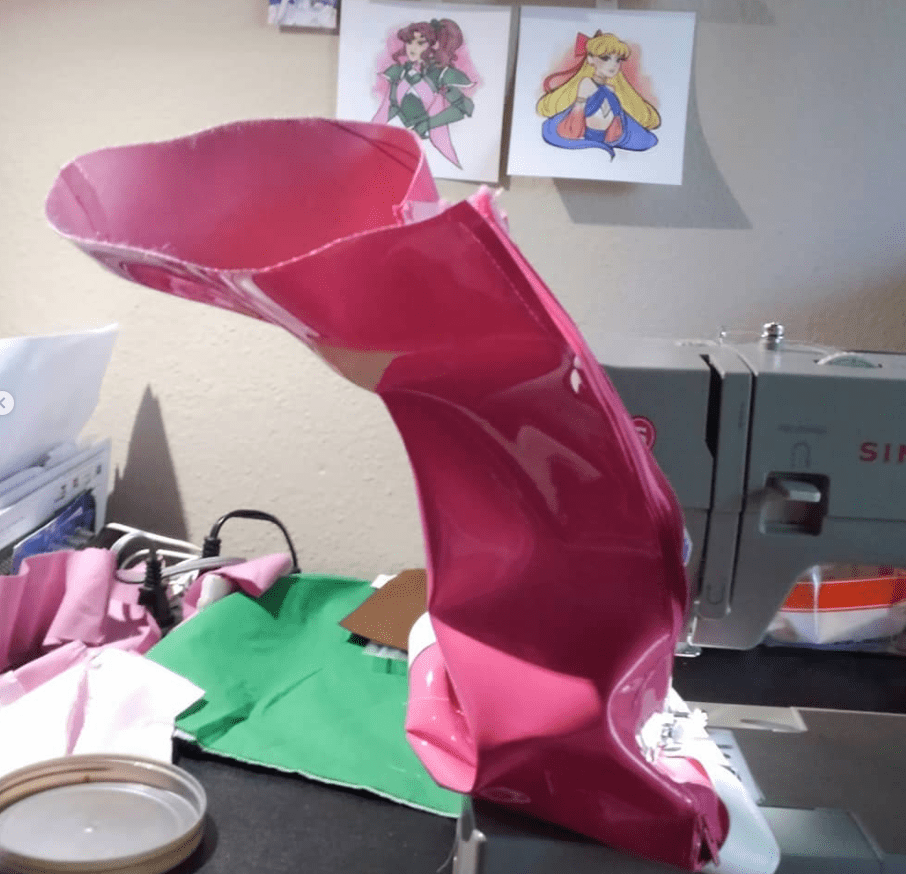
I think the weirdest I’ve sewn was a pleather boot for Sailor Chibi Moon. It didn’t fit on the machine and wouldn’t properly stay the storage tray arm, and I found myself carefully easing the fabric through the machine until it kind of worked in the end. The number of hats I’ve made definitely rank up there along with shoving entire massive petticoats through the machine to sew a mushroom skirt. Cosplay requires weird.
A manufacturer or industry has specialized machines. Ones that sew hats or boots or shoes or just one singular pair of jeans. But we’re cosplayers. Likely you have just a regular sewing machine and maybe a few other things, so that means you’ll need a little bit of ingenuity to sew these weird things.
When working with weird things, often it’s very situational. Each project has its own flavor of weird and oddities of trying to shove things into a machine that probably doesn’t really like what you’re doing. Take my boot for example. This boot trim required a top stitch around the top opening and to somehow avoid the zipper that sat on the side. I didn’t want to break the side of the trim for the zipper, which naturally made it harder on myself. It required me sitting at my machine, leaning into the machine, as I carefully pressed on the pedal and sewed a straight stitch over the trim with heavy duty thread and a zipper foot.
Hats became a problem as well. When you sew a hat, it tends to flop around as you go. I learned this pretty early on in my cosplay work that hats are very much classified as weird. They take over your machine, they like to wiggle, and they’re curved in a way that it’s nearly impossible to get both hands in.
When I work with hats, I generally approach them one of two ways. If the machine allows it, I prop the top of the hat on the top of the machine and sew it like a really large, obtuse sleeve. By resting it on the machine, I was able to control the fabric wiggle and get the inner seam sewn.
But my current machine doesn’t allow for this. My second method is to pull the hat slightly forward, allowing my left hand to hold onto the hat brim as my left hand does all the guiding in front of the foot.
There’s honestly no universal way to handle weird, and being able to wrangle weird comes with practice. Sometimes it requires shifting your hands awkwardly, and even once I sewed with my right shoulder towards the machine at an angle. Sometimes weird comes with the type of fabric, much like my boot, or the size and stiffness of a project like a hat. And sometimes it’s just because you’re sewing a giant poof for a magical girl cosplay. Just keep at it until something works and make sure to have that seam ripper handy.
I hope these tips help you on your quest to become a sewing machine master! Work with them, practice with sewing, and work with the machine and the fabric. The more you sew, the more you’ll truly master the sewing machine. Remember, sewing is a skill, not a talent!
