Learning stitching seems like it would be just a straight line. Sew this straight and you got it, right? Not quite. While a straight line can get you pretty far in projects, learning other stitches will get you much further. Plus you do have to practice that straight line, so why not learn other useful stitches too? It’s time to practice and learn four foundational stitching techniques that will get you through nearly every project.

The best stitch to start with is the one that you’ll be using most – the straight stitch. Every sewing machine can make this stitch, even if it can’t make anything else. It is also the easiest to learn how to control without worrying about decorative stitches or zigging and zagging. Nearly every project will use this kind of stitch.
A straight stitch is named this because the needle punches through the fabric, making one stitch after the other. The needle does not move back and forth as it would with zigzags or other kinds of stitches. A straight stitch is simply the name for how it is sewn. This type of stitch can be sewn in a straight line, around a curve or a spiral, or turned on a corner.
When loading the fabric into the machine, make sure the needle is in the highest position. Turn the handwheel on the side of the machine if needed. This ensures you don’t damage the needle or your hand. You also cannot pull the thread when the needle is not fully upright, and yanking the thread can throw off the machine’s timing.
It’ll be a good idea to familiarize yourself with the previous article, Hand and foot positions for your sewing machine, so you have a feel for the machine and the fabric.
Materials you’ll need:
- Light-colored fabric
- A dark pen
- A ruler
- Something round like a pot lid
- A spool of thread and a bobbin that don’t match the fabric
- A sewing machine
- Thread scissors
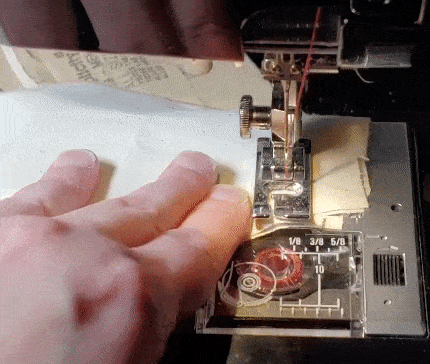
Before you get started with each section, make sure you’ve threaded your sewing machine according to the machine’s instructions. Set your stitch selector to a straight stitch and your stitch length to 4. Make sure there are no zigzags selected and you’re using a standard foot. Cut out a large scrap of fabric and get ready to stitch!
Straight line
Before you get into curves or turning or fancy stitches, you must first learn how to sew a straight line. Straight lines are used for nearly any project, found in seams and along hemlines. You use it for sewing bias tape, zippers, ribbon accents, waistbands, and much more. Before learning any other stitches, practice with the straight line.
To make your first straight line, take a ruler and draw a line on the fabric with a pen. Make sure this line is not next to the edge of your fabric. Give yourself about an inch of room to work with when first starting. It doesn’t have to be exact. You can guestimate. Make it a long line or draw several lines to give yourself plenty of space to work with.
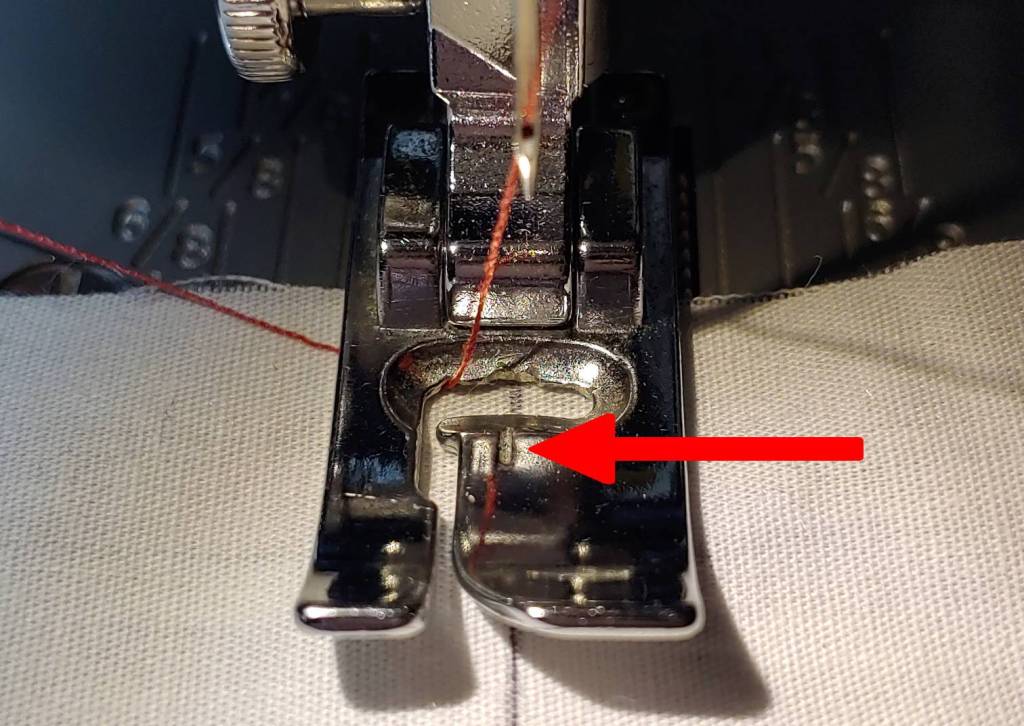
Once you have your line, it’s time to match up the needle to the line. You don’t need to stick your face into the machine and guess where the needle is. Modern standard feet have a notch in the center of the foot. This notch indicates where the needle will meet the fabric when using a standard stitch. You can line the notch up with the drawn line, lower the presser foot, and it’s time to start stitching.
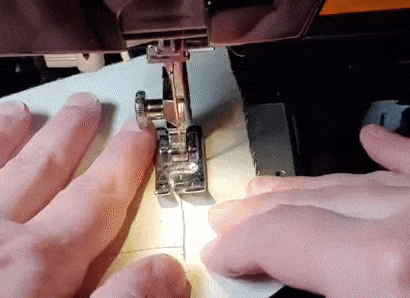
Press on the foot pedal enough to get the stitches going. Take it slowly when you’re still getting used to it. If you press too hard and lose track of the fabric, move the needle to the upright position using the handwheel. Raise the presser foot, pull the fabric, cut the stitches, realign your fabric to the line once again, lower the presser foot, and start again.
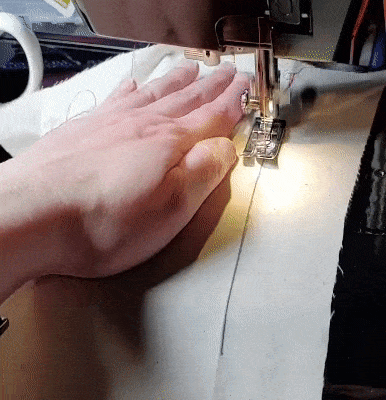
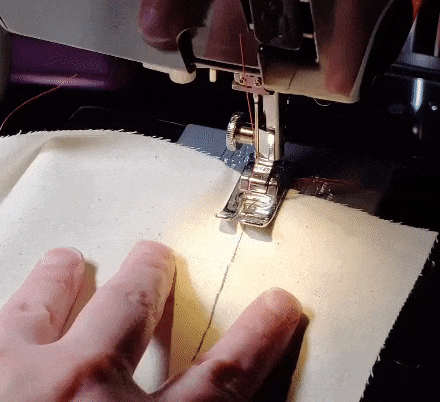
While the fabric is moving, make sure to move your hands with it. The left hand will be on the side of the fabric while your right hand will be in front of the machine or in front of the foot. If you’ve drawn your line near the edge of the fabric, keeping your right hand in front of the machine will be good to start with as you only focus on moving one hand and keeping the other stationery. Make sure not to push or pull the fabric. Let the feeder dogs do the work for you.
As you practice with this stitch more, try increasing the speed you’re working with. You’ll also want to practice switching the position of your hand. Practice both by having your hand in front of the machine and in front of the foot. Also, practice swapping your hand between the two positions. A practical place for swapping is when you reach the end of the fabric. You run out of a place where you can hold the fabric in front of the machine so you need to move your hand to the front of the foot to continue to stabilize the fabric.
Backstitching
After getting a feel for a straight stitch, it’s time for a backstitch.
The backstitch is the process of stitching backward over your stitches in order to secure them and prevent them from unraveling after you snip the tails. Backstitching doesn’t cover the entire length of your stitch. Instead, it’s a few stitches at the start and end of any stitch you do, no matter how long or short.
Backstitching is started by pressing the reverse stitch button on the sewing machine. Vintage machines may instead of a stitch lever that you have to move up and down to activate the backward stitch. During this time, the feeder dogs work in reverse, moving your fabric backward.
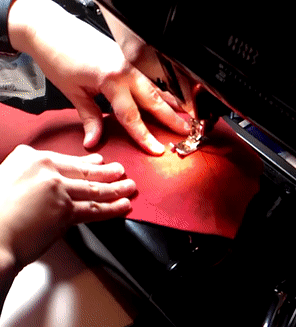
This adds another challenge. You have to move your right hand to operate the machine, which leaves the left hand to do the fabric guiding when stitching backward. This means you need to keep the fabric from moving with a single hand. Placing your left hand on the side of the fabric isn’t quite enough, especially if you backstitch fast like I like to do. Instead, you can use a new hand position really only used for backstitching.
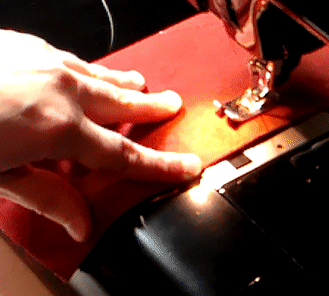
Move the left hand in front of the presser foot and spread your fingers. Press lightly on the fabric to stabilize it and move your hand forward with the fabric. Don’t press so hard that it causes the fabric to yank or the stitches to bunch. Just a little bit of weight of your hand is enough to control errant fabric with solely your left hand.
As you move your hand forward, you can get pretty close to the foot because you straddle it. This is why you spread your fingers. I tend to straddle the foot between my index and middle finger so I don’t twist my wrist, but honestly, you could use whatever is comfortable with your hand. This allows you to get very close to the edge of a seam or a design without messing it up with fabric wiggles. Because backstitching is a quick back and forth, you do not need to worry about lifting your hand off the fabric and moving it. Once you’ve backstitched, you can resume the normal positions of your hands or lift the presser foot and pull the fabric.
Starting with a backstitch
When starting a stitch, you want to backstitch before you continue on your way. Start with only the left hand on the fabric and the right on the reverse button. Keep your left hand a bit away from the presser foot. Stitch a few stitches forward and release the pedal. You’ll find your left hand is close to the presser foot.
Press and hold the reverse button or push the lever for vintage machines. Stitch only a few stitches backward right over the forward stitch you just made. Use your left hand to guide the fabric backward and keep it straight. Release the pedal. You should find your hand close to the presser foot.
Release the reverse button and place your hands in normal stitching position and go forth!
Ending with a backstitch
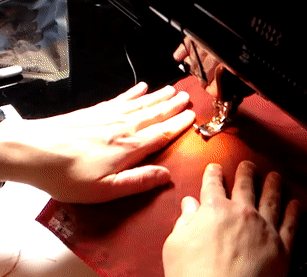
You’ll want to tie off the end of your stitch as well. Once you reach the end of your stitch or the fabric, release the pedal and stop. Move your left hand to the front of the presser foot and straddle the foot as needed. Move your right hand to the reverse button and press and hold it.
If you are having problems holding the end of the fabric or getting your fingers next to the foot, move your fingers to the side of the foot. You’ll be using your first three fingers for the bulk of the work, pressing down to guide the fabric. Rest your thumb off to the side and use it for balance as the fabric moves.
Now it’s time for reverse stitches. Guide the fabric backward toward the front of the machine for several stitches, making sure to keep the fabric straight as you work. Release the pedal and the backstitch button.
Stitch forward to the end of your stitch. Make sure your needle is up, lift the presser foot, and pull your fabric. Your stitch is secured!
Corners
Making a corner seems like a strange thing to do. It was one of those stitches I learned and thought, “okay, what will I use this on?” Truthfully? A lot. Patches, bias tape, decorative ribbons, and jacket and irregular hems. Anything that has an angle instead of a curve will require you to turn corners. Corners come in all sorts of angles too. They can be slight corners, 90° turns, or very tight angles. Each of them will use the same general technique.
The trick of a good corner turn is getting the fabric to turn the fabric sharply without it slipping. But if you lift the foot during sewing, you’ll likely notice you can’t get the fabric back to the same position and your threads may even be loose if you’ve pulled the fabric even slightly. But you have a tool right on the machine at your disposal: the needle.
If you drop the needle down to the lowest point before lifting the foot, it keeps the fabric in place, allowing you to rotate the fabric in any direction needed. You just need to rotate the fabric lightly. If you pull on it, you’ll notice the needle clamp move. This is to allow for stitches like zigzags and to prevent the needle from breaking if you yank too hard. The machine has a bit of a give to it. But even if you move the needle clamp, it will always return to the proper position when you release the fabric.
To start practicing with a corner, draw a straight line down your fabric then add a corner. Use the end of your ruler to make a nice sharp right angle. It’ll be the easiest to start with. Align the fabric at the top of your line so the corner is closest to you and start with a straight line stitch.
Once you get close to the corner, you’ll want to stop and lift your foot off the pedal. Move your foot away from the pedal since you’ll be working on the machine near the needle. You won’t get exactly to the corner unless you have some very good luck, but you should be close. Turn the handwheel to get the needle as close to the corner as possible. You may need to turn the handwheel a few times. If you pass your corner, simply press the reverse button with your left hand and turn the handwheel with your right.
Once you get super close to the corner, turn the handwheel so that the needle drops to the lowest position. The needle clamp will be nearly touching the presser foot. If it’s a little higher than the lowest position, that’s okay. You’ll want that needle to be in deep in the fabric. You may find that sometimes the needle won’t line up exactly to where your corner is. As long as it’s close, it’s fine.
Once you drop the needle, raise the presser foot and rotate the fabric. Gently move it so that you line up the new line with the presser foot notch. Lower the presser foot to check that the line is aligned with the foot. Lift the foot and move the fabric as needed before lowering the presser foot again.
Once you’ve positioned your line under the presser foot, continue on with a straight line, and you’ve done a nice corner turn.
The biggest part of practicing a corner isn’t necessarily the lead-up or the follow, it’s the corner itself. Getting close to the corner itself. You’ll probably overshoot it a few times or get too far away. It’ll take some practice to be able to judge where the corner is underneath the presser foot. Fortunately, when you’re using corners on edges, you’ll be able to see the difference between your details and the base fabric a little better than a pen marking. Or the edge of your hem. Either way, you should still practice with drawn lines so you get more of a feel of where the corner is underneath the foot, how to rotate the fabric, and how to operate the handwheel.
Curves and spirals
When I first learned how to curve a stitch, I thought to myself, “I’ll never use this.” When I got into cosplay, being able to curve and turn a stitch is incredibly useful. You can use it to attach patches, to make Naruto-style spirals, or to edge curved details. For clothing sewing, you’ll use a curved stitch along collars, waistbands, crotchlines, and shoulder seams. It is incredibly useful, and I have people asking how I got my stitches to work this way. Now, you too can curve a stitch.
Curving is a bit different than other forms of straight stitching. While other stitches generally keep your arms stationary, curving requires you to move both of your arms quite a bit in order to guide the fabric around a curve while the feeder dogs want to push the fabric straight forward. The tighter the curve, the more you’ll find yourself moving your arms.
When curving, your two hands will be pressed lightly against the fabric but just firmly enough that you can make the fabric move in the direction you want to go. It’s like pressing down for a backstitch but you’re using both your hands. Depending on the direction you move, one hand will move forward and the other will move backward. This makes a wide rounded turning motion that curves the fabric and keeps the stitches even.
Your left hand will generally move a lot more than the right. This is due to the space on a sewing machine. You don’t have as much maneuverability on the right side and you have to be careful of the needle clamp and screw on that side. This leaves a lot of work to your left hand to handle. It will be your guiding hand and the one that needs the most control when working with curves.
Of course, you cannot rotate your hands forever. You’ll need to adjust your hands as you rotate the fabric, picking them up and placing them back in the starting position for your type of curve. This action may not be at the same time for both hands. When first starting, you’ll want to lift your foot off the pedal and then move your hands, but with practice, you’ll keep stitching in spirals without stopping stitching.
You can also combine a turn with a straight line just by shifting your hands to a straight line position and continuing sewing from where you stopped turning.
To get started with curves, you’ll need a wide piece of fabric. Use a wide rounded object such as a pot lid or a large serving bowl to make a large curve. You’ll want to start big so you get the feel of how your hands shift when curving. You can get smaller as you go on, but there is a limit to how small you can get your circle. You can draw a spiral, a circle, or even a squiggle. You’ll want to practice in both directions, a right and a left turn. I find that I use more left turns than right, but it’s important to know how to go both ways.
When sewing, start slow. Your stitches likely won’t be perfectly along the curve when learning. This is probably the most difficult technique on this page but practice will get you sewing along those curved lines. I recall sitting at the desk, sewing spirals over and over until I could follow the line, and it’s that practice that got me good at sewing curved details. You can do this too. Just don’t give up!
Turning left
When turning left, your right hand goes forward and your left goes back. To start, your right hand will be much closer to your body and your left will be further back on the machine. You’re rotating the fabric in a clockwise motion. You’ll want to swing your elbows to make room for this hand position. Remember, elbows can move and this helps you with your control over the fabric.
When moving the right hand forward, move it to the right side of the needle screw with enough clearance that you don’t knock your knuckles with the screw. If you do, it won’t cut you. Just shake your hand out and try again to get a feel of how much clearance you need.
When moving the left, I find it easier to raise my hand when it’s at the top of the machine. This gives me more control over the turn and also keeps my wrist from getting all bent out of shape. You can keep it flatter if that feels more comfortable. Whichever position is good, as long as it gives you that control.
Turning right
Turning right is the opposite motion than turning left. Your left-hand goes forward while the right goes back. The starting position is your left hand forward and your right hand on the side. The movement is a counterclockwise motion.
Your right hand will generally stay more towards the front of the machine, rotating slightly towards the foot. Depending on how you hold your hand, you can get pretty close to the presser foot without knocking it against the needle screw.
The left hand will once again be doing the bulk of the work. Move it forward and turn it as you go. Move your elbow to keep from putting a kink in your wrist. Your elbows do not need to be stationary when sewing.
For whatever reason, I find that keeping both hands flat is more effective than cupping them in this direction. Because of this, I can get my right hand pretty close to the presser foot before I need to reposition my hand.
Time for practice
I don’t think I can say this enough. Sewing is a skill, not a talent. These stitches alone can carry you through a wide variety of projects and cosplay. The more you practice with them, the easier and more natural they will feel. You don’t have to be an expert right away. I screwed up a number of stitches and had to repeatedly rip them in some of my first sewing projects (there are times when I still screw up and I’ve been sewing about 30 years). It does take time, but don’t be discouraged and keep at it. The more projects you do, the easier it will feel.
So to start, amass some scrap fabric. Buy a yard of muslin. Grab some scrap cotton out of the remnant bin at Joann. Get some spare fabric or random bedsheets at a thrift store. Whatever you need to get yourself practicing. Once these stitches feel less foreign, you can start on your first projects. Start with things like pillowcases, sleep pants, reusable shopping bags, and hair scrunchies. You can make yourself a whole sleeping wardrobe! The possibilities are endless once you get the hang of stitches.
