Patterns require fabric. Seems like a no-brainer, right, until you encounter the pattern envelope. There’s a lot on an envelope, and fabric takes up a pretty large portion of the back. There’s a lot of information there, and each one looks slightly different. There are notions and pieces of styles and different accents and what does a petticoat actually require? What fabric types are there? It’s all so confusing!
Well no worries, I got you. I have several hundred patterns in my collection and picked out a few for examples of how to fully interpret fabric requirements on an envelope. I’ve included a simple skirt pattern, two cosplay patterns, the most unusual pattern in my library, an accessory pattern, and a spandex pattern. Each has different ways to read the envelope but in the end, when you look at it? They all have a lot of similarities. The more pattern envelopes you read, the easier it gets, so let’s get started.
Oh and make sure to read last week’s expose on the pattern envelope first. We briefly discussed fabric requirements, but it’s a good idea to understand the envelope as a whole before delving into fabric.
A simple skirt pattern

You might recognize this pattern. It’s the same one featured on many of the examples last week. This is a beginner’s pattern and will help you understand things like pleating, using waistbands, and the dreaded zipper.
This particular pattern has 6 different styles of skirts, each labeled by a different letter. Each skirt will have different fabric requirements as well. The fuller the skirt or the more pleats it has, the more fabric it requires. The more like a pencil skirt it is, the less fabric it needs.
The amount of fabric also changes depending on what size you’re making as well as what the width of your fabric is.
So that means the envelope needs to convey a lot of information in a tiny space about how much you need. If you flip over an envelope, it looks like a complex chart of numbers and letters and can get dizzying, so let’s take a look at it.

At the top is the description. Misses’ skirts. Each skirt has a yoke (the extra-wide band around the top of the skirt) and a zipper. Each skirt gets a description with a bit of information about what extra might be needed for construction.

Next is the fabric suggestions. This will tell you what fabric types to look out for and what this pattern is specifically made to work with.
This pattern is for a medium-weight woven skirt. Woven fabrics are usually things like cotton or wool or similar fabrics made of natural materials woven together. Medium-weight is fabric of average weight. Not light like tulle or heavy like leather. Something in between. Medium-weight fabrics are pretty beginner-friendly, though corduroy and wool might give you a little trouble if you’ve never worked with them before.
Style D also has a contrast, which you can see in the drawing on the front of the envelope. Contrast generally refers to any fabric that is different from your main fabric. A different type like lace or a different color. For this pattern, it suggests scalloped lace, with a scallop on one side to make that rounded scallop pattern on the drawing.
When you go to the fabric store or shop online, you can look for quilting cottons or fashion fabrics that would fit into this category. Avoid slippery things like satin and taffeta or heavier stiffer materials like suede or denim. Once you locate a fabric that appeals to you, you’ll need to determine how much fabric you need.
To interpret this chart, you’ll need to know a few things before you head to the cut counter or drop things into your checkout cart.
- What is my size according to my measurements?
- What style do I want to make?
- What is the width of my fabric?
Once you have that information, you can look at the chart. Let’s say I want to make style A and I’m a size 22. This is located in the top right-hand corner where Row A and Column 22 intersect

Let’s say I want to use quilting cotton for this skirt. The bolt says it comes in 45″ width. Looking at the chart, you want to take the top number matching the 45″ width measurement. So you need to buy 2 1/8 yards for this skirt.
But maybe I want to use wool, which comes in 60″ width. Looking at the chart, you want the lower number in the 60″ row, which means I need to buy 1 3/8 yards.
Some styles may have extra requirements, like Style D:

If you look at the front of the envelope, Style D has a lace overlay to give it a contrasting color. If you see a contrast listed for your style, you’ll need to get it along with the main fabric. In some patterns, contrasts are an essential part of the construction. For this pattern, it’s an accent.
This contrast requires a 60″ width fabric only. You cannot use a 45″ width fabric. It’ll be too small for the pattern. So when looking for a contrast, you need to look for the appropriate width on the end of the bolt or on the website. Once you’ve found your fabric, you can read the chart much like before. Contrast D for size 22 on the right side of the chart requires 1 7/8 yards.

When scanning the chart on the envelope, you may also see separate fabric requirements listed on the chart like this.
Interfacing is a material required to give your garment structure, and in this case, it’s used in the waistband so it doesn’t sag. Interfacing really only comes in 18-20″ width and can be found on a bolt or in a prepackaged roll.
Since it’s separate, it seems like it could belong to any skirt. And if you look at the list, it does. This interfacing is required for all styles A-F. You can find the measurement you need much like with the rest of the chart. Match the column with this row to see how much interfacing you need to buy.
Lastly, you also need notions. Sometimes this is just thread (which if you’re sewing should be understood but is half the time listed anyway) but other times, you have extra notions to finish the style.

Notions listed without a letter are used in all styles, so one 7″ zipper and a hook and eye closure. Style A has a special notion. Two frog closures are used as accents on the front of the skirt.
When looking at fabric requirements, make sure to look over the entire chart on the back. This ensures you don’t miss any notions, contrast, or interfacing requirements that may be listed in separate sections.
Now that we’ve covered a beginner’s skirt pattern, let’s look at a few others.
Kimono pattern
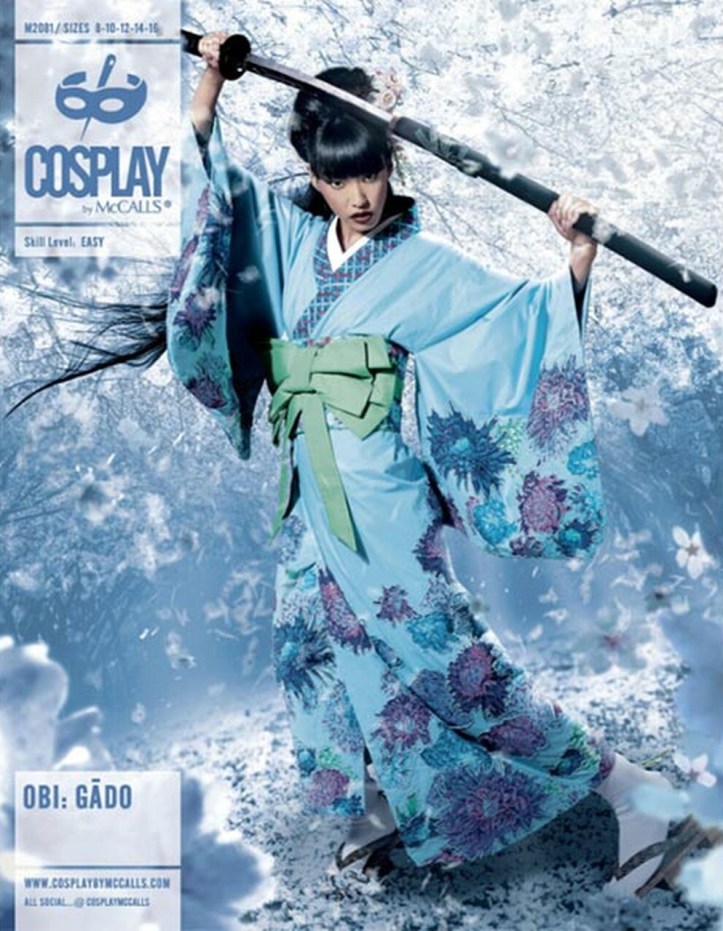
This is one of the patterns from McCall’s now-defunct cosplay line. These patterns are super high quality and have a lot of styles and accessories that are useful for cosplay and costuming. Their envelopes are much larger than standard pattern sizes, making them easier to read on the back. Each of these patterns has a difficulty scale ranging from easy to advanced depending on the skill and construction requirements.
Let’s take a look at the envelope and break it down much like the last one.
The sizes included in this envelope range from 14-24.
It is branded as Cosplay By McCalls. At the bottom, you see Obi Gado. This is the name of the pattern, as this line has specialized names for each one instead of using a pattern ID number.
It’s definitely a kimono pattern, though there don’t seem to be any style letters on the front. That’s when you flip it over. The kimono here has several different pieces, which are close to an actual kimono, plus other more anime styles.
There is the main kimono A, pictured in blue on the front, with the obi sash D, pictured in green. It also tells you how to make a short under-kimono called a juban B. These pieces are part of a regular kimono. If you’re making a yukata, you skip the juban. This pattern also shows you how to make kimono ties, which is more typical of modern kimono and just makes cosplay kimono easier.
Then it gets stylish. This pattern includes a kimono C with detached sleeves and also a smaller, more stylish obi E. The detached sleeves can be a different fabric than the body of the kimono or in the same fabric.
You can mix and match pieces to make your own custom kimono.
So let’s take a look at how to read this pattern with the same process as with the skirt pattern.

At the top of the envelope, you immediately see a description of the pattern. The kimono, the undershirt (juban), the detached sleeves style, and obi (waistband/sash). Since this is a cosplay-oriented pattern, each style has a detailed description of what you make with it.
The Cosplay by McCalls patterns also go a bit further and tell you the techniques you’ll be using to complete each piece. This will let you judge if the pattern is too difficult for you or if you need to go and research any new skills you want to learn. Since this is an easy pattern, it covers entry-level techniques if adding contrast, trim, piping, and creating bows and knots.

Next are the recommended fabrics. If you’re just starting out, stick to cotton and rayon. Rayon works pretty similarly to cotton and is made from cellulose produced from wood pulp. It’s often made of eucalyptus or bamboo but can be made of other natural materials as well.
Silk is a delicate creature, so you’ll want to use this after some practice. Brocade can be difficult due to how much it frays. When starting out, stick with the other fabrics.

Next comes the notions. Fortunately, kimono don’t have a lot of notions on the actual kimono itself. It’s usually on the obi. This particular pattern uses a modern pre-tied obi, which means you don’t have to tie it yourself. Just close it up with some sort of closure and be on your merry way. And with cosplay, easy is good.
Much like with the skirt pattern, you can match your style letter to the list to see what you need. This pattern does not have any notion requirements used across all styles.
This particular pattern assumes you’re marginally familiar with kimono terms. E is suggesting getting an obijime. This is the cord that ties around an obi. These aren’t always easy to find, but this pattern is meant to be high-end and use high-end supplies. When creating your own obijime, you can use any sort of think cord as long as you can sew through it.
Let’s look at fabric requirements next. Since this particular pattern has a lot of pieces, let’s take a look at the more complicated sections and break those down. Here are the requirements for the long outer kimono, Style A
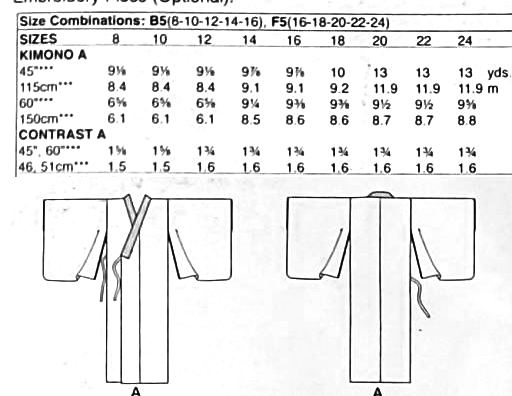
Much like with skirt D in the skirt example above, there’s a contrast fabric. To tell where the contrast is, you look at the drawings on the back of the envelope. Contrast is often shown as shaded in, and it’s a little hard to see in a photograph but in person, it’s very obvious. See that grayed section on the collar? That’s the contrast.
You might be staring at the yardage requirements for this pattern, and it is a lot. This pattern makes kimono like you would for a real kimono, which means it requires a lot of fabric. Most costume patterns fake it so it requires about half of what’s listed here. But if you want to make a real kimono, this is what you need.

You read this table much like with the skirts, though this pattern also lists the metric underneath the imperial measurements. Since I’m in the US, let’s take a look at the example. let’s say I am size 24, which is on the right side of the table. If I have 45″ fabric, I need 13 yards, but if I have 60″ fabric, I need 9 5/8 yards. You can see how using a wider width for some patterns will require less fabric due to how the pattern pieces are laid out.
The contrast required for this will also depend on the size of your kimono. Let’s stick with the size 24 example. You’ll need 1 3/4 yards of 45″ width fabric. When you see 45″ and 60″ listed on the same row, that means that you’ll be using the same amount regardless of which width you choose. If you go with the wider width, you’ll have scraps leftover after cutting the contrast pieces out.
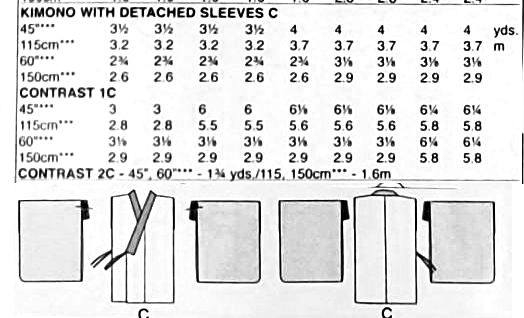
Let’s look at the detached sleeves kimono. If you look at the picture on the back of the envelope, there are three different patterns on the kimono. When a pattern requires more than one contrast fabric, each contrast fabric will have a number before the style letter. Here you see 1C and 2C.
When looking at the diagram, you can see two different shades of gray. The sleeves are a medium gray with the collar being a darker gray. If it’s hard to tell which is which, you can generally tell by the yardage requirements. Sleeves require a lot more yards than a collar ever could so looking at our size 24 example, Contrast 1C requiring 6 1/4 yards at 45″ width definitely indicates sleeves and not a collar. For patterns where it’s too hard to tell by yardage, the contrast panels will be labeled with numbers.
Contrast 2C is listed a bit differently than the contrast in kimono A. As all the measurement information is justified left and is not listed out in a column, this yardage is required for all sizes. So regardless of if you’re making size 8 or 24, Contrast 2C will always require 1 3/4 yards of fabric.

About halfway down, you’ll see an interfacing requirement. Unlike in the skirt pattern, this interfacing requirement is not required for all styles. Instead, it is only required for the styles listed here, A, B, and C. These are two kimono and the juban styles, and the interfacing is used in the collar.
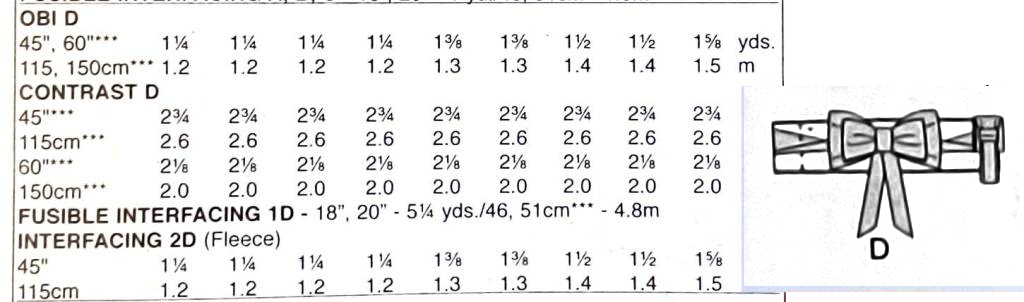
For this pattern, the obi are separate from the kimono and the juban. Let’s take a look at obi D, which requires the most materials out of both styles.
Much like the kimono, the contrast is marked in gray where the main fabric is in white. While it seems like a lot, you read the chart much like you do for the rest of the fabric. The main fabric and the contrast require yards depending on your size. But what makes this unique is the interfacing requirement and that requires a little knowledge about kimono.
Kimono have something called an obi-makura which literally translates to obi pillow. This pillow is used to add structure to the obi and keep it from sagging against the small of your back. Since obi-makura are pretty specialized, this pattern is using fleece interfacing to mimic this piece of an obi. Now this isn’t just regular fleece you’d use to make a bathrobe. This is fleece interfacing. It’s a special type of interfacing found in the interfacing rack and is thicker and fuzzier, thus the name fleece interfacing. It’s often quite stiff and is usually sew-in instead of fusible. You’ll likely only find this at a fabric store. If you’re not sure what to look for, you can always ask someone at the cut counter to help you find it.
Lolita pattern

Let’s take a look at an advanced example. Lolita patterns are easily some of the most difficult patterns to work with due to the techniques required to get all those flounces and ruffles. This one goes further and tells you how to make a supportive cage. But regardless of the difficulty, let’s take a look at how to read this pattern.
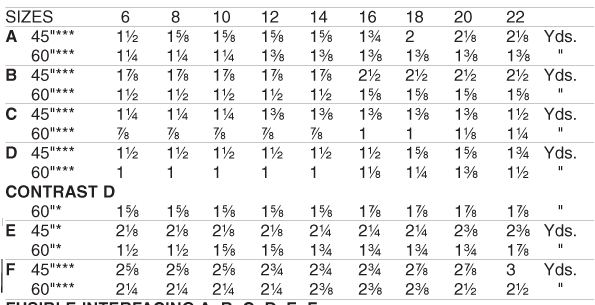
This is Bouquet de Fleur from Cosplay by McCall’s. It’s an advanced pattern with sizes ranging from 14 – 22.
Some of the accessories are added here for extra flair to make the look complete. The hat, gloves, necklace, and stockings are all extra but the rest is included right in the envelope. Since it’s not numbered, we’ll have to flip it over to see what’s actually inside.
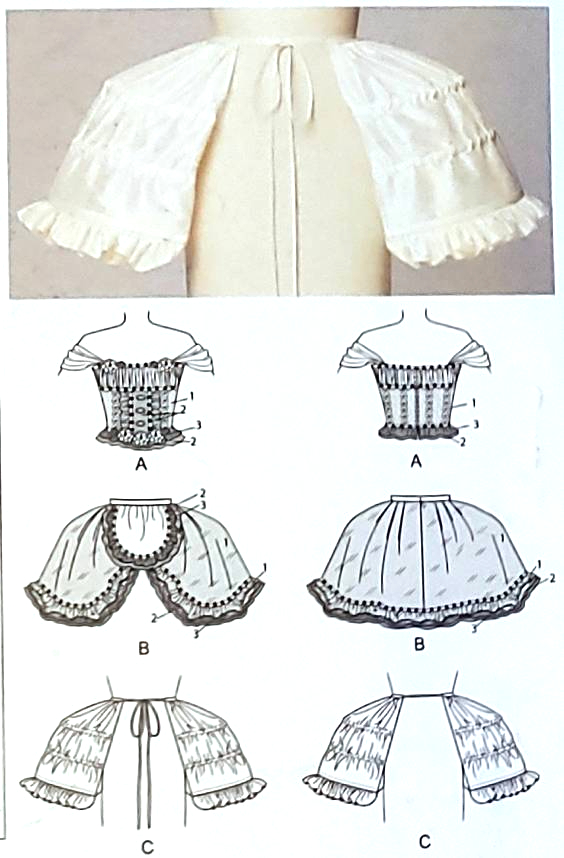
The back gives you an image of the cage supporting the dress as well as each of the pieces, lettered and showing front and back.
Like with the kimono pattern, this pattern uses a lot of contrasts. You can see that on the front image of the envelope, but it’s not always so obvious which contrast is which. So each one is labeled by a number as well as being shaded.
Each piece of the outfit is broken up into sections as separate style pieces, but the entire thing is meant to be one outfit. This is to make it easier to understand what is required for each piece and how to construct it.
So let’s break down the fabric requirements.

These are the suggested fabrics for this particular pattern. Many of these fabrics are delicate or require a bit of work to handle. They have a bit of a skill requirement, but this doesn’t mean they’re impossible to work with. It simply means these are definitely not beginner-friendly. This pattern is meant to be constructed like a high-end lolita dress.
Chiffon and organza are extra lightweight and slightly sheer. They are thinly woven fabrics that look light as air and come in a variety of colors and prints. This means that some of the decorations require some of the lightest weight fabrics you can work with.
Shantung and taffeta are woven medium-weight synthetic fabrics that have a shine to them. They’re a bit on the heavier side of medium-weight and are a bit easier to work with than some of the fabrics on this list. Shantung is woven in a certain way that the fabric appears variegated. You can see the different threads in this weave and it gives it a unique pattern. Taffeta can come in a variety of colors, including color-changing fabrics that appear to be two different colors depending on the angle. You often see taffeta in formal dresses for proms and weddings.
Twill and coutil are used to stiffen corsets. They give a garment structure and work with the boning to keep the outfit from sagging. And with lolita patterns, there are a lot of accents and you don’t want them dragging the top down. How embarrassing!

Lolita patterns have a ton of notions. A lot. Lace, trim, charms, rhinestones, even flowers in this case. This particular pattern has a massive list to give it this more flowery flair. I picked this pattern purposely as an example of what a long lotion list could look like. Let’s pick out a few examples.
Starting with A, the top of the outfit. The rhinestones and lace should be easy enough to handle, as well as the charms, but there are some interesting things on this list. Boning is used to stiffen a corset and help it keep its shape. Rigilene is a polyester boning that is ultra-stiff but not so difficult to work with as metal boning. This allows you to make boning channels instead of needing metal cutters and stoppers to keep from stabbing yourself in the ribcage with the boning.
The supportive cage C has the most unusual list but this is also a cage. Cable ties are zip ties. Sometimes patterns call for some rather unusual materials, and this is definitely one of those. But no one said making modern cages was exactly normal.
Let’s take a look at one of the fabric requirement sections
This table should look familiar by now. You pick your size and section, and you can find your yardage on the chart. The big challenge of a pattern like this is what fabric matches which section? There are so many listed in the fabric requirements so which is which?
For this, you have to look at the fabric list. Fortunately, the list tells you exactly which fabric goes to what piece by referencing the letters and numbers. These letters and numbers match what’s on the table. let’s take a look at the fabric requirements again and match it with our table:
A is listed at chiffon. So the top section requires chiffon.
1A, 2A, and 3A are listed as shantung and taffeta. The three contrast sections use this type of fabric.
The underlining is batiste and organza. This is a delicate, sheer fabric.
Lining for A is listed as twill and coutil. These are corset linings.
Interfacing, while it is not listed on the fabric list, is generally regular old featherweight interfacing. As it is not listed as fusible, you’ll want sew-in. These fabrics are delicate so you want to avoid stressing them out by ironing fusible interfacing on them.
After understanding which fabric goes to what section, you can use the chart much like any other envelope to determine how much you need. The charts require you to know the size you’re planning to make but the single lines (Contrast 3A, Underlining A, and Lining A) are the same requirements for all sizes.
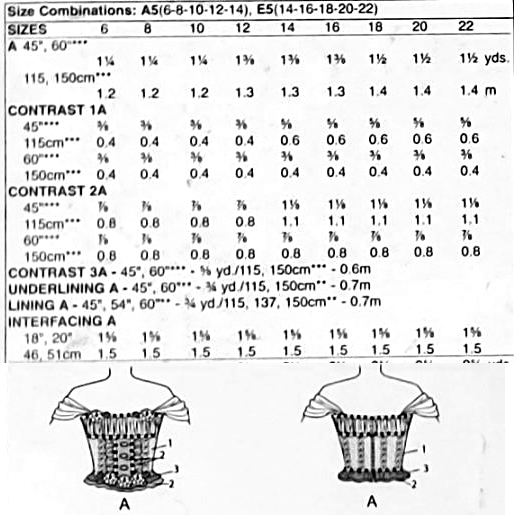
A truly unusual pattern
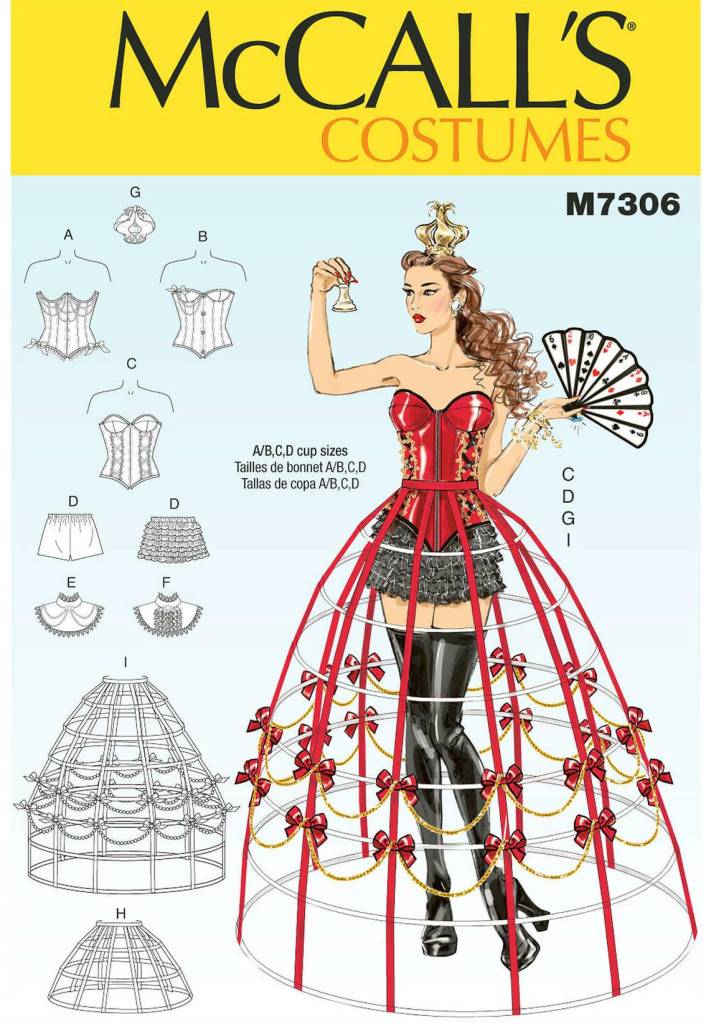
This pattern is probably one of the strangest I own. It’s some cross between burlesque and corsetry magic. I’m not entirely sure which, and I’m not sure anyone else does either. I’ve seen this described as burlesque, steampunk, historic, Renaissance, and everything in between. I had honestly bought it for the cage, but it works pretty well for a corset pattern.
But as bizarre as this pattern is, we can still analyze it much like the rest of the costume patterns. You have a drawn model showing off a number of the pieces with drawings of each style shown on the lefthand side of the envelope. Three corset styles, shorts and ruffle butt shorts, two collars, two styles of cage, and a hat that looks like an onion.
This pattern also comes with custom cup sizes to ensure that corset fits properly.
Let’s take a look at the back.
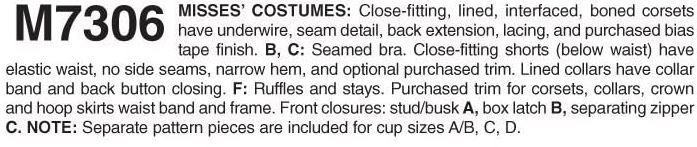
At the top, you see the pattern number and a description. Misses’ Costumes, since it’s found in the costume section of the book. It goes on to tell you details about each style piece since there’s such a variety in this envelope. At the bottom, it adds a few extra things needed for certain pieces like latches and zippers.

Next is the fabrics list. Some of these fabrics require a bit of an intermediate hand to handle. It is made specifically for medium-weight fancier fabrics, ones that you would find in a corset, plus some more costume ones like velvet. However, since it’s made for medium-weight fabrics, you can substitute these suggestions for easier fabrics such as cotton or polycotton.
The shorts are made only for stretchy fabrics, so making these out of something like cotton would definitely not work. (the stretch example further down goes into detail on how to understand stretchy fabrics).
The strange onion hat is made of shiny things, as one would make an onion-shaped hat, of course. Why would you want anything else?
You may notice I and J are not on this list. If you look at the front of the pattern, these are both dress cages. Some cages use fabric, like the lolita cage in the earlier example. This type of cage does not use fabrics but instead other materials for construction.

The fabric requirements for A-G should look pretty familiar by now. This pattern ranges from size 6-22 and has rather simple requirements given how bizarre this pattern is. Most of the styles require a set amount of fabric regardless of size. Corsets are generally pretty close-fitting so some may have separate yardage for sizes but some do not. This is the latter case here.
The only one with separate measurements for size is style D. These are the shorts made of stretchy materials. For the most part, stretchy fabrics come in 60″ width. It is rare that they come in smaller width and even rarer to see a pattern actually give you a smaller width. But these are shorts. They don’t have a lot of material requirements, so this pattern gives you both common fabric widths.

Now for the hoops. Hoop wire is generally thick wire or boning that comes in a fabric casing. You’ll likely need wire cutters and caps to ensure the wire doesn’t stab you in the leg or rip your skirt. But if you don’t want to deal with wire, heavyweight polyester boning like Rigilene is a good alternative. Make sure it’s stiff if you plan on supporting any extra weight.
But as you look at the back of the envelope, you see something different

You may find listed on the back of the envelope “see instruction sheets”. I’ve seen this mostly with corsetry, lolita patterns, and petticoats, but it can appear on any pattern envelope where they’ve run out of space. This means you’re not done, and if you’ve forgotten to take the instruction sheet with you to the store, you’ll probably find yourself internally cursing at yourself as I’ve done multiple times.
The instruction sheet is found on the inside of the envelope. It’s several pages printed on newsprint and folded several times to fit inside. This has a wealth of information on it, something that we’ll be covering for several articles, but right now, our target is the additional information we need for our notions and fabric requirements.
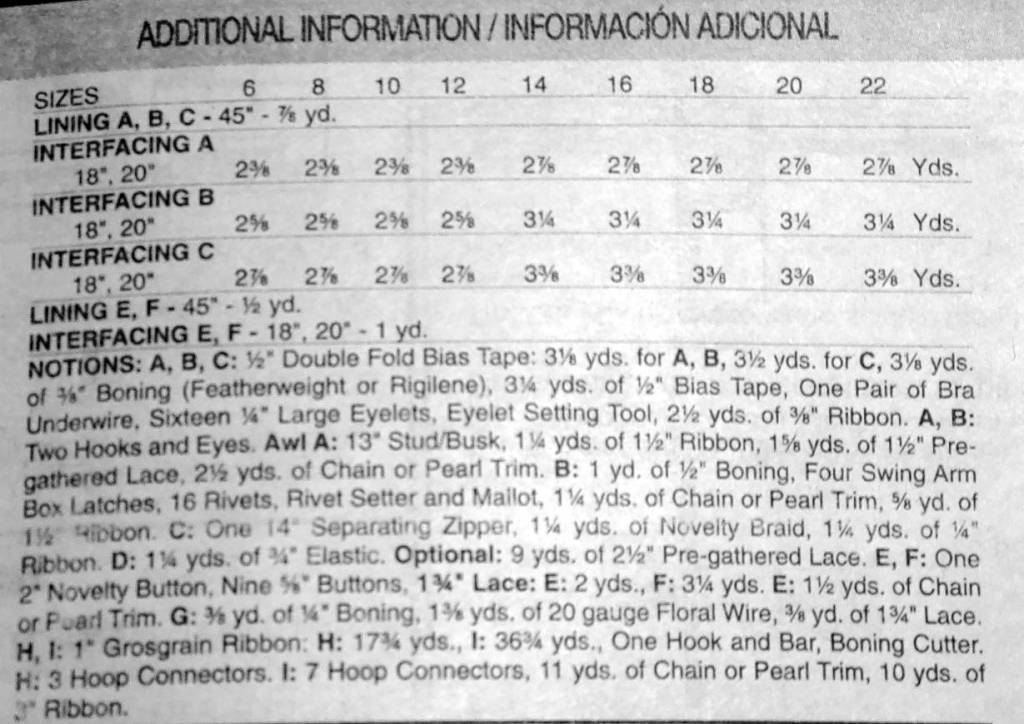
The additional information will always be listed on page one, likely on the right-hand side. For this pattern, it’s on the bottom half, right of center.
This extra section isn’t much different than what you might find on the back of the pattern envelope. It lists the interfacing and lining requirements for the three corset patterns plus some extra lining and interfacing for the collar pieces.
Then comes the massive notion list. It lists all the required and optional notions for all styles A-I. This includes everything you need to make a corset all the way to additional bits required to make a skirt cage. It lists out all the trim, the actual tools needed for handling eyelets and boning, and what you need to handle hoop wire.
Some sections include optional notions, such as with D. If you look on the front of the envelope, you’ll see that D comes in regular shorts and ruffly. The optional notions tell you what you need to give yourself maximum ruffle-butt shorts. It’s optional, but it sure looks cool.
When making any of the styles in this pattern, you’ll need the fabric and notions listed here to fully assemble the look so make sure to take this with you when shopping!
Accessory pattern
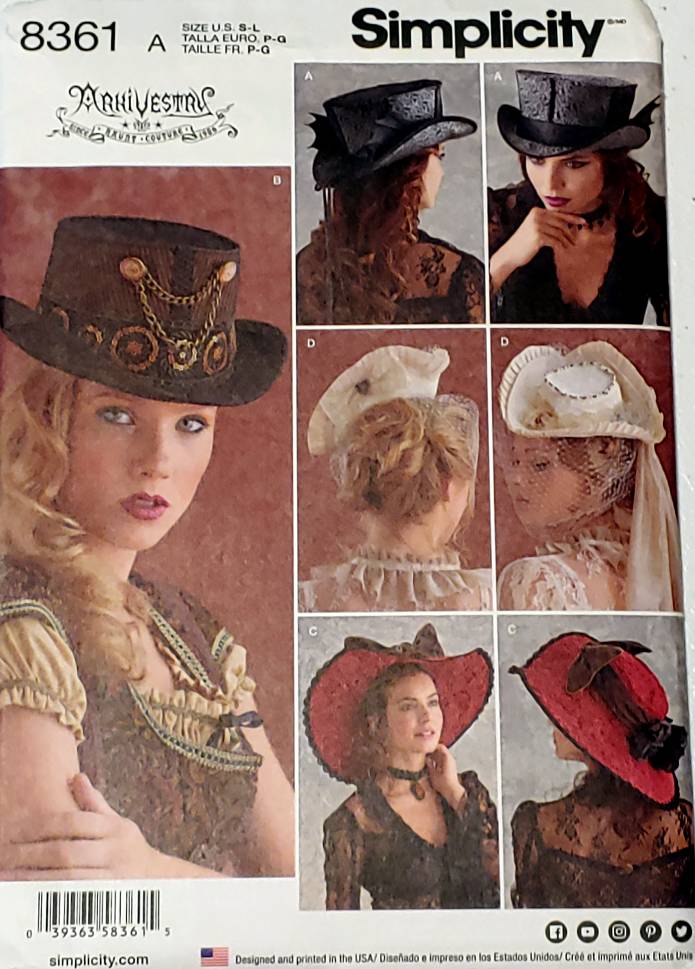
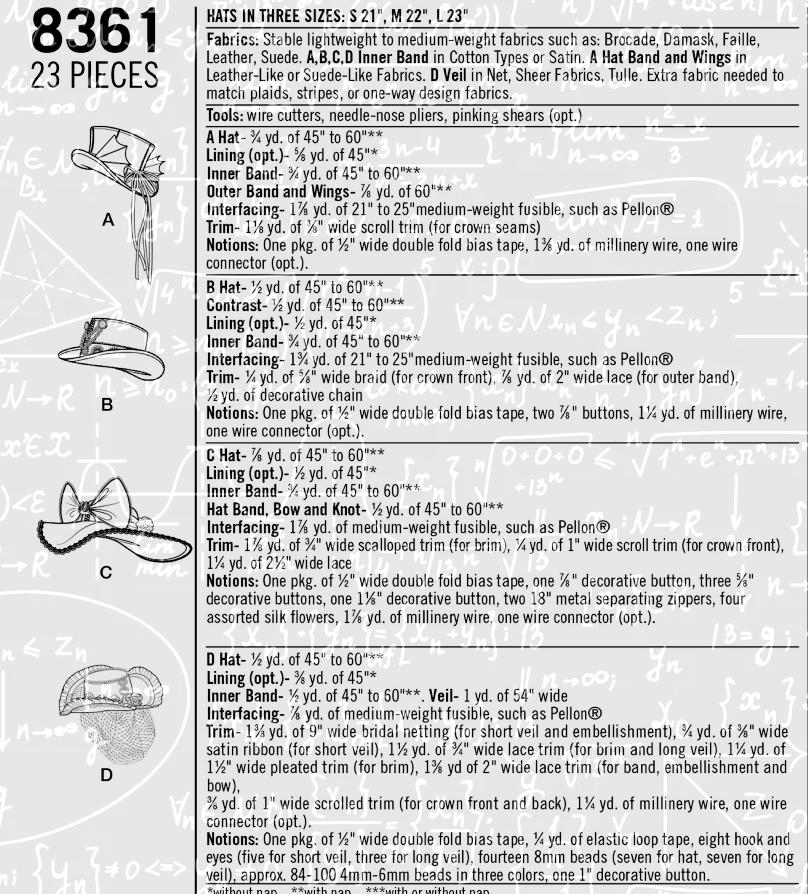
Next, let’s take a look at an accessory pattern. Accessory patterns can range from making satchels to belts to medieval bracers, and my favorite thing, hats! This hat pattern is from Simplicity’s Arrivestral line which focuses on a steampunk aesthetic.
Accessory patterns vary greatly. Some are single size, but patterns like belts and hats generally have a size range to fit multiple body types and head sizes. Hat sizes are generally sized according to the circumference around your head where a hat would normally sit. These sizes are all listed on the back of the pattern and are generally standardized. I have a big head at 23″ so my size is large.
If you’re making a hat you intend to wear with a wig, make sure to measure your head with the wig on. And if you have a big head like me, you may have to modify how wide the opening is by where you place the stitches.
Let’s take a look at the back of the envelope.

The description at the top is pretty simple. Yep. You guessed it. It contains hats. Here we also see what the measurements for the sizes are. It ranges from a small head to a giant noggin like mine. Some patterns will list different fabric requirements depending on the size, but most hat patterns will use the same amount of fabric for all sizes as there isn’t too much difference between the size of the pattern pieces.

Fabric suggestions for hats aren’t as strange as you might think. Most hat patterns use medium-weight fabrics. This pattern is made to be fancier and more geared towards the couture or steampunk style so it recommends these particular types to complete the look. It is also recommending more stable thicker fabrics, but feasibly you can use cotton if you use enough interfacing to support it.
This pattern also recommends fabrics for bands and accents. A has little bat wings as accents, and it recommends a leathery fabric for these. D has a sheer net, and any sort of sheer net or tulle-like fabric should work here. Look for ones that do not fray. Fabrics like organza or chiffon probably won’t work unless you plan on finishing the edges.

Some patterns may require extra tools, and they’ll let you know ahead of time so you don’t get halfway through the pattern and realize you don’t have a pair of pliers. This can include things like eyelet tools, specific scissors like pinking sheers, and wire tools. Some cosplay accessory patterns may require things like a heat gun or a box cutter if foam work is involved.
Here, it’s simply wire supplies as you use wire to support the brim of a hat. Pinking sheers are scissors that cut in zigzags and prevent fraying. They’re optional but nice to have if you don’t have a way to finish the inside of the hat’s seams.
Let’s take a look at what fabric requirements a hat might need.

If you’ve never seen a hat pattern, this might look strange, but after working with hat patterns, this list is pretty normal. A hat does not require much fabric. It’s all the accents that will require a list.
The hat itself requires just shy of a yard of fabric. This includes the part that sits on your head and the wide brim. Lining can be added inside for comfort or for style.
The inner band is used to hide your raw edges and match the outer band.
The outer band and the bow are listed separately here so you can buy them in a different color and create a contrast. Of course, you can buy it all in the same fabric, but by listing it separately, it takes all the guesswork out of how much you need.
Interfacing is a big part of making a hat. medium-weight is often enough to support a hat along with the wire, but what if you want the hat to be ultra stiff? Look for buckram. This is super heavy-weight interfacing that comes in both sew-in and fusible forms. You’ll still want to support it with wire, but it gives the hat brim an extra stiffness if feel that medium-weight just isn’t enough.
Last is the list of notions. A number of these notions are decorative. Like a zipper. You don’t need a zipper to put on a hat. But the wire is necessary. It tells you how much wire you’ll need to properly support the hat. The circumference of the hat brim is nearly 2 yards so that’s how much you absolutely need. I tend to use heavy iron wire in my hats, usually 16-18 gauge I find at the hardware store. You can use fancy hat wire if you wanted, but when you can get it so easily by walking into a Home Depot, why get anything else?
A spandex pattern
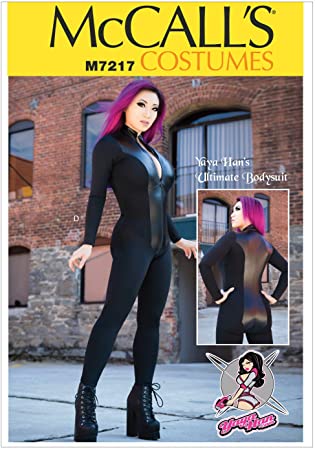
Let’s look at one more pattern today. At some point in your sewing ventures, you’ll come across a spandex pattern. While you can certainly get away with cotton for a good number of patterns and cosplays, you may eventually want a pair of stretch pants, a stretchy shirt, or a bodysuit. I’ve picked out a Bodysuit pattern as our example here.
This pattern is from Yaya Han’s costume line for McCall’s. It’s a pretty versatile pattern as it comes in several different styles and even has a plus-size variant more suited towards pear and rounded body shapes.
This particular one is the Missus’ sizes, size 6-22. It has variants for making the entire thing out of spandex or having a contrast fabric like in Yaya Han is modeling on the front of the envelope.
Let’s take a look at the back of the envelope.

When looking at the fabric list, the first statement tells you what kind of stretchiness you need. Two-way stretch means that the fabric stretches along the crossgrain, selvage to selvage, left to right. Four-way means that it stretches along the crossgrain and also along the grain, up and down the fabric. Unless specifically noted, a four-way stretch will work for a two-way stretch fabric. But two-way stretch fabric will never work for a four-way stretch as it’s missing an important stretch up and down.
If a fabric pattern doesn’t list which kind of stretch it needs, it’s generally assumed both two-way and four-way stretch will work.
But how much stretch is actually enough? How stretchy should my stretch fabric be? I can’t look at a fabric, tug at it, and say, “yes, quite, this is exactly what I need.” No one can do that. That’s where the “Pick-a-Knit” guide comes in.

This guide is found on nearly every pattern that uses stretch. It’s called a stretch guide or a pick-a-knit rule. Knit here is referring to the type of fabric, a woven fabric that is made to stretch. When looking at this guide, you lay the fabric still on the black section, placing a selvage or an edge against the line where the white arrow is pointing. Then grab the left edge and stretch. Does the fabric stretch at least to the black arrow? Good. It works.

Zippers. This one is pretty obvious. It’s a bodysuit. No matter how stretchy the fabric is, you absolutely cannot fit your hips through a neck hole. Bodies are not made this way. So you need a zipper to be able to make the opening wide enough for your body to fit through. To understand why these requirements are different, you’ll have to take a peek at the style drawings at the bottom of the envelope.
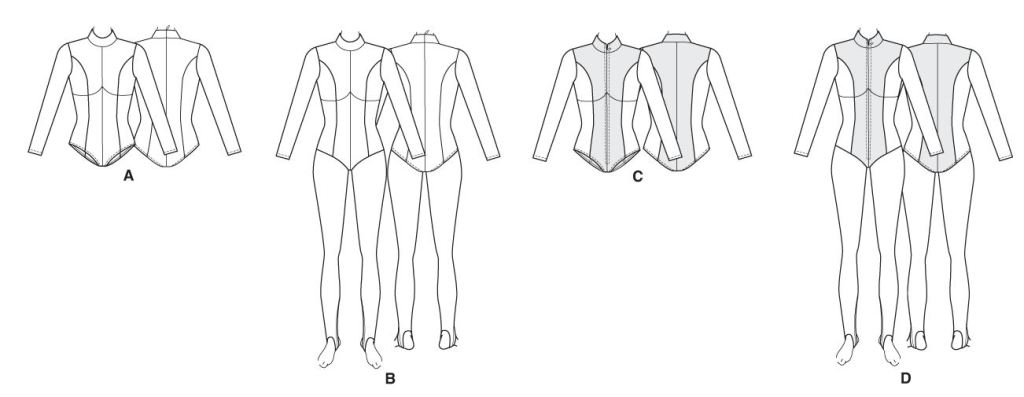
Styles A and B use a hidden back zipper. It’s hard to tell but if you look at the drawing, you see a little zipper head at the neckline on the back drawing. If that’s hard to see, the gap on the back of the neckband also indicates that’s where the zipper is located. If you look at C and D, you can see the stitch lines for the zipper on the front.
Styles A and C are leotard-style bodysuits. The elastic is required for the leg holes. You may be thinking, “oh it’s spandex. Who needs elastic anyway?” If you don’t thread elastic into the leg holes, you end up with a saggy butt because the fabric doesn’t properly pull and conform to the curvature of your body properly. No one wants a saggy butt. Get your elastic.

Spandex patterns are often surprisingly simple. Some come with one fabric requirement such as with shorts or a bra pattern, but bodysuits, stretch pants, and workout shirts will tend to have measurements for your particular size. Because this is spandex, the yardage requirements between sizes are much closer than a non-stretch pattern.
There’s only one width spandex and knit come in, and that’s about 60″ width. You may find wider widths but the standard 60″ width will work just fine.
Styles C and D have a contrast panel. You can see this in the photo on the front as well as the drawing on the back in a medium gray. For all sizes, the contrast requirement is the same.
I hope this adventure today gives you a better understanding of how to read fabric requirements. This is more than enough to help you get started with your first pattern and your first project! The more envelopes you read, the easier it will get, so keep at it!
