When working with patterns, you’ll need to deal with pattern pieces. Unless it’s a toga, then it’s probably just one long piece. But if you’re making anything else, it involves multiple pieces. Pattern envelopes usually have more than one style in them, which begs the question. Which pieces go to which style?
When you open a pattern envelope, you’ll find a few things in there. The uncut patterns are printed on beige or white tissue paper, folded up neatly, and taking up most of the envelope’s space. But there’s another thing that’s very important to your projects. Printed on newsprint paper, you’ll find instructions. There are often several pages, and it’s more than just instructions. It also includes piece layouts, a pattern symbol dictionary, supplemental sizing and fabric information, and the thing we’re looking for today: the pattern piece guide.
The pattern piece guide sits on the very first page of the instructions. It serves as a guide to the pattern.
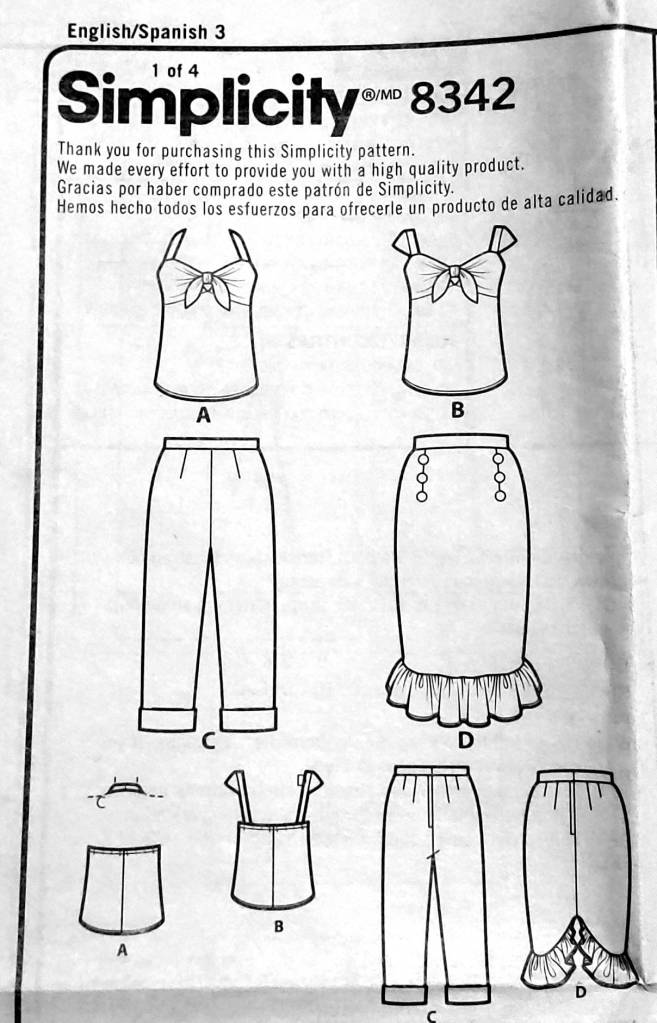
The front page tells you quite a bit of useful information. It includes the maker and ID of the pattern as well as how many pages are in the instructions.
There are also drawings of all the styles included in the pattern envelope, showing the front and back of each. These styles are all lettered with the same letters that are found on the outside of the envelope. These letters are important for determining which pattern pieces to use for your style.
Below or next to the drawings is the actual guide to all your pattern pieces. At the top of this guide is the pattern piece count, usually listed as “pieces given”. This is a count of the total number of pieces in the entire envelope across all styles. The number of pieces for your particular style may be less than the total.
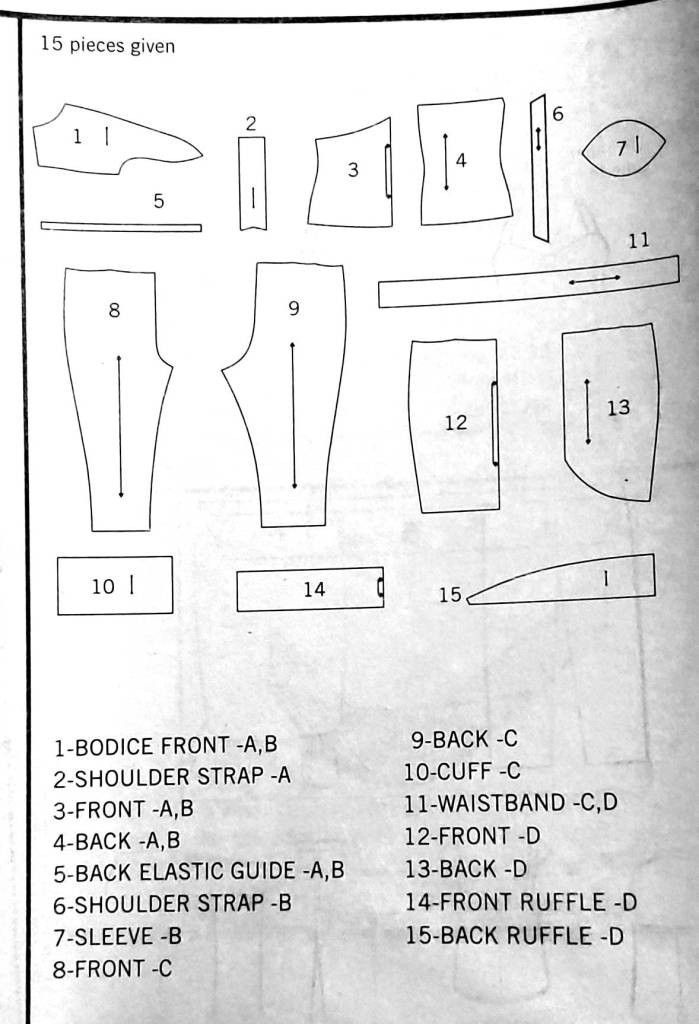
Below the count is drawings of all the pattern pieces. Each one is numbered and shows major pattern markings such as the grainline (⟷) and cut on fold (⬐⬎). But just looking at these shapes isn’t really helpful beyond being able to identify the pieces on the pattern paper. Pattern pieces don’t often look like their finished counterpart, and sometimes they look really silly like the elongated 1 in the example. They still don’t tell you which style they belong to.
That’s where the list comes in. Usually below the pattern piece drawings is a list of all the pattern piece numbers plus a description and a letter. The descriptions are pretty straightforward and easy to understand. Sleeve, waistband, ruffle, front. Bodice refers to part of the top, usually around the bustline, and cuff often refers to a sleeve cuff or a pants cuff. They tell you what each piece is for without having to squint and guess what it is.
The letters for each pattern piece tell you which style it belongs to. Generally, the pieces are in order of style. So A will generally be first on the list and D is at the end (since it’s the last letter on this example pattern). Any piece shared across styles will be listed on the same piece, such as with #1 being used for both A and B.
When you look for which pieces you need, just look for your style letter! For our example, if you wanted to make style A, you would need pattern pieces 1-5 to make the look. For B, you’d need 1-7, because it shares pieces with A. For style C, you would need pieces 8-11. For D, you need pieces 11-15. Use this list to find only the pieces you need for your project and put the rest back into the envelope so they don’t get lost.
Pretty easy, right? Let’s look at a few examples including a few that show special kinds of pieces you may encounter.
Tunic pattern

Let’s start off with a pattern with no special pieces.
This pattern is from New Look, Simplicity’s budget-friendly fashion line. It’s a tunic pattern and probably one of my favorites to use. I’ve used it in a large number of cosplays, everything from Fire Emblem to Utena.
This pattern comes with two sleeved tunics in different lengths plus a sleeveless variant. You also get a pair of wide-leg pants and a simple handbag. It’s a good pattern to start with since it doesn’t require a lot of difficult techniques to make. It’s also useful for any collared tunic cosplay.
Each style is labeled with its own letter, and both front and back are given for everything except the bag because, well, it’s a simple handbag that looks the same on both sides.
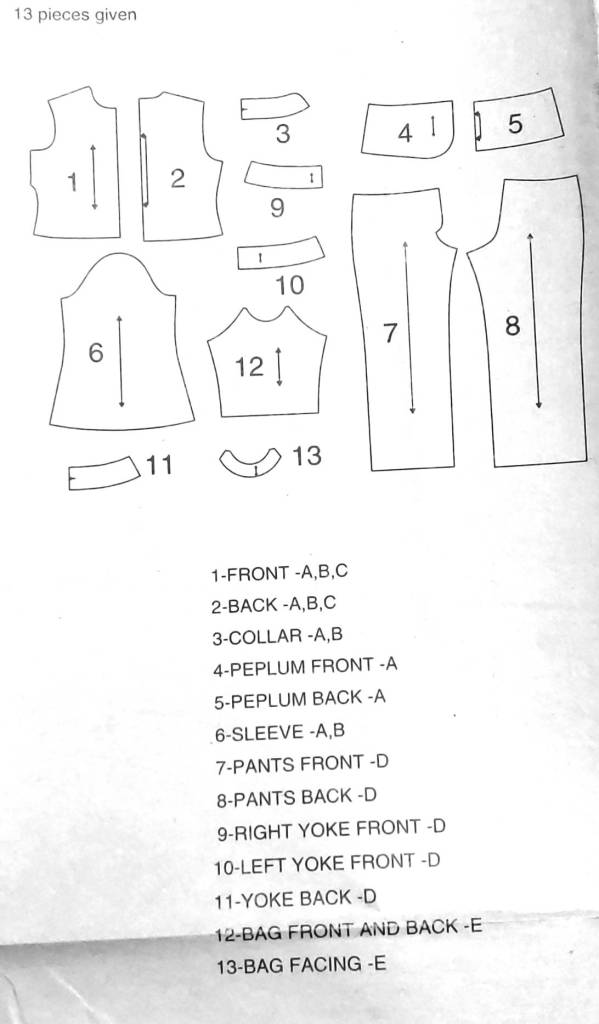
Taking a look at the pattern piece guide, there are 13 total pieces in this pattern and each one is numbered. Most of the pieces have a grainline arrow (⟷) and #2 has a cut on fold symbol (⬐⬎).
All three tunic styles share the same body pieces, 1 and 2, but the rest of the pieces are sorted by style. Using the style letters on each piece, you can locate which pieces are needed. Style A needs pieces 1-6. Style B uses pieces 1-3 and 6. Style C only uses pieces 1 and 2.
The pants use pieces 7-11, and the bag uses pieces 12-13. Both of these use a piece called a yoke.
A yoke by definition is a piece that is shaped. Not really helpful, especially since the term in sewing is pretty broad. For this pattern, a yoke is used on a seam to make sewing a curved seam easier. You sew the yoke to the main garment, in this case, a pants waistband and the neck of a purse, right side to right side. Then you turn the fabric right-side out and press. This makes a nice curved seam without the need to line something. This is a pretty basic summary of it, but the instructions will tell you how to work with one during construction.
Dress shirt – Multi-size pieces
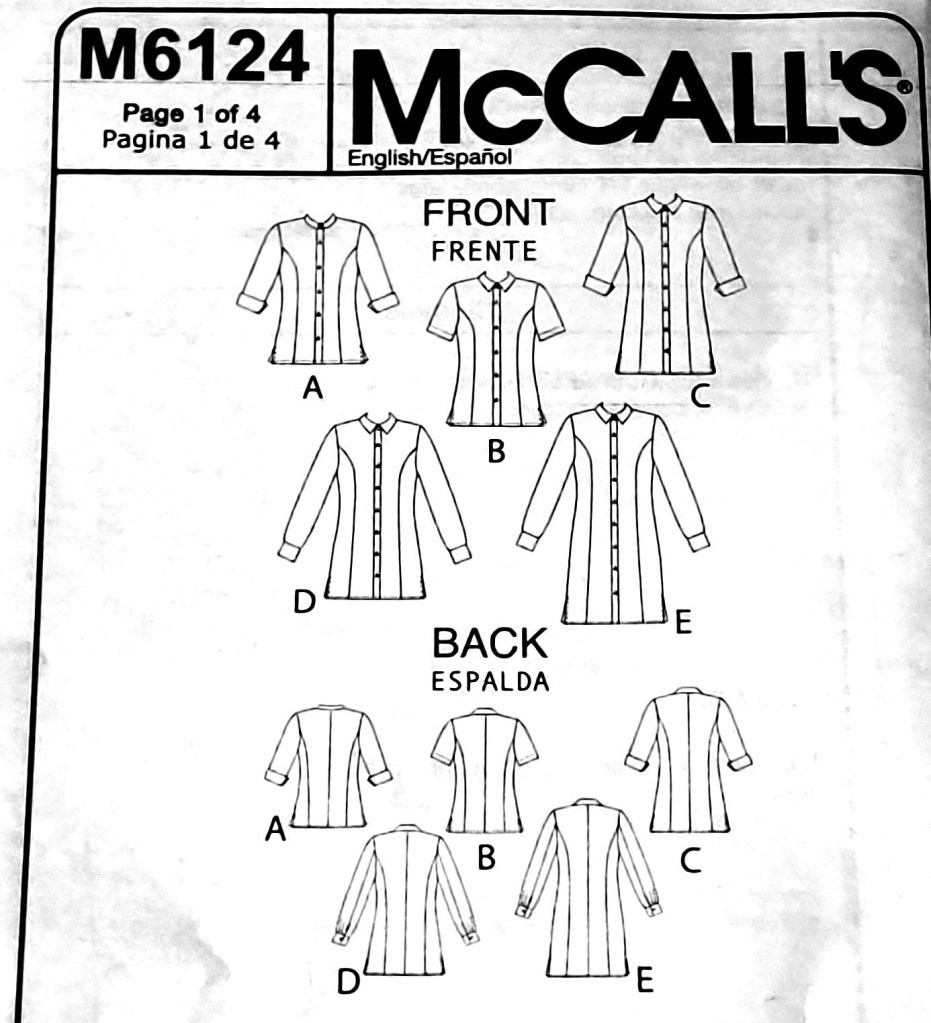
This is probably one of my most used patterns. This is McCall’s dress shirt pattern in three different lengths. There are three different sleeve lengths and two different types. Plus it also has two types of collars. It features a princess seam to conform to the body’s curvature instead of using darts. This particular pattern also has a plus-size line, making it good for multiple body shapes and sizes.
This pattern is pretty useful in both cosplay and in fashion wear. After all, you need a dress shirt to fit under that school uniform seifuku jacket.
What makes this pattern interesting is that these shirts mostly use the same pattern pieces.
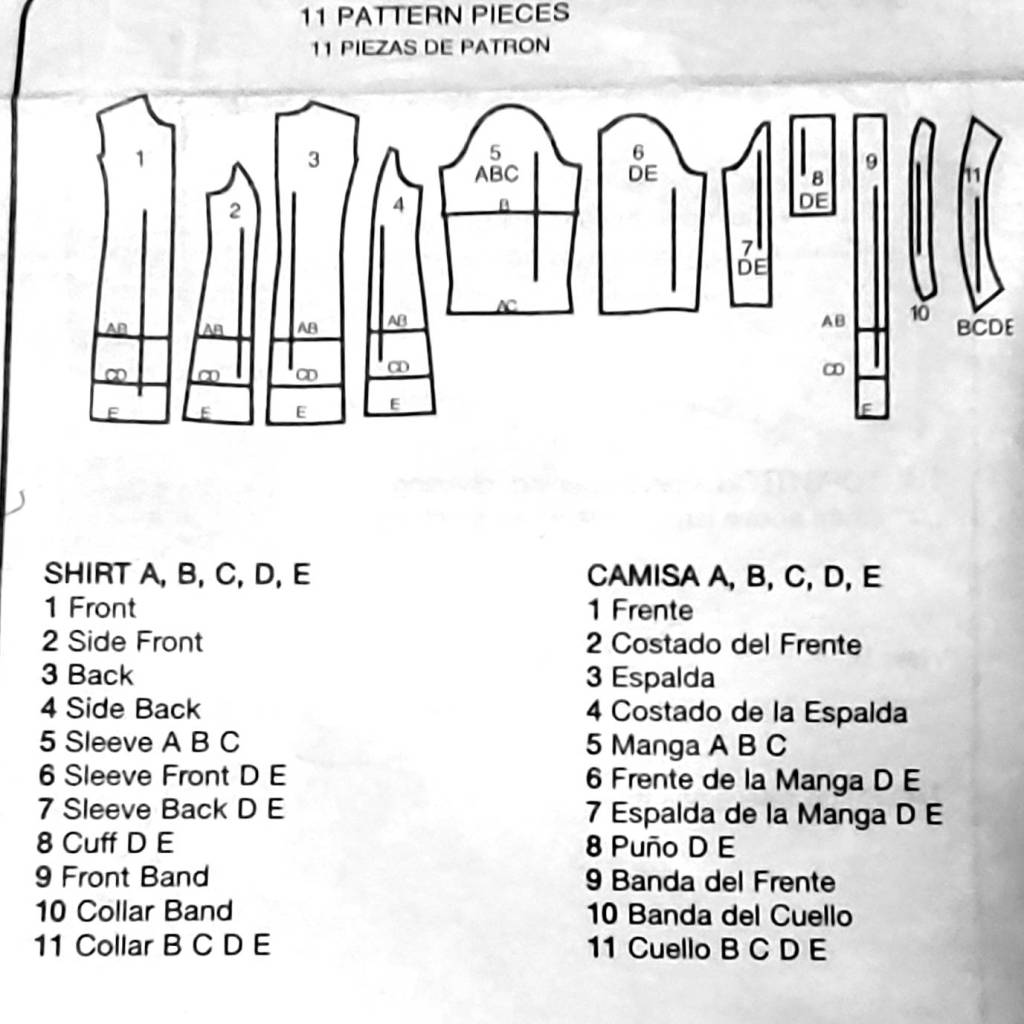
When looking at the guide, you’ll notice there are only 11 pieces in the entire pattern. The list does not put a letter next to some of the pieces like with our first example. Instead, it just names them. This means these pieces are used for all styles in this pattern.
The pieces that are labeled are specific to some styles. In the case of this pattern, it is the style of the sleeves and the style of the collar. Style D and E use a more formal two-piece sleeve whereas the other styles use a simple one-piece sleeve. So if you want to make Style D, you’ll want pieces 1-4, 6-11. Style A would be 1-5, 9-10. And so forth.
Let’s take a look at the unique pieces.

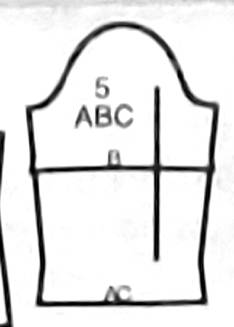
Pieces 1-4 are used to make the body of the shirt, but if you recall from the drawings and the description, there are 3 different shirt lengths. Feasibly the pattern could print 3 different versions of Piece #1, but that’s a waste of pattern paper and production time.
So instead, all the lengths for #1 are combined onto one singular pattern piece, making them multilength pattern pieces. If you look at the drawings and the pattern piece when you cut it out, you’ll see lines drawn across the bottom. When you cut out these pieces from your fabric, you’ll be cutting at the line for your style. So if you wanted style E, you cut out the fabric at the bottom line, and style A is at the top line. Don’t worry, they’re all marked on the pattern piece itself. Just make sure not to cut the pattern itself at A’s line else you’ll never be able to make E later!
You can find multilength patterns in a variety of places. Sleeves, shirt lengths, skirt lengths, pants and shorts patterns combined, etc. Anywhere a pattern can make a multilength piece, it will try. It saves on space, production costs, and time locating the pieces when you want to use them.
Peach & Daisy – accessories and guides

This is an officially licensed Super Mario pattern for Princess Peach and Daisy. Each princess has her own style so you know exactly what you need to make which princess.
Licensed patterns pop up every so often in the big pattern company lines. They’ll cover some popular characters Like Mario or Peach or some recent movie like the live-action Cruella. They have classics like an entire official Disney Princess line or a full line of alethetic-wear based on DC ladies like Wonder Woman or Harley Quinn.
When you encounter patterns like these, they’re usually pretty straightforward. When you have multi-character patterns, a style letter matches a character. When you have a single character, there may be only one style in the envelope or the outfit is broken up into pieces, like A for the shirt or B for the pants. You can always tell by the drawings how the pattern is broken up.

Let’s take a look at Peach and Daisy. For the most part, both princesses have a very similar dress design. The bodice (top) and skirt are the same shape, so the same pattern pieces are used for both styles. These pattern pieces are labeled “A,B” to indicate these pieces are used for both.
But then you get into the accents and accessories. They have different collars, sleeve accents, and skirt bands. These are all pretty standard, much like the other patterns. Match the style letter to the pattern piece and you got the right accents for your princess.
But there are a few pieces here that look a little strange. You see a few labeled Guide or Accessories, but when you look at the actual drawing, they just look like squares. Take a look at 13, 19, and 20. None of those look even remotely close to what they are. But I can promise you, they are what they say they are.
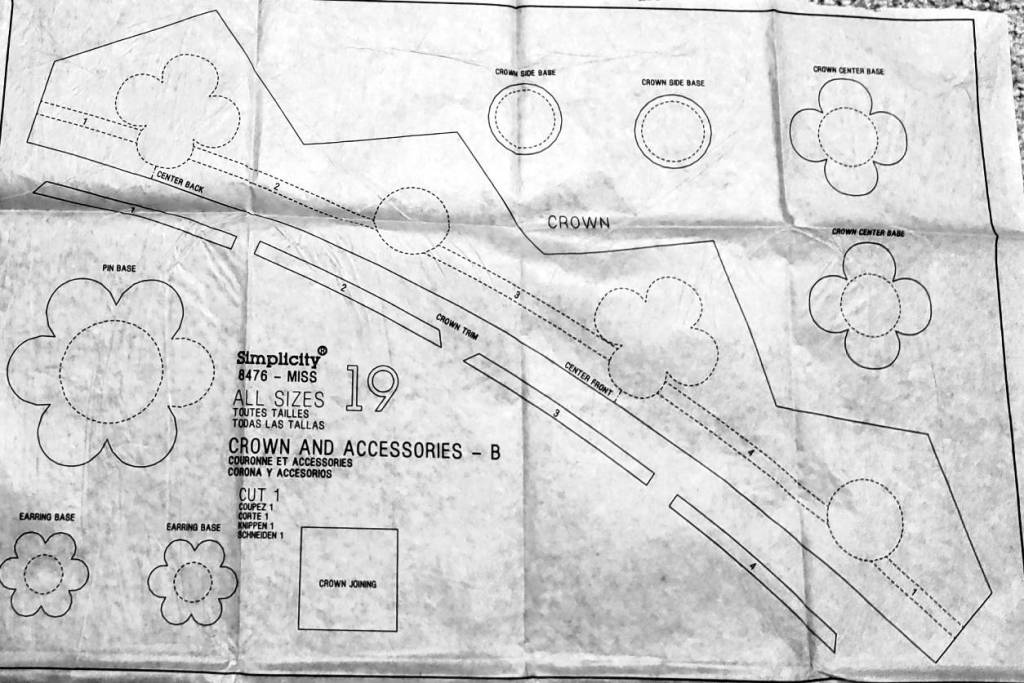
The actual pattern piece itself is indeed square. This makes it easier to find and cut out instead of having to look for a bunch of tiny accessory pieces. It also prevents the pattern piece list from growing ridiculously long.
Pattern piece #19 belongs to Daisy, and if you locate the piece, it has all of her daisy-shaped accessories and her matching crown on that square. If they had listed out all the accessories on this square, it would make the pattern list grow immensely long, so to make it easier, it’s just on an accessory square.
You’ll find guides on costumes primarily, though you might find them on fashion patterns. My Harley Quinn leggings pattern has a guide for her diamonds. A number of cosplay patterns have this as well. Like any other pattern piece, a guide will have a style letter associated with it so you know which one it belongs to. Just match it like the rest of them and you’re good to go!
Wonder Woman – pattern extensions
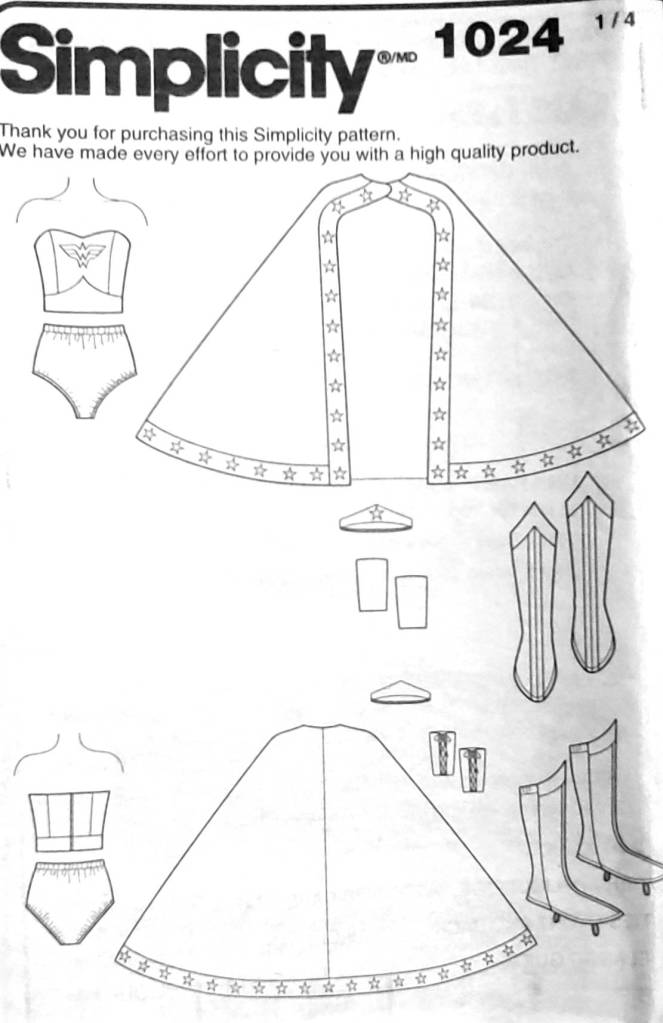
Here’s another officially licensed pattern, this time Wonder Woman based on her classic appearance from the TV show in the 70s. It comes with a corset, panties, boots, accessories, and a full cape.
Unlike the other examples, this pattern is not broken down into style letters. In fact, there are none at all. This pattern makes only one thing: Wonder Woman’s attire. That’s it. That’s the pattern.
When you encounter patterns like this, you’ll need to use the pattern piece guide to determine which piece goes to what section of the outfit. They’re pretty easy to identify, at least. Bustier is the corset top. Cape belongs to the cape. Boots are boots. And so on and so forth.

For a pattern like this, you’ll want to match the pattern pieces to the piece of the costume. So if you want to make only the top, pick pattern pieces 1-7 to make the whole bustier. For boots, pick pattern pieces 10-14.
At the end of the list is all the accessories. Unlike the Mario Princess pattern, the accessories for Wonder Woman are fewer and larger. You have a pair of bracelets and a crown with an applique.
Pattern piece 18 is more like the guides in the Mario Princess pattern. There are a lot of stars for the cape. It’s an entire applique pattern. So all these stars are put onto one big square pattern piece to make it easier for you to cut out all the stars you need in one go instead of giving you a single star and saying something like “Cut 25 stars”.
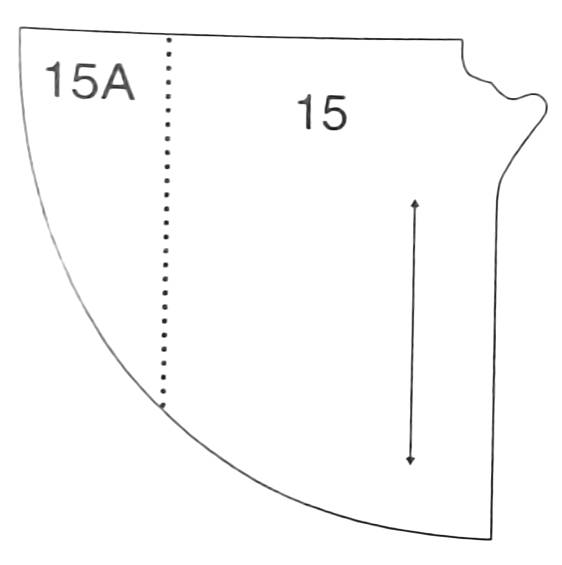
For this pattern, you may have noticed a strange piece, #15. It seems to be broken up into two pieces labeled 15 and 15A. And it actually is two pieces! This is a pattern extension piece.
Pattern paper has a certain width/height to it. It’s pretty standardized across pattern makers, so if a pattern piece is wider or bigger than the pattern paper, it needs to be split into two pieces. This happens with capes and cloaks and sometimes dresses with long trains. Technically by definition, this is one piece, #15. But when you look at the pattern paper itself, you need to find both 15 and 15A, then tape them together at the indicated line.
Costume pattern – custom cup sizes
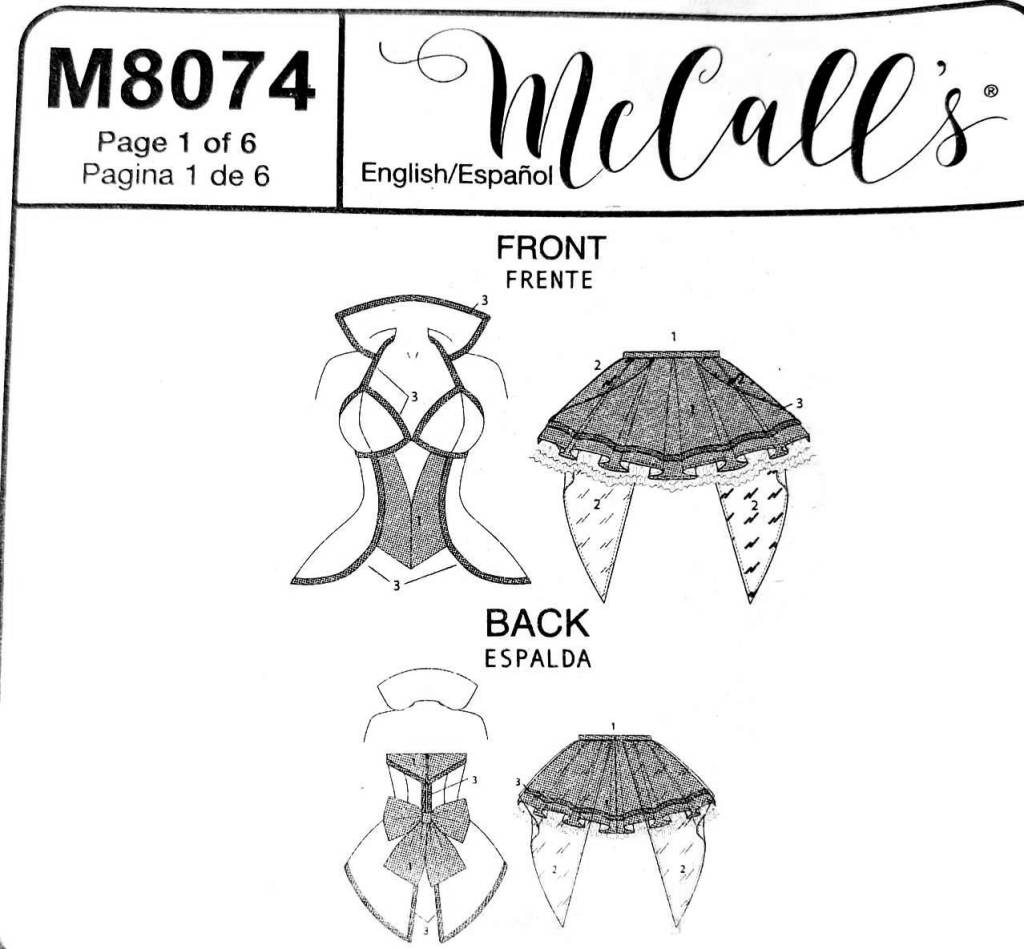
This is a costume pattern from the Yaya Han collection. It has only one costume inside the envelope so there aren’t any style letters much like with the Wonder Woman pattern.
This outfit has a lot of contrasting colors, so the drawing identifies the contrast by numbers. But these numbers don’t have an effect on the pattern piece guide, only when you’re cutting out fabric.
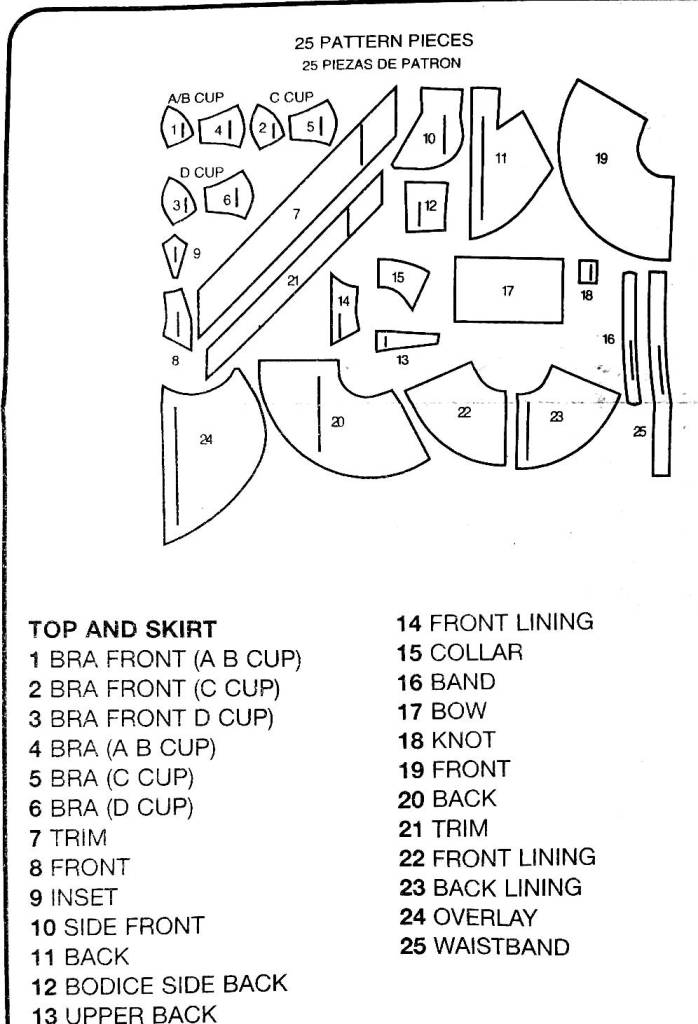
When you look at the pattern pieces for this outfit, they don’t have style letters because there are no styles. Instead, you’ll find all the pieces labeled as to what they are, though some of the pieces do assume you recognize a corset piece when you see it. Thankfully they’re easy enough to recognize by sight, and if there are any questions, you can generally figure it out by what the other pieces are not. There is an additional section on this list that wasn’t in previous patterns: custom cup sizes.
Custom cup sizes were mostly found in bra and corset patterns but more and more you’ll find them in everything from decorative jackets to dresses and costumes.
This particular pattern is made to fit like a corset, so the top is customizable to better fit your form and shape. Too big of cups and it’ll sag. Too small and you’ll spill out. So you’ll need to find the size that fits you.
Now, these sizes are not commercial sizes. It’s all done by measurements. Inside the pattern is a guide on bust measurement specifically for custom cup sizing. It’s pretty standard across patterns, so generally, your size for one pattern will be the same for another. Even so, it’s always a good idea to check and make sure you know your exact size before picking out the pattern pieces.
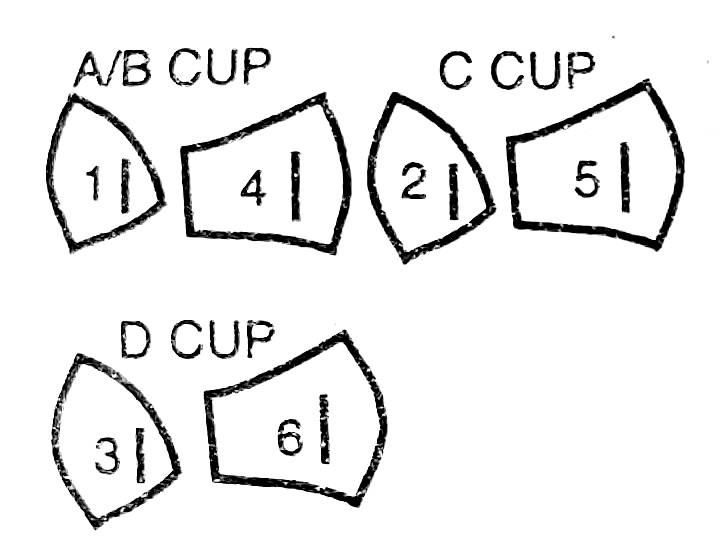
When looking at pattern pieces for each cup, you only need to cut out the one that fits your specific size. If you look at the list of pieces, you’ll see that 1, 2, and 3 are all Bra Front pieces but in different sizes. Same with 4, 5, and 6. Each size is listed here, but it’s also listed on the image as well for quick reference.
This particular pattern only has two pieces per cup size, but some patterns may have several depending on how it’s made. Corset patterns tend to have more due to structure, but something like this costume pattern may only have two. The pattern piece guide will always list all of them, so as long as you check the guide, you’ll always have what you need.
I hope this helped in understanding the pattern piece guide. The more you read guides, the more familiar they will feel, so keep at it. You’ll want to read the guide with each pattern you use, even if you’ve used it before. It saves you the trouble of trying to interpret which piece goes to what by reading the pattern pieces themselves.
