New to sewing? Confused about a stitching or pattern term you’ve found? Can’t remember what that stitch looks like? Hopefully this handy index will help you out!
This index includes stitches, fabric terms, sewing techniques, tools, and pattern terms. It is organized alphabetically and includes alternate terms and names. Use CTRL+F or CMD+F to find the term you’re looking for or scroll through and see what catches your attention! This guide may be updated on occasion with new terms, pictures, and tutorial links.
2-way and 4-way stretch
Directional stretch is a property of stretchy fabrics like knit and spandex. Stretch is determined by how much give the fabric has and in which direction. Your directions are along the crossgrain (across the fabric left to right, selvage to selvage) and along the grainline (up and down), totaling to four directions.
To determine stretch, pull the fabric along the crossgrain then pull it along the grainline. If it pulls like a pair of yoga pants, it has stretch. If it pulls about as much as a cotton bedsheet, it does not have stretch.
Knowing the stretch of your fabric is important. Certain patterns will call for certain stretch directions and percentage. Most patterns will have a stretch guide along the top or side of the envelope to tell you how much a fabric must stretch to be suitable for the pattern. Some patterns are not suitable for 2-way stretch but most will be suitable for 4-way stretch. So here’s what these terms mean:
2-way stretch means that the fabric stretches crossgrain but does not stretch along the grainline.
4-way stretch means the fabric stretches both crossgrain and also along the grainline.
Backstitch
A backstitch is a stitch when you use the reverse button or lever on your sewing machine and stitch backward. This type of stitch can also be called a reverse or reinforcement stitch.
While you can feasibly backstitch most stitches on a sewing machine, it is usually used with a straight stitch. It is generally not used with a stay stitch or a zigzag stitch.
Backstitching is used to strengthen the end of the stitch. By backstitching over your straight stitch, it prevents the threads from unraveling once you snip the tail threads. You use this to secure any start or finish of a stitch.
Some machines do not have a backstitch button. Instead, they will have a button that sews stitches in place, not moving the fabric forward or backward. This button serves the same purpose as creating a backstitch.
Basting
Basting is the process of temporarily holding two pieces of fabric together. This prevents slipping or shifting while you’re working with the fabric. Two methods of basting include using basting spray and a stay stitch (also called a basting stitch).
Basting spray
Basting spray is a type of spray glue with a temporary bond. It is very tacky and lets you baste two pieces of fabric or accents together. If you don’t want it to move while working on it, you can baste it down. Some basting sprays simply lose their tack over time. Others will vanish in the wash.
Basting spray is useful when working with large areas of fabric or with accents such as ribbons. If you want it to stick and not move, use some basting spray to lay it on the fabric while you work with it and sew it down.
If you are looking to baste seams, try a stay stitch instead.
Basting stitch
Also called a stay stitch. Please see stay stitch for more information.
Bias
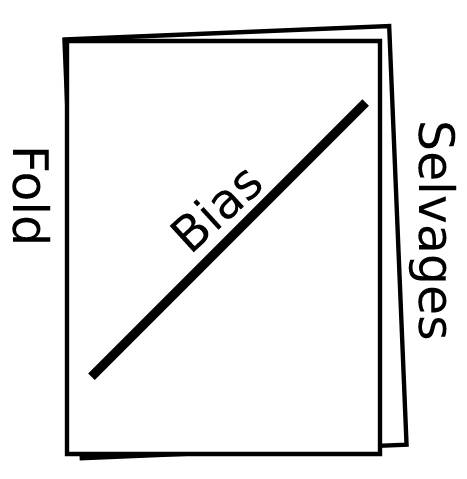
Bias is a property of fabrics, determined by the weave of the fabric. The bias sits diagonally on the fabric and has a bit more flexibility than the grainline or the crossgrain.
Bias tape is made by fabric cut on the bias and is good for adding piping and edges to cosplays. You can also heat form it with an iron, bending it around loose curves.
When making your own bias tape, you will want to cut it along the bias and not the crossgrain or the grainline.
See also grainline and crossgrain.
Bias tape
Bias tape is strips of fabric cut along the bias then folded. It is usually made of cotton. You can buy it packaged at fabric and craft stores or make it yourself. Bias tape is often used for finishing raw edges or for decoration. Cosplay uniforms love decorative edges and accents, and bias tape is a good go-to for this style of accent.
Bias tape generally comes in two types and examples of what they’re used for:
Single-fold bias tape – each raw edge is folded in, wrong side to wrong side, then pressed. This type of tape more closely resembles a cotton ribbon when sewn down. This is good for decorations that need to be thinner and decorations you wish to shape with an iron.
Double-fold bias tape – single-fold bias tape folded in half, then pressed. This type is good for finishing edges. Because it is folded over, you can side the raw edge inside the bias tape fold and sew the bias tape down. This prevents the raw edge from fraying. Double-fold bias tape is also good at hiding zippers in cosplay.
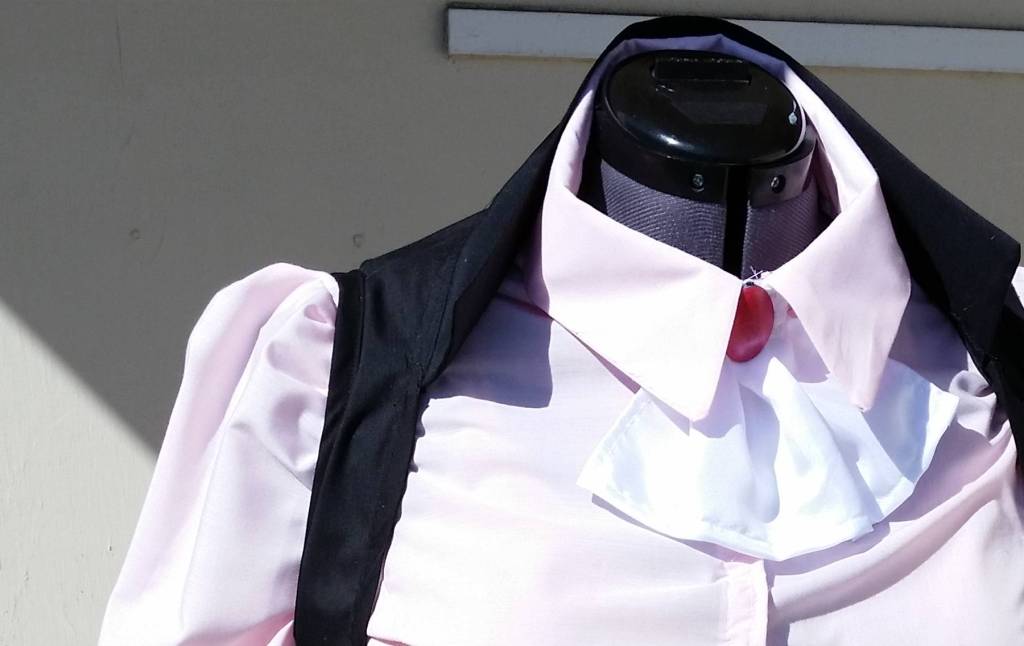
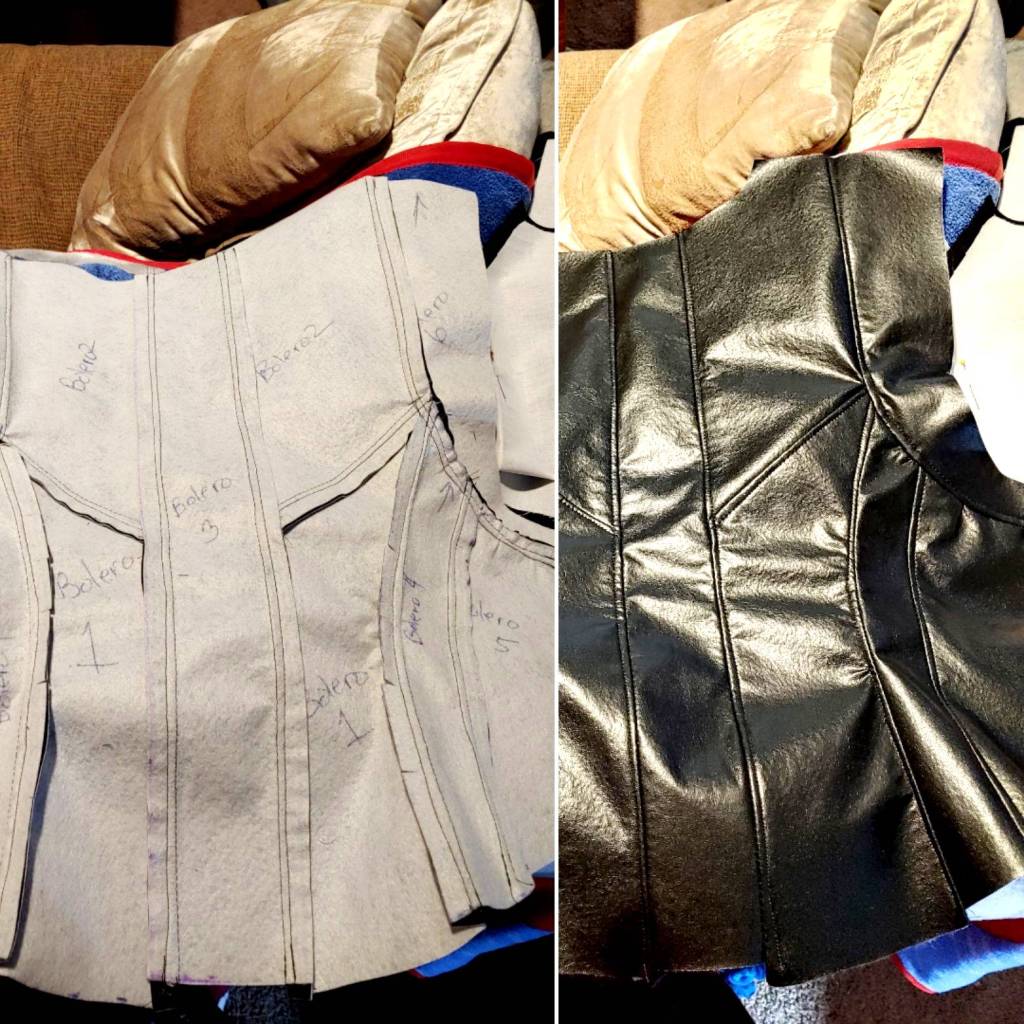
Boning
Boning is something that can be used to add stability and shape to a cosplay. It is thin and comes in metal or plastic/polyester. Traditionally boning is used in corsets, but it can be used in many places where you need to strengthen the fabric. Originally it was made of bone (this is where the name comes from).
Metal boning is your stiffest boning and is used in corsets and places where you need the strongest amount of support. Metal boning must be cut with special tools and requires caps so the metal doesn’t dig into your side. If you want to make a corset that holds everything up without any assistance or underpinnings, you’ll want metal boning.
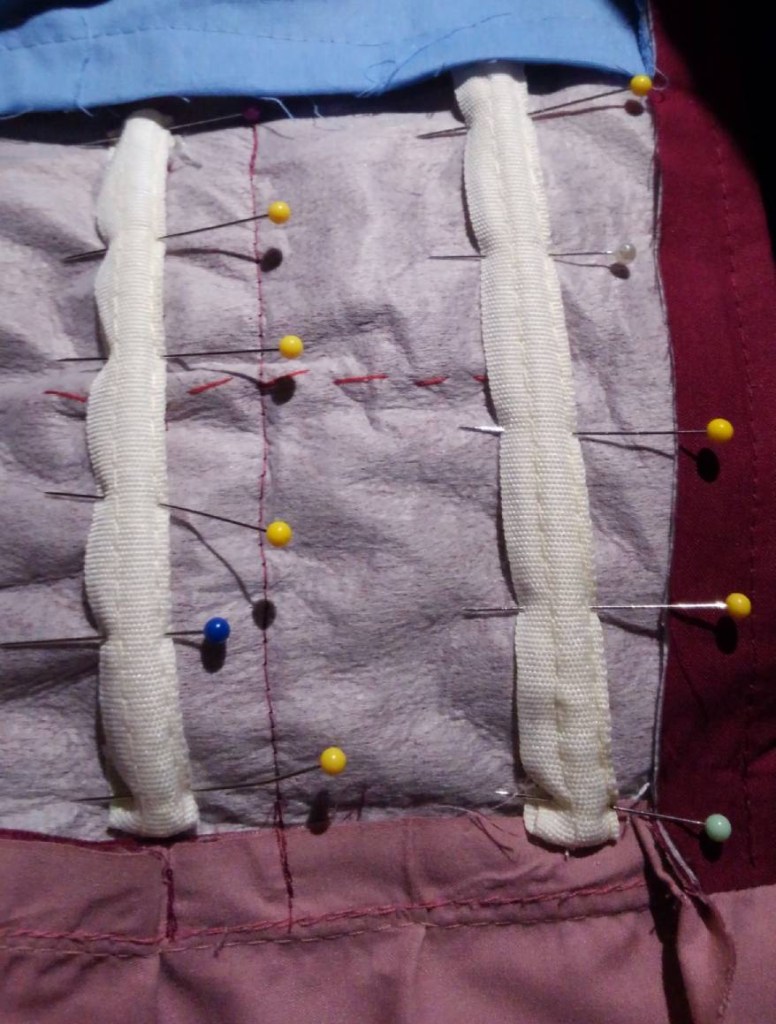
Plastic or polyester boning comes in a few varieties and can be cut with scissors. You can slip it into bias tape or ribbon casing to keep the plastic from digging into your skin. It’s not strong enough to hold a corset up by itself without underpinnings, but it will help keep its shape. It can be used in combination with interfacing, duck canvas, or other stiff materials to support corsets and large accessories.
In cosplay, plastic boning is an incredibly versatile material. You can use it to support large collars or shape giant bows. You can also use it to lightly shape corsets and large flat skirts. With thick boning, you can use it to make cage and hoop skirts.
Boning can also be used to support eyelets for corset and costume laces. You can also use it to stiffen and hold up obi and other large waistbands to prevent them from sagging.
Cording Method (ruffles)
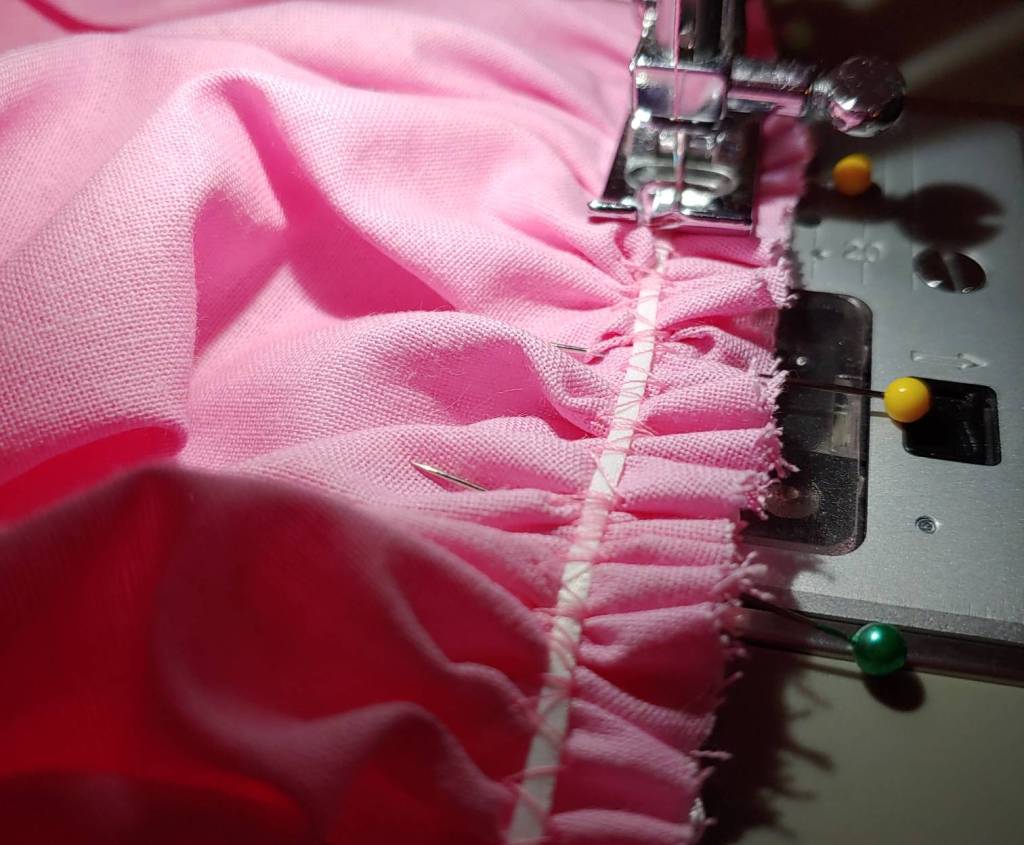
When making petticoats or ruffles, you can use a cord to create the bunched effects. This method involves sewing a zigzag stitch over a cord and then pulling the cord to make the ruffles. This method is very useful with long stretches of ruffles where pulling the bobbin thread could potentially strain your fingers.
When using the cording method, you’ll want a very thin cord or 1/8″ ribbon plus a cording foot to ensure that you evenly feed the cord onto the fabric and don’t sew over it. One end of the ribbon is sewn down, leaving the other side loose. You pull the ribbon on the loose end, creating gathers.
Corner pusher
Also known as a point turner. See point turner for more information
Crossgrain
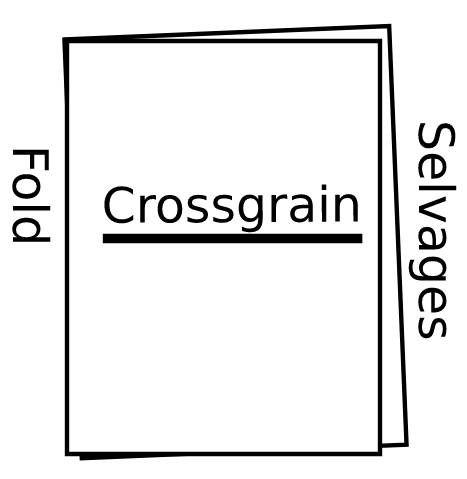
Crossgrain is a property of fabric related to the direction of the threads in the fabric. The crossgrain runs perpendicular to the selvages and the grainline.
The crossgrain is not marked on pattern pieces, but it is important where it is when testing the stretch of spandex and knit fabrics. On the back of a pattern envelope for a spandex or knit pattern will be a guide to measure how far your fabric stretches along the crossgrain to ensure it has enough stretch to work for the pattern.
Cut on fold
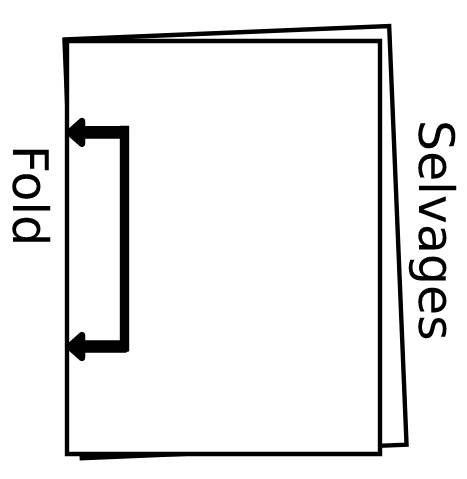
On patterns, you may find something like “Cut on fold”, “place on fold”, or similar words. This is accompanied by a marking, usually double arrows connected by two bars. In some patterns, the marking is a circle that is half on the pattern piece and half off.
The marking indicates where to place the pattern piece against the fold. To find the “fold” of the fabric, matching the selvages (raw edges) together and lay the fabric flat. This will form the fold of the fabric.
Pattern pieces with this marking are often ones that only require one of them to be cut out. To save fabric and to make cutting easier, only half of the piece is provided and then you cut it on the fold to make a whole piece. This is used for things like the front of a dress, a waistband, or the back of a tunic.
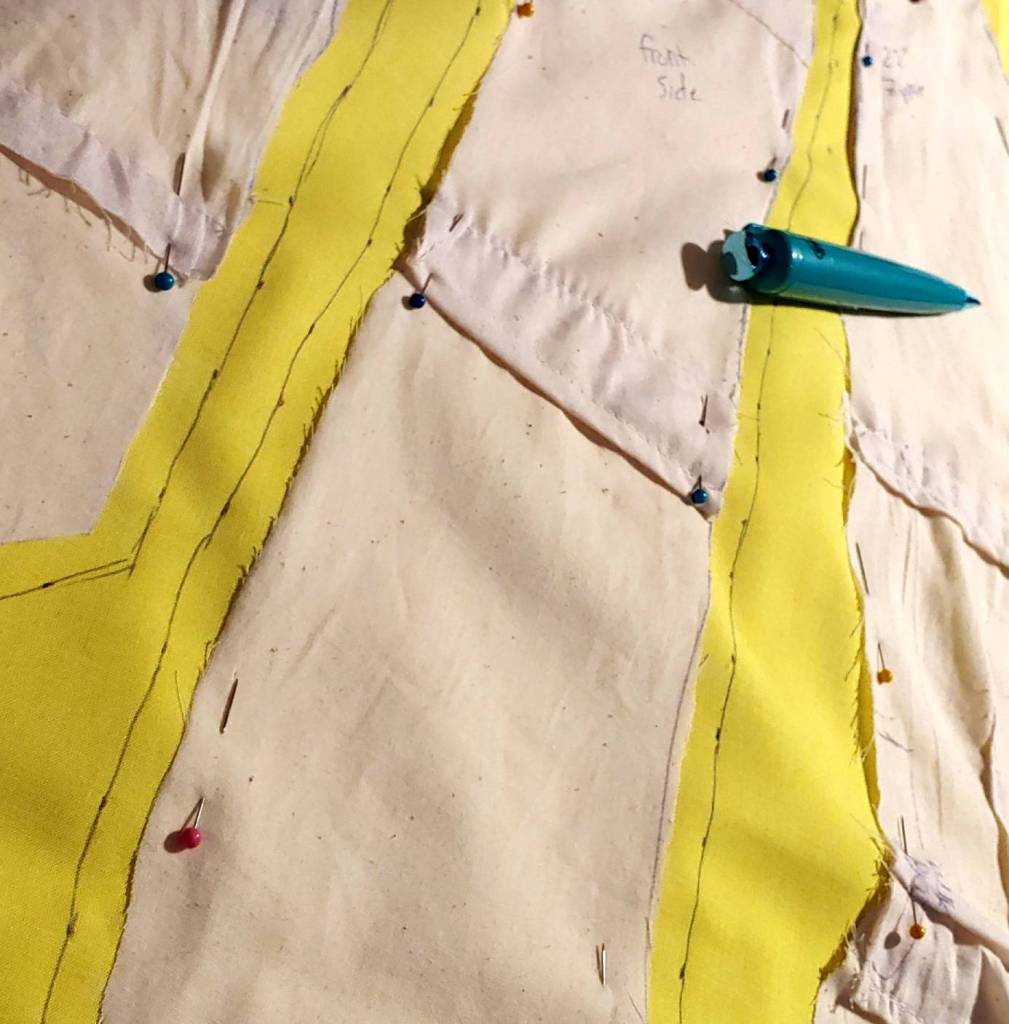
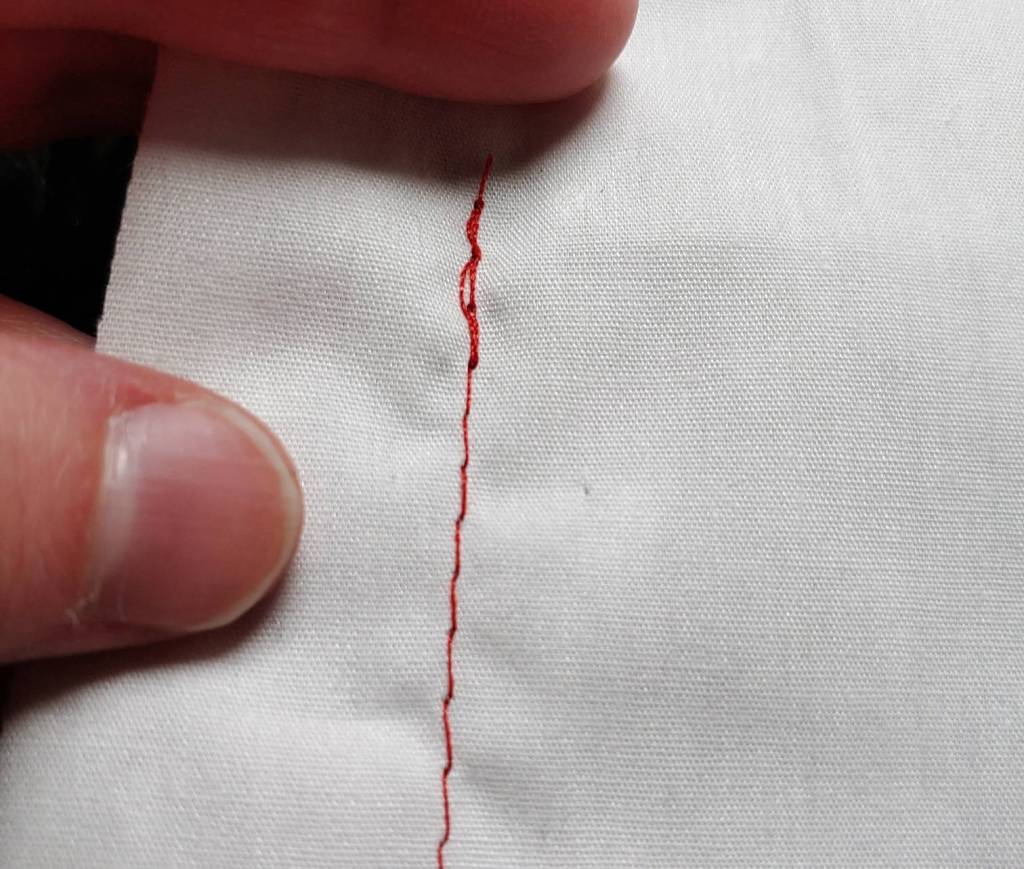
Dart
A dart is a fold of the fabric sewn in as a seam to provide shaping for a garment. The most common shape for a dart is a triangle. You can commonly find darts along the bustline to provide curves in jackets and shirts or along the back of pants to provide room for the backside. You can also find more diamond-shaped darts along the back or front of dresses which do not have shaping seams.
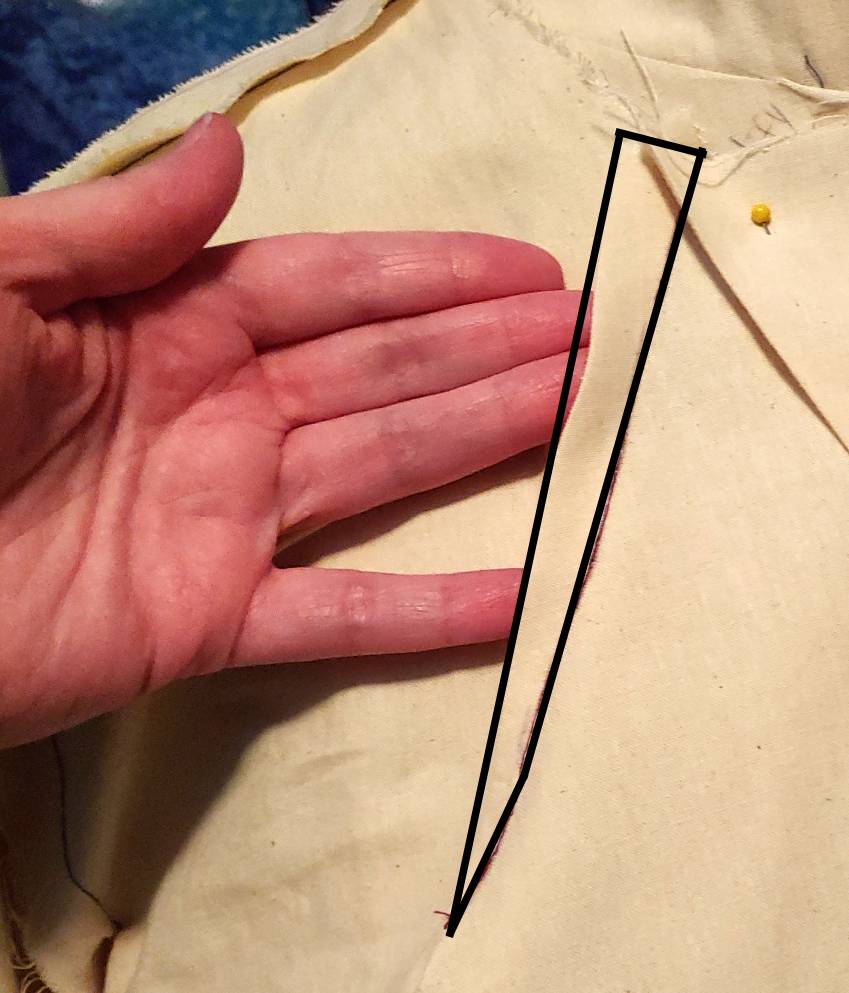
When creating your own cosplay patterns or tailoring premade patterns, adding darts may be necessary to provide the perfect fit for your body shape. The most common places to add darts are to the side of the bust and right below it to the waistline. You may also commonly add them along the back or at the waistline of pants or a skirt.
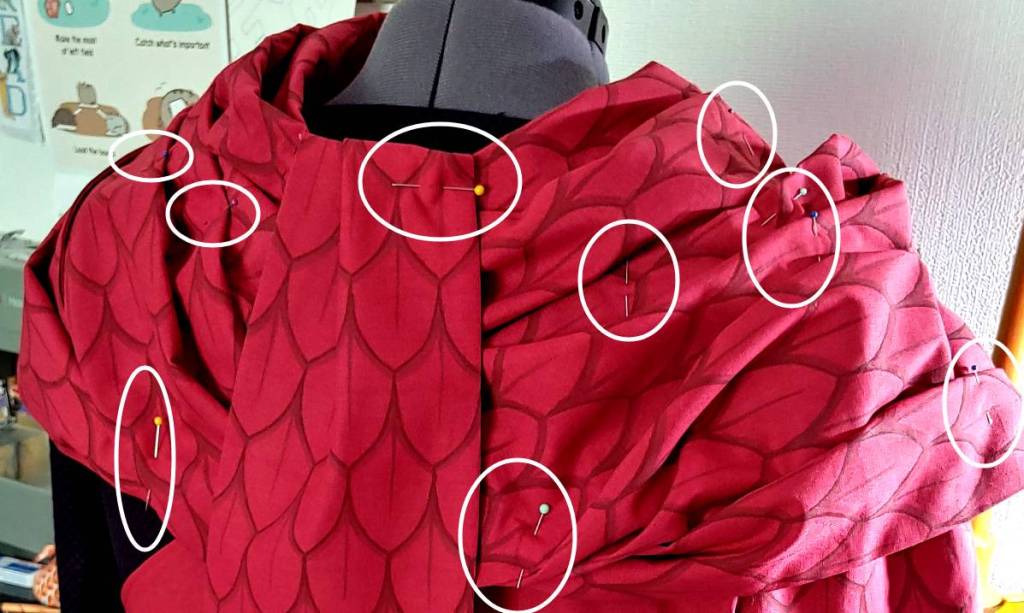
However, outfit designs in games and anime don’t always make logical sense, so you may need to add unusual darts into the cosplay to make it sit properly. When adding unusual darts, such as at the neckline of a robe, you’ll want to pin a dart and test out the fit before sewing it down in the final outfit.
See pleat for a similar kind of fold.
Eyelet

An eyelet is a round hole you thread cord, string, or laces through. They can be practical such as for shoelaces or lacing the back of a corset, used for belt buckles, or be decorative and serve no structural purpose other than to look cool. Eyelets will need to be reinforced to prevent unraveling and the laces digging into the fabric. Eyelets in thick leather and other heavy-duty materials don’t necessarily require such reinforcements.
A popular type of eyelet reinforcement is small metal rings that come in two parts. Typically they come in metal colors such as golds, silvers, bronze, and black and can be found in a variety of sizes. You can put eyelets into an outfit using a hammer or with a pair of eyelet pliers. You can put a lot of pressure on these eyelets with lacing and corsetry as long as you have the proper support such as boning or interfacing.
Eyelets can also be reinforced with embroidery. The eyelet stitch is mostly ornamental though you can lace them up much like with metal ones. Embroidered eyelets are a bit more delicate and do not withstand the yanking of a tightly closed corset and may lose their shape if put under pressure.
Something that looks like an eyelet but isn’t, is a grommet. It too can reinforce eyelet holes, but it is made of heavy metals and is typically seen in curtains.
Gather
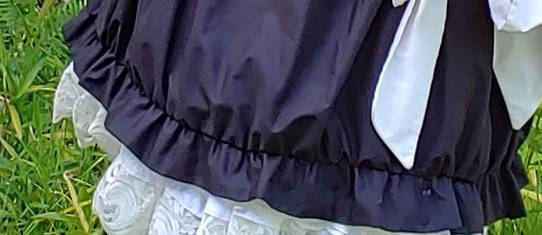
Gathering is the process of bunching fabric together. Unlike a pleat which involves folding or tucking the fabric, a gather is made by pulling a cord or the bobbin thread, using the differential feed on a serger, or other similar methods which involve pulling the fabric into a bunch.
Gathers are found in a number of places in clothing sewing and in cosplay. Here are some places you might see them:
- Ruffles on a petticoat (layers and layers of gathers)
- Decorative accents on a skirt or a dress (magical girl shows love these)
- At shoulder seams or other places where one pattern piece is larger than the other. You may see “gather” written on a pattern to tell you where to bunch the fabric to make it fit.
Grainline
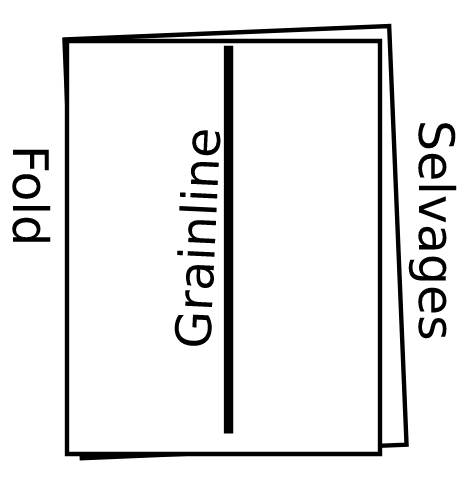
The grainline is a property of fabric related to which way the threads are running. The grainline runs parallel to the selvages of the fabric, essentially up and down the fabric, and runs through the entire bolt of fabric no matter if it’s cut at 1 yard or at 15.
For assembled clothing, you may never notice the grain of a fabric until something is cut against it or in the wrong way. This will cause poor fit issues and sometimes the fabric will even sag.
When cutting fabric using patterns, the grainline will be marked on the pattern with a line with arrows on both ends. When placing this piece on the fabric, make sure this line runs parallel to the grain of the fabric to ensure the finished cosplay will fit properly.
See also crossgrain and bias.
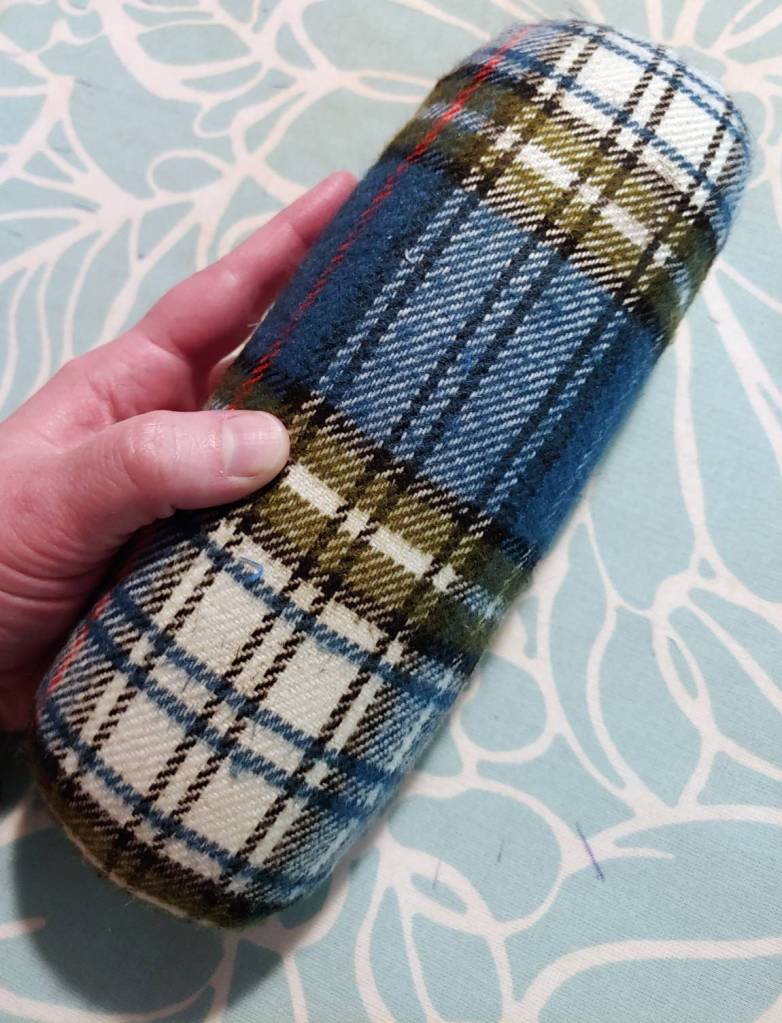
Ham
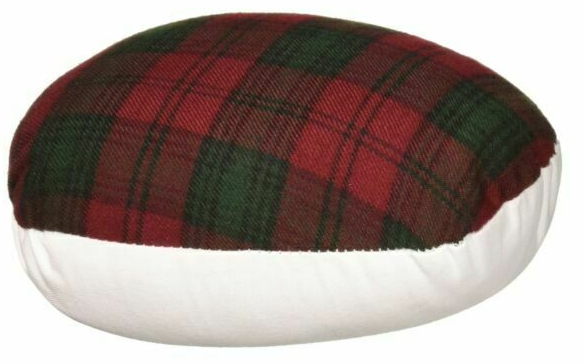
Unlike the name, this is not dinner. This is a fat stuffed ironing roll that goes by a few names: tailor’s ham, pressing ham, even a potato. The ham is good for ironing curved seams such as collars and shoulder seams.
Because of a ham’s shape, you can turn the ham sideways, sit it tall, or lay it flat on its back to get the perfect form for your curve to keep it from creasing. It is heat resistant so you can iron it on the highest setting without damaging it.
See sleeve roll for a similar ironing roll.
Hem
A hem is created when fabric is folded down on top of itself then sewn down. The original definition of the word meant “border”, so you’ll find a hem at a border of your garment. You can find a hem at the bottom of a garment, the edge of a sleeve, or the bottom of a pant leg.
Hemming ruler
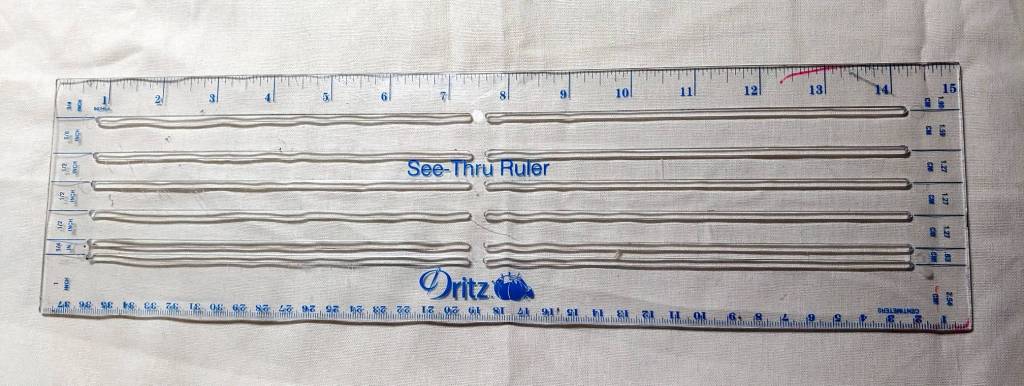
This type of ruler will become your best friend when you start altering patterns and making your own. It is a wide see-through ruler that has common widths marked as cutouts for you. This ruler is used to measure hems and seam allowances but also works as a sturdy ruler when working with any kind of markings or measurements.
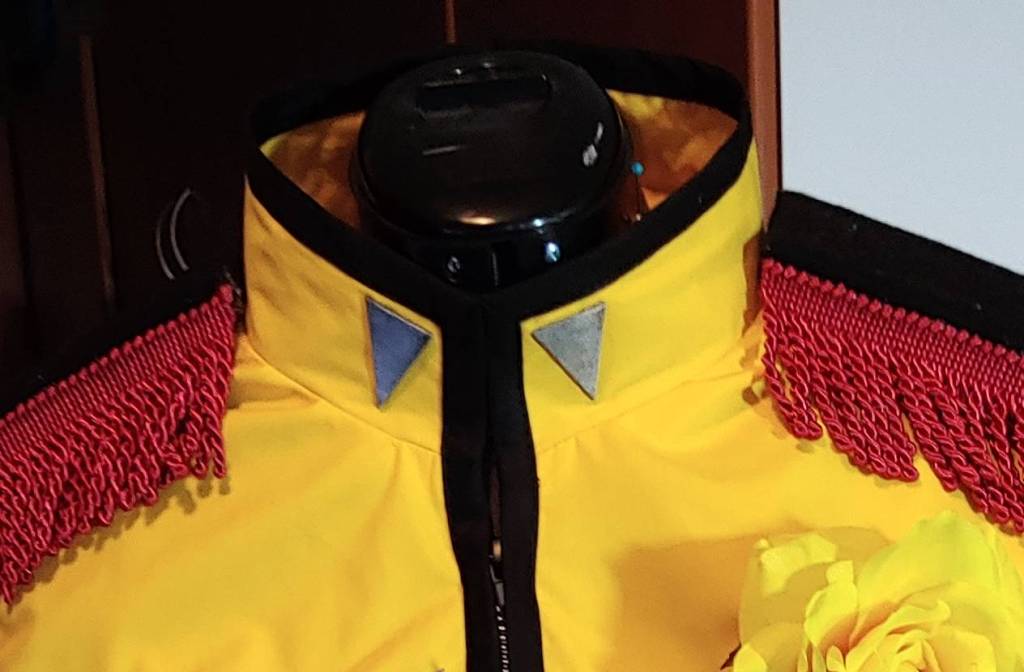
Horsehair braid
Horsehair braid is a type of nylon stiffener that looks like a lattice fence. It comes in various widths and traditionally is used in hems to give skirts and sleeves a large flounce and some volume. It is not as strong as boning and cannot hold a corset up.
Because of its stiffness but also minor flexibility to work with shapes, horsehair braid is incredibly useful for cosplay. Horsehair can be used to stiffen collars and even support massive decorative collars when working with other stiffeners. You can add horsehair to a large bow to give it a rounded shape. If an accessory needs stiffness but is too round for boning or needs some flexibility, horsehair can help.
Interfacing
Interfacing is a material that is used to stiffen fabric. It is a rather large umbrella term that spans from light interfacing used to shape dress shirt collars to buckram in hats and heavyweight upholstery interfacing. You can find it precut in rolls or by the yard at fabric stores. You can sew through it and is generally washable. Do not use a hot iron on the interfacing itself as it will stick to your iron and gum it up.
There are generally two types of interfacing. Iron-on interfacing comes with bumps on one side that makes it stick to fabric when activated by heat. Sew-in interfacing does not have bumps and must be sewn into the garment to prevent it from moving.

When looking to purchase interfacing, you’ll need to look at the weight and what you’re using it for. If you buy the interfacing in precut rolls, the label will likely have common uses for the particular weight. If buying from a bolt at a fabric store, the bolt will have a brief description of what the weight is used for, and often a fabric store employee can help you out.
When looking at patterns, it will tell you the weight of the interfacing you need and how much. But if you’re creating your own pattern or accessory, you’ll have to judge what weight you need by what you’re doing. You can always double up on interfacing with multiple layers but you cannot reduce the stiffness.
In general, you can judge what you need by the following scale:
- Featherweight: collars, buttons, flexible sleeve cuffs, waistbands for jeans
- Middleweight: stiffer sleeve cuffs, collars that need to stand up, eyelets, lightly lined corsets
- Heavyweight: obi, corsets, smaller stiff accents
- Upholstery / home decor: massive bows, large accents that do not move, hat brims (used with wire)
- Buckram: hats, large accents
- Stabilizer: backing for embroidery and sewn details that need extra strength
Overlock stitch
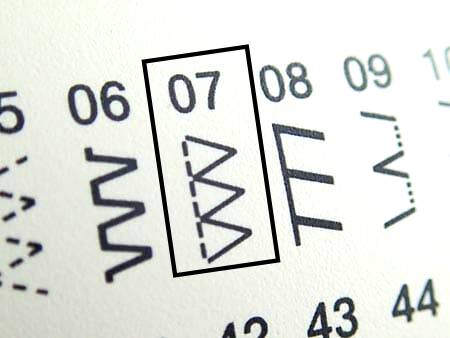
An overlock stitch is a finishing stitch used on the edge of the fabric to prevent fraying. This type of stitch can be performed by a serger (more typically called a serged stitch), by hand, and by some sewing machines.
If you look at the stitch, you can tell which machine (or hand) made the stitch. Sewing machines make an overlock stitch using diagonals or lines. A serger will make a stitch using a looped pattern.
Much like a serged stitch, an overlock stitch is stretchy and prevents fraying. This makes it a good option for working with stretchy fabrics and for preventing fraying on anything that can shed.
An overlock stitch on a sewing machine tends to be more narrow than one on a serger. Because a sewing machine does not have a fabric knife like a serger does, the seam allowance must be trimmed beforehand.
An overlock stitch usually requires an overlock or a type of hemming foot to properly get the stitch next to the edge of the fabric so the overlocking can do its magic and prevent fraying. Check your machine’s manual for which foot you need.
Check out a serged stitch for a finishing stitch done by a serger or a zigzag stitch for another stretchy machine stitch.
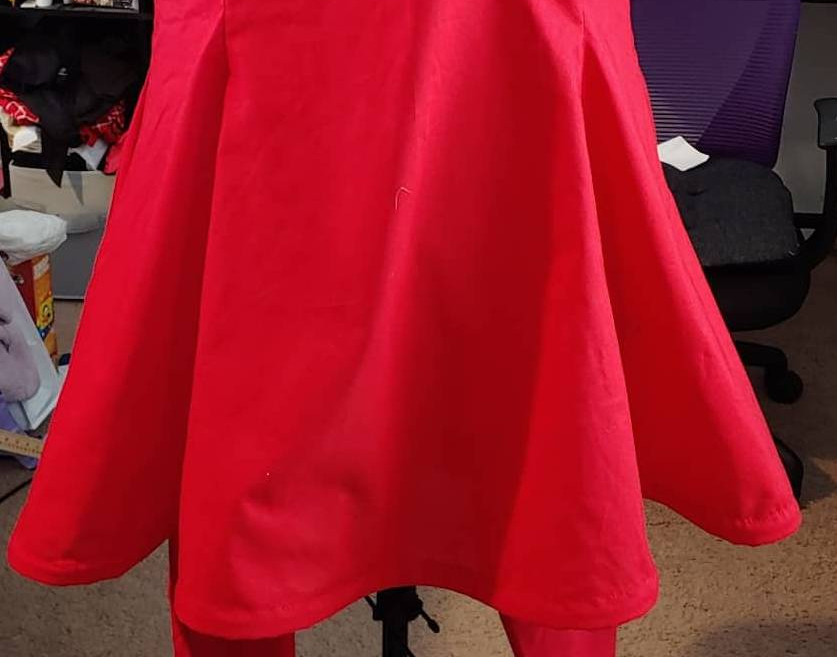
Pleat
A pleat is a fold of fabric only partly sewn down. It is often sewn into a seam, a waistband, or a singular point. Pleating is a multipurpose technique used in both clothes-making and cosplay. Let’s talk about a few common uses.
Pleating can be used to get a larger piece to fit into a smaller one. This technique is sometimes used with fitting poofy sleeves into a regular sleeve hole of a shirt such as for a school uniform. You can also use pleating to fit large sleeves into a sleeve cuff or puffy pants into an ankle cuff like with harem pants. In these cases, either pleating or gathering can be used.
Pleating can form a fan effect. This is useful when making cravats or other fan-shaped accents. Simply pleat along one end by making folds then gather all those folds close together to form a fan. All the pleats will be sewn together then often accented with something to hide the pleated edge.

Pleating is commonly used in anime skirts. School uniforms, sailor guardian fuku, and everything in between likes using pleats. There are multiple ways to pleat a skirt, and each is named after the shape that the folds create. Commonly you’ll see an accordion pleat where all the pleated folds are facing one direction and look like a folded-up accordion. Sailor guardian skirts sometimes use accordion pleats in two directions. Box pleats look like a box folded closed.
When working with a pleated skirt, to get that crisp anime look, iron down your pleats flat. For some styles of pleats, you can sew the top of the pleat near the waistband so it flairs out against your body.
See dart for a sewn-down type of fold or gather for a related bunching technique.
Point turner
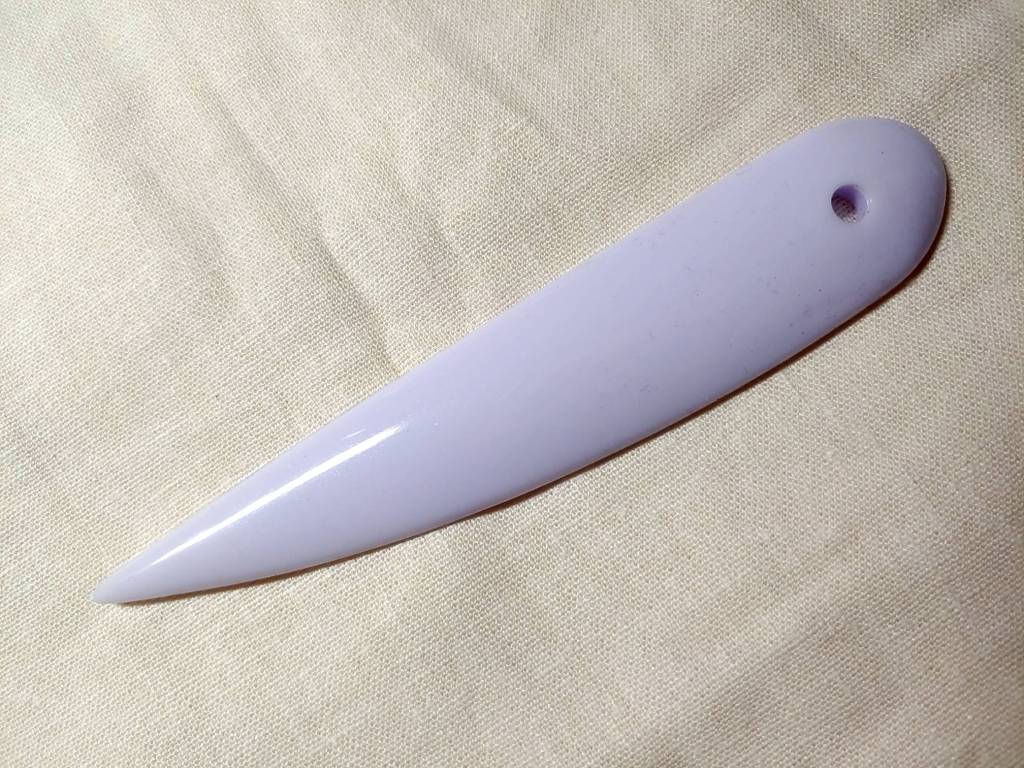
A point turner, sometimes called a creaser or a corner pusher, is a teardrop-shaped plastic tool. This tool helps you push seams and corners out and makes them crisp. If you’re making collars or large bows or anything that has a corner in it when you turn it right-side out, a point turner will make pushing corners out much easier.
When you use a point turner, you slip the tool inside your collar, accessory, or any edge with a corner. Gently push the point turner into the corner and it will help push the fabric outward for a nice corner instead of a rounded, sometimes blunted point. You can also push the flat side of this tool against folded seams to push them completely outward before ironing flat.
Potato
A nickname for a ham. See ham for more information.
Reverse stitch
Also called a back stitch. See back stitch for more information.
Right side of fabric
The right side of the fabric refers to the side of the fabric you want facing outside when turning the finished garment right side out.
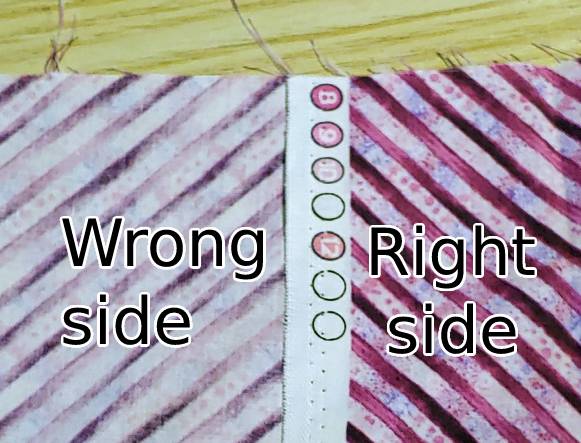
Determining the right side of the fabric depends on if you’re working with prints, brocades, synthetics, or solid colors. For the most part, the right side of the fabric will be more vibrant or may be shiny. But other fabrics do not have a right or wrong side and you can use either. Here are some examples of how to determine right side:
- printed fabrics: the brightest and most vibrant colors and patterns
- brocades: full detailed designs without any loose threads
- synthetics (satin, synthetic silks): the shiny side. Sometimes this side is also smoother
Examples of fabrics that do not have a right or wrong side are solid colors in quilting cotton, fleece, flannel, knits, some crepes, and some spandex.
Rotary cutter
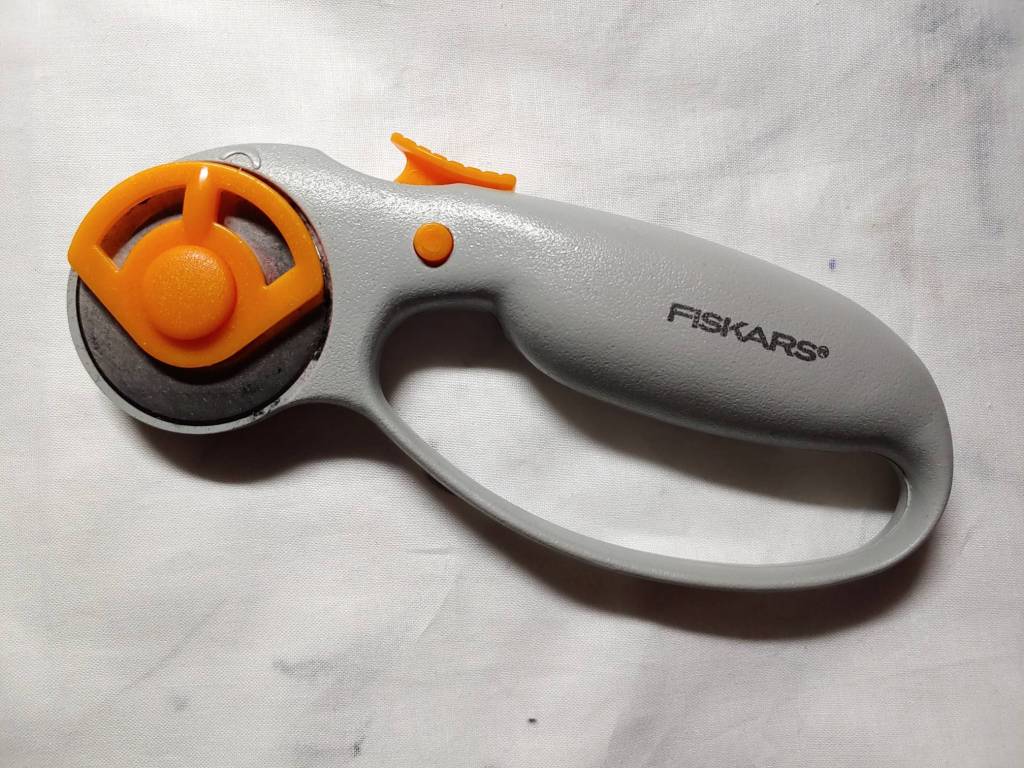
A rotary cutter is a cutting tool with a sharp wheel that looks like a pizza cutter. This particular tool is paired with a specialized plasticky cutting mat, usually one that self-heals from the rotary cutter blade. A rotary cutter blade is incredibly sharp and comes with a safety button to withdraw the blade so you don’t slice your fingers when you set it down.
This cutter is used to cut patterns out of fabric. Unlike scissors, it does not put any pressure on your hand or your wrist as there is no cutting or snipping motion involved. If you have any wrist problems or your hand gets tired from cutting out patterns, a rotary cutter may be a good investment for the long run. Make sure to get a good self-healing mat along with it.
Seam
A seam is a join of two or more layers of fabric, connected by stitches. A seam is a building block of a garment, allowing you to connect pieces together and form clothing and cosplay.
There are multiple types of seams, defined by how it is stitched and where it is placed in the garment. There are also multiple ways to finish a seam, everything from running it through a serger to topstitching the seam down.
The most common type of seam stitch is a plain seam. This is two or more pieces of fabric sandwiched together then sewn with a straight stitch. This will be the building block for most of your projects.
While most of the seams of a garment are obvious by the name (shoulder seam, center back seam, side seam), cosplay sometimes calls for decorative seams. These seams don’t necessarily serve any purpose for construction other than looking cool. When drafting extra seams, you will need to add seam allowance before joining the seams together. This ensures that the pieces have the proper fit and your cosplay doesn’t end up too small.
Seam allowance
A seam allowance is the distance between the edge of a cut piece of fabric and where the seam stitches will sit. For store-bought patterns, the standard seam allowance is 5/8″ and will be included in the pattern pieces. Some seam allowances may be smaller and will be marked on the pattern or on the instructions.
When creating your own patterns or adding extra seams into your cosplay, you’ll need to add your own seam allowance. Standard is 1/2 to 5/8″. Anything smaller can risk the weave unraveling or ripping if the cosplay is yanked or tugged. You can use a standard ruler or a seam or tailor’s ruler to add allowances to your pattern pieces.
Seam ripper

A seam ripper is a thin, sharp, pointy tool that gets underneath the stitches or in between the fabric so you can rip the threads and pull the seam. Because of its size and shape, this tool makes ripping stitches much easier than using thread or embroidery scissors or attempting to rip the seam by pulling the fabric.
Seam rippers come in a variety of sizes, everything from travel size in travel repair kits to wide-handled ergonomic size. Having at least one in your kit is good to correct mistakes and pull apart custom pattern pieces for cutting out of the final fabric.
Selvage

A selvage is a part of the fabric. The selvage is the edge of the fabric created by the manufacturer to prevent unraveling. This edge is often rough or ridged, sometimes printed with color or copyright information. Selvages on spandex and knit sometimes have holes in the ribs. Selvages on pile fabric like velvets and furs may not be fuzzy to keep the pile from falling off the edges.
Some fabrics do not have a distinct selvage. However, they are still considered to have one at the edge of the fabric to make patterning and finding the grainline easier.
Serged stitch

Also called an overlock stitch, a serged stitch is a type of stitch created by a serger. It is used to finish the edges of the fabric to prevent fraying (check the inside of your t-shirt!) as well as a stretchy stitch that can move and stretch with spandex and knit.
This particular type of stitch isn’t created with a spool of thread and bobbin. Instead, it is created using multiple spools, anywhere from 2-5 spools depending on the stitch and machine. The serger uses 1-2 needles with loopers that move back and forth and look more like someone doing very intense crochet or knitting.
Because of the loopers, serged stitches are very flexible and are the preferred stitch for spandex and knit fabrics. You can yank this stitch and it will generally stay together. If you yank a straight stitch, it will tend to pop.
Serged stitches are considered a finishing stitch because the serger trims the fabric then stitches up the edges to stop fraying and make the seams look nice. Because of this, serged stitches are incredibly tedious to rip out if you make a mistake. It is recommended that you use a stay stitch before serging to ensure all your fabric pieces are in the right place.
If you do not have a serger, check out a zigzag stitch for another stretchy stitch. Some sewing machines will have an overlock stitch, and it will look more like zigzags or angles instead of loops. It is also a useful stitch for stretchy fabrics. You can also do an overlock stitch by hand.
Sleeve board
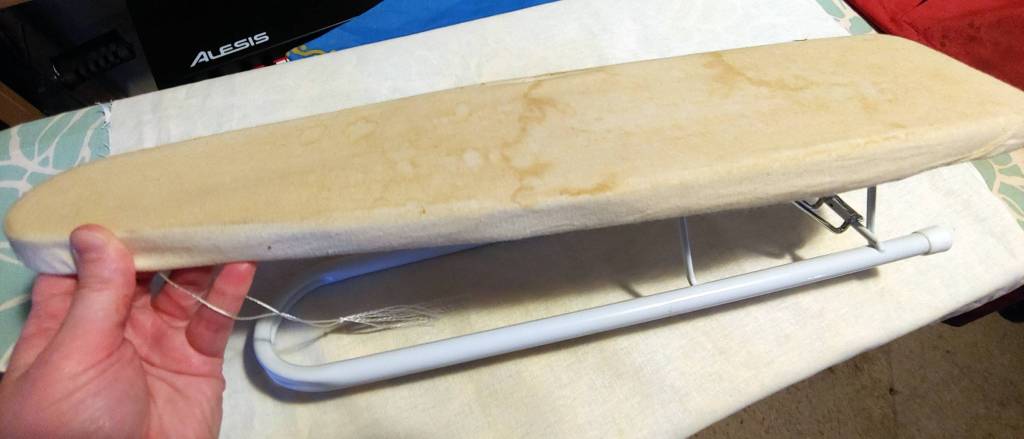
A sleeve board looks like an ironing board that got shrunk in the dryer. It is a small board that is used for exactly what it sounds like. Sleeves! This board is very useful for any small seams that you can’t fit around a normal ironing board. Sleeves, pant legs, and accessories like pouches and bags.
Sleeve roll
A sleeve roll is a long stuffed ironing roll. Because of its long round shape, it allows you to iron sleeves, shoulder seams, and pant legs without creasing the sides or the other side of the sleeve or pant leg.
It also has a rounded shape so you can use it for ironing curves. Small curves such as sleeve cuffs can fit right over a sleeve roll, and you can roll the sleeve roll as you iron each side. You can also iron collars, curved accents, fabric bracelets, and anything round that it can fit in.
For a wider ironing roll, see ham. For a similar ironing board, see sleeve board.
Straight stitch
A straight stitch is a foundational stitch used in sewing. When sewing with a machine, a straight stitch means that the needle does not move side to side, and one stitch comes right after the other. Straight stitches can be sewn in a straight line or along a curve or a spiral. They also can be used to turn corners. You can also hand sew a straight stitch.
Nearly every sewn project will use a straight stitch, and every sewing machine is capable of sewing one. On a machine, you can control the length of the stitch, usually by a dial or a sliding knob on manual machines or through settings on a computerized one.
See also zigzag stitch for another foundational stitch.
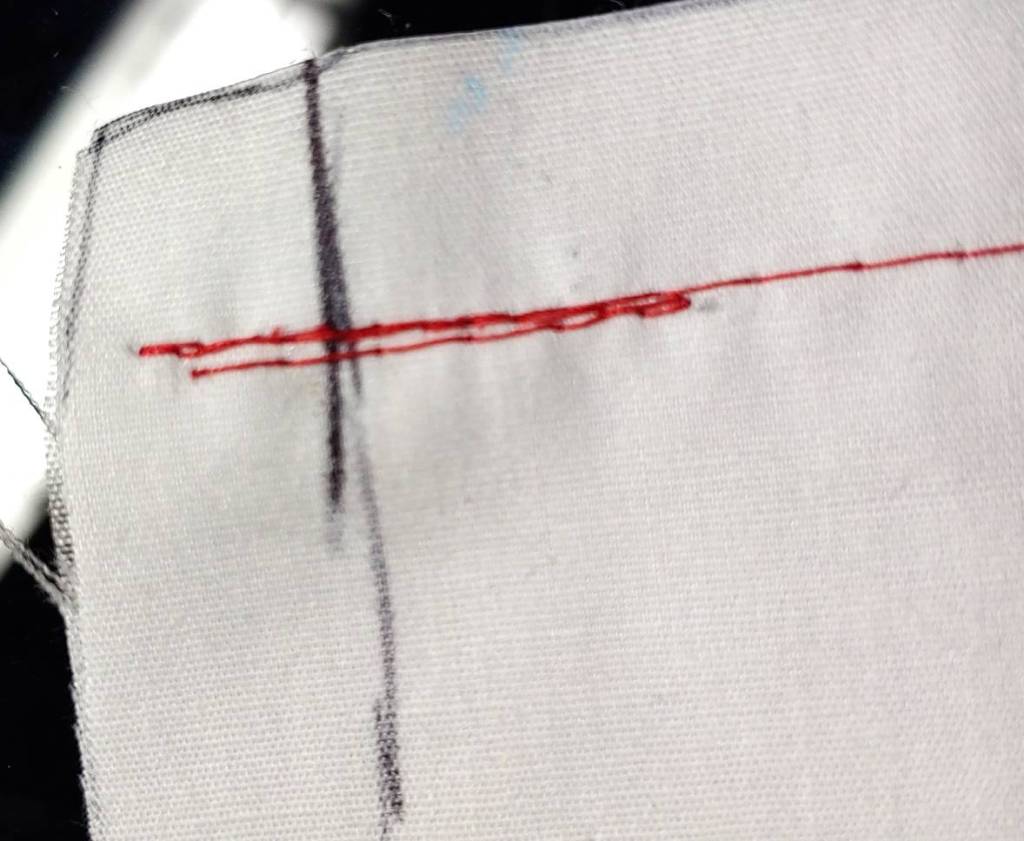
Stay stitch

Sometimes called a basting stitch, a stay stitch is a straight stitch used to make something stay put while you work on it. This particular stitch is simply a straight stitch placed along a seam or an edge and isn’t back stitched at the edges. This allows you to pull the stitch after sewing the final seam or pop a stitch to remove it from a serged stitch.
Stay stitches are incredibly useful when working with spandex. Because serged stitches are incredibly tedious to rip, sewing your spandex pieces together with a stay stitch allows you to check your work before running it through the serger. It also ensures that your fabric doesn’t slip during the serging process. You don’t want to get through an entire seam only to realize your bottom fabric slipped halfway through.
Tacking
Tacking is a type of hand stitch that is incredibly useful for cosplay. It is usually done underneath fabric or inside accessories to hide the stitches and make something look like the folds never move or that something was attached without stitches.
Tacking involves sewing in irregular or straight stitches to attach a piece of fabric, a non-removable belt or sash, or an accessory to the cosplay where a machine may not be able to properly reach. Tacking can also be used to attach draped accents, keep pleats from unfolding, or accessories such as large bows to prevent them from moving while at a convention. If a piece can move and get out of place, tack it down.
When planning out where to tack, pin the pieces of fabric or accessories together and try the cosplay on. After you’ve decided on a tacking location, shift the fabric as needed around the pins to get a needle underneath and sew the pieces together. When tacking, it is recommended to double your thread for strength.
For a practical example of tacking, check out Getting giant bows to stay up.
Tape measure

A tape measure is a flexible ruler, usually made of a type of vinyl or plastic. It has inches on one side and metric on the other. This type of ruler is good for measuring round things such as bodies, dress forms, and curved accessories whereas a rigid ruler simply won’t get an accurate measurement.
A tape measure is essential when determining size for patterns, as pattern sizes are determined by your body’s measurement instead of standard clothing sizes. You can also use it to measure the circumference of your head for determining wig and hat sizes as well as measuring neck and wrist circumference for jewelry and accessories.
Thimble

A thimble is a small cap for your finger. Modern thimbles are metal and contain ridges and grooves. Traditional thimbles may be wood or embroidered fabrics.
A thimble is used to push sewing needles through fabric or materials. By sitting the eye of the needle in one of the ridges or grooves, you can press the needle through the fabric without causing damage to your fingers. The grooves keep the needle from slipping during this process.
Wrong side of fabric
Wrong side of the fabric refers to the side of the fabric that will not be visible in the final outfit.
Determining the wrong side of the fabric greatly depends on the type of fabric you’re working with. In general, the wrong side will be duller or have incomplete patterns. Some fabrics do not have a right or wrong side. Here are some fabric examples.
- Printed fabrics: the side that looks faded
- Brocades: the side that appears to have a partial design or may have loose threads
- Synthetics (satins, synthetic silks): the side that appears to be duller
Examples of fabrics that do not have a right or wrong side are solid colors in quilting cotton, fleece, flannel, knits, some crepes, and some spandex.
Zigzag stitch
A zigzag stitch is a foundational sewing stitch that makes a zigzag pattern on the fabric. This is done by the needle moving side to side when punching the needle through the fabric. All full-size machines will have a zigzag stitch setting or at least a zigzag setting. Smaller machines such as handheld machines or children’s toy machines likely won’t have this stitch.
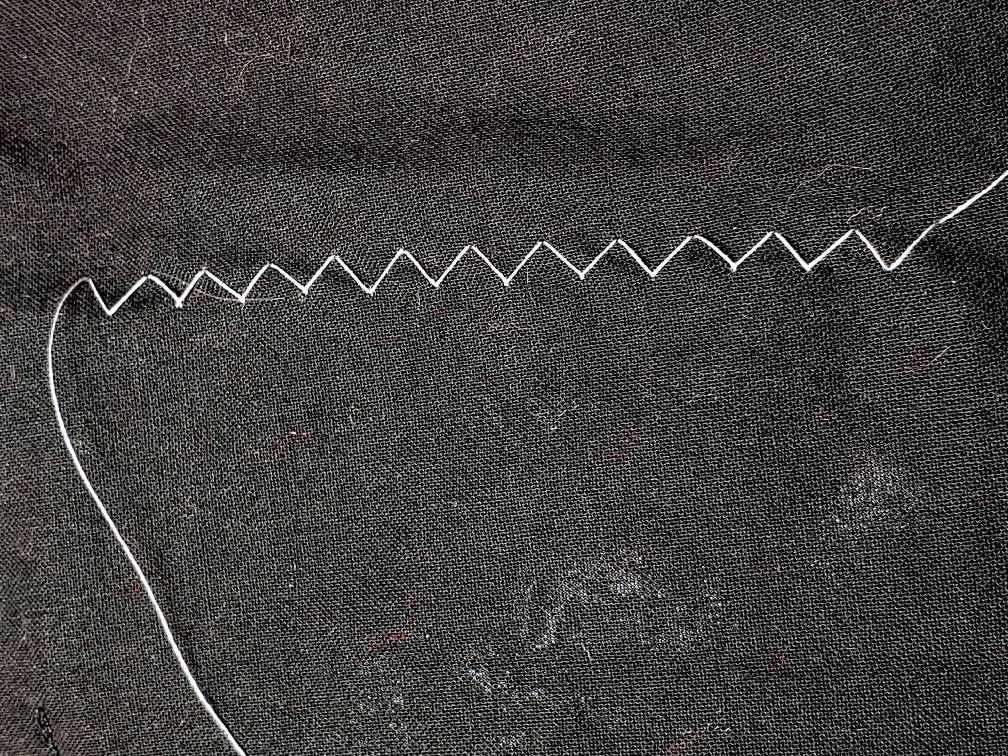
You can control both the stitch length and the width of the zigzags using a dial or a slider button. Computerized machines may have a setting on the screen. Some machines will require you to set the stitch to zigzag before zigging and zagging can take place.
When using a zigzag stitch, make sure that the needle opening on your foot supports this type of stitch. Some will only support a straight or specialized stitch and may not have enough room for the needle arm to swing side to side. If you’re not sure what foot to use, start with a standard foot.
Zigzag stitches have a certain amount of give to them. This means that the stitches can stretch before snapping. This makes this stitch ideal for finishing off edges of spandex sleeves and pants or other stretchy places where the fabric needs to stretch and give. You can use a zigzag stitch to sew stretchy seams, though the zigging and zagging may make the seam look uneven. In this case, using a serged stitch or an overlock stitch is recommended.
In addition to being stretchy, zigzag stitches are good for adding corded accents or decorative trim, especially if you cannot sew over the trim itself. You can also use a zigzag to sew over cording when using cord to gather ruffles. See cording method for more information.
See also straight stitch for another foundational stitch.
This page will be updated on occasion with new photos, terms, and article links. If there’s a sewing term you’d like to see included, let me know!
