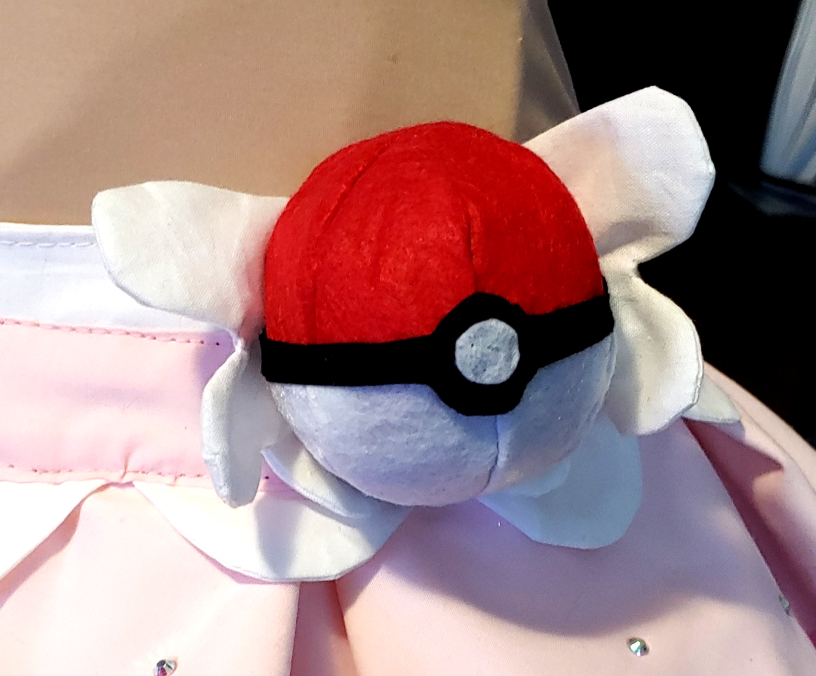
Pokeball, go! I’m a long-time fan of pokemon, and recently I’ve been making more Pokemon cosplays. And naturally, you need some Pokeballs to go with them. I thought about all different kinds of media from foam to plastic ornaments to balls, but why not just sew them?

Felt Pokeballs are great for cosplay accessories, making keychains for your bag, or just having a Pokeball prop. They’re pretty cheap to make and are also quite con-safe. You can customize them to any color or style you want, though for this tutorial, I’ve made the standard Pokeball.
For this tutorial, you’ll need some basic machine and hand sewing knowledge.
Cost: Budget-friendly
Skill level: late-beginner
Materials:
- A felt sheet in each color, red and white for a standard Pokeball. A small scrap of black felt is needed for the center accent
Tools
- Tacky glue. I recommend Alene’s. You can find it in pretty much any craft aisle
- Small straight pins
- A pen for pattern marking
- Scissors
- Matching thread
- Basic hand sewing needle
- A handful of poly fiberfill and quilt batting. Given that it’s felt, beans, foam scraps, or similar stuffing may not work as the felt will tend to try to fold in on itself.
PokePattern
Please feel free to use my pattern! This pattern will give you an approximately 2½” size Pokeball. This pattern has a ¼” seam allowance already added into the pieces.
Print this pattern on standard letter paper!
Additionally, you can make the Pokeball pattern yourself from toy or holiday ornament patterns. As long as it’s round and shaped like a Pokeball, you can make it a Pokeball!
Whichever pattern you choose, trace the pattern pieces onto the felt with a pen. If you’re using my pattern, you’ll need an equal number of pieces in each color, 6 of your top color and 6 of your bottom color. To get the most out of your felt square, you can stack the pattern together.
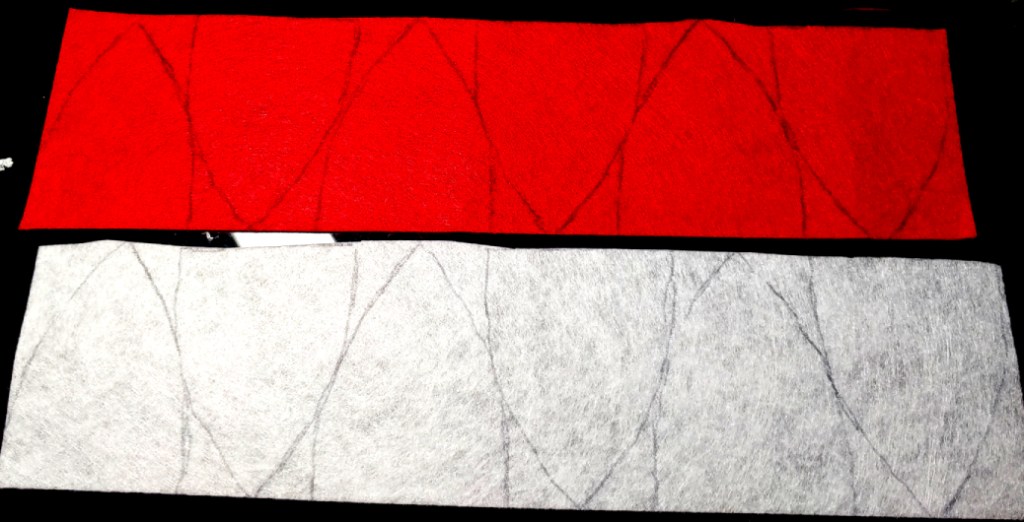
Once you’ve traced all your pattern pieces, cut them out with some fabric scissors, set them on your table, and count them. It’s pretty easy to miscount so make sure you have all the pieces you need.
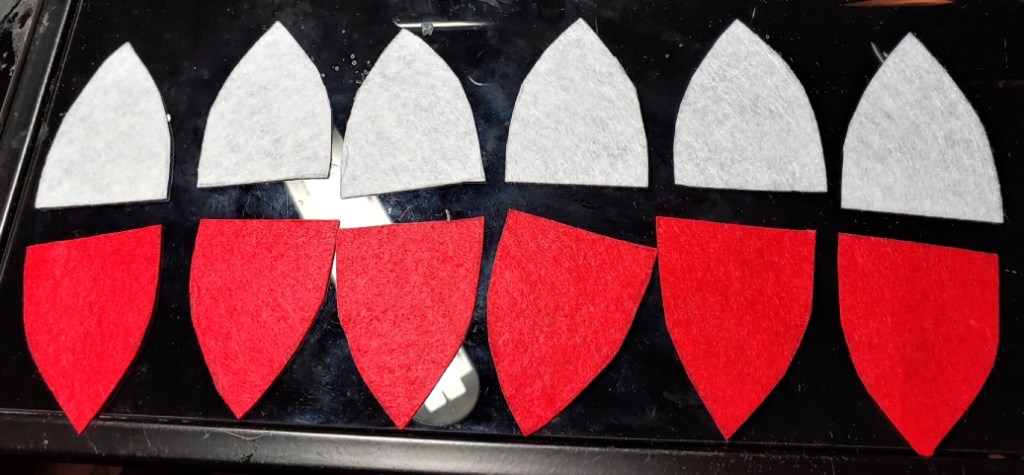
You should have a total of 12 pieces sitting on your desk now. If your ball pattern requires more, make sure to count the pattern pieces according to your instruction sheet.
Pokeball, sew!
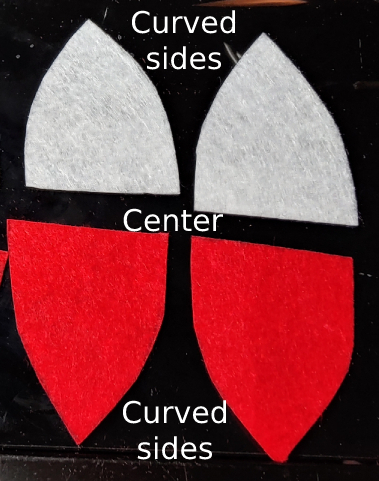
Now it’s time to sew the main Pokeball together. Pick whichever color you’d like to start with first and work one color at a time. For the pattern pieces, the shorter flat side is the center of the Pokeball while the longer curved sides form the rounded edges, forming the top (or the bottom) of the Pokeball at the rounded end.
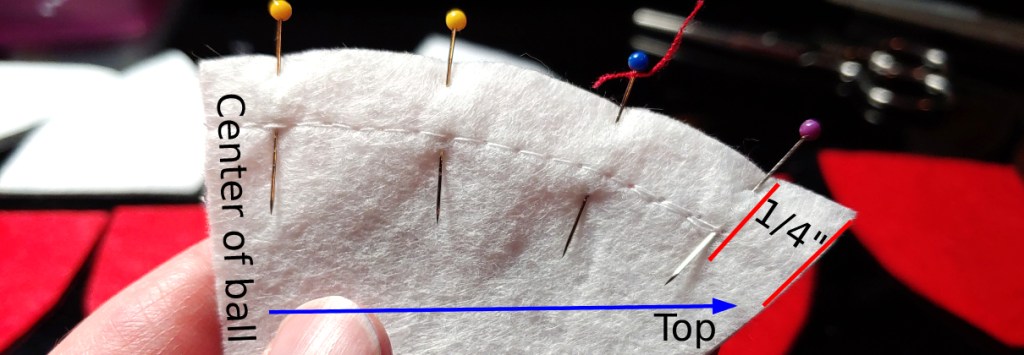
Start by pinning two pieces together at the side. Doesn’t matter which two as long as they’re the same color. Sew a straight stitch from the center of the Pokeball to nearly the top, stopping about ¼” from the top. You need this gap so all the pieces will sit flush with each other and form a nice rounded end instead of something more pointy and irregular.
Sew using a ¼” seam allowance, making sure to backstitch your seams to secure them.
Remove the pins and open the seam. It’s felt and curved, so don’t worry about ironing the seam open, just separate it with your fingers and start pinning the next side then sew it down. Continue this until you’ve used up all the pieces. Don’t sew the last seam shut as we’ll need that open for sewing the two halves together and stuffing the Pokeball full.
Repeat this for both halves of the Pokeball. Now it’s time to sew this ball together.
Open the two halves fully and start pinning from one side. Pin the seams open as you go. This will reduce the number of layers you need to sew through while also forcing the seams to lay open when stuffing the Pokeball full later.

Sew with a ¼” seam allowance across the entire seam, leaving a ¼” gap on either edge. This will give you space to make the final back seam.
Now open the Pokeball up a bit by sticking your finger inside and pushing the fabric outward to make a more ball shape. It’s time to partially sew the back seam. It’s felt so it’ll pop up pretty easily without a lot of force.
Press the two sides together and pin to about halfway down the side of the Pokeball section. Sew from the top of the Pokeball down to that halfway point. Do the same for both sides of the Pokeball.
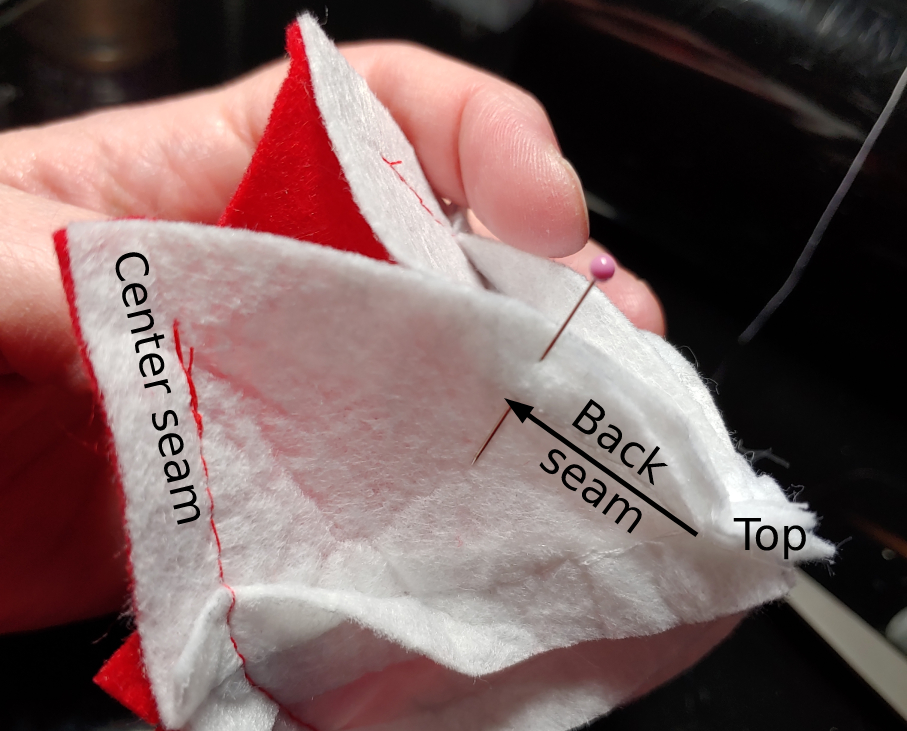
The gap is large enough to turn the Pokeball right side out. Remove all the pins and then push the Pokeball fabric through the gap until the thing is turned completely right side out. Stick your fingers in the gap and push any troublesome seams outward. Some will attempt to cave in on themselves, but that will be fixed in the next step: the stuffening.
Stuff that fluff
It’s time to stuff that Pokeball and make it nice and round. Unfortunately, no Pokemon inside, since we’ll be sewing up the back seam permanently. Whether you got some Altaria fluff or Wooloo wool or perhaps even Flaffy fluff, it’s time to stuff it inside. Take a handful of fluff and shove it inside.
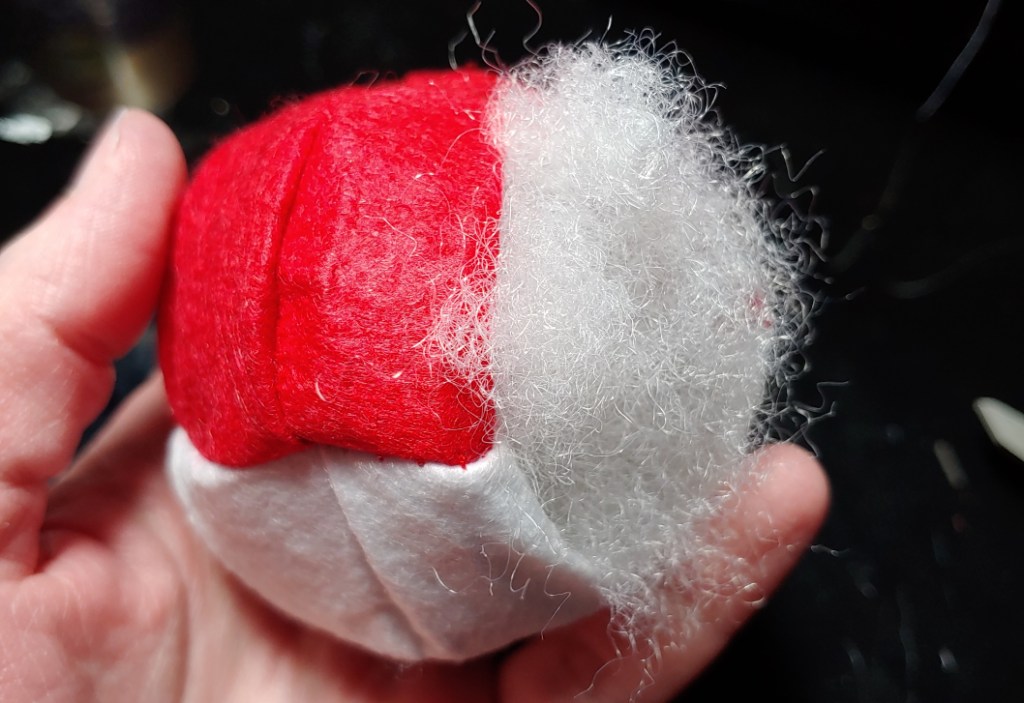
You can really push a lot of fluff into the Pokeball. Fiberfill and batting are really fluffy and you can condense them pretty well in the Pokeball to make a firm prop or keychain. The firmer you get it, the more likely it will be to hold its shape. Felt is stubborn and may try to fold in on itself given the opportunity, much like in my photo.
Now it’s time to sew up the back. You can use two stitches to do this: a ladder stitch or a whip stitch. These are both really useful hand stitches to learn if you don’t know them yet. Either stitch works so it’s up to you which one you want to use.
Whip stitch
A whip stitch is a basic stitch with a wide variety of uses and is referred to by a number of names. It looks like you’re whipping the stitch back and forth over the seam. It is visible in the end, but if you’re holding the Pokeball in your hand, it’s really not noticeable. You’ll want to match your thread to your felt color pretty closely for this kind of stitch.
Start the whip stitch off towards the top of the Pokeball where the machine stitches end. Knot your thread and push the needle from the inside of the Pokeball outward. This hides the knot and prevents it from getting caught on anything.
On the outside of the Pokeball, make straight stitches, but on the inside, go at an angle to reach the next stitch location. The stitches should be relatively close together, but they don’t need to be right next to each other else you’ll be whip stitching all day.
Continue stitching until you meet the center seam of the Pokeball. Tie the thread off and clip the tails to finish the seam. If the tie is partially showing, it will be concealed by the center accent soon enough.
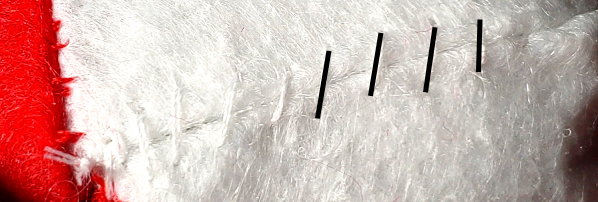
Ladder stitch
Ladder stitches are a type of straight stitch sewn right into the crease of the fabric where the seam would normally be sewn. They’re called ladder stitches as before you pull the stitches tight, they look like rungs of a ladder. This type of stitch is invisible once you pull the stitches, but it may take a little bit of practice to make this stitch even.
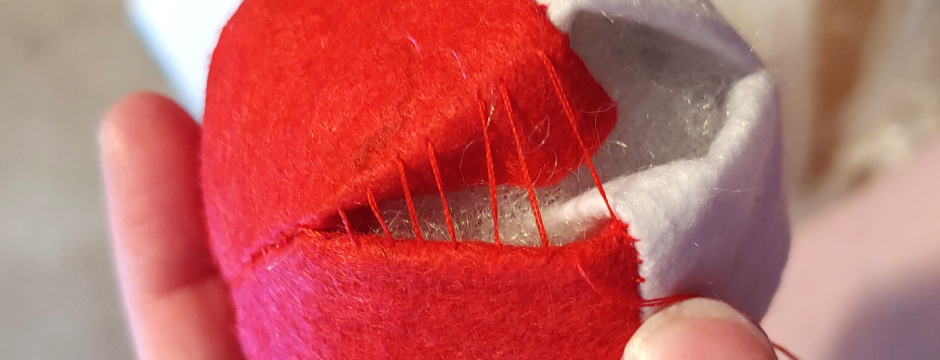
Unlike the whip stitch which zigs and zags across the open seam, the ladder stitch snakes back and forth with a series of straight stitches, looking more like square steps than anything else. Here is what the ladder stitch looks like with all the stitches marked:
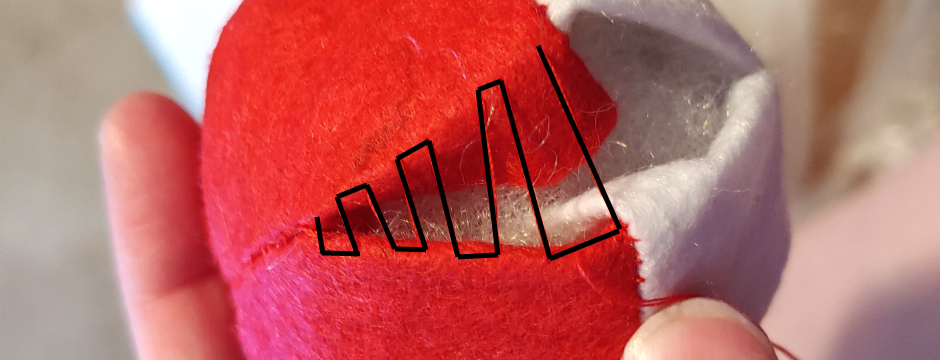
For a ladder stitch, you’ll need to know about where the finished seam will be. You’ll be sewing right in that seam and sewing straight across the gap.
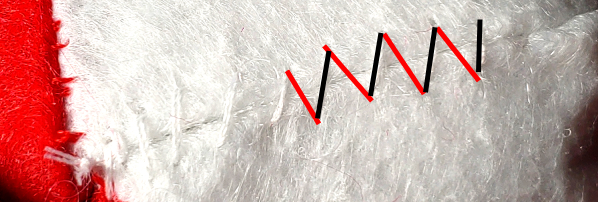
Start the stitch by pushing the needle from the backside of the fabric out into the seam gap and pull the thread completely through. Take the thread across the gap and push the needle into the seam crease, folding the fabric just a bit to push the needle back out into the seam gap to form a straight stitch underneath the fabric.
Repeat this process, pulling the thread directly across the gap then making a straight stitch underneath the fabric. Don’t pull the gap stitches taut just yet. As this is a very small gap, finish all your stitches to form the ladder. That’ll make it easier to work with.
Once you’ve finished the stitches, use your finger or the sewing needle to gently tug the gap shut then tie the stitch to finish it.
Adding the center decoration
No Pokeball is complete without the center decoration. Feasibly you could sew this on with a whip stitch or somehow add it into the seam, the easiest way is to simply glue it on.
Tacky glue is really good for crafts and has a permanent bond as long as you apply some pressure while it’s setting. You don’t need to squeeze the Pokeball during the drying process. Instead, you can apply the needed light pressure with some small straight pins. Once the glue is dry, the straight pins will come out easily and glue-free.
After cutting out your center decoration, find the seam opposite the back seam you stitched up in the last section. This seam will be the front and center of your Pokeball.
Apply some glue around the center ring of the decoration and a little bit outward on the bar sections. You don’t want to glue the whole thing at once as tacky glue dries pretty quickly. You want this bond to last an entire con, after all. The glue doesn’t need to saturate the decoration, just enough to trace the outside edges and scribble a little bit in the middle.
Once the center decoration is glued, press it against the Pokeball. You have some time to reposition as needed if the bars are crooked. Tacky glue dries clear, so you don’t need to worry about glue smudges. Once you got the position right, stick some pins along the edges to keep the decoration from moving.
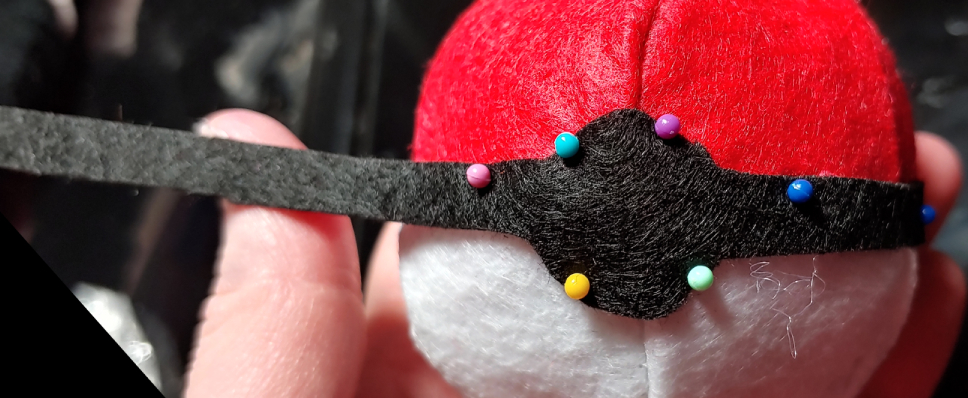
Continue gluing each bar one at a time, stopping at the center back. Overlap the back just slightly and glue one side on top of the other and pin. This ensures that the decoration doesn’t shift and show a gap in the back.
Now it’s time for the center-center decoration. Cut the small button out of white (for standard Pokeball colors) and repeat the same process. Scribble glue onto the back of the button then press it down onto the center of the front circle and pin.
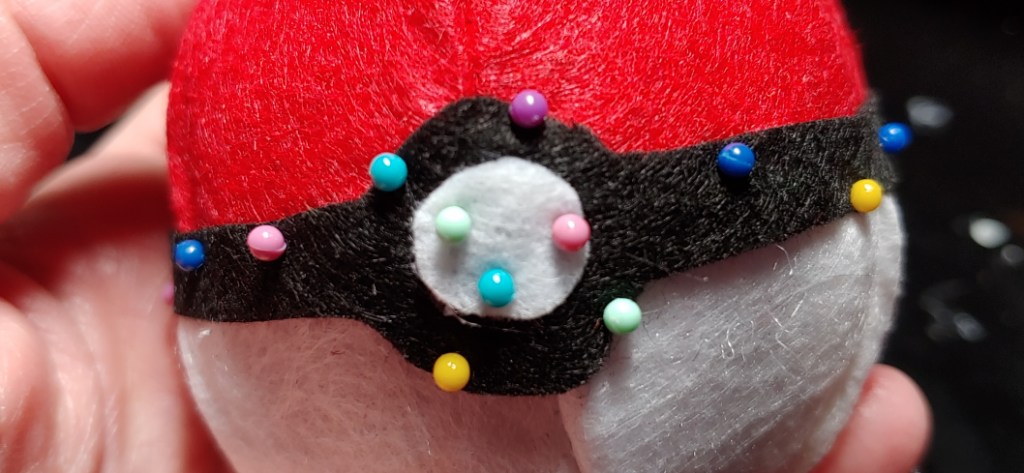
Wait about 15-20 minutes before removing the pins. This will give the glue time to fully dry and bond the two fabrics together. Now enjoy!
I hope this takes you one step closer to being a Pokemon master. Or perhaps a Pokemon coordinator! Whichever strikes your fancy, you now have a plush, con-safe Pokeball that’s great for cosplay or simply for decoration.
Let me see your Pokeball creations! @ me on social media so I can admire your work.
