Sometimes you really want to cosplay a character who has cutouts in their shirt but don’t want to show your bra or compromise the shape of the shirt itself by stretching a cutout too far. Fortunately, there are ways to make privacy panels that will make the shirt a little more modest while staying true to the character’s designs.
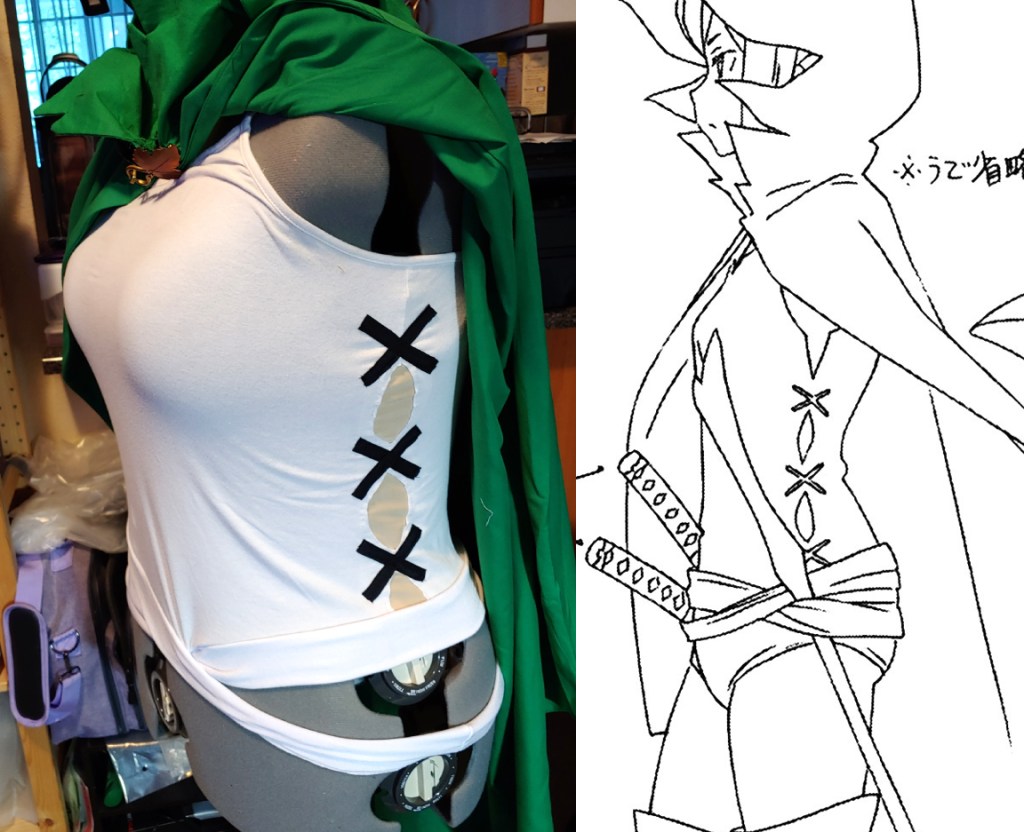
Ryu Lion from DanMachi is one of those characters where I encountered this design issue. I didn’t want to show the bra line in the cutout, and as soon as I tried on the shirt after cutting the design, the shirt started stretching the cutouts irregularly. Regular cutouts just didn’t work.
To preserve the design (and my limited modesty in cosplay), swimsuit lining creates modesty panels that hide the bra line and provide structural support. I am relatively pale, so swimsuit lining, peach, and beige spandex work for me.
However, if you are darker, take a look at power mesh (which comes in all sorts of skin tones, though it is slightly see-through) as well as places like dance supply stores or even stealing material from tights. Some wholesalers do carry a variety of skin tone spandex, though some of them will make you hunt for it. As long as it’s stretchy, it’ll work here.
The trick here is to find something “close enough”. The shirt itself breaks up the difference between the skin tone spandex and your actual skin tone, making it believable in photos and in person.
Skill level: late beginner – early intermediate
Cost: relatively budget-friendly. Power mesh is generally pretty budget-friendly and small quantities of swimsuit lining are pretty affordable.
Materials:
- A stretchy shirt to modify. I’m modifying a simple spaghetti-strap top
- Swimsuit lining, tights, spandex, or power mesh, enough to cover the cutouts. 4-way stretch. (If you’re not sure how to determine stretch, see Sewing terms)
Supplies
- Pens or pencils to mark cutouts
- Fabric scissors
- Small stick pins. The smallest ones snag the least with spandex fabric
- Machine with a knit or stretch needle
- Thread that matches your shirt color
Sewing spandex
If you’ve never sewn spandex, there’s a trick to it. It’s the type of needle you sew with.
Standard universal needles have a sharp point to them. This is so it can pierce the woven fibers and reach the other side to hook the bobbin thread and form your stitch.

Spandex is a little different. It’s stretchy, so when your needle attempts to pierce the fibers, the material itself stretches and usually ends up stuck in your feeder dogs or bunches up. It seems like you need a specific foot to evenly feed the spandex through your machine but in reality? It’s the type of needle you’re using.
Stretch and knit needles aren’t pointy like universal needles. They’re actually more rounded like a ball. When the machine drops the needle down for a stitch, the ball-like shape pushes between the spandex fibers instead of attempting to pierce through them. This prevents the fabric from getting stuck in your feeder dogs and stops the bunching from happening.
So when sewing this project, make sure to install a stretch or knit needle before sewing!
Creating cutouts
Now that you’ve had a short crash course on sewing spandex, let’s get to the actual cutouts and sewing the modesty panels. How you plan the cutouts is up to you, though you’ll want to keep in mind the following
- large cutouts may still stretch irregularly as your body needs to move
- small cutouts work best and can be almost anywhere on the shirt
- cutouts on the seams, necklines, and armholes will show the edge of the spandex but are still doable if you want them
- the cutouts are more vertical, as too many across the body will cause the shirt to no longer stretch properly
- if cutouts are on the pants, try to avoid ones around the hips unless your pants have a lot of stretch (you want to sit down, after all)
Take your shirt and lightly sketch out where you’d like the cutouts to be. For Ryu, I sketched out three egg-shaped cutouts along the side seam of the shirt. These cutouts should be roughly the size of the final cutout. We won’t be adding any hems to them as spandex does not fray, so no need to account for a hem allowance.
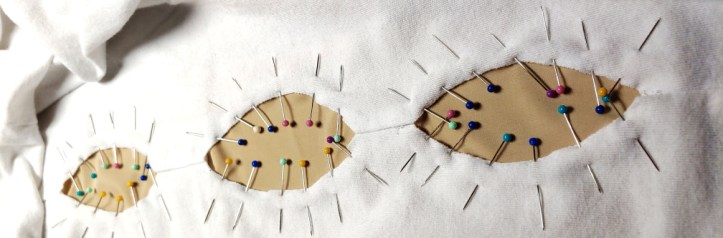
Now that you have the cutouts cut out, cut a piece of spandex with at least ½” extra room around the edge of the cutout. If you have chains of cutouts, like Ryu’s 3 egg-shaped cutouts), cut a singular piece of spandex that covers them all. This ensures you have plenty of room to work with when pinning and sewing (and also prevents slipping).

Once you have a strip of spandex long enough, start pinning around the cutouts with the tiny pins. The tiny pins will prevent crossovers in the cutouts that could potentially catch on the machine foot. It’s best to pin all the cutouts so that if you need to reposition the fabric underneath, all you have to do is unpin and not rip threads.
Once you’ve pinned everything down, it’s time to sew the privacy spandex in place. For this, I’m using a zipper foot to help me line up the foot near the edge of the fabric, but a clear foot will also work. Don’t use an open-toed foot, as the toes get stuck on these tiny pins and start pulling on the fabric.
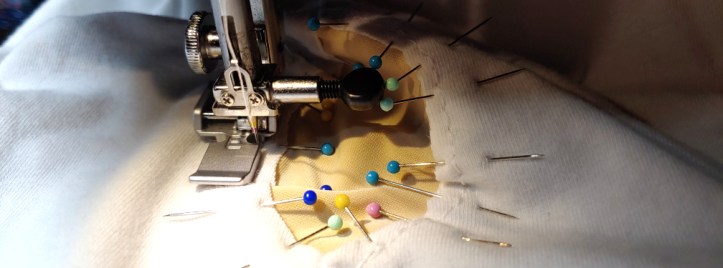
Use a simple straight stitch, making sure to backstitch at the start and end to prevent unraveling. These stitches will be under a lot of pressure, but a straight stitch has enough stretch to them that the stitches will last all day even with movement.
Your stitches should be about 1/4 – 1/8″ away from the edge of the cutout. This is small enough to not be noticeable but still securely holds the spandex fabric in place. Too close to the edge and the stitches will pull right through the shirt and dislodge it from the spandex.
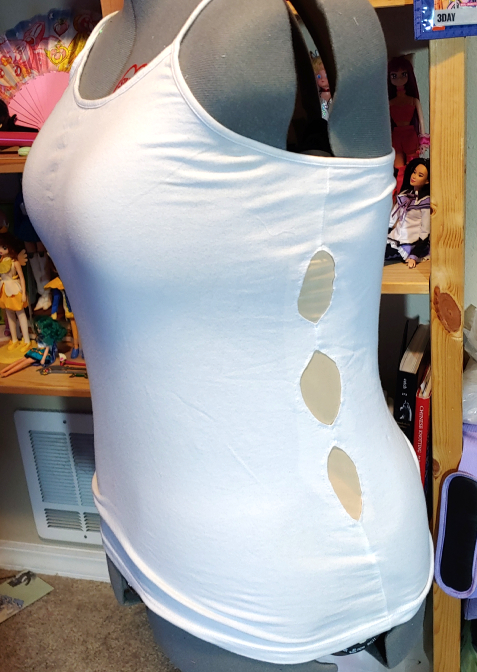
Once you finish the cutout, remove the pins and work towards the next one. Removing the pins helps with not accidentally leaning on the spiky porcupine while you work.
Continue working until you have sewn all your cutouts. Now it’s time to decorate them. If they’re on the side seam of your shirt, you can add smaller non-stretchy accents, as most of the stretch can come from the front and back of the shirt. If your cutouts are on the front or back, pin your decorations and test to make sure the shirt still has enough stretch to fit without strangely tugging.
And once you decorate, you’re done! You now have cutouts with privacy panels!

I hope you’ve enjoyed this quick little tutorial on how to add stretchy privacy panels. It’s a great way to cover bra lines, preserve the shape of the shirt, and fake a bunch of bare skin.
When you have a cosplay shirt that really doesn’t seem like it should be feasibly possible (because spandex gonna stretch), it’s time for some privacy panels to help you out.
Let me know what kind of cutouts and privacy panels you decide to make! @ me on social media so I can admire your work!
