It’s no secret. I’m a pretty big Fire Emblem fan, and Camilla has been on my cosplay list for some time. One of the biggest questions I had was how to make Camilla’s crown and make it removable. I scoured ideas, everything from fabric to magnets, but honestly, why go complicated when you can go simple?
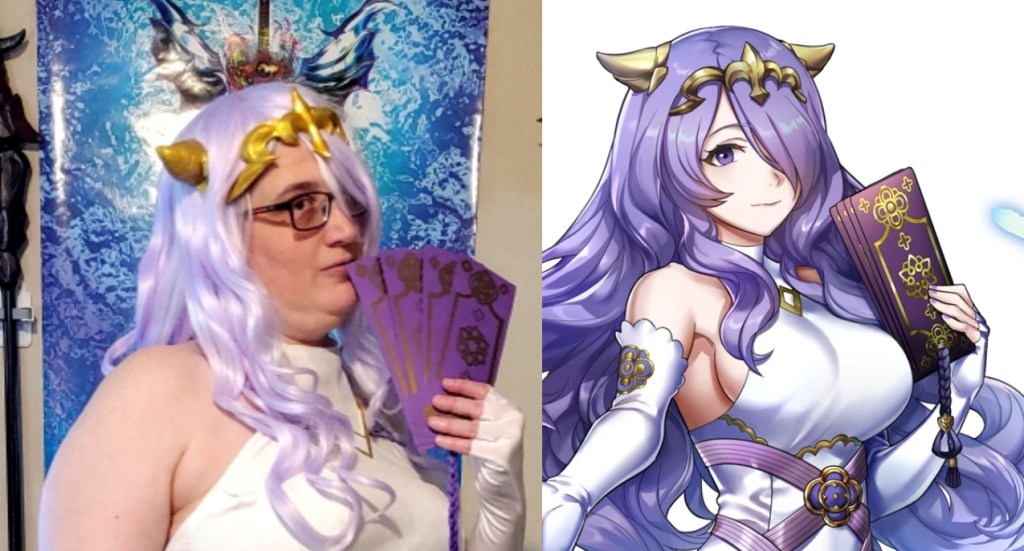
When it comes to headpieces, I like lightweight. I also wanted it removable so I could cosplay her other costumes. The Adrift costume from FEH was my first project and that crown is gold instead of her usual black.
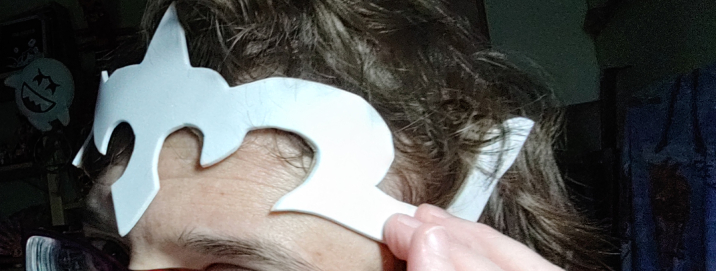
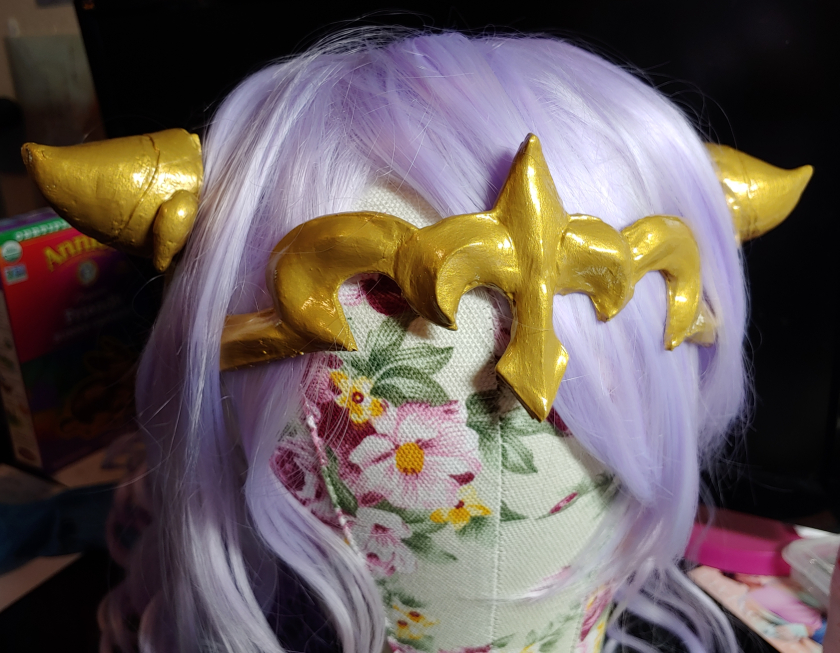
The result is a singular crown attached with simple wig combs that hide partially underneath the wig hair to appear to be two sections. This crown works for any of her FEH costumes as well as her original Fates attire that uses her standard crown. Let’s get our hands dirty (with clay) and make a crown!
Skill level: beginner friendly! Recommended to have some knowledge of sculpting, even if it’s play-doh!
Cost: moderate. Worbla and foam clay are involved.
Materials:
- Printer (optional for printing my pattern)
- Pens
- Less than a sheet of 2mm foamies. any color will do
- A strip of Worbla (the beige stuff works best)
- Small horns (if you choose to prepurchase them)
- 2 wig combs or other small wire combs
- Foam clay (recommended for details)
Supplies and tools
- Heat gun or really hot hair dryer
- Heat-resistant mat or a really thick towel
- Extra sharp scissors for cutting Worbla
- Regular scissors for cutting foamies (don’t use your fabric scissors. Foam dulls the blades)
- A bowl of water and a paper towel (for use with foam clay)
- Flexible primer like Flexbond, Plastidip (use this outside), or similar
- Acrylic paint.
- White and gold for Adrift costume
- Black for other costumes
- Clear glossy varnish. I recommend DecoArt Gloss varnish
- Hand needle and thread
- Quick drying super glue (I use GorillaGlue 10s super glue)
- Foam wig head and straight pins (highly recommended to make this much easier)
Safety notes:
- Protect your space from heat! Use a heat mat or work in a place without flammable objects
- Worbla is safe to use indoors with regular heat. If you plan on melting it with a hot knife, work in a ventilated area!
Working with foam clay
Foam clay is a fun and lightweight type of clay that honestly feels like EVA foam once it’s dry. It’s non-toxic, flexible, and easy to paint without sanding (you can sand it if you want to). It works pretty similarly to other lightweight clays like paperclay or air-dry clay, though it has a strange consistency. It feels like you’re sculpting foamies!
If you’ve never worked with the stuff, here are some tips I’ve learned to become the boss of my clay.
- Water makes foam clay stick to foam. Just rub water on the foam using your fingers then press the clay into it and it sticks!
- You can smooth and shape foam clay with water.
- Clean your fingers off frequently with a paper towel to keep them from getting gummy. Once they get gummy, the clay will stick to you instead of your work.
- The thicker the clay (or the more humid your environment), the longer it will take to dry.
Honestly, water is the key to using foam clay. Once I learned that water-dipped fingers made foam clay magic happen, I was able to sculpt all sorts of shapes and make them smooth. Try it out! Foam clay is pretty awesome!
Making the horns
With Halloween right around the corner, you could go out and buy a pair of little devil horns or purchase some 3D-printed ones. Just make sure the base of the horns is completely flat so you can glue the combs to them. You may want to sand them by hand with fine sandpaper, about 240 grit, to give the glue and paint something to stick to. Neither will stick to a smooth surface.
But you might want to make the horns yourself like I did. Foam clay will work best and give you a nice base for gluing the combs.
Start by cutting a pair of circles approximately 1½-2″ in diameter. It doesn’t have to be exact. Just close enough to round to serve as a good base.

Take a piece of foam clay and roll it between your hands to make a thick sausage. Dip a finger into the bowl of water and rub the water over the foam disk, squashing the bottom down on the foam. Using wet fingers, start sculpting the shape by turning your hand around the clay sausage and smoothing out any bumps. Curve the top of the horns slightly to give them the upturn her design has.
If you’d like to make the groove she has in her horns, take a clay knife or just a butter knife from the kitchen and dig a groove into the side of the horns at an angle. Make sure to wash the butter knife when you’re done. Foam clay is nontoxic but you still don’t want to eat it.
Set these aside for about 48 hours to completely dry all the way through.
Creating the crown base
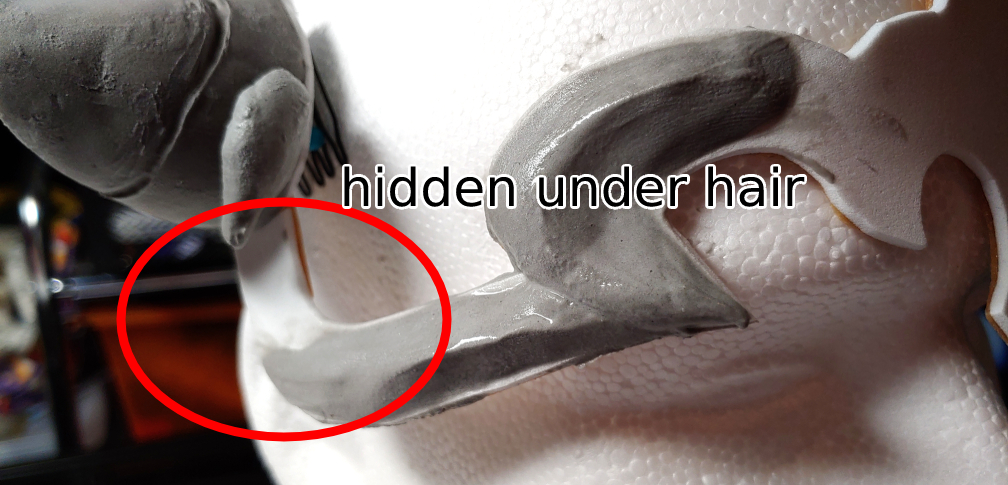
While the horns are drying, it’s time to create the base crown. Her crown consists of a fleur-de-lis in the center with a curl to the side. This part appears to float in her hair. While you can add combs into this piece, this section of the crown doesn’t exactly have a lot of real estate for them to stick to. And there’s not a lot of wig net to work with around the bangs area for you to attach the combs either.
Instead, curving the bottom of the curl around the side of the head to meet the horns will give you plenty of support for your crown. You can hide the side pieces under the wig hair.
Since her crown is symmetrical, fold some paper in half to draw the crown out and you’ll get something similar to this:
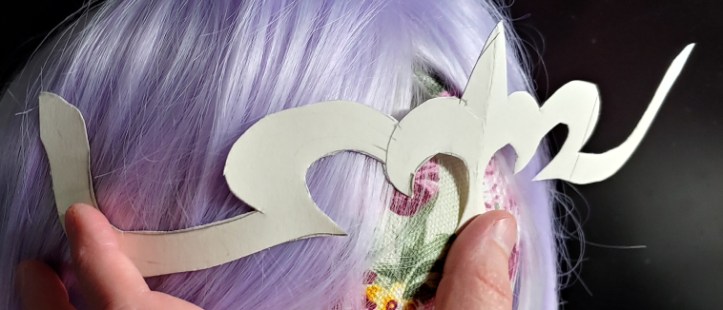
Don’t want to create a pattern or have trouble creating it? You can download mine!
Print this PDF out on standard letter printer paper and cut it out with a pair of scissors! This pattern is made for my big head, which is about a 23″ circumference around the hat/hairline. You may need to scale the pattern a bit or trim the edges to fit your head. I ended up trimming some of the sidebars so the crown would sit higher on my head, but left the extra in so you can adjust this crown as needed to fit your style and head!
Now that you have a paper template, it’s time to make the physical base. Trace the template on a piece of Worbla. As Worbla is the more difficult to cut, it’s best to make your first base here.
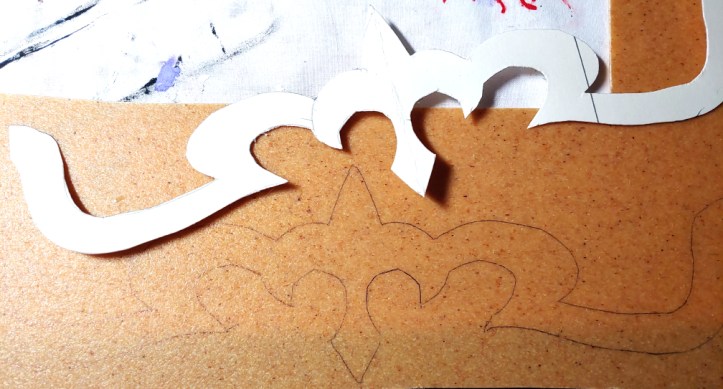
I cut my Worbla out using a pair of very sharp metal scissors. You can cut it out with a sharp shop knife as well. If you’re having a lot of trouble, heat the Worbla up just a little bit to make it soft before you cut it. It should be barely warm when you pick it up else it’ll stretch while you cut it. Make sure to put down your heat mat or towel first!
Next is to trace the template out of the foamies. Use the Worbla as your template this time instead of the paper template. By using the Worbla, you know that the two pieces will match exactly.
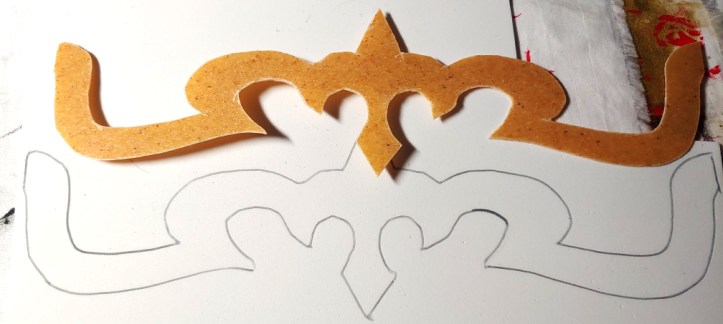
Cut the foamies out using a pair of regular scissors. Don’t use your good sharp scissors or your fabric scissors, as foam dulls the blade.
Pull out your heat mat or thick towel. It’s time to fuse these two layers together. Worbla has a sticky side, a glue of sorts that’s activated by heat. It’s the rougher of the two sides and will fuse with most materials. Worbla becomes pliable at about 150F and we need to only get it to about that temperature to make it sticky.
Using your heat gun, place the bumpy side up and heat it up a little. You’ll notice the Worbla start to darken a little and start to look wet. That means it’s hot enough. Once it feels warm and pliable, place the foamies on top with a very gentle press. You don’t need force at all. This just makes sure that all the points of contact are made before the Worbla starts to cool.

Now see if you can pick the crown up. If it sticks to your mat or towel, leave it be for a few minutes as pulling it off now will cause the shape to warp. Once it cools off, it will release its grip on your mat and you can pick it up without any resistance. Worbla is sticky by nature, and it may stick to the mat during this process.
Once you can pick it up, flip it over. Heat up the Worbla side once again until it becomes pliable and slightly darkened. Pick it up (it should be easy this time as the foamies won’t stick to the mat) and gently press it against your head, Worbla-side to you. It should feel warm, but if it feels like it’ll burn, don’t press it against your face. 150F should feel like a hot shower.
Hold the crown here until it cools and holds its shape. It will have some flexibility and undo itself a little bit but it should be roughly the shape of your forehead. This flexibility will give you room to shove a wig underneath without squeezing your face.
If you have trouble with the heat or have trouble holding your hands there long enough, use a wig head that is close in size to your own. You can pad it up with fabric or paper as needed. Remember though that Worbla will stick to a lot of materials so cover materials with plastic wrap or aluminum foil to keep the crown from getting stuck.
Attaching the horns
To complete the full crown, you’ll need to attach the horns to it. The attachment will need to be low profile so the combs will still sit properly on the horns. The easiest way to attach it is a singular piece of Worbla.

Cut a strip of Worbla for each horn no wider than the crown and about 2″ long.
Heat up the little Worbla strip just enough to make it soft and pliable. If you try to pick it up and it stretches like a rubber band, it’s too hot. Let it cool a little bit.
Leave the strip on the mat for a moment. line up the horns and the crown’s back edge, making sure that the curve of the horn is pointing upwards. Take your strip and position it along the back so it crosses over from the crown to the horn like a strip of tape. Try to get it about 50% on the horn and 50% on the crown for good stability.
Let it cool. If the strip doesn’t seem to be sticking, lightly heat it up again to restick it, or use high-temp hot glue to soften the Worbla and glue it down.
Adding the combs
The secret to how the crown stays on the wig and appears to float is the combs attached to the back. The combs used here are wire wig combs which can also be sewn into the front of a wig to keep it from slipping. The combs are wide-toothed and slip into the wig hair and net pretty easily.
Wig combs come with a fabric strip attached, and that strip might be too big for the horns. Fortunately, it’s pretty easy to remove with a seam ripper and pull the comb from its fabric hold. Fabric can be a pain to superglue to foam sometimes, so the best way to attach it is to glue foam to foam!
2mm foamies is best for this method. You can find anywhere that foam crafts are sold. You can sew right through them with a standard sewing needle and they hold pretty strongly.
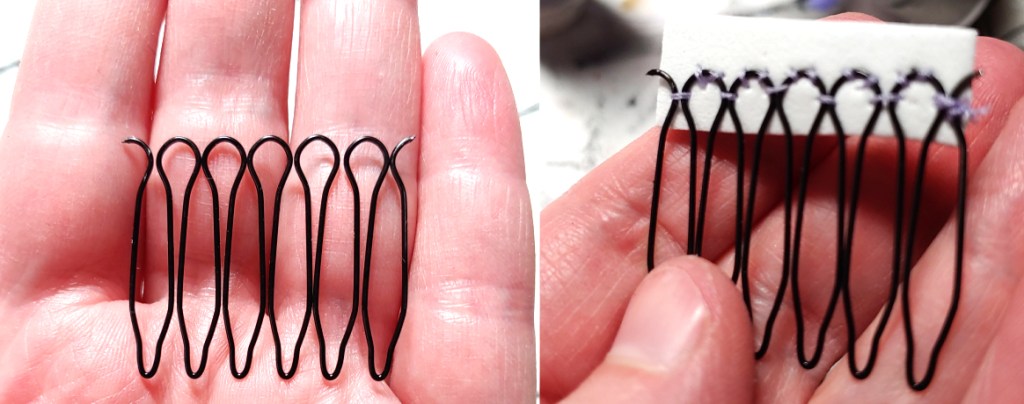
Once your comb is removed from the fabric, use a few straight stitches to tack the comb to a small piece of foam and trim any wire on the side with wire cutters to make sure that the combs don’t get stuck in the wig hair or show through.
Next, glue the foam to the back of the horns, facing the teeth downward toward the crown base. You only need a little bit of superglue squiggled onto the foam piece to make it stick as it expands when you press it to a surface. Press the foam piece down for about 10s.
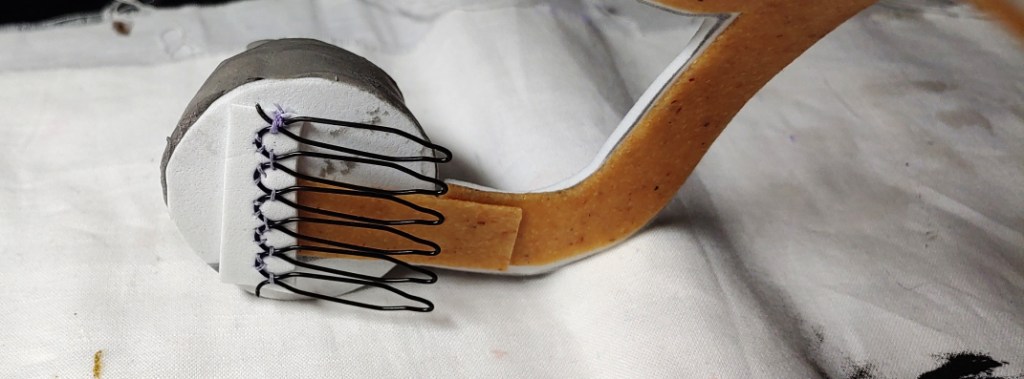
While the glue does dry in 10s, it won’t fully cure until about 24 hours. You can still work on the rest of the crown while it cures, just don’t yank on the combs before the glue fully sets.
Raised crown details

While you can certainly leave the front of the crown flat, we’re here to get our hands messy with clay. Get your small bowl of water and a paper towel. It’s time to dive into the clay tub once again.
For this section, I recommend pinning the crown to something like a wig head to give you a stable surface and both hands to work with when sculpting the clay. Stick some straight pins into the side of the wig head then slip the comb teeth over them.
Now it’s time to sculpt
Sculpting the sides
The best point to start is with the sides. The sides will be partially hidden under the hair so you only need to sculpt part of them and have the work fade underneath the hair.
You can put raised details underneath the hair if you choose, but I chose to skip it, flattening the clay so it met flush with the undecorated foam underneath.
For the decorations, take a glob of clay and start rolling it between your hands to make a noodle. Wet the crown foam with water on your finger then smush the foam clay on top of it. Wetting your fingers, you can get a nice ridge shape by pinching your thumb and index fingers together and running it along the squished noodle. After a bit of running, a distinct ridge shape begins to form.
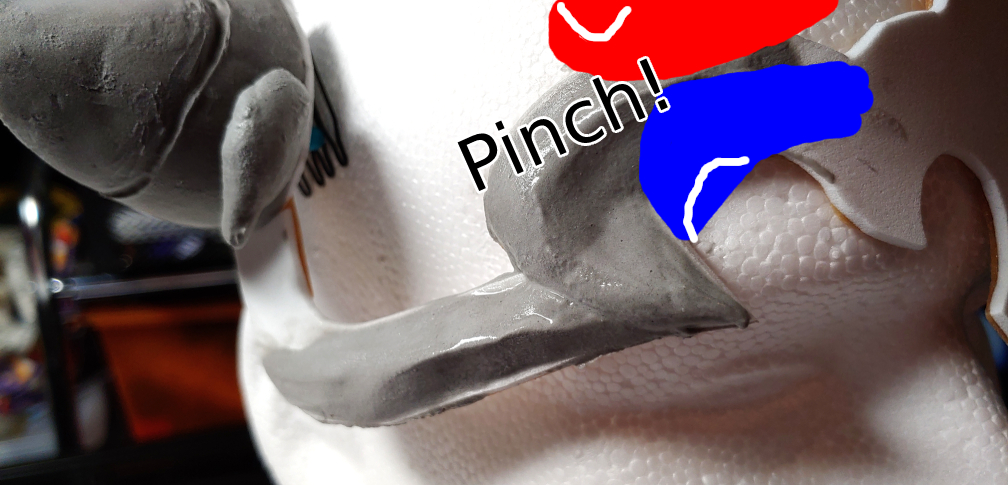
You can turn your hand while pinching your fingers together to make a curved ridge. If you have excess at the point, use some scissors to cut off the extra or pinch it with your fingernails before pulling it free from the rest of the clay.
To make the indent between pieces, you can use a long fingernail or the back of a knife to smooth out the sections and create a small groove. (Make sure to clean off your knife afterward!)
Sculpting the center fleur-de-Lis
Aside from the horns, the most prominent feature is the fleur-de-lis that sits in the center of the forehead. The easiest way to approach this shape is to start at the center. Start by rolling another noodle, wetting the foam, and squashing it down. Use the pinched fingers to create a sharp, distinct ridge down the center.
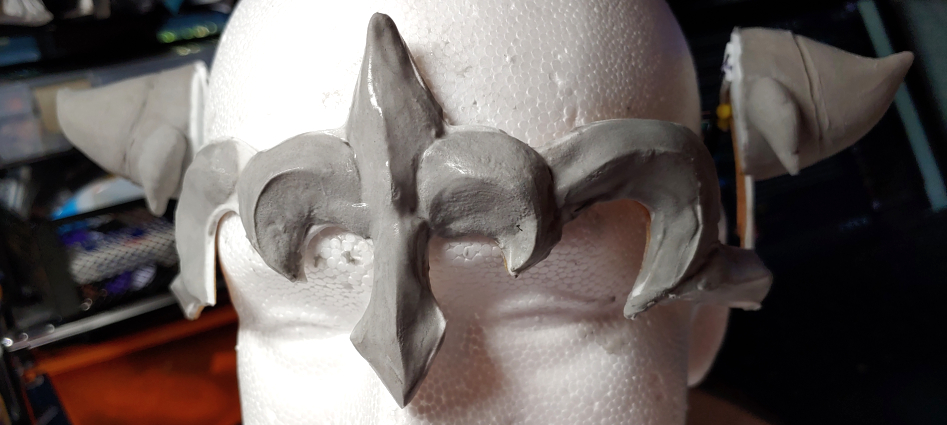
Once you’re satisfied with the center section, make a fat noodle then squash it on one side of the center part. Using your pinched fingers, make a less prominent, curved ridgeline. Do the same for the other side as well. You can make a distinct line between the sides and center using a knife or your fingernail. Because the side pieces are so fat, the line may form while you’re working on it anyway.
Let the crown dry for 24-48 hours.
Painting
With the clay fully dry, it’s time to paint. Before adding any color, it’s time to give it a proper base coat. While you can paint right on foam clay, it can be prone to cracking. By painting a flexible base coat, even acrylics can withstand bending around a head and a bit of abuse at a con.
You will need a soft brush for this as stiff bristles will leave marks on your work. When painting, make sure to get into the grooves in the design, brushing out any pooling before the layer dries. This will ensure that your design will stay as designed, not gain extra bumps and bubbles.
Flexible base coat
I recommend Flexbond as a good apartment-friendly method. As it’s becoming harder to find lately, you can use primers like white school glue as well. Paint at least 2 layers both inside and outside of the crown (don’t paint the combs), letting each one dry before working on the next.
Adding color
Camilla’s normal crown is completely black but her Adrift crown is gold. So you’ll need the following colors in acrylics
- Base crown: just black
- Adrift crown: white and gold
Any acrylics will do honestly. $1 acrylics from Walmart work just fine.
If you are working with the gold crown, paint a few layers of white first, making sure to cover the foam and clay. This makes it a consistent color and makes the metallic layer appear to be very brilliant gold once you’re done with it.
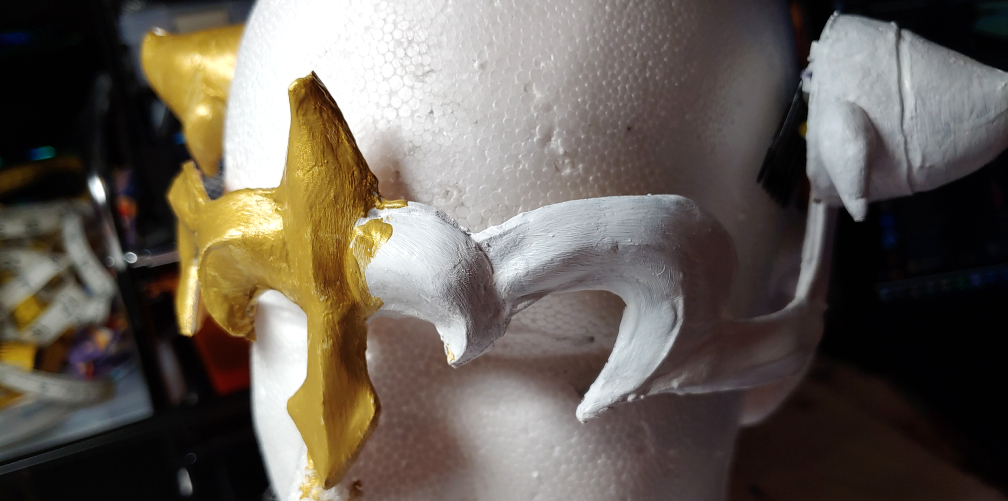
For both crowns, paint several layers of the outside color until all the base colors are completely covered. Paint the backside as well so that if any of it peeks out, you won’t see a weird combination of Worbla and foam.
Make it shiny
To protect your paint job and clay work, you want to seal it. And to make it look believably metallic, it needs to be shiny. My fave is DecoArt gloss varnish. You can pick up a pretty large bottle at the craft store with a coupon. But honestly, any gloss brush-on varnish will do.
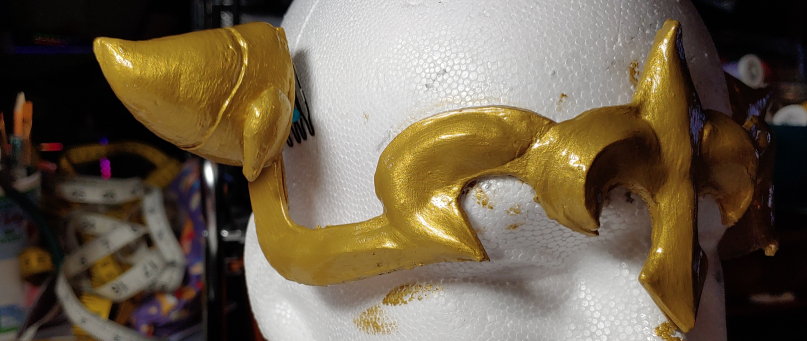
Brush on at least two coats of varnish, letting each coat dry in between.
These extra coats will keep the paint from chipping or nicking during normal wear and tear at a con. It can take a bit of a beating, but it is still foam, so make sure to take good care of your new crown!
I hope this helps you make your own Camilla crown! It’s lightweight and easy to transport. You barely feel it on your head at all during the day. I only felt it on my forehead when the bangs would move. Simply slip the crown sides underneath some wig hair on the sides of the face then tuck the combs into the wig net. It’s easiest to do this with the wig on while looking in a mirror to get the perfect placement.
It stays all day after sticking it in your wig, and I didn’t have to adjust it once.
Share with me your Camilla crowns! @ me on social media so I can admire your work!
