Sometimes you want a mini crown. Princess crown, fallen prince, idol accessories. There are plenty of mini crowns in multiple genres. Foam may feel bulky for a mini crown, and thinner foams just don’t stand up well on their own. So why not decoupage?

Decoupage is a great technique that is safe indoors and extraordinarily cheap. No fumes, no glue, no need to worry about working outdoors or requiring PPE. The most you’ll need to protect is your floor and table, as decoupage can be messy.
You might be familiar with decoupage as a kid. It’s that arts and crafts method that involves gluing something to another surface with a sponge brush. I used to cut out anime characters from the TV guide and decoupage boxes to make my own nerdy jewelry cases (it’s fun! I recommend trying it!). This is the same technique but with a different type of application!
Skill level: beginner-friendly!
Budget: budget-friendly!
Materials:
- Scrap fabric, cotton. 100% cotton works great, though polycotton should do just fine. Fabric cannot be shiny, slick, waterproof, or stain-resistant.
- A drinking glass about the size of your crown. Make sure it’s glass as plastic will give you trouble.
- Mod Podge, either gloss or matte
- Mod Podge hard coat (recommended)
- Acrylic paint and accents to decorate your crown
- Elastic for crown strap
Supplies:
- Fabric scissors
- Nonfabric scissors (for cutting tape)
- A foam brush
- Paint brushes for acrylic paints
- Plastic wrap
- Masking tape
- Pens/pencils to draw your crown shape
- Towels. You will need them for your hands to keep your fingers from getting sticky
- Something with an angle like a triangle, corner of a notebook, etc
- Superglue for crown strap
Mod Podge hard coat is an amazing top coat that will make your decoupage super strong. However, it takes 4 weeks to fully cure and harden. You can use your crown before then, but if you want your crown to be super strong, give your crown ample time to cure before the con!
Prepping your glass
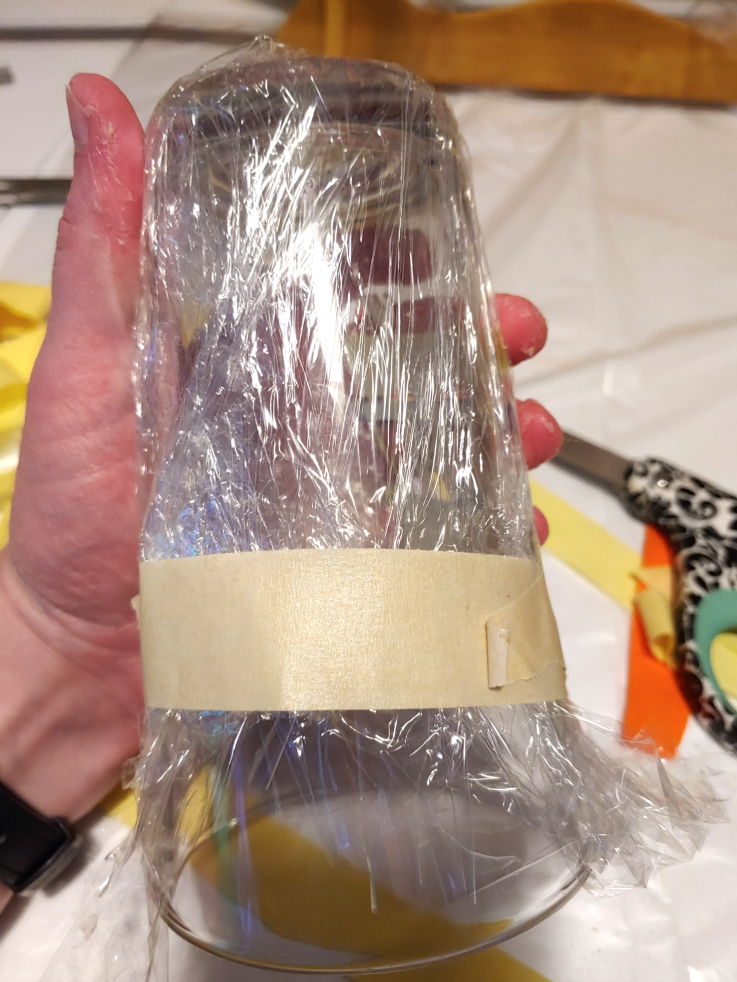
One advantage of decoupage and its sibling paper mache is that it doesn’t stick to plastic wrap. Yep, that stuff you use in the kitchen to cover your food. This makes removing the finished crown possible (decoupage will try to stick to glass) and also protects your glass. I would like to keep my glass in good shape, after all.
Tear a large enough piece of plastic wrap and flip the glass upside down. Wrap the plastic wrap down over the bottom of the glass and sides, folding the wrap in on itself as necessary. The plastic wrap doesn’t need to be smooth, just flat.
Tape the plastic wrap down with a band of masking tape to hold it in place and to mark how tall you want your crown to be.
Time to decoupage
If you’ve never played with decoupage before, I recommend reading my entire article on techniques and handling decoupage with fabric: Using decoupage and fabric for props and accessories. While working with the glass, you’ll be working with the crown upside down, with the bottom of the glass working as the bottom of the crown.
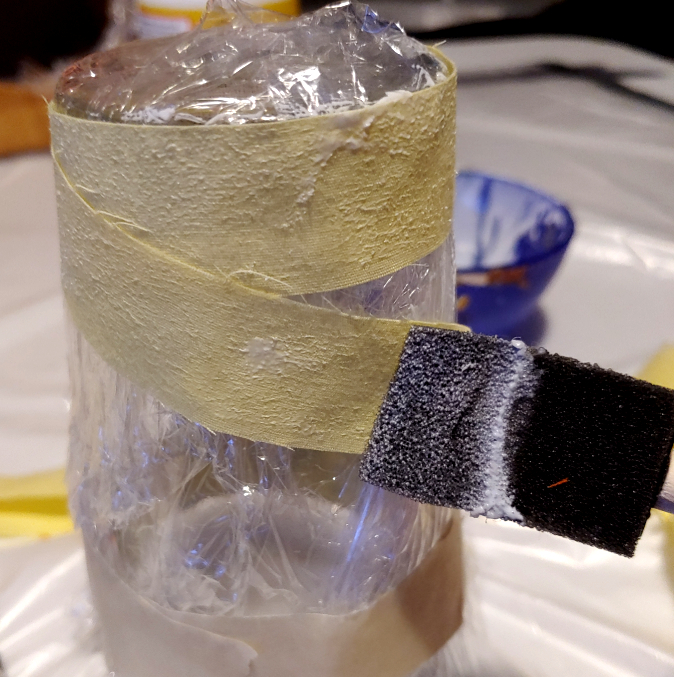
Cut strips of scrap fabric a few inches long. Doesn’t need to be exact. Start at one end of the glass or the other. Doesn’t matter which. I started at the bottom for mine, no reason in particular.
Wrap a strip of fabric around the glass, applying a thin layer of undiluted Mod Podge to the fabric. As you wrap the fabric, it won’t stick to the plastic wrap, but it will stick to itself.
If the fabric causes any problems, you can use your fingers to smooth it out or reposition the strips so they sit flat against the glass.
After wrapping the glass from the bottom to your tape line, it’s time to add the vertical strips. Vertical strips will hide the fabric better than horizontal ones once the crown is painted.
Apply the vertical strips directly over the wrapped horizontal strips. The strips can be applied while the base layer is still wet. Use the sponge brush to apply the glue to the horizontal strips then place the vertical strips down on top. Apply glue on top of the vertical strips to keep them in place.
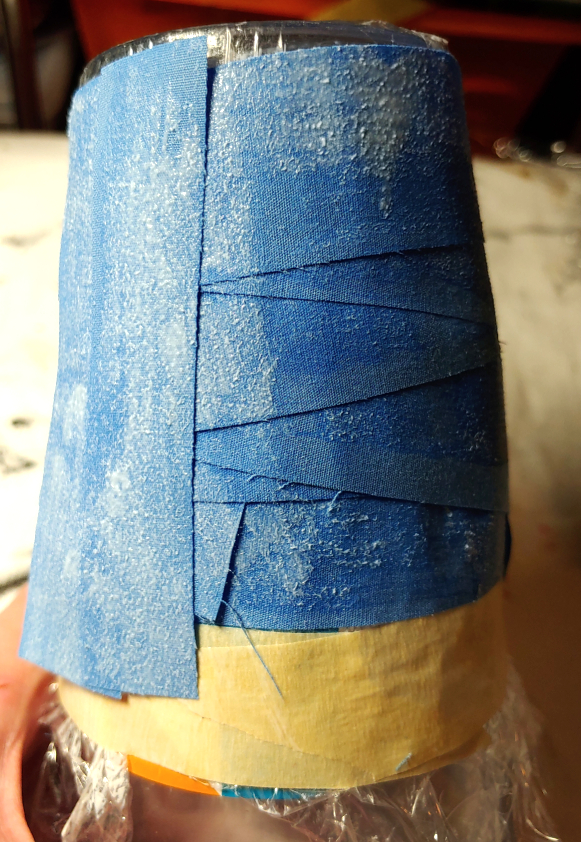
Leave a little bit of a lip over the top of the glass so you can grip it later when removing the crown.
These strips can be longer than your tape as we’ll trim those down later once everything is dry.
Continue adding vertical strips around the entire glass until it’s completely covered.
Now let it dry. The glass can be handled after about half an hour, but it won’t be fully cured until at least 12 hours later. So leave it overnight in a place where it won’t get knocked over or touched so it can dry completely.
Removing the crown
This is honestly the hardest part as it may try to fight you.
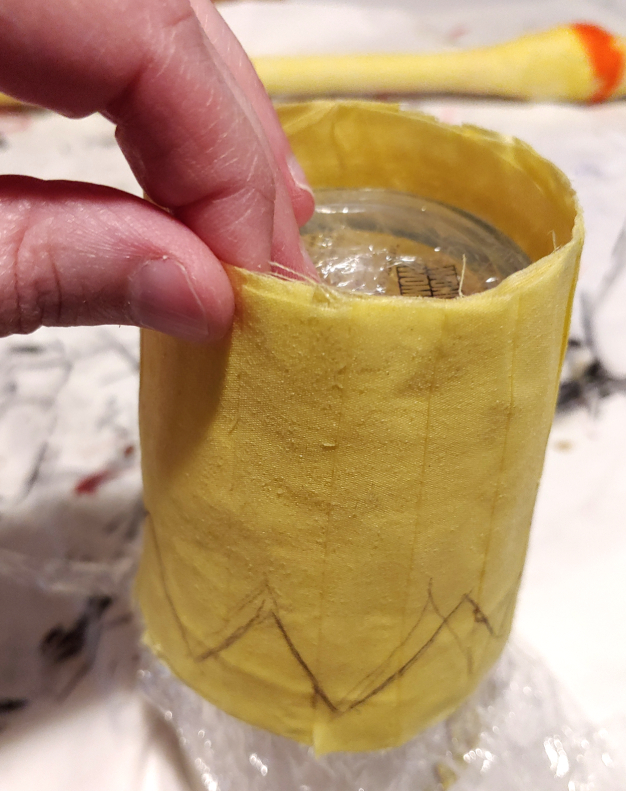
Start by cutting the tape at the bottom of your plastic wrap with a pair of non-fabric scissors. Tape can dull scissors, and we don’t want to dull the good ones.
Grab the overlap and pull it to start pulling the fabric over the glass. Don’t yank, but you should be able to pull it. If it doesn’t budge, try wiggling the overlap just a bit to try to get it to move.
If it still doesn’t move, take a flat object like a thin ruler and wedge it between the fabric and the glass.
Now, what if you don’t have an overlap and it still doesn’t move? It’s time to get the scissors and perform some surgery.

This can happen with plastic cups or if you just can’t get a grip on the fabric. And that’s why we need a backup plan.
Take a small pair of scissors and wedge them underneath the fabric. start cutting as straight of a cut as possible up the side to free the crown from the glass. The line won’t be completely straight as you’re dealing with tight fabric around a glass, but you can get close.
Make sure to cut through all the layers of fabric, both horizontal and vertical strips.
Now you need to do something about that gash. And what’s the answer? More decoupage!
Carefully pull the two sides of the crown together. The material will feel a little soft in your hands as we’ve cut the stability away from it. With the two sides together, decoupage a vertical strip of fabric to the outside of the crown.

On the inside of the crown, decoupage several strips of fabric horizontally like bandaids closing a gap and holding it together. Allow about 12 hours for this to dry and fully cure.
Creating the zigzags
While you have a crown shape per se, it’s not really a crown without the zigzag pattern at the top. For this, I’m using a triangle I got from a set during a back-to-school sale at Walmart. However, you can honestly use anything that has an angle to it. Corner of a notebook, paper, heck even a credit card. Something that will make a nice template for you to trace.
Return the crown to your glass for stability. Taking your angled object, start planning out how many angles and zigzags you want in your crown. Mario crowns have 4 but others may need more zigs and zags for their design.
Start by dividing the crown up evenly to how many angles you want. It can be guestimated or measured. Once you have your guestimation, start drawing the angles onto your fabric with a pen.

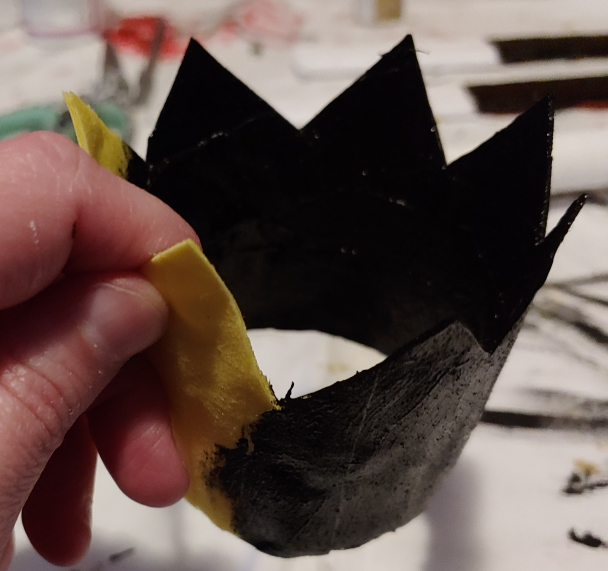
Once you’re satisfied with the angles, remove the crown from the glass. Using fabric scissors, cut off the extra fabric.
Decorating and painting
Now decorate. Most things will stick to decoupaged fabric. Foam clay, air dry clay, foamies, glitter. Anything that’s lightweight will work as long as it can be glued.
Foam clay can be applied using water, much like applying it to EVA foam. Other types of clay and foamies can be added using super glue. Avoid hot glue as it warps the decoupage fabric. You can also use white school glue to add accents as well.

Once all your accents have dried, it’s time to paint. Since Mod Podge is actually a sealant by its nature, there’s no need to add a sealant to your decoupaged work. If you have added accents, however, you may need to seal those. Mod Podge can seal clay and foamies no problem, turning them into paintable, nonporous surfaces.
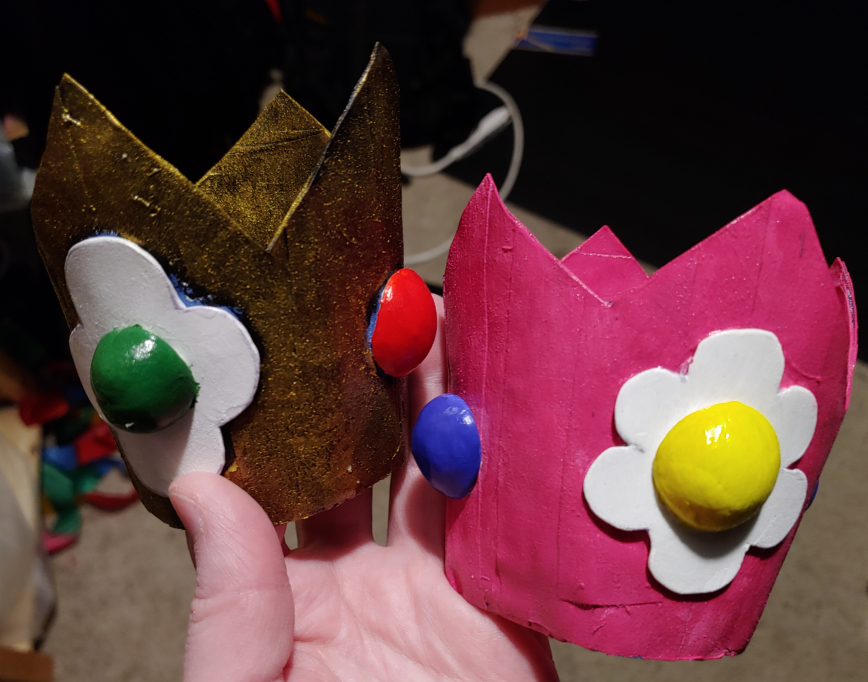
The trick to a good paint job is the base color you use. If you want a metallic, slightly weathered, or darker look, use a black base coat. If you want brilliant metallics or just bright colors, use a white base coat.
Paint both the inside and the outside of the crown as both sides will be visible as you move around.
After painting the base coat, add the colorful top coat on top. You can spray paint it, paint it with a brush, even use a sponge. Whatever you need, get some cool color on there. If you’re looking for a cool metallic technique, you can try my Painting weathered metal with a makeup wedge tutorial!
Cover the crown and all the accents completely with your colorful paints. Once you’re finished, you’ll want a shiny top coat to make the crown appear to really shine. While I tend to use DecoArt Gloss Varnish, you can actually just use gloss Mod Podge for a cheap alternative! Seal the paint with at least two layers to protect the paint from chips, bumps, and scrapes at a con.
Optionally, to make the crown super sturdy, brush on two layers of Mod Podge hard coat, allowing each coat about 30 minutes to dry in between. This hard coat has become one of my favorites. It’s often used with furniture painting, so it’s really resilient to scratches and bumps. And after it cures in 4 weeks, the decoupage becomes very strong with the rigidity of a plastic candy bucket. It has some give, but it holds its shape very well.
Adding straps
Now that you’ve decorated, you need a way to hold this thing to your head. The easiest way is to add straps that span the center of the crown. You can use alligator clips or the like to clip the crown into your wig.

Once the varnish has dried, take a piece of elastic and cut a length just slightly longer than the diameter of the crown. Don’t pull as you want the elastic to simply sit there and not tug on the crown itself. You’ll want 2 pieces to make sure the crown is extra secure.
Glue the elastic to both sides of the crown using superglue, allowing about 24 hours or so for the glue to fully cure and become unmovable. Work near a fan as superglue is toxic to breathe for an extended period of time.
And that’s it! Now attach the crown to a wig and go have fun!
I hope you enjoyed this cheap and easy way to make yourself a tiny, lightweight crown. I’ve used this method for a few crowns with whatever scrap fabric I have leftover on my shelf for several characters. It’s a great way to also clear out those fabric scraps that are sitting around.
Let me know what crowns you make with this method! @ me on social media so I can admire your work!

I appreciate the effort you put into providing practical solutions for common challenges. Thanks for the help!
LikeLike