Sometimes you just want a stick. For cosplay of course! And with this summer being as inhospitable as it was, I didn’t want to pull on all the PPE gear to work with foam on the apartment balcony. So I turned to my favorite low-tech medium: paper mache and decoupage!
Decoupage is pretty similar to paper mache, just a little bit less messy as it uses a sponge to paste something down instead of a bowl of paste. I used to do it a lot when I was younger, decoupaging cutouts from TV Guide of anime characters onto jewelry boxes (it’s fun! you should try it if you haven’t!)

And like paper mache, decoupage is as strong as the base materials put into it, so to make a large sacred stick for my DanMachi cosplay, I needed something strong to handle a nearly 40″ prop. Instead of using newsprint or whatever random junk ad I got in the mail this week, I went with something I have a ton of scrap fabric.
This project was made almost completely from stuff I had lying around. I only had to buy the Mod Podge. You can make it from a variety of materials, so I’ll list a few good prop guts you can use to make this prop super stable.
Alright, let’s make a stick.
Skill level: beginner-friendly!
Cost: budget-friendly!
Materials:
- Foam core board or a thick box like from an Amazon package
- Aluminum foil (a lot of it)
- Something stick-like. I used a 1/4″ PVC pipe I had leftover, but you could use an old broom handle, a Swiffer handle, or even a curtain rod (check with cons before using metal in your props). You can get cheap PVC pipes at the hardware store in the plumbing section.
- Fabric scraps. I used about 1/4″ to make this stick
- Masking tape
Supplies:
- Mod Podge, glossy or matte
- A sponge brush
- Paper towels (you will need them for your fingers)
- Fabric scissors
- Xacto knife or box cutter
- Metal ruler for any straight edges (an Xacto knife will destroy a wooden or plastic ruler)
- Cutting mat (recommended) or a surface you don’t mind marking
- Posterboard or paper for pattern-making
- Pencils or pens for drafting and marking
- Pipe cutters (for PVC pipes, couple bucks at the hardware store), saw (for wood stick bases), or the like if you need to shorten your stick base
- A vinyl tablecloth or a plastic trash bag for your workspace and maybe the floor
- Plastic wrap and something to prop the stick up on during drying. I used a sword display holder, but you can feasibly use anything from jars to bowls or cups. Mod Podge is nontoxic but probably tastes bad so make sure to wash your holder.
- Acrylic paints. I used white (base) with beige and chocolate brown (wood color)
- Sealer. If you want a non-shiny stick, use a matte sealer. I recommend Delta Creative ultra matte varnish. You can also use matte Mod Podge.
- Paintbrush
Creating and adding accents
Planning accents
Before you delve into the good materials, it’s time to plan any accents that will extend beyond your stick base. For the DanMachi stick, the design was relatively simple.

The main accents you want to plan out are anything that extends beyond your stick base. This includes branches or notches and accents like my stick has. Knots can be skipped as these will be added with tinfoil directly onto the base later.
The paper templates created here will be used to cut out the base support in cardboard or foam core board. Give yourself a little extra room where the templates meet the stick base to either bond the accents to a solid stick base with tape or shove them inside a pipe.
Once you’re satisfied with your accent shape, set the stick base aside.
Cutting the accents
The hardest part of making the base is cutting foam core board or cardboard. Both materials have a soft inside that is very porous. Apply too much pressure and the guts will collapse and you get puckers in your material. To keep the material strong, you want to avoid puckering and the core collapsing.
Once you’ve traced your accents onto your material, it’s time to cut them out. And there’s the trick to cutting porous material. It’s making multiple passes with your knife blade.

If you have a straight edge, lay your metal ruler along that edge, stabilizing it with one hand. Knife in the other hand, gently pierce the surface and start pulling the knife towards you along the ruler. Don’t push the knife all the way through. Just graze the surface. If the knife feels like it’s dragging at any point, pull it out and cut closer to the surface.
Once you’ve made your first cut, make a second pass, pushing the knife a little bit deeper into the material. If the knife feels like it’s dragging, it’s likely catching on the porous guts. Like the first pass, pull it out a bit and cut a little more shallow.
Now you need a third pass. This third pass should cut through the bottom of the material, reaching your cutting mat. If you’re not using a mat, you may feel some resistance from the table, but don’t press too hard while you’re cutting so you don’t chip the knife blade.
Cutting curves is a bit more tricky as you don’t have a ruler to guide you. The process is the same, but for each pass, you want the knife to follow the same path as the previous one. You can get away with some errant cuts off the path as we’ll be covering it with a bunch of fabric and tin foil, but the fewer nicks you have, the more stable your material will be.
Shaping the accents
While you could feasibly leave the accents as is, sticks generally have volume to them, making them wider and more natural-looking than a piece of cardboard or foam core board. And to give it volume, we turn to our friend, the aluminum foil.
When you compress foil, it becomes quite dense and strong. You can smooth it out a bit as well, but we’ll be smoothing it out with some tape instead to ensure we have a nice easy-to-work-with canvas for decoupage.
The larger your accents, the more foil you will need.
Start with the thickest part of your accent. Take a strip of foil and crinkle it up into a sausage. Compress the crinkle flatter against a table or against your cardboard accent until it starts becoming more solid. It won’t become completely solid or flat without a ton of work, and we just need a base, so try to squash it somewhat evenly instead of completely during this process. Once it’s sufficiently squished, tape it partially down with masking tape so it doesn’t move.

Continue adding squished crinkles across the entire piece, making sure to leave some room where it will connect with your stick base. Crinkle and tape down. Crinkle some more, add more tape. For some of the thinner sections, you may need smaller sections of crinkle. And as foil tears pretty easily, you can crinkle then tear off a section if you find it too large.

Repeat the crinkle cover on both sides of your accent so you have a more organic shape and not a flat piece of cardboard.
To cover the edges of your cardboard or foam core board, take thin strips of foil and roll them into noodles. These noodles have enough flexibility that they can be wrapped around curves and corners of your accent before being taped down.
When taping down the edging noodle, you will need to wrap the tape across both sides to get it to stay. The more even your tape is across this noodle, the smoother your edge will appear to be.
Now wrap the whole thing in tape like a mummy. This gives you a full surface to attach the fabric to while decoupaging.

Attaching the accents
While having accents is great, they need to be part of your stick. And these attachment points need to be sturdy so if you bump your prop, it’s not going to snap in half.
If you’re working with a pipe, crush the core of your material with your hands. This is the only time you want to squeeze the stuffing out of your foam core board or cardboard in this entire process. This will round out the material and give you enough room to shove it inside of the pipe as far as it will go.
If you are working with a solid stick base, place the accent against the base and tape it as best you can. It’s going to be wobbly but we’re going to pad it up and secure it.
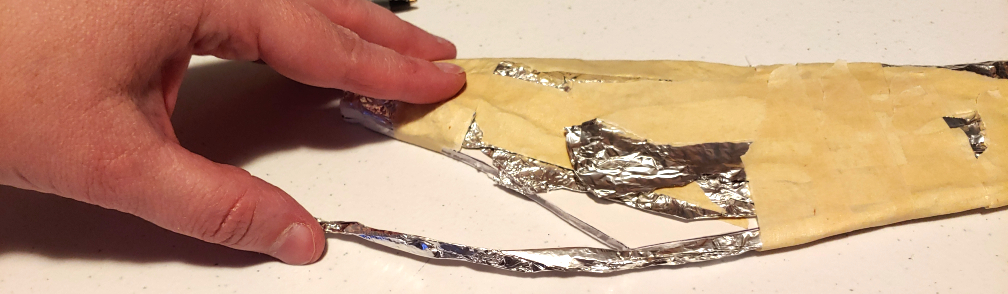
For both methods, we want the transition from base to accent to be even and smooth, to give it the illusion that this is one solid piece. And for that, we need MORE FOIL!

Take a piece of foil and crinkle it up. Compress it flat on one side much like when creating the accents but this time, smooth out the edges a bit more flatly. This creates the illusion of a transition from the more voluminous section to the accent. Push one side flush against your stick base and tape it down.
If you’re working with a solid stick base, place a few pieces of foil halfway over the base and halfway over the accent to create a bridge.
Now wrap the joint tightly with tape.
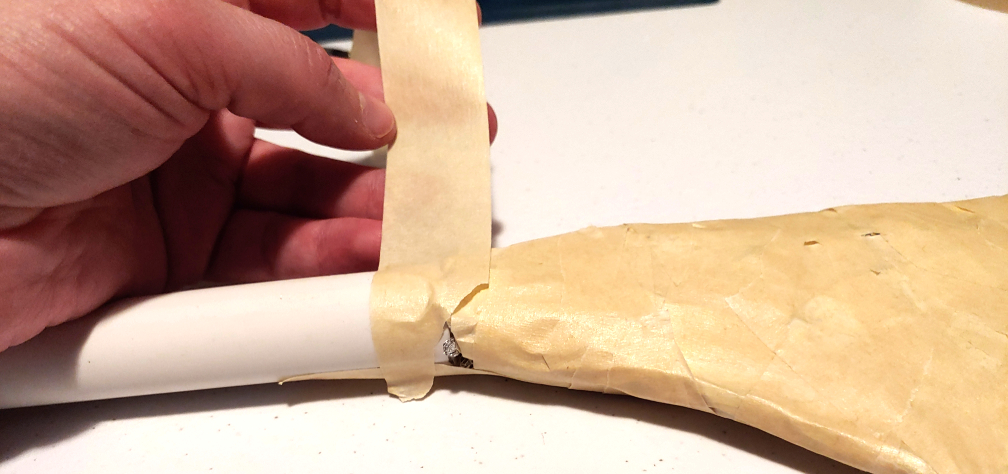
Give it a good few wraps and wrap partways up the stick base as well. This reinforces the joint and helps prevent snapping.

Adding knots
If you’re making a stick or a staff, you might need some wood knots! Unlike the other accents, they’re attached directly to the stick base. And to make these accents, it’s time to get the aluminum foil out once again.
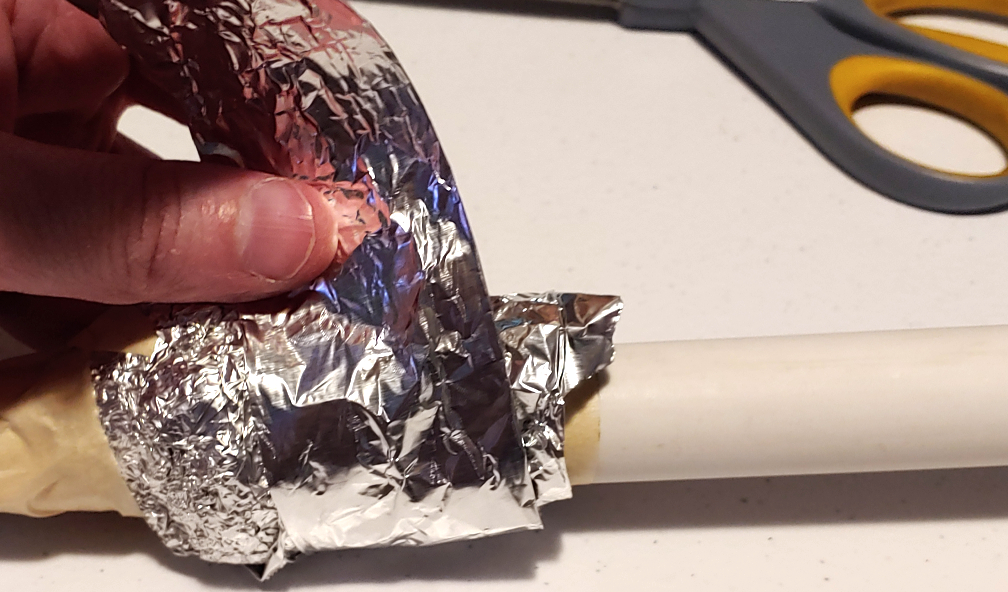
Start by taking a large piece of foil and crinkling it up, wrapping it around the pole. Unlike with the accents, don’t compress it just yet. Wrap it completely around the pole first. Layer it up a bit if you need more volume for a thick knot. Wrap with fewer layers at the outer edge to make a smoother transition from stick base to knot.
Now take your hand and start squeezing the stick base, condensing the foil down until it starts becoming more solid.

A knot has a sort of double-sided cone-like shape. To make this shape, start compressing at the center, squeezing a bit to make the foil denser. Move towards the outside edge, compressing more and more until the foil flattens.
If you need a dip in the knot, take foil pieces and build up a small raised structure around where you wish the dip to be. You can also try to dig your knuckle into the foil and compress it more to make a gentler knot (though this depends on how dense your foil is after squeezing).
Once you’re satisfied with the knot, you can optionally wrap it in flat sheets of foil to smooth it out. This can also be used to make the slope from knot to stick base more gradual or to smooth it out so there are no noticeable edges.
Once the knot is to your satisfaction, it’s time to mummify it.
Decoupage
We’ve reached the point of messy. It’s time to decoupage the stick. You can find how to decoupage here with this full rundown: Using decoupage and fabric for props and accessories.
Here’s some stick-based tips to help you get your stick nice and covered with decoupaged fabric:
Organic shapes
The stick has a lot of organic shapes to it, so you’ll need to do quite a bit of layering to work around them. Odd shapes like knots may give you the most trouble, so attack them with the smallest strips and build your way up to the longer ones as needed.

For the organic shapes, you want the fabric to sit flat. If you notice it puckering, you can cut the strip shorter and overlap the fabric at a better angle to continue on your way. For each of the layers, make sure to decoupage glue on top to ensure the fabric is completely stuck down.
Joints and stick base
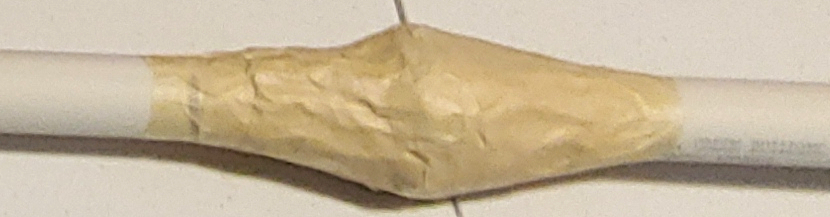
Your stick may need some extra decoupage to ensure it’s super stable, especially around the joints where the accents attach to your stick base. You’ll want to wrap the joint several times to ensure it’s completely stable and reinforced.
Wrapping the joint a few times will give it a little volume, but it will also ensure that the transition between pieces isn’t visible or noticeable.
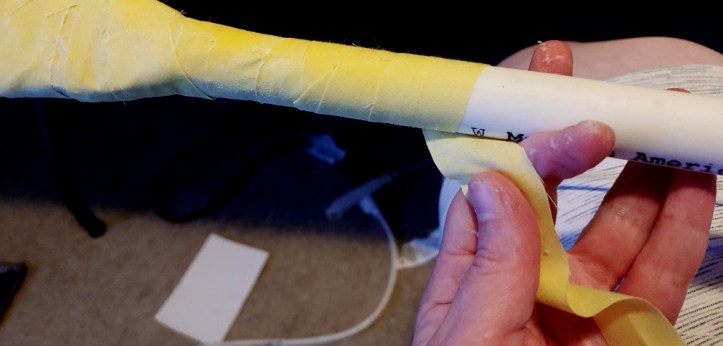
Once you’ve wrapped the joints, you’ll also need to wrap the stick base. This gives you a consistent look and makes the base easier to paint without the need for sanding or other prep. Long strips are best for this as you can wrap it up in a spiral. Place glue down section by little section to ensure your glue doesn’t start drying before you get the fabric placed in the spiral pattern.
The spiral pattern is good for covering a greater distance with the least amount of material. Since the base is sturdy, you only need one or two layers to get full coverage.
Drying
Drying takes about 12-24 hours depending on how humid your drying spot is and how thick your decoupage work is. It’ll start to feel dry after about half an hour. You’ll want to prop it up onto something like a display rack or some jars so that the decoupage can dry the full way around.

Painting
Mod Podge works great as a base sealant, which is good for us because it’s already there as part of the decoupage process. This means the next step is to create the base paint coat.
Adding color
A base color ensures your canvas is all one color before you start adding the actual stick colors to it. For light sticks, you want to cover the entire project in white. For dark sticks, use black. The color of your base coat will reflect into the top coat in a way. A black base will make the top coat appear deeper and darker. It can even make it appear weathered or worn. A white base will make a top coat appear more vibrant or lighter in color, like a birch branch or a lightly colored staff.

Paint the entirety of the stick in the base color of your choosing. Depending on how bright your fabric is, it may take a few coats to fully cover the fabric’s color.
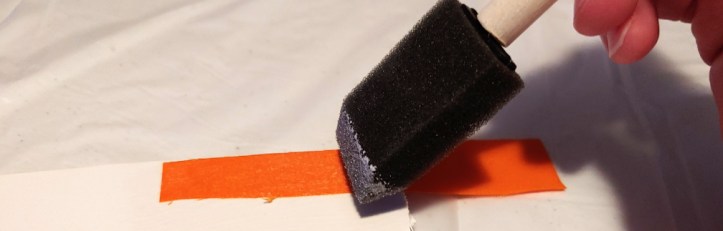
Once you’ve added the base coat, I suggest using a sponging technique to get the top coat on. This tends to disguise the texture of the fabric a bit more due to a slightly speckled paint look. It is adapted from my favorite technique, Painting weathered metal with a makeup wedge.
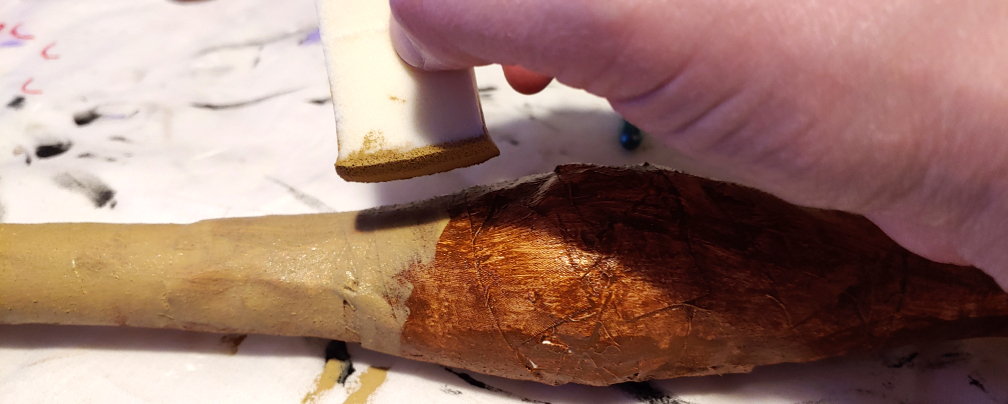
To make my DanMachi stick, I added a second base coat of beige then sponged on two top coats of chocolate brown to give the stick a slightly weathered, light wood look.
The sponge painting isn’t required by any means. You can paint your stick with a paintbrush or spray paint as you so desire. But I do highly recommend the makeup wedge to give it a more natural look.
Varnish
Regardless of which method of painting you choose, you need to varnish it. This a protective layer that protects your paint job from normal wear and tear of a con and prevents it from chipping off if you bump it.
Since this is a stick, I recommend a matte varnish since sticks generally do not have any shine to them. Wood doesn’t shine. If you have a shiny stick for whatever reason (because anime, honestly), gloss varnish is what you need. I personally stick to DecoArt varnishes as they go on nice and smooth, but honestly, you can use any varnish you choose (even Mod Podge!).
If you used a makeup wedge to sponge the paint onto your stick, you’ll need to use a makeup wedge to put the varnish on. A paintbrush is too rough with the thin layer of sponged paint, so you have to use the makeup wedge to brush it on instead.
If you used any other method, generally you can use a fluffy paintbrush to apply your coats.
Make sure to apply at least 2 layers to ensure that your paint job is truly protected.
An extra hard coat
Optionally you can add a hard shell to the outer layer of your stick. Mod Podge makes a Hard Coat (it’s hard to find, but you can find it at Michaels). This coat does what it sounds like: it makes the surface incredibly hard and is traditionally used in things like furniture!
Now the challenge with Hard Coat is the drying time. If you skim the bottle, it says that it requires 4 weeks to cure, and that is not an exaggeration. Hard Coat will dry in about 30 minutes or so, but their website says not to hang anything up for at least 24 hours, so I wouldn’t put this coat on the night before a con.
The 4 weeks’ time factors in to make it stiff, and I mean incredibly stiff. It will make the surface feel a bit rough, but the result is quite rigid. If you are worried about stability around the joints, brush some Hard Coat on and let it cure.
Hard Coat brushes on like any other sealant. The easiest method is to use a sponge brush as you used when applying the decoupage. You can also paint it on with a paintbrush. Add two thin layers and let it cure and you got yourself a nice durable outside coat.
And that’s it! Congrats on your new stick!

I hope this stick tutorial is helpful! Whether it’s to create your own stick, a staff, or something else magical, you can create it on a budget and possibly with stuff you pull out of the craft bin. I spent about $5 to make this stick, and that was for an extra large bottle of Mod Podge. (I will likely need to get more aluminum foil after this, however.)
This method is con safe, indoor-safe, and has so many possibilities for your next stick needs! I plan on using this again myself to make a few sticks and staffs that don’t need to be ultra-smooth.
So go make something yourself! Pull that shipping box out of the recycling bin and give it a new life in your next prop. @ me on social media and let me know what you make with this tutorial! I’d love to see it!
