
At some point in your cosplay and sewing adventures, you’ll encounter the pattern envelope. Patterns are a good way to get started with sewing, and many companies have complete beginner patterns that will teach you how to use patterns and some sewing techniques. Some patterns are more advanced and might involve adding a lining to a coat, sewing a zipper fly, or making petticoats.
Regardless of which pattern you’re using, you’ll need to interpret the information on a pattern envelope. They contain nearly all the information you need to complete each pattern or garment on the envelope, but there is a lot of information. When you first encounter a pattern envelope, it might make your head spin with how much information is actually on it. No worries.
Let’s walk through a couple of envelopes together, first looking at a pattern envelope you might start with then one that is much more complex. These pattern examples come from two commercial pattern brands, Simplicity and McCall’s. Both of these companies have been producing a lot of costume and cosplay patterns and they’re relatively easy to find at nearly any place that sells patterns. Though the envelopes will differ depending on which brand and what’s inside the envelope, these key elements will always be the same.
Front of the envelope
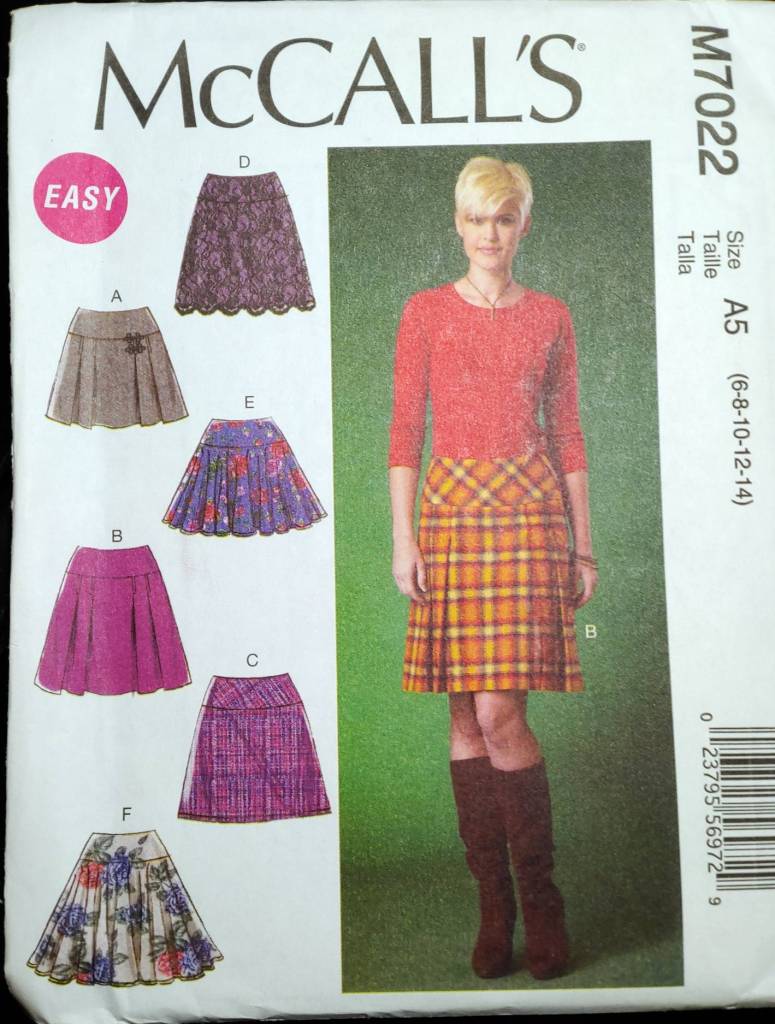
Let’s start by taking a look at the front of the envelope. Immediately you can tell, this is indeed a skirt pattern and only skirts, but there’s more information you can glean from this envelope.
This is a McCall’s pattern. Commercial patterns make their branding very visible and easy to identify. So when you’re shopping for patterns in the store, you know what drawer to search. While this particular pattern does not have it, some patterns may also have a designer’s name or logo on them.
M7022 is the pattern ID number. Each pattern company has different numbers, usually ranging from the 1000s to 7000s though some go even higher than that. Some like McCall’s have letters in front of the numbers, especially if they have multiple brands on their line, but others simply have numbers.
When searching a pattern drawer at the store, the patterns are sorted numerically with the range of numbers listed on the drawer itself. You open the drawer and search for the pattern with the matching number on the tag to locate which one you want to purchase. You can find the pattern’s number by browsing the website before you go to the store or searching in the pattern look-book usually located near the pattern stand.
Pattern styles
Also on the pattern envelope is a display of all the styles included. For some patterns, these are full outfits or pieces of a set, but for the M7022 pattern, these are different styles of skirts. Each of these styles is labeled with a letter used for identification throughout the pattern. You’ll find these letters on the envelope, on the pattern pieces, and on the instructions. This makes each one identifiable when you’re working with each style.
Each pattern will have one or more models on the front. Modern patterns often have a model showing off one or more of the pieces so you can see what it looks like worn. Some have hand-drawn images, and this is especially found on vintage patterns.
Modern patterns more and more are making specifically plus-size lines. On these envelopes, you’ll likely find either a plus-size model alone or standing next to a non-plus size model showing how the pattern scales between sizes and body shapes.
Some patterns only have one singular outfit or variants of the same outfit with letters next to the model. It may be difficult to determine which pattern piece goes to what letter, but you can flip over the pattern and check out the drawings on the backside for more information.
Difficulty markings
This pattern has an Easy mark on it. This label marks the pattern as beginner-friendly. Each pattern company and even pattern styles mark their pattern with a different term. “Easy”, “Easy-to-use”, “Learn to Sew”, and sometimes even “Beginner”. When starting out, look for these markings and terms to know this pattern is friendly to those who have just started sewing.
Some patterns will go further and tell you more difficulty ratings such as intermediate or advanced. This means these patterns use more advanced sewing techniques or require sewing seams that may not be as easy for a beginner. When you feel ready, you can advance to these more difficult patterns to improve your skill and technique.
Style markings
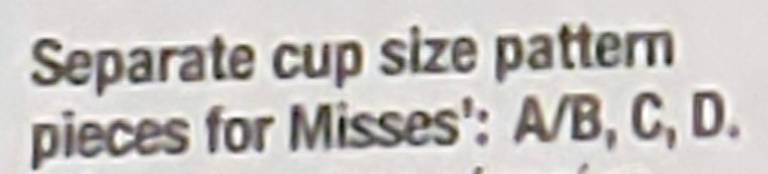
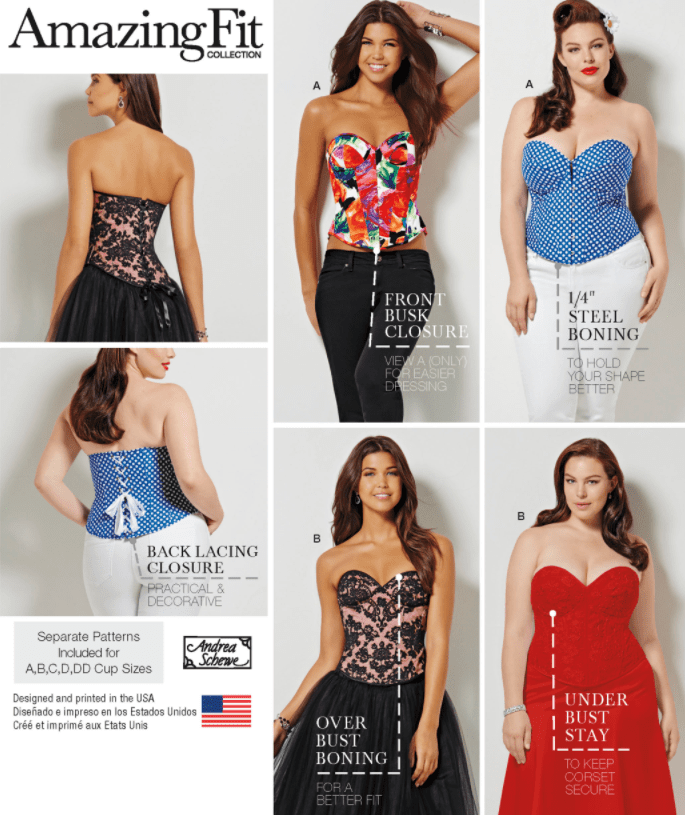
Commercial patterns sometimes have styles or lines that may fit a specific shape or a specific purpose. A common one to find is a cup size pattern. These patterns have extra pieces for specific cup sizes that will allow you to customize the pattern to fit your particular measurements. These patterns may also be listed as “Amazing fit” or “A, B, C, & D Cupsize” or something along those lines to let you know that these patterns are customizable according to your particular size and shape.
Some patterns also have different fits listed as Curvy, Average, and Slim or something of similar nature. These sorts of markings indicate the patterns have specialized pieces for different body shapes, much like the cup size indicator does. If you’re pear-shaped like me, a Curvy fit has extra room in the hips to allow for a better fit. If you’re straight down, a Slim fit will keep the hips and butt from bagging. If you’re an hourglass, an Average fit may suit the body more snugly.
Sizes
All patterns have sizes. For some patterns, they can shove all the adult sizes into one envelope, but for some, they split the pattern sizes into different envelopes. Now a very important note about pattern sizes. These are absolutely not commercial sizes. These sizes are generally standardized across patterns using body measurements. So while you may fit X size in jeans, your body may be Y size when using your actual measurements. The numbers are often different due to commercial sizes lacking standardization.
The pattern sizes will always be listed on the front of the envelope. They often have a symbol of some sort accompanying it, such as A for adult, though half the time they don’t make sense to anyone but the pattern maker. That’s why you check the numbers.
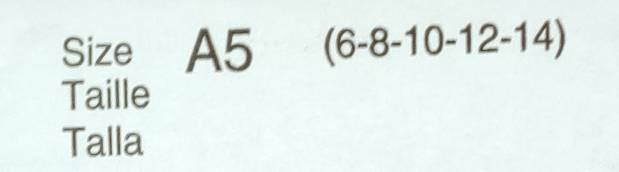
The size you want to pay particular attention to is the numbers accompanying those symbols. They are often found in parentheses to tell you what things like A5 actually stand for. (6-8-10-12-14) indicates that this pattern envelope has those sizes included within it.
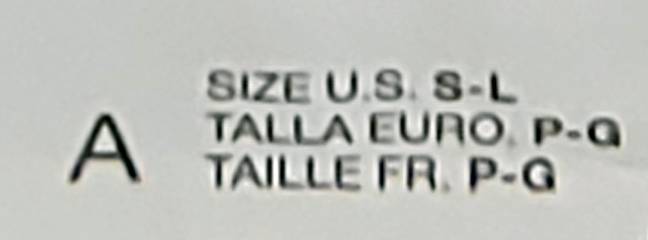
Some patterns may have sizes by letters. You can find these in sleepwear, hats, robes, and accessories. Hat patterns tend to be the same sizes across the board, but other patterns may be listing sizes how they see fit. The measurements for these sizes will always be listed on the envelope.
The exception to the size range is an envelope that says “one size”. Like it says, this type of pattern has only one size. You’ll find size markings like this in gloves, cloaks, accessories like scarves and bags, and things that do not necessarily need to fit a particular body type.
For all size markings, save the one size, you’ll find the definition for the sizes on the back of the envelope. How to interpret them will be discussed below, so keep reading on! Sizing is important to make sure you purchase the right envelope.
Back of the envelope
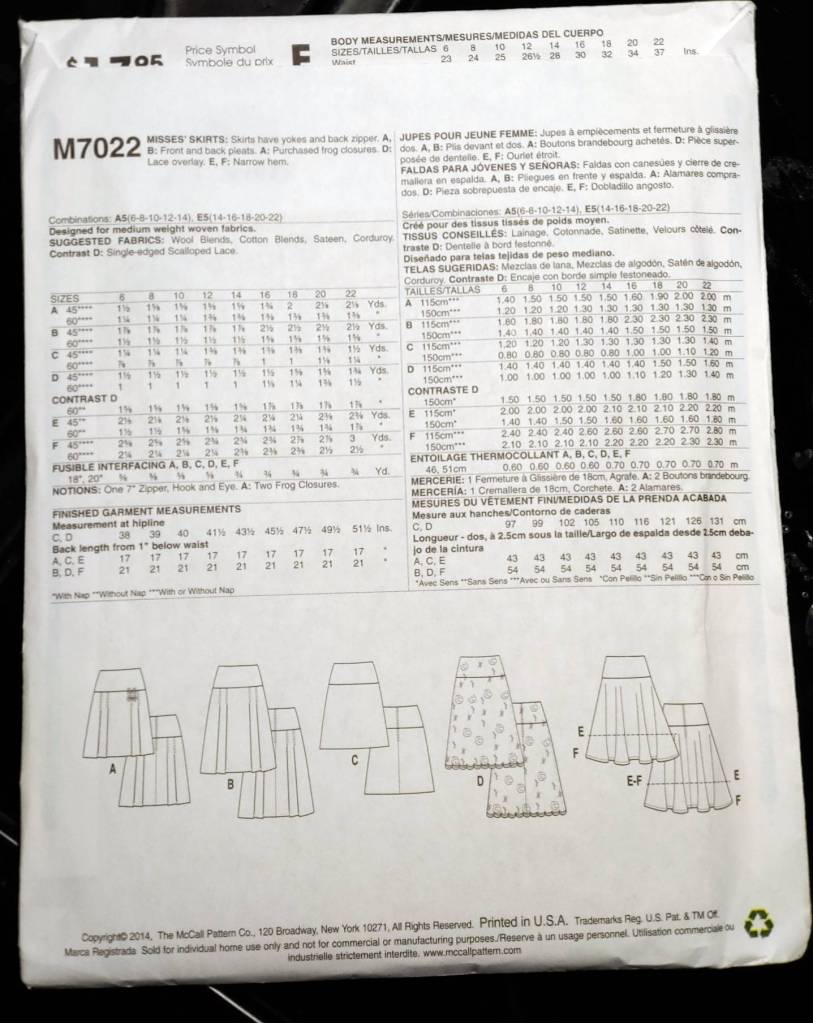
The back of an envelope gives you a lot of juicy details. here you’ll find everything you need, from sizing to fabric measurements, notions, pattern piece count, and even drawings of the pattern pieces. Some include only what the back looks like, but other patterns may include both a front and a back drawing.
The amount of information on the back of an envelope may seem dizzying. There’s a chart of information, at least two languages, and more details than you can shake a stick at. It seems like a lot, but all this information is actually crucial to the construction of the pattern.
You need all this information when determining how much fabric to buy or how many notions to purchase. For multi-patterns such as this skirt pattern, requirements for each style are broken down into sections. This allows you to only buy what you need for the particular style or piece you want to make.
But what do all these crazy numbers and all this information mean? Well, let’s break it down using this skirt pattern as an example.
Basic description

At the top of the pattern, you’ll always find a basic summary or description of the pattern. Like on the front, you see a pattern number or ID. This is the same ID that was on the front of the envelope and is found in several places on the envelope so it’s easy to identify which one you’re looking at.
In bold, the pattern tells you what pattern you have. This is a skirt pattern. Misses’ skirts. That’s it. Other patterns may say “hats” or “costumes” or “pants”. It is a quick summary of what’s inside.
Some patterns give you more of a description, much like our skirt pattern. It tells us a few details about each style by letter. All the skirts here have a yoke (that wide band that goes around your waist, in this case) and a zipper in the back. Each of the styles is slightly different (pleats and lace) or has different requirements (narrow hem or special frog closures)
Fabric requirements

All patterns are designed with a specific fabric type and weight in mind. You can’t sew a bodysuit with cotton and you can’t make a hat out of spandex. Patterns will tell you what fabrics are recommended for the pattern. This skirt pattern is simple. All style types can use the same type of fabric: medium-weight and cottony. This makes it a good pattern to start with as cotton is a relatively easy fabric to start with.
Style D has an extra element to it: a contrast. For this skirt, you can look on the front or the back of the envelope and see that D has an extra layer of lace. The pattern is suggesting a certain type of lace. Single-edged means the scalloped edge is only on one side and is used to make that scalloped pattern at the bottom of the skirt.
For more complex patterns, you may see fabric suggestions broken down by pattern piece, and the list can get quite long, such as with this hat pattern:

Some patterns may also say “Extra fabric needed to match plaids, stripes, or one-way fabrics” like on this hat pattern. This means that if you have patterned fabric and want the pattern to match at the seams, add extra to the fabric you buy so you can make those matches.
This section may also show tools or extra notions required. For this hat pattern, you need wire cutters and pliers to bend the wire needed to support the hat.
Notions

Some patterns need various notions for everything from support to accents and things like buttons. Notions may be listed under the fabric requirements or they may be listed further down under fabric requirements. Notions may be listed for all styles (listed without letters or at the start of the list) or they may be broken down for each style in the envelope. Notions listed specifically for A are not required for style B.
Sizes
Remember those sizes listed on the front of the envelope? You’ll find what those mean on the back of the envelope and how to find the pattern that matches your own size. For McCall’s patterns, the sizing information is found on the tab tucked into the envelope. For simplicity, it is listed below the fabric suggestions.
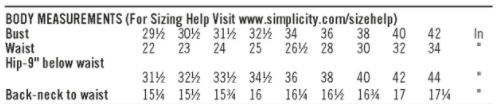
When working with garments like dresses, coats, bathrobes, and most things you wear, you’ll find a variety of measurements listed. Here’s what these measurements mean
- Bust – The widest section along your bustline
- Waist – the smallest section of your torso
- Hip – below the waist, usually around your hips. If you’re shortwaisted, it may be a bit lower than where your natural hip sits.
- Back-neck to waist – the distance from the back collar of your outfit down to your waistline
Other measurements may be present as well such as sleeve length, neck circumference, and inseam (length of your crotch). Not all measurements may be present either as they may not be needed for a pattern. A skirt pattern doesn’t need to know what your bustline is, so it may only list your waist and your hip measurements

When taking your measurements, if you’re slightly larger than one of the measurements, it’s recommended to go up one size so that the pattern doesn’t squeeze you uncomfortably.
Once you’ve found your size, match it with the pattern size number. You can use this size number to make sure your size is included in your envelope and also to determine how much fabric is needed for your size and style letter.
Fabric requirements
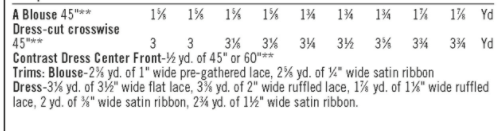
Let’s take a look at our skirt pattern for a simple example:
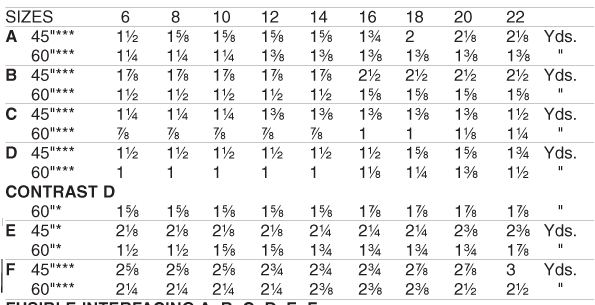
Let’s break down what this actually means.
The left side of the table lists the style letter in bold. This will tell you what style these numbers actually belong to. These are the same letters that are present across the entire pattern.
Also on the left size, you see a bunch of numbers. 45″ and 60″ refer to the width of your fabric, measured across the crossgrain in inches. These are pretty standard fabric sizes you’ll find at fabric stores and when buying fabric online. Most quilting cottons will come in 45″ or a close measurement to that, ranged from about 43″ – 50″. You can generally squeeze a 45″ pattern into 43″. Fashion fabrics such as brocades or taffeta and utility fabrics like vinyl and canvas generally come in larger widths close to 60″.
The top of the table lists the sizes. These sizes are present across all envelopes regardless of if that size is in this envelope or not.
When looking at the table, you’ll want to match the column of your size to the letter of your style. So if you wanted to make style A and your size was 22, you’ll look to the top right of the table to see your measurements. Once you’ve located your cell on the table, you’ll need to figure out what the width of your fabric is.

Let’s take our Size 22 Style A example here. I want to purchase this really nice plaid quilting fabric to make this skirt. The site says the width of this fabric is 45″. So looking at the table, I will need to buy 2 1/8 yards of fabric to make Skirt A.
Let’s take the same Size 22 Style A skirt. But this time, I want to buy wool. Wool usually comes in 60″ width, so if I look at the table, I need to buy 1 3/8 yards of wool.
When looking at the chart, you’ll want to be mindful of other requirements. This includes things like contrasts, overlays, lining, accents, and interfacing. These will be listed separately from the main fabric lengths. When buying fabric, you’ll want to make sure you have all fabric requirements for your style.
I’ll go into more detail next week on how to fully understand fabric requirements so stay tuned!
Finished garment measurements
At the bottom of garments, you may find a finished garment measurement section. These measurements match up to the sizes on the fabric table, usually listed right above this section.
Note that these measurements are larger than the body measurements used to determine the size. These measurements should never be used to determine what size to make. They are simply the measurements of your finished work, which will always be larger so you don’t squeeze the life out of yourself. Garments need to be able to move with your body, and if it’s fitting that tightly, you’ll start popping seams or getting things riding up where they absolutely should not be.
The exception to this is spandex. Spandex and knit are meant to be worn tightly so the measurements may actually be smaller than the body measurements listed for sizing.
A harder example

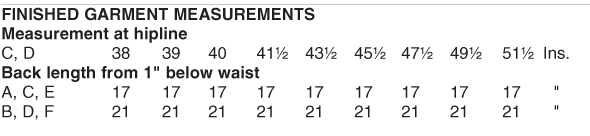
Let’s take a look at a lolita pattern from Simplicity. Lolita patterns are notoriously complex and often involve ruffles, accessories, pleating, petticoats, and more bows you can shake a stick at. But simply because this pattern is complex doesn’t mean you can’t use the same techniques to read this envelope.
Let’s start at the top. We see the Simplicity logo so we know the brand. The pattern ID is 8444 as Simplicity does not use a letter in their pattern numbering.
The size of this pattern is P5 and spans sizes 12-20.
Unlike our skirt pattern, this one has a designer’s name listed in the bottom right-hand corner.
This pattern has two styles, A and B. Each style is an entire look, everything from the shirt, the overskirt, and the petticoat. Each style is further broken down into pieces to make it easier to purchase materials and to sew the style together.
There are no drawings on this pattern but you can see the two styles quite clearly with the models on the front of the envelope. They have a few extra accessories such as stockings, shoes, a giant hair bow, and an oversized lollipop which aren’t included in the pattern but complete the overall look.
Looking at the back of the envelope, it seems like it has a lot more stuff, but in truth, it’s the same sort of stuff as our skirt pattern had but broken up in a different way.
At the top is the pattern ID number along with the number of pattern pieces. This means there are 35 pattern pieces included to make both complete looks. The pattern piece count is mostly found on Simplicity patterns, though others may have it too.
The description in bold is pretty short. Misses’ Costumes. While this is a lolita fashion style, it is found in the costumes section of Simplicity’s catalog. Same thing with kimono, some coats, and historical garments.

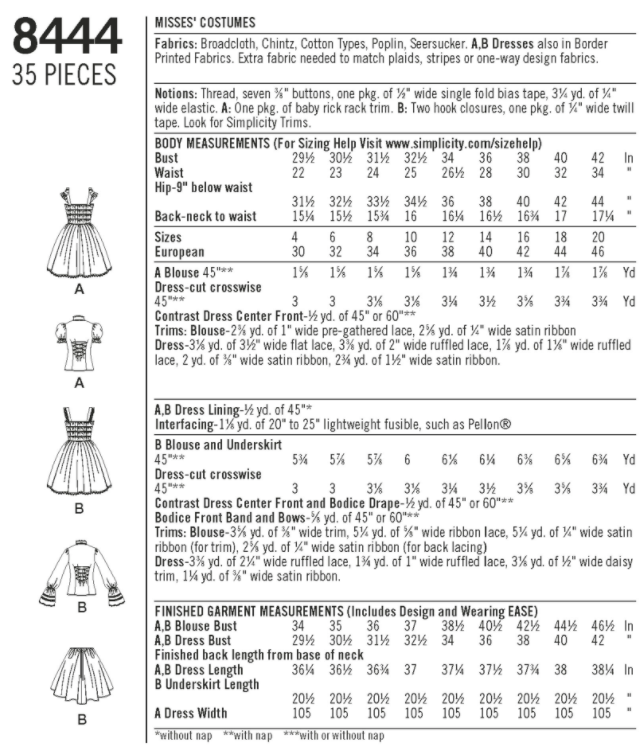
Next is the list of suggested fabrics. This pattern is suited for medium-weight fabrics such as cotton and fancy cotton-like fabrics. Because of the lolita style, it also suggests using border-printed fabrics, aka printed cotton that appears to have a border running down the side. That type of fabric makes that border-like pattern that is common in lolita skirts.

Below the fabrics is notions. Lolita patterns love notions. Lace and accents for days. It’s fitting for the style, right? You can choose what style you want for the accents like rick rack or bias tape, but other things like buttons and hook closures are necessary to support the garment.
Next, we have the fabric requirements. This section is broken up differently than our skirt pattern simply because of the nature of this pattern. When you have patterns that involve garments for styles instead of a single style of skirt, they are often broken up into visible sections, separated by a horizontal rule. Each section lists out the requirements for that particular style, listing each piece of a style out individually if they’re cut out of different pieces of fabric.
While there are more sections here, this chart should look familiar. You have a chart listing out fabric length requirements according to size but instead of listing the style letter, it lists pieces.
The blouse and the dress are designed for 45″ width fabric. This means that if you buy a wider width at the same length, you’ll be wasting all that extra uncut fabric. The other pieces like the dress contrast can be cut out of 45″ or 60″ but it honestly doesn’t matter because it still requires 1/2 yard anyway.
Additional notions are listed here as well. These trims are accents. You can add whatever accent you want, but these are listed here to match the design on the pattern front. (Also, pre-gathered lace makes ruffled accents easier so roll with it). Lolita patterns require quite a lot of details to give it the proper look, so buy in bulk if you plan on making a few outfits.
More about understanding fabric requirements next week!
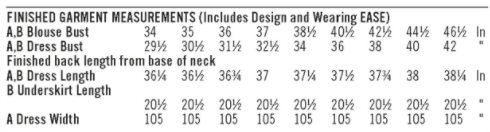
At the bottom is the finished garment measurements. Since there are so many pieces in this pattern, each one is listed separately to give you more accurate measurements.
Not so hard, right? It seems like a lot of information, but all that information is necessary to tell you exactly what you need to make the look on the envelope. The more you read pattern envelopes, the less like moon runes they appear to be. And understanding pattern envelopes means you get exactly the pattern you want in the right size.
Next week, we’ll talk more in-depth about interpreting the fabric requirements on an envelope, so stay tuned~!
