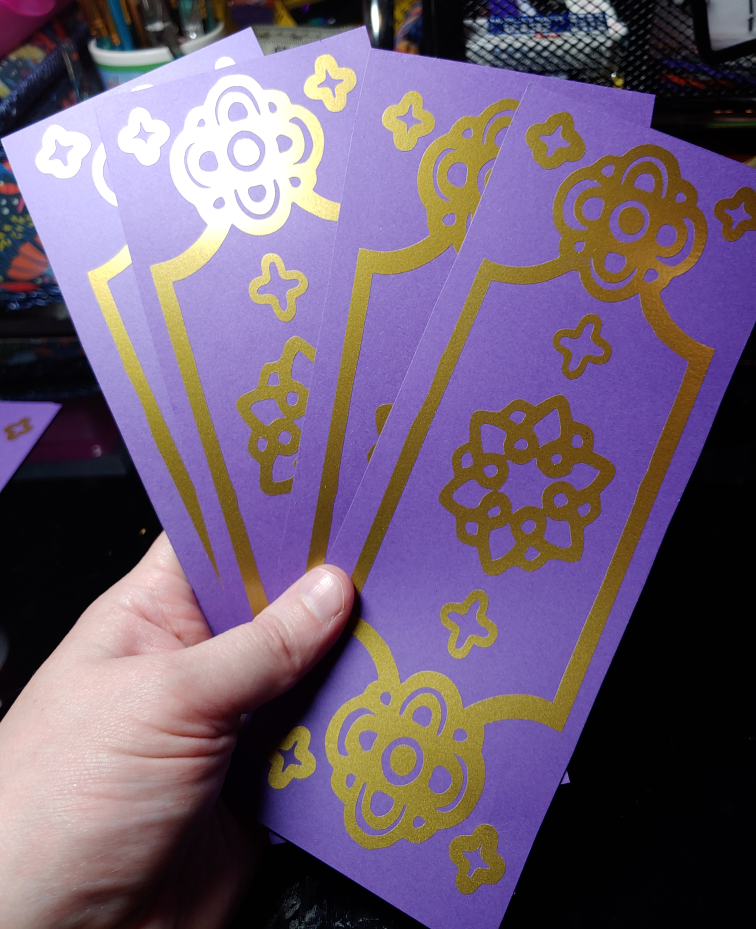
Ofuda appear in all sorts of cosplays, from traditional to more fantasy designs. While you can print some out, others like metallic designs don’t work in a printer. Or perhaps you don’t have a printer but you have a vinyl cutter (or have access to one at the library or a maker’s space). Well, good news. You can make ofuda with sticker vinyl!
Pressure-sensitive vinyl, or PSV, is a type of vinyl that activates and adheres to a surface using pressure. It’s pretty much pressure-activated stickers. You can use it to make decals for your car or sewing machine or decorate cosplay. It comes in nearly every color you can imagine and usually comes in 12×12 sheets (though you can buy rolls!)
You’ll also need this stuff called transfer tape. It is a semi-sticky clear tape that holds your design in place while you transfer it to the final surface. PSV does not have a backing like heat-transfer vinyl (HTV) does, so you need something to keep the design from moving.
PSV can be activated using a hard squeegee (you’ll see mine in the photos), but you can honestly roll a tennis ball along the transfer tape to activate the PSV.
Does all of this sound strange? Don’t worry about it. Let’s walk through the whole process.
Skill level: Beginner-friendly
Cost: varies. PSV itself is relatively cheap. It should not cost you more than a few bucks for a 12×12 sheet. Cutters can be pricy but you can start with a basic, barebones cutter when you’re first starting out. To make it super budget-friendly when you don’t have a cutter, use a vinyl cutter at a library or maker’s space.
Materials:
- Card stock in your chosen color
- PSV, at least a few sheets if you plan on making many ofuda
- Transfer tape
Supplies
- Pen or pencil
- Ruler
- Scissors
- PSV squeegee or a tennis ball
- Weeding tools or an xacto knife (weeding tool recommended so you’re less likely to accidentally cut yourself)
- Vinyl cutter
- Ofuda designs you’d like to make (you can use my ofuda designs if you’d like!)
Planning the ofuda

Before even touching the ofuda, you need to plan out how big you want them. I knew for Camilla, I wanted tall and somewhat skinny ofuda to match her concept art. A standard piece of stock paper (in the US at least) is 8.5″ x 11″, so the ofuda needed to fit in that space and not waste too much paper.
Looking at the designs, I calculated the ofuda to be approximately 11″ x 4″. This size is pretty easy to hold and easy to work with in terms of standard 12×12 PSV sheets. My designs for the vinyl cutter needed to be slightly smaller than this, approximately 10″ x 3″, to ensure the PSV didn’t spill out over the side of the ofuda.
Yours might be a different size and shape, but cutting out a few sizes in scrap paper or printing out a reference can help you determine the approximate size pretty quickly. It can also help determine what feels most comfortable in your hand.
Use a ruler and a pencil to mark your ofuda’s size on some scrap paper then cut them out with a pair of scissors. Cut out a few extra sets just in case something sets crooked or you need to recut any designs.
Cutting the designs
You can create the designs by hand or use a clear screenshot in paint or a photo editor to create a base design to use. Cut out any extra graphical information and only leave the ofuda design visible in your image. I also have my designs here for you to use as well if you like:
Your designs do not need to be flipped mirror image. Unlike HTV where you apply it upside down, PSV is applied right-side up. So the image you create is what you’ll see on the final ofuda.
If you’re working with an image such as my Camilla designs, you’ll need to use your cutter’s tracing tool to map the cut lines for you. This’ll be the easiest way to get started. For complex designs like Camilla’s ofuda, you want to use a tight trace but other designs can allow for looser and smoother traces.
Once you’ve created your designs, create a cut file that’s the same size and shape as your PSV sheet, leaving about 1/2″ or more from the edges plus about 1″ between designs. Make sure that the designs do not overlap in any way. This will give you plenty of space to work with when weeding and cutting the ofuda designs apart. For a 12×12 sheet, I fit 2 ofuda designs on each. I wanted my ofuda tall.
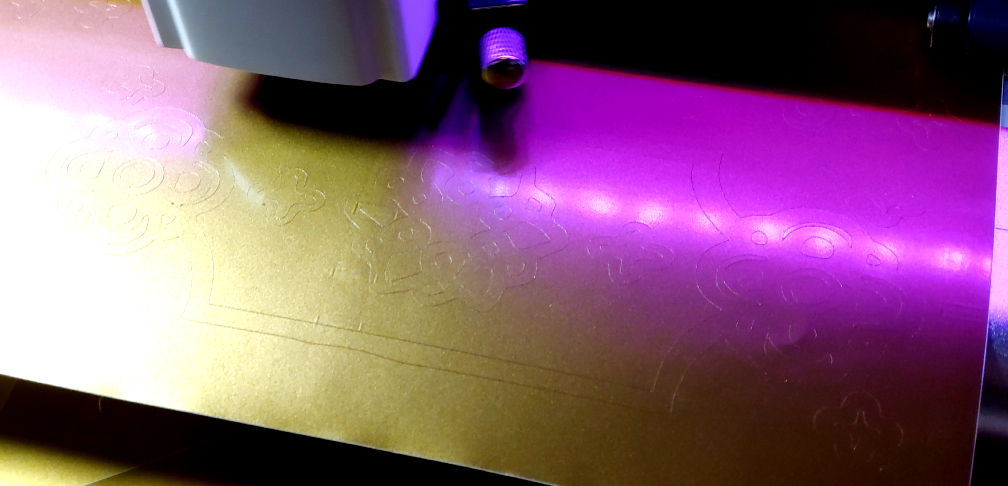
Once you’ve positioned the designs, send them to the cutter and let it do all the cutting work for you!
Weeding
Once your designs are cut, it’s time to weed. Weeding is the process of removing unwanted sections of PSV, leaving only the sticker designs behind. You can use an Xacto knife to weed, but ideally, you want a weeding hook because it’s the safest to use.
Start with the largest sections of unwanted PSV. Stick your tool into the PSV, spearing it near the edge of the section and pulling outward. Make sure not to spear the backing paper. When you pull, the PSV should lift off the backing easily.
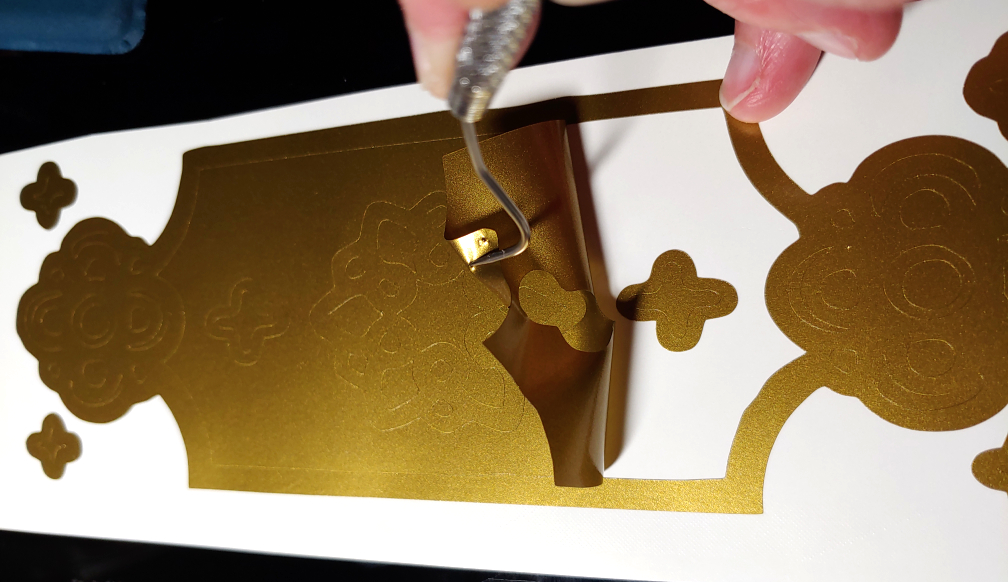
Weeding doesn’t have to be delicate. As you’ve already cut the design, you can simply pull the section up and lift the entire thing off the backing without pulling the rest of the design. If other pieces do pull off, you may need to adjust your cutter’s pressure settings and recut the ofuda designs on a new sheet of PSV.
The smaller sections of unwanted material may try to fight you, especially the skinnier details. When weeding the details, for shapes like circles or squares, keep to the edges unless the detail is particularly small.
And when the details are small, spear the material towards the center of the design or where you have the most amount of material to work with. For crescents, this may be closer to the center of the arc. For tiny circles, it’s near the center of the circle.
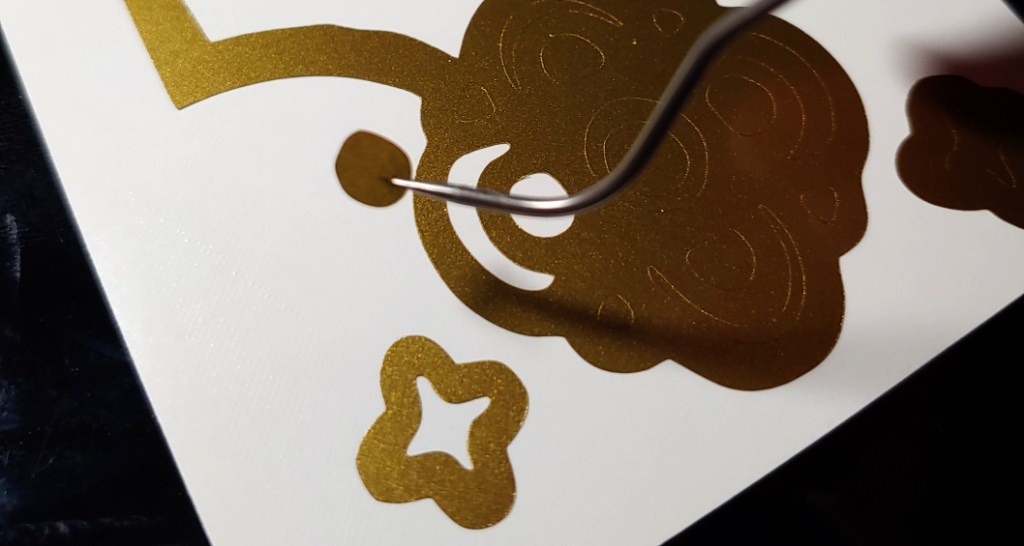
Now keep going until you’ve removed all the unwanted PSV and are left with only the ofuda design. For more complex designs, this may take some time, but it’ll look cool once it’s done.
Transferring the design
With your design weeded, it’s time to transfer it over to the cardstock. Lifting up the design from the backing isn’t going to work very well. It’ll shift all over the place and usually fold in on itself. And if you have a segmented design, placement becomes a problem. Fortunately, we have a solution, and that solution is called transfer tape.
Transfer tape does what its name implies: it transfers a design over to a new material but does not stick to the material itself. The stickiness part of the tape is only a light bond, making it easy to pull up once the design is transferred. The tape also has a grid marked on it so you can use this for exact placement in your final design.
Cut a piece of transfer tape slightly larger than your design and lay it flat over the PSV. Using a tennis ball or a PSV squeegee, press down on the design to make it stick to the tape. You’ll want to roll over the design about 2-3 times.
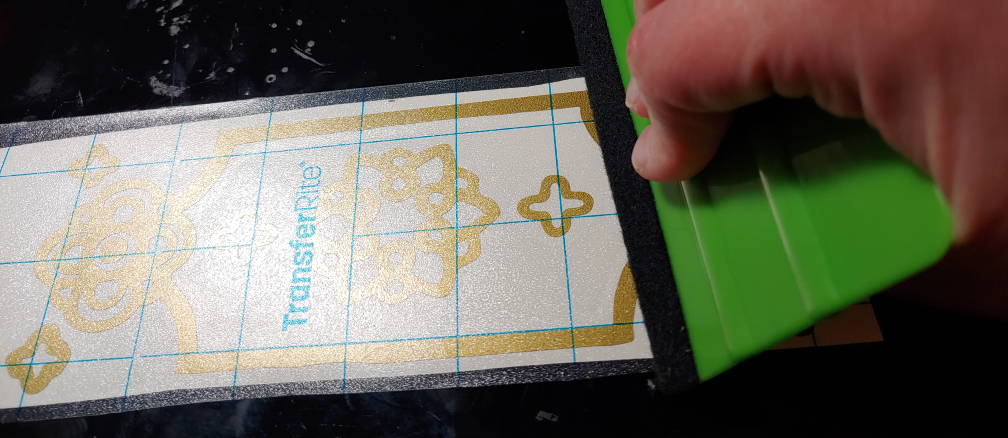
Flip the transfer tape over and slowly peel off the backing. If you notice any of the PSV trying to cling to the backing, press the backing back down and press on the design a few more times with the squeegee or tennis ball.
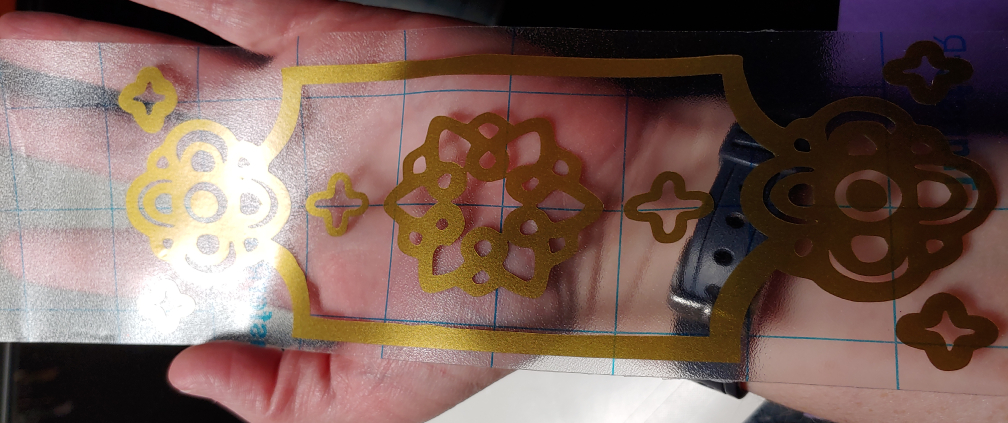
If the PSV is properly stuck to the transfer tape, it’ll lift right off and keep its design in place, even if you hold it. It’s not going anywhere until it’s transferred to the new surface.
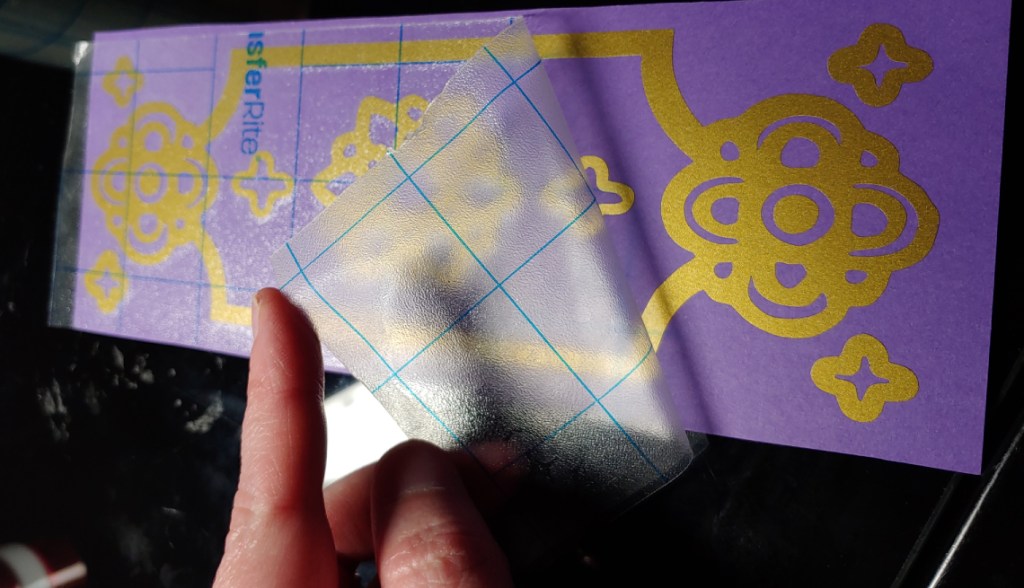
Place the transfer tape over the cardstock paper you cut out for the ofuda, using the grid lines to line the design up. You can move the tape a bit, but once you press it down, if you try to remove it, it may take the design with it and rip the PSV or your cardstock.
Once you’re satisfied with the placement, press the transfer tape down with your hand then roll the tennis ball or pull the squeegee across the tape several times, at least 2-3 times or however many times it took to get the PSV to stick to the tape.
After applying pressure, gently pull up the edge of the transfer tape and peel it back. As we’re working with paper, do not yank the tape off else you’ll take the paper right with it. Take it slowly and work your way from one end of the ofuda to the other. If you notice the PSV attempting to cling to the transfer tape, press the tape back down and use the squeegee or tennis ball to apply more pressure.
And that’s it! You now have ofuda made with PSV! You can add more layers to create additional colors or string them together using cording and a hole punch. How you finish is up to you!
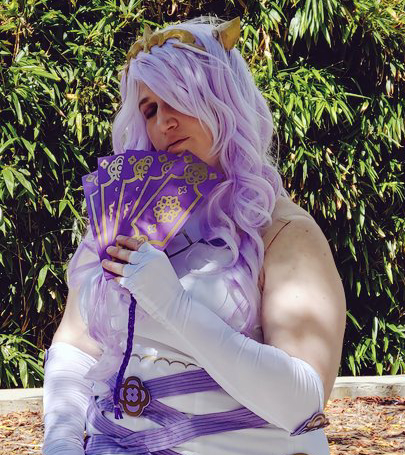
I hope you like this little tutorial! I use a lot of ofuda in cosplay, and using PSV had made creating ofuda much easier. I get a more consistent design and I can make them metallic, something I can’t quite do with a printer or some markers.
You can store them pretty easily when not in use in a folder or flat in a drawer. The PSV is pretty stuck at this point, and the worst you have to worry about is them getting wet or bending the cardstock. Other than that, you have a nice con-friendly prop you can now use!
Let me know what ofuda you make with this tutorial! @ me on social media so I can admire your work.
