Shoulder pads are important to the fit of garments like suit jackets, tunics, and high school gakuran uniforms. Without them, the arms may be too large or the seam lines may not fit properly along the chest or the sides. The sleeves might impede your range of motions because they fit wrong. The solution? Shoulder pads, and let’s make it the homemade kind.
Properly fitted shoulder pads are hard to come by. I have slumping and very broad shoulders and store-bought shoulder pads never do a thing for me because they’re the wrong size. When I was researching how to make shoulder pads, I couldn’t find many good tutorials on how to make them with varying thicknesses until I ran across information in an old sewing book from the 50s. It takes only a few materials and a lot of hand sewing, but it’s well worth the investment to make properly-fitting shoulder pads.
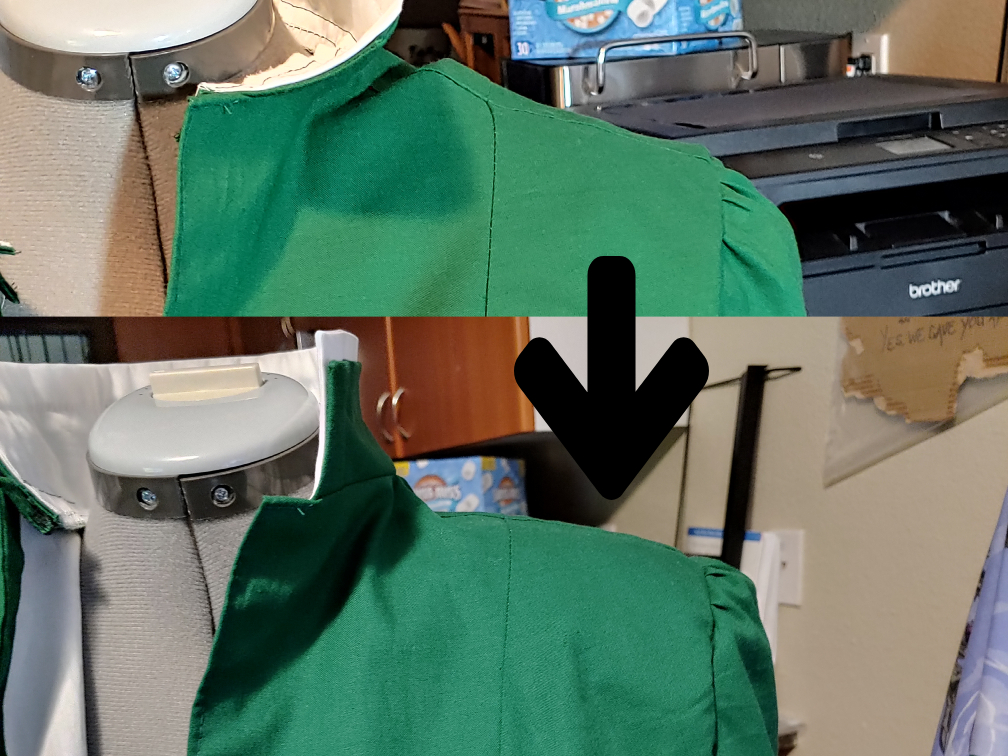
The shoulder pads in my JoJo jacket above are 1/4″ and you can see pretty easily how just that small 1/4″ can make a huge difference in the structure of the shoulders. Without them, the jacket was sagging and bunching at the chest and arms. But as soon as I added those small shoulder pads? The tailoring fit great.
So let’s talk shoulder pads and make some! I have a pattern down below if you don’t have any drafting supplies to make the pattern.
Skill level: intermediate
Cost: moderate
Materials:
- Padding material. This includes quilt batting, thick fleece, or thick wool felt. About 1/4yd
- Cover material. The best cover material tends to be lining fabric. This stuff frays, so if you plan to have exposed edges, you may want to consider serging, overlocking, or using Fray Check to seal the edges.
Supplies
- Hand sewing needle. A simple sharp will do
- Polyester thread
- Sewing machine with standard universal needle and thread that matches your cover material
- Straight pins
- Fabric scissors
- Paper scissors (don’t use fabric scissors on paper)
If you draft your own pattern:
- A compass with a pen or pencil
- Ruler
What makes a good shoulder pad?
Properly fitting shoulder pads should reach from the sleeve seam of your garment across most of your shoulder, stepping down until nearly flat by the neckline. Most jackets and tunics will sit close at the neck, so this means you want something spanning your entire shoulder. If you’ve ever bought store-bought shoulder pads, you’ve probably noticed they’re a bit smaller than your shoulders. This can work for some garments, but for others, this just isn’t enough structure to properly shape your tunic.
So if you need full support, you want your shoulder pads to have the following properties
- Be around 8-10″ in length across the flat edge
- Be cut in a half-circle or a half-oval
Since I have particularly broad shoulders, I designed mine in a circular shape.
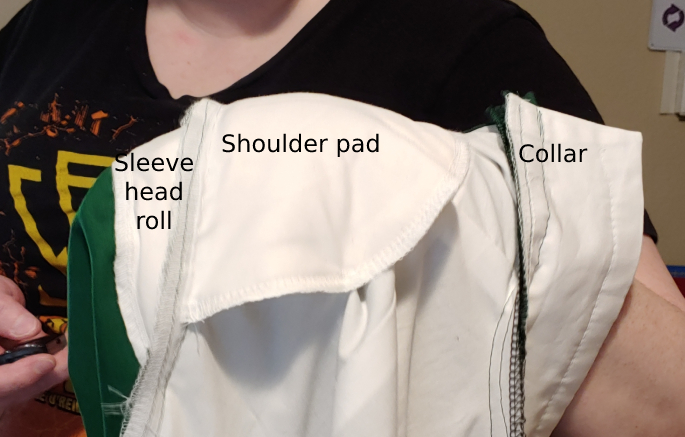
Shoulder pads work with sleeve head rolls and can be sewn inside the lining or to the lining directly. For more info about making your own sleeve head rolls, see Making and attaching a sleeve head roll.
When picking out thick fabrics for your shoulder pads, you want something about 1/16″ wide. This honestly covers a lot of pretty common fabrics. I used quilt batting. I bought a full twin-sized bag of quilt batting in the sewing aisle. If you don’t want to buy an entire quilt, you can also use blizzard fleece and thick wool felt as an alternative.
These types of fabrics don’t have a lot of give to them if you squish them between your fingers but they still have enough that the material moves with you when you move your shoulders.
Shoulder pad pattern
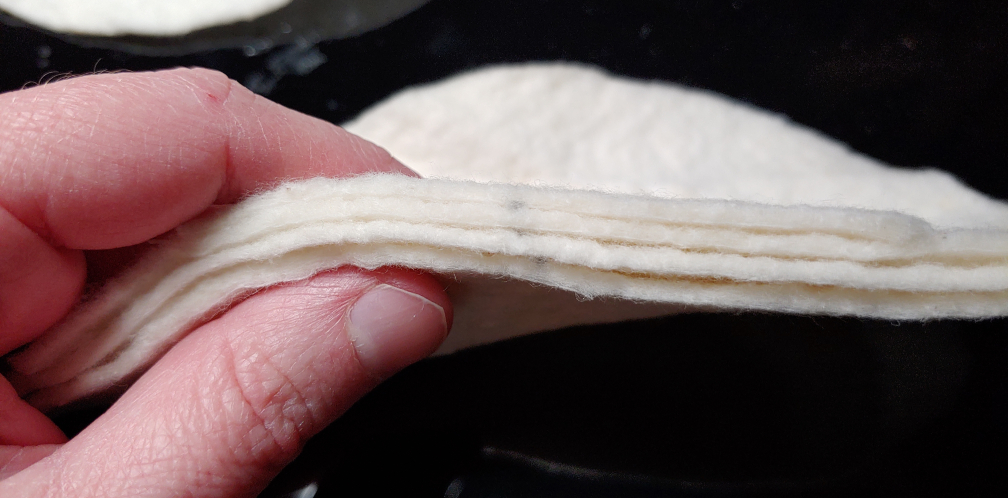
The trick to good shoulder pads is layering the fabric. Each layer adds about 1/16″ width to your shoulders. Guestimating how much you need can be a challenge, but most shoulder pads are about 1/8″ to 1/4″ thick.
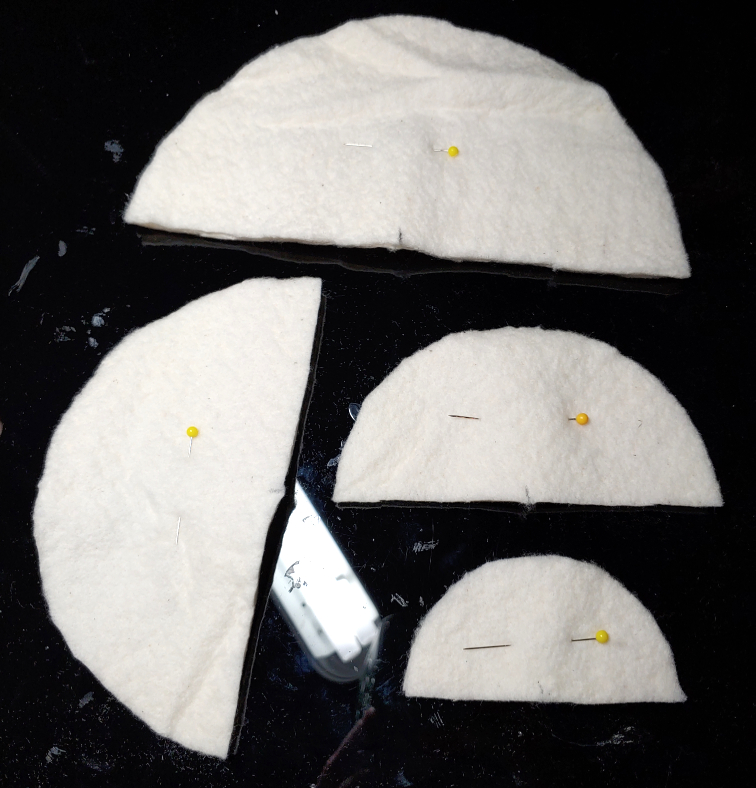
For 1/8″ shoulder pads, you want two layers. For 1/4″, you want four. Here is my pattern for a 4-tiered 1/4″ shoulder pad with approximately an 8″ width:
If you want to use this pattern for 1/8″ thick shoulder pads, remove the smallest and 2nd largest circles from this pattern. This pattern prints on standard Letter-sized paper.
To draft your own, you’ll need to start with a line to draft the width. When choosing how to much to spread out the concentric circles, you’ll need to do a little math based on the size of your largest and smallest circles. The smallest will be about 1/2 the size of the large one for 1/8″ shoulder pads and about 1/4-1/3 the size of the largest one for 1/4″ shoulder pads. The amount doesn’t need to be exact, so approximating is generally fine.
Use a compass to draft the circles, as trying to find plates or bowls with the exact measurements you need can be trying. You can pick up a compass pretty cheaply in the school supply aisle.
Once you’ve drafted your pattern, cut out the largest circle first without cutting the inner circles. If you want to reuse the pattern, I recommend making a copy to keep first (or just saving a copy of my pattern!)
Cutting and sewing the layers
The shoulder pad layers are cut along the grain of your fabric, with the flat edge sitting on the crossgrain. Drawing on quilt batting is nothing short of a pain, so it’s easiest to cut the pattern pieces out one at a time.
Start with the largest one, cutting two pieces, marking the center of the shoulder pad (it’s marked on my pattern with a tick in the center of the smallest circle), and setting them aside. Unpin the pattern then snip the pattern down to the next circle size and repeat the process. Keep going until you have two of each tier cut out.
Next, thread your hand-sewing needle, it’s time to stitch these layers together. I find that hand sewing preserves the fluffiness of the material compared to machine sewing which stitches them tightly together and may create puckers. You can go from largest to smallest or reverse, it honestly doesn’t matter. I went largest to smallest.
Take two tiers and separate them so you only have one cut piece of each. Line them up at the center line and pin them together. Using a simple whip stitch, sew the two layers together along the curved edge.
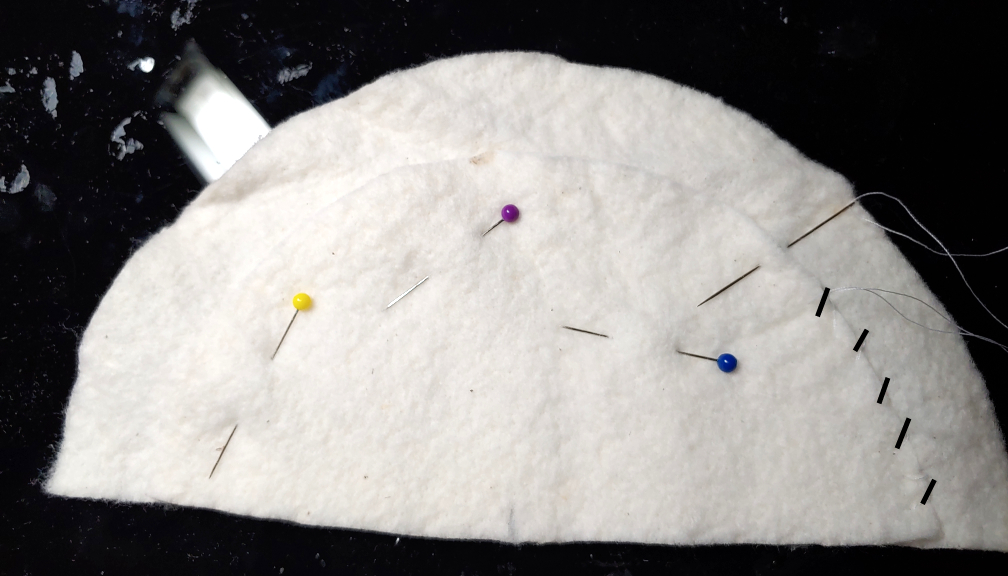
The whip stitches can be spread apart. Make sure they’re secure but don’t pull so tightly that the fabric begins to bunch or the layers pucker. When sewing the next layers, try to sew only through the current two tiers if possible to prevent any bunching.
Add each layer the same as the first two, pinning them together and sewing a whip stitch around the curved edge.
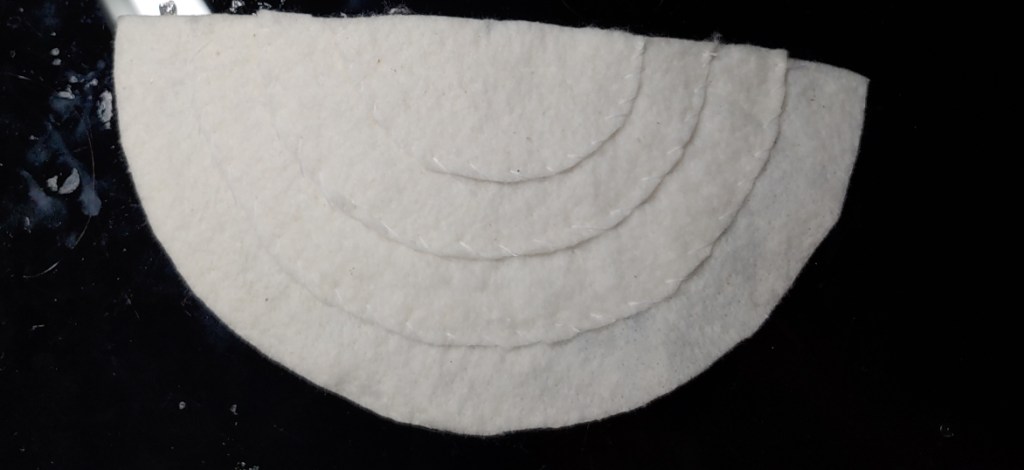
Repeat this for both shoulder pads.
Creating a cover
If you’re using fleece or felt or if you’re sewing the shoulder pads in between the lining and your outer fabric, you can potentially skip this section, but if you’re using quilt batting or have an exposed shoulder pad, a cover is a must. I’d recommend a cover either way.
Fold your lining fabric in half and set the shoulder pad on top of it. Cut the lining fabric slightly outside the edge of the shoulder pad to account for the thickness of the pad itself.
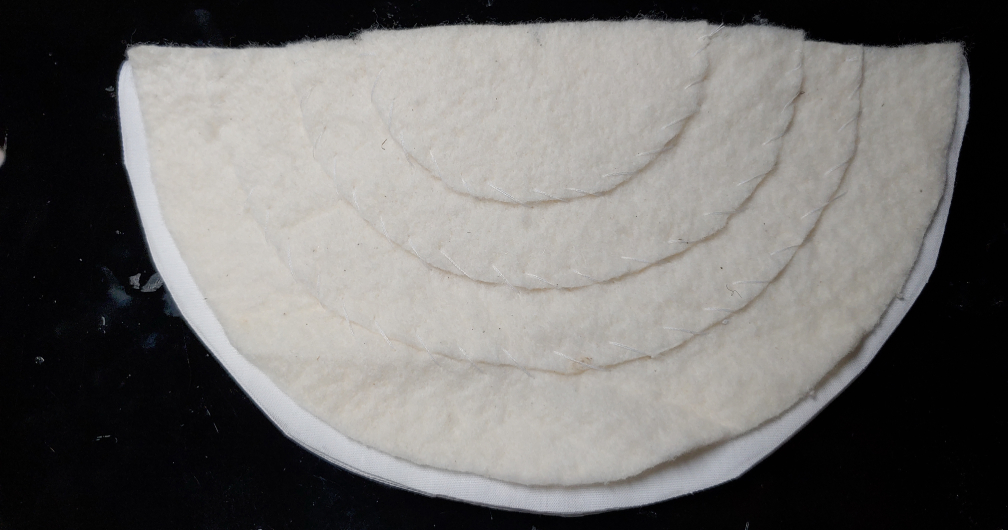
You’ll need two covers, so make sure to cut two folded circles like this.
For each shoulder pad, take one lining piece and sandwich the shoulder pad in the middle. Try to get the sides of the lining fabric to line up as best you can without squashing the pad inside. Pin the edges together to secure them.
Sew a straight stitch with your machine along the edges to keep secure the fabric. Make sure to sew the lining into the shoulder pad material so it all stays together. If you have a serger or an overlocker, finish the edge to prevent any fraying. If you do not, slather the edge with Fray Check and let it dry.

Repeat this for both shoulder pads.
Attaching the shoulder pads
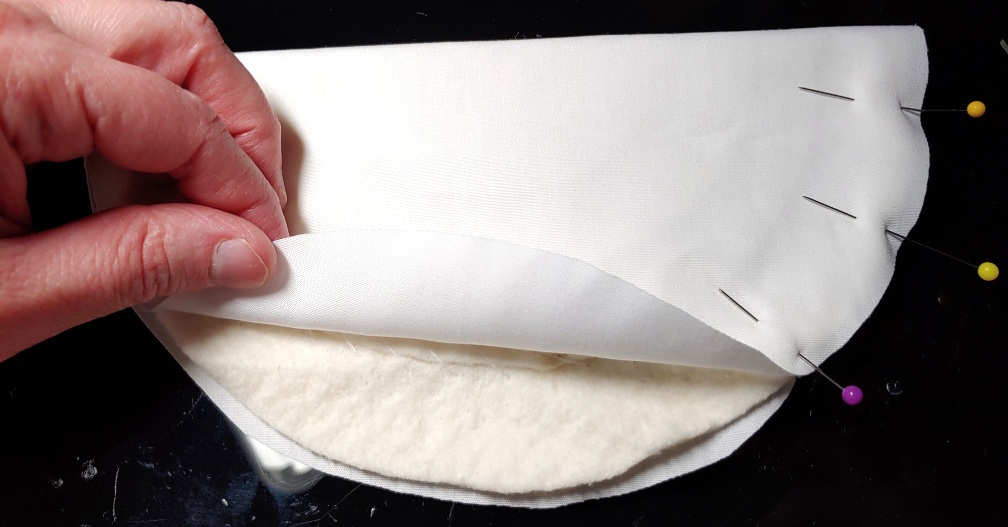
Attaching the shoulder pads is as important as proper sizing and fit. If they’re improperly installed, it can cause bunching or pulling with your outer fabric. I’m installing mine directly into the finished lining. With the design of my tunic, it was easier to do. And if this is your first time sewing shoulder pads, this is a good option.
You can also install them to the wrong-side of the lining fabric and sandwich them in between the lining and outer fabrics when you sew the two together.
This tutorial will cover the former.
Before you get started, make sure to install sleeve head rolls if you’re planning to use them. See Making and attaching a sleeve head roll on how to do this.
Installing shoulder pads is very specific, and this is true even for store-bought shoulder pads. It’s easiest to sew these by hand since you’ll need to tack them down in key places. Here’s a diagram to explain the method best:
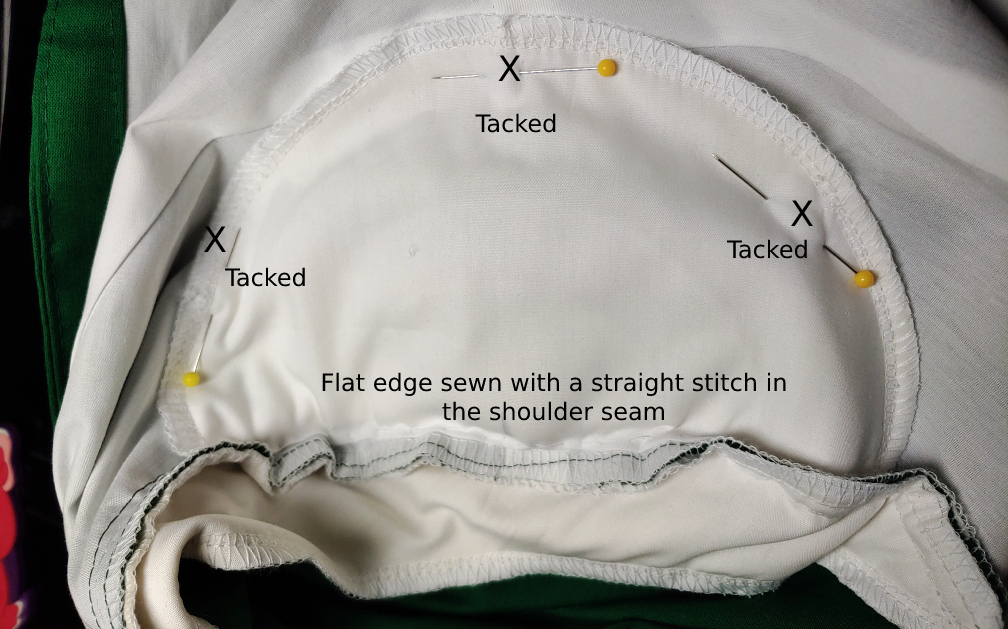
The flat edge of the shoulder pad is sewn into the shoulder seam. It’s sewn approximately 1/4″ away from the shoulder seam stitch line. The pad is sewn into the extra fabric between the seam line and the outside edge so it’s not visible. This part of the shoulder pad should be sewn first using a simple straight stitch to secure the cover fabric to your garment fabric. Match the center of your shoulder pad up with the top shoulder seam so that the shoulder pad is evenly spaced on both sides of your shoulder.
Next is to sew the three tacking locations, the top and the two sides. A simple X tack or a few stitches will do in these locations. When pinning the shoulder pad for these tackings, make sure the garment fabric lies perfectly flat against the shoulder pad else you end up with puckering. You can turn the garment inside out and place it on a person or your dress form for pinning. With careful smoothing, you can also lay it against your table.
When pinning, if you’re sewing it to the already-attached lining, pin partially through your fabric. Once you can feel the tip of the pin on the outside fabric, pull the outside fabric away and then continue pinning. This ensures you’ve only pinned the lining and shoulder pad when working.
Once pinned, tack the shoulder pad down in the three spots.
Repeat for both sides. Now you have proper structure.

I hope you enjoyed this tutorial on making your own structure! It’s super important to have properly-fitting shoulder pads for a structured jacket or tunic to ensure those seam lines always properly line up on your body. The difference between proper structure and not is absolutely incredible and you’ll find your structured jackets fit much better with them.
Experiment with sizes and layering to see what works best for your shoulders and your garment’s specific needs.
Let me know what you use your homemade shoulder pads for, be it for cosplay or for fashion sewing. @ me on social media so I can admire your work!

Thank you for this tutorial!!! I am making a cosplay right now for a character with broad shoulders! I was considering shoulder pads.. but double or triple the amount you’ve shown.. has there ever been any issues when you’ve made them bigger?? Thank you!
LikeLike
I haven’t actually made them bigger yet. 1/4″ is surprisingly tall. However, if you want to double it, I wouldn’t double the width of your largest half circle. I would double the tiers instead and keep the largest tier the same size. Try it out with a pile of batting and see what works for you! I think the only issue you’d come across is how easily you can divide the half circles. But at that point, your shoulder pads would reach the ceiling haha.
LikeLike
Thank you for this! It’s the best instructions and easiest to understand. I am making a winter coat.
LikeLike
[…] delightful parts of making these jackets was making little shoulder pads to go inside them. I found this excellent and thorough tutorial about making and placing shoulder pads and had a treat of a time making small ones for the […]
LikeLike