Decorative cutouts are holes that are edged so they don’t fray. There are various techniques to make cutouts, everything from layering fabric to embroidery to quilting. This tutorial covers layered fabric technique that stretches fabric around holes to make a nice finished edge using Ryne’s collar decoration as an example.

Cutouts can be used for all sorts of accents, decorative and practical, in cosplay and everyday clothing. I’ve used them for button holes, eyelets for loose lacing (tight laces should use metal eyelets for strength), and large decorations like keyholes. This technique requires stiffening the fabric so it is not recommended for cutouts that need to stretch.
Smaller cutouts will require a more intermediate hand at sewing, but larger cutouts can be done with upper-level basic sewing skills. You just need to be able to sew a steady, straight line!
Materials needed:
- Cotton (or similar material that can be ironed)
- Featherweight or light iron-on interfacing
- Knit or other matte stretchy fabric
- Basting spray (recommended)
- Ruler
- Tiny stick pins
- Zipper foot
- Small scissors such as embroidery scissors
- Reference material
Creating the cutout template
This cutout method requires a stiffened base to support the holes and to ensure they don’t sag. The base must also match up with the shape of the dress so it doesn’t warp when you sew the finished piece down.
Ryne’s cutouts match the neckline of the dress, so to ensure that the final cutouts lay flat, start with sketching the neckline. You can do the same if you’re matching sleeves, edges, or hems. If your project doesn’t require matching any seams or hemlines, go ahead and skip this step.
Using Ryne’s dress as an example, draw the seams or hemlines. Put the dress on a dressform or a warm body (or yourself!) and then tuck a piece of interfacing into the collar of the dress. Trace the edge of the neckline on the interfacing with a pencil or lightly with a pen (dark pen will show through the white fabric). If you’re creating a tall collar, make sure to draw the base of the neck as well. I recommend drawing on the bumpy side of the interfacing so it is facing away from the top layer in the finished design.

Once your lines drawn, move to a hard surface for the drawing. For Ryne, her collar is symmetrical, so you only need to draw one half then cut out both sides at the same time. Fold the interfacing in half and lightly draw a line for the center.
Next you need some seam allowance. While it’s not necessary, I found that adding some interfacing into the seams helped stabilize it in the final version. Add about 1/2″ – 5/8″ depending on how much seam allowance you need for your designs. I added 1/2″ for Ryne to allow for attaching to the dress and the collar
Next is to draw the shapes of the cutout. Angular shapes such as diamonds are the easiest to sew in a straight line when working with tiny cutouts. Curving is difficult on small sizes, but when working with large sizes, curves are perfectly fine. When drawing the shapes, make sure to space them out around a third an inch or so. Give yourself a little bit of room along the edges to allow for seam allowances. As long as your lines are lightly drawn, if you mess up, the errant lines won’t show up in the final cutouts, even if the fabric is white.
Once you have the shapes, If you have a symmetrical design, fold the interfacing in half and cut the holes out sandwiched together. If your design is asymmetrical, cut out the holes without the interfacing folded. Make sure to follow your designs as close as possible to ensure the cleanest cutouts. You’ll be using these as the guide for this entire process.
Creating the base
After creating your template on the interfacing, it’s time to create the base. As the base needs to be stable and able to be ironed, cotton or cotton-adjacent fabrics are recommended. They’re also soft if you’re creating a collar and have it pressing against your skin for hours a day at a con.

Choose a large piece of fabric, larger than the template to allow for seam allowances. Follow the instructions for your interfacing, and fuse it to the fabric. As this will be on the inside of the cutouts and not be visible, it doesn’t matter if it’s the wrong or right side.
Once the template is fully fused with the fabric, cut the excess off. Give yourself lots of room to work with. You can cut the extra off later when you finish the edges and seams.
Placing the top layer
Before you can start sewing the cutouts, you’ll want to sandwich the base and the top layer together. To keep the layers from shifting, I recommend basting spray. Any basting spray will do. It’s nontoxic and you can use it inside. With basting spray, you don’t necessarily need to be a quick when squishing the layers together before the spray sets. Since it is a temporary spray, you can lift an errant section and place it down again. The spray does not stain knits and cottons, but if you’re worried about how it will affect your fabric, testing on a swatch is always a good idea.
There are two ways to create your layered sandwich, depending on what type of cutouts you’re making and if you’re creating cutouts on a finished garment.
- The folded method is good for creating finished necklines and edges. It involves creating a finished edge while leaving the other side raw for sewing into a garment.
- The flat method is good for adding cutouts to a finished garment or where a folded method simply won’t work.
For both methods, the wrong side of the base is the side with the interfacing. The right side is the cotton side that will face your skin.
Folding method
Start out by placing right sides of both the base and the top layer together. Sew the edge you want finished then trim close to the stitches. Make any notches for curves to ensure this edge sits flatly.
Open the fabric so you can see both the top and base layers at the same time. Spray the wrong side of the fabric with basting spray and press the fabric flat, wrong sides together, with your hands. Use a flat surface to ensure that the top layer doesn’t bunch.
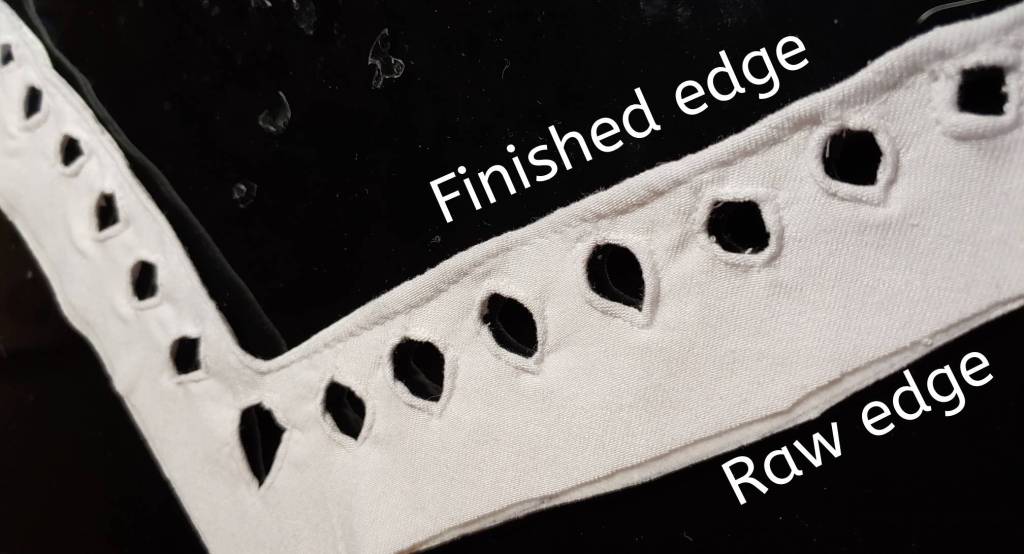
As one side is knit, you can’t iron your finished edge flat. You’ll need to stitch it flat. This also ensures you aren’t pulling the top fabric too far when sewing the cutouts. You only need to sew the finished edge with a straight stitch. The raw edge should stay relatively in place with the basting spray.
Sandwich method
Lay your top fabric flat on a flat surface. If your top layer is a finished garment, make sure to have enough room to baste the base layer onto it (and enough room to support the rest of the garment so it doesn’t slide off your table while working).
Spray the basting spray on the wrong side of the base layer. If possible, spray the basting spray on the wrong side of the top fabric as well for maximum stick. Sandwich the two layers together, wrong sides together so that the interfacing is between the the top and base layers. If working with a finished garment, lightly place the base layer to the garment before pressing the two layers together with your hands.
Sewing the cutouts
Now is time for the bulk of your work and what will be presented to the world. Depending on how many cutouts you have and how complex the design, this step may take several hours. Patience pays off when you see it all come together.
When working with large designs, work with each cutout one by one to prevent stabbing yourself with little pins or having them get caught in the machine. Start in the middle of the design and work outward. The center of the design works as a stabilizer and helps keeps things aligned properly in case there is some minor slipping when working with the cutouts.
Pinning the cutout

Since you want to no raw edges showing, you can’t simply cut the shape in the same shape as your template. Cotton frays, and you need to cover that with the top layer.
First step is to cut the top layer and prep it for wrapping around your template. This is where geometric shapes will prove the easiest. The photo example is a diamond-shape cutout, the simplest shape you can work with.
Start by cutting corner to corner, leaving a tiny bit of fabric at the edge. Cut across for more corners. The amount of cuts you’ll need to do with vary depending on how many corners you have. For diamond shapes, the cuts will end up looking like a + shape. Triangle shapes will look more like the bottom half of a stick figure person. 5-sided shapes will look more like a star. The more complex your shape, the more cuts you will need to make to have a smooth final edge.
Once you make the cuts, pull the tabs through the hole and pin them on the other side. For smaller holes, you may have to pull a bit more to get the pins in and keep the fabric from slipping back out. I recommend starting on opposite sides of the hole first then stretching the other sides until you have completely pinned all the sides. Starting with opposites helps keep everything balanced and prevents minor slipping during the process.
Sewing the cutout
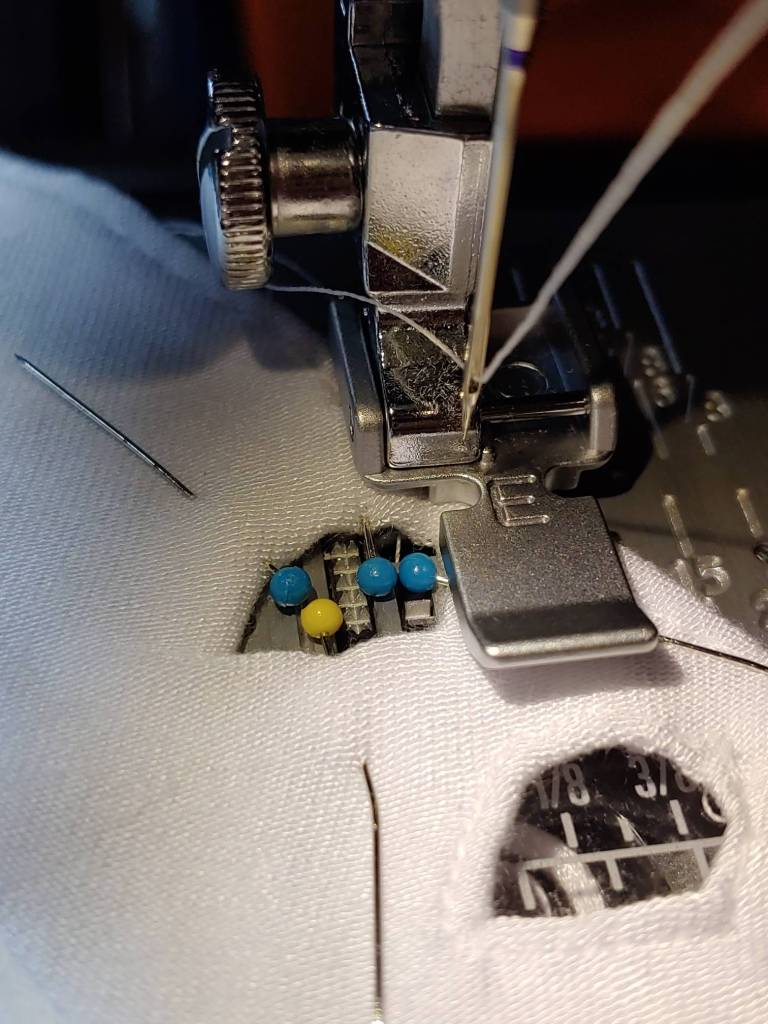
Once you have the hole pinned, flip the fabric over so that the top layer is on the top. Adjust your stitch length to 2 so your stitches don’t go flying out of control and attach your zipper foot. The zipper foot is the only thing that can get close enough to the edges and not chew on the pins while sewing.
Carefully go over each edge, dropping the needle at the corners and lifting the foot up to make a tight turn. Make sure to back over your stitches so they don’t unravel.
When stitching the cutouts, you may have to remove the pins. Feeder dogs sometimes eat tiny pins. If you can’t get your fingers in close enough to grab the pin, use tweezers or small scissors to grip the ball and pull the pin out.
Once you finish the stitch, pull the remaining pins out and flip the fabric back over. Trim the edges of the top layer. Give yourself a little room between the stitch and the edge, so the fabric doesn’t ravel and pop out of the stitch.
Rinse and repeat
After you’ve finished your first cutout, it’s time to repeat the process for each one on your template. Cut and pin the next one before sewing it down and moving onto the next. Keep going until you’ve finished your design. You’ve got this!
Finishing edges
Like with the center accent of Ryne’s collar, you may have raw edges that need to be finished. simply fold the top layer over the template and base layer and pin down. Use a straight stitch to finish the edge then cut off the excess.
Finishing touches

Once you’ve done all this work, now it’s time to attach and add any extra accents such as collars. Since each project may vary, here are a few tips
- Check your placement on a dress form, yourself, or a willing friend before sewing everything down.
- For necklines and hemlines, you can sew the cutout accents in like any other piece of fabric. Since the cutout pieces are likely still stuck together with the basting spray, you won’t have to worry about them slipping.
- For an extra flourish, sew your hems flat with a steady straight stitch.
- Cut off any excess that might show through other cutouts or other accents on your outfit, like the centerpiece in the photo above.
Once you have everything sewn down and connected, you’ll want to give it a light press. the top layer is stretchy and stretchy fabrics are delicate when it comes to heat. Turn down the heat before pressing. Do a test press on some spare fabric first if you’re unsure of how much heat to use. You don’t want to scorch your hard work!
Just a light press is all you need to ensure your accent lays flat and shows off all the work you’ve done!
Feel free to @ me on Twitter or Instagram to show me your work! I’d love to see what you’ve made with this tutorial!
