Every so often, you’ll find a cosplay with ethereal flowy fabrics. Long capes, intricate underskirts, and everything in between. Chiffon and voile are your best options as they’re both very thinly woven, making them lightweight and sheer. However, because they’re thinly woven, they fray like crazy and any hems will be visible.
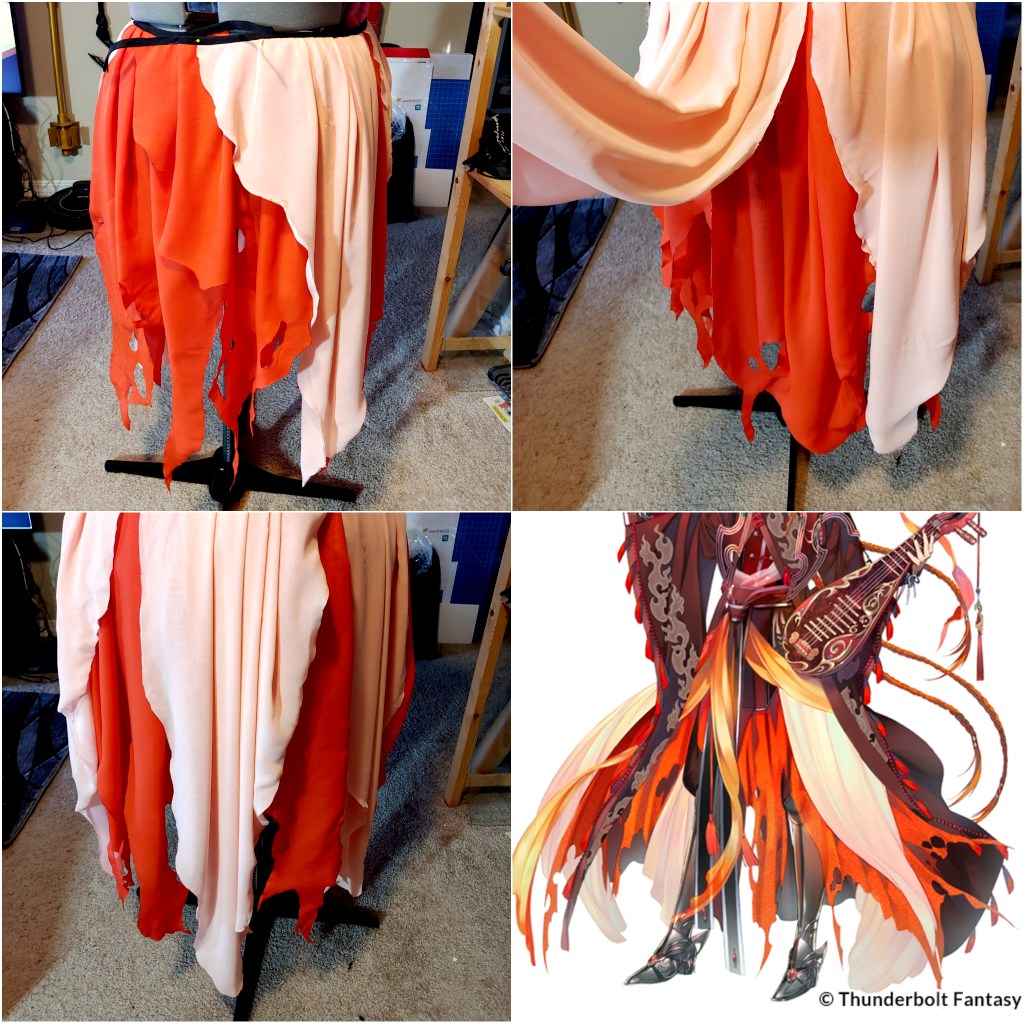
Enter the hot knife or soldering iron. If you get the synthetic, polyester version of either fabric (which is also cheaper and easier to find), you can burn the edges at a very high temperature to seal the edges and prevent them from fraying. This allows you to create intricate designs without ever worrying about them fraying. If you can draw with a pen, you can draw with a soldering iron.
A word of caution: this method involves using a soldering iron at very high temps. Do not bump your fingers or your arms with this. It will burn you. Be safe when using a soldering iron and make sure you have a stand in your kit to prevent accidental burns.
This process also has a slight smell to it as you are literally burning fabric. If you’re sensitive to smells, use a fan near your workspace or work in a ventilated area.
Skill level: relatively beginner-friendly
Cost level: moderate. Requires more upfront to start but later fabric purchases will keep the cost lower.
Supplies:
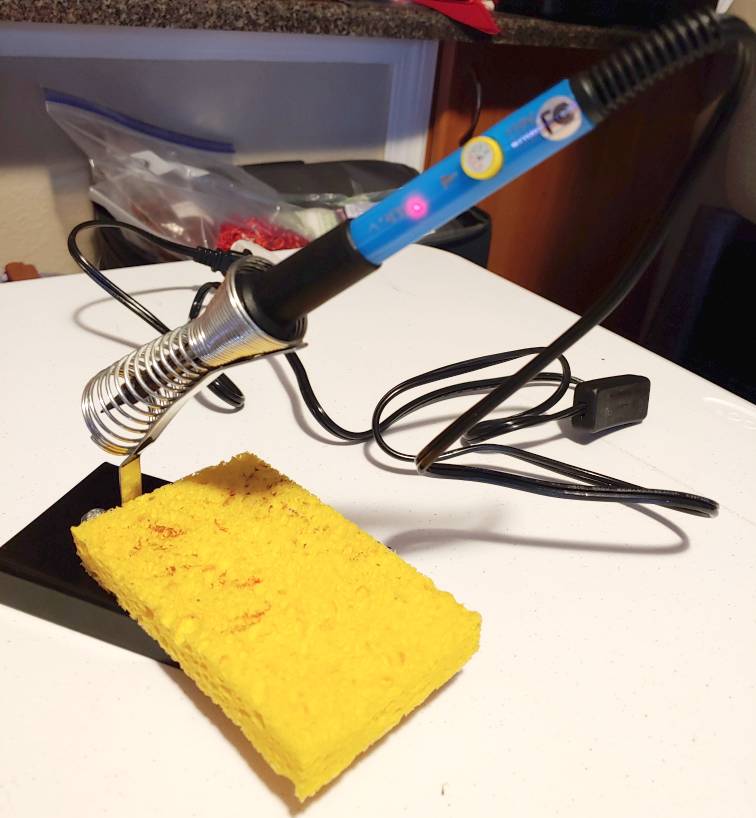
- Soldering iron. Any brand will do. Make sure it comes with a stand and has temperature controls
- A large kitchen sponge without a scratch pad. Just a cheap sponge will do. Do not reuse this to clean your dishes. This should be a soldering iron-only sponge
- Glass cutting board with smooth surface. Rough surfaces will catch the iron’s tip
- Synthetic chiffon or voile. Make sure it is 100% polyester
- Pen
- Hard work surface
Voile vs Chiffon
Voile and chiffon are pretty similar in texture and weave, but there are some differences between the two. Let’s talk about the basics first so you can make the right choice for your fabric.
Voile
- Thicker weave
- Slightly heavier weight and a little stiffer, but still quite flowy
- Most often used for curtains
- A bit courser but still soft to the touch
- Often found at 120″ width but may vary depending on the seller
- More budget of the two. Wholesale is usually on the lower end
- Can buy curtains at a thrift store or Walmart for a budget alternative
Chiffon
- Thinner weave
- Lighter weight and more flowy
- More often used in fashion but can be found in drapery
- Slightly softer
- Usually comes at 60″ width
- More pricy of the two, but usually around $10/yd or less at wholesale prices
I’ve used both in cosplay, and voile definitely has more structure of the two, making it good for robes and larger accents where you still need the flowy nature of a sheer fabric but also need the structure of a garment.
Chiffon is good for the most flow. It is lighter weight and works great for capes, skirts, and accents. Despite its flighty nature, chiffon can still work for dresses and garments pretty well. Just remember, it is still sheer and you can see through it.
Soldering iron 101
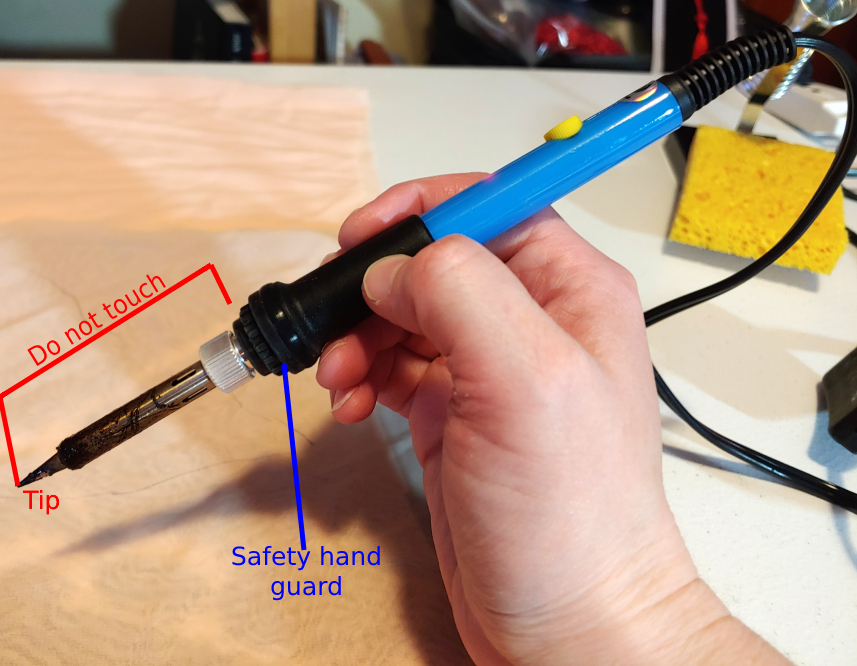
While you can use a soldering iron like a pen, it does feel different and you have to hold it a bit higher since you hold it near the tip. There is usually a guard on the iron to protect your hand from the heat while you work. Never touch the metal tip after turning it on. This will cause severe burns. Always make sure the iron is out of reach of pets and kids, as they will try to play with it. I’ve had dumb cats. They will 100% try this because they can. You don’t want them burning themselves, so keeping it out of their reach is best for them and for you.
When working with a soldering iron, you’ll be drawing lines with the tip slowly. The heat will do the work for you, but if you move too quickly across the fabric, the fabric will begin to buckle and you’ll burn unwanted holes into the fabric. Everything this soldering iron tip touches will indeed burn (your arm, your fabric, your table, everything), so be mindful of where you put the tip while you’re working. When you are not drawing, always place the iron back into its holder.
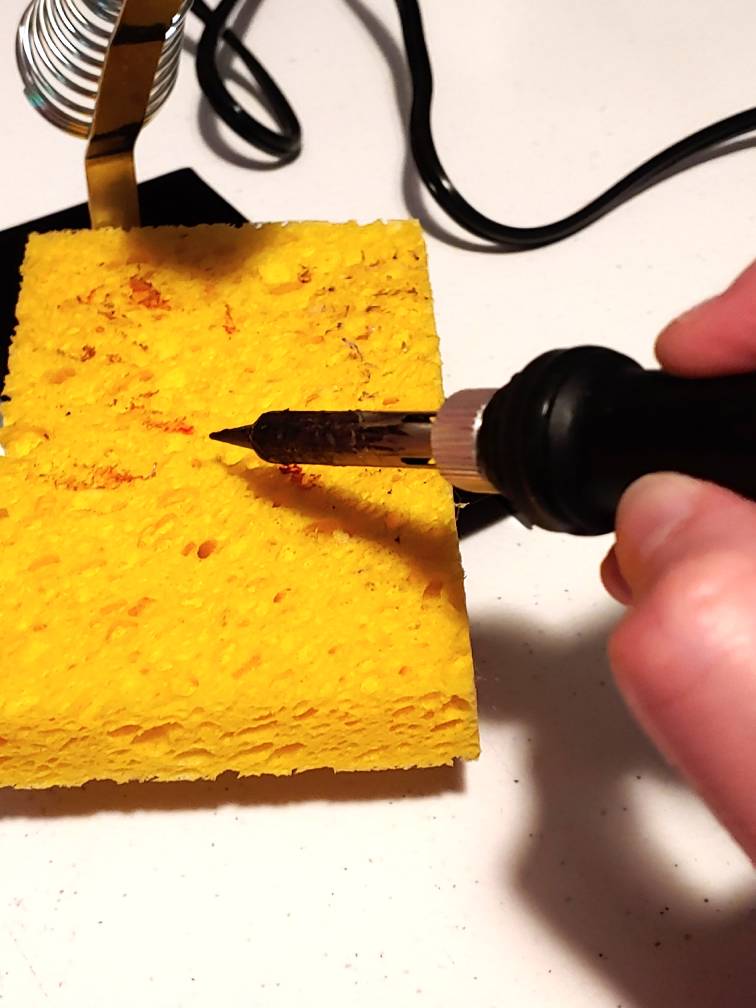
When working with a soldering iron, you must always clean the tip. I did not know this at first, and it’s made my tip kinda nasty but it still works just fine.
So to keep your tip in its best shape, you want to clean it pretty frequently. Before you place the iron back into the older, roll the tip over the large wettened kitchen sponge. This will clean the tip as you roll the iron and keep it in good shape. You may notice that pieces of fabric come off on the sponge. You want that off and not permanently stuck to the tip.
You may also notice the sponge and iron steam while you do this. The iron operates at very high temperatures so this is normal.
Once you’re done with the iron, unplug it and turn it off. Allow it to cool before tucking it away. This may take several hours, so I generally just leave it in its stand and allow it to cool overnight. Do not touch the tip to check if it’s cooled off. Just leave it be and pack it away the next day.
Prep work
I highly recommend trying this out on scraps before jumping into your final project. It takes a bit to get used to the soldering iron and how fast you should move it.
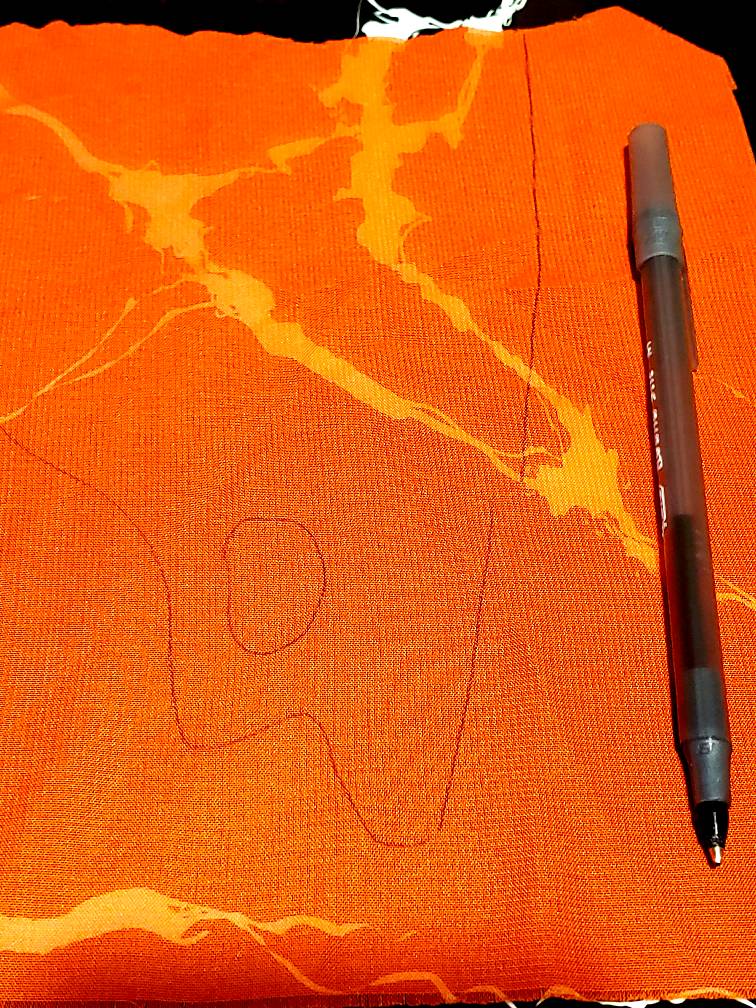
After setting up your table but before you even turn on the iron, you’ll want to make a rough sketch of the pattern you want to cut. For my project, I wanted to cut tattered flames, so there were holes and curves all over the place.
Use a pen to lightly sketch out the design you wish to cut. Try not to make too many lines as any pen marks left behind will be visible. It’s unclear how chalk pencils react to heat, so stick with a pen if possible.
If you’re uncertain of the design, sketch it out on some paper and poster board, lay the fabric over the sketch, then transfer the design onto your fabric. Because you’re working with high temps, you cannot keep the paper underneath it for reference.
If you’re working with a large piece of fabric, I recommend sketching the entire design out first before sitting down to cut.
Once you have your fabric sketched, move anything that can be damaged or is flammable out of the way. Artbooks, papers, laptops, other fabric. Place the cutting board underneath the fabric where you plan to start. Assemble your soldering iron stand as needed, place the iron in the stand, and wet your cleaning sponge. The sponge needs to be damp, not soaking wet, so after wetting it, wring it out in the sink and set it on a plate or a surface that can be easily cleaned. Avoid paper towels because of the flammable thing.
The temp for your soldering iron is 350°C. Once you set the temperature, turn the iron on and wait a few minutes for it to properly warm up.
Cutting the fabric
AKA let’s burn some fabric. It’s now time to cut the fabric with your soldering iron.

Place one hand on the fabric to stabilize it but leave enough room by your lines to avoid bumping the iron tip. I tend to straddle my hand over the lines, using my index finger and thumb to keep the fabric from moving as I work. You don’t need to apply pressure to spread the fabric. Simply gently hold it in place.
Touch the tip of the iron to the fabric and trace the design slowly. Trace a small line at a time, adjusting your supporting hand as you go. When you need to move the fabric on your cutting board, clean the iron tip and set it back in the holder before moving the fabric. This keeps the iron and the fabric from accidentally touching while you adjust the fabric.
The direction you cut doesn’t make a difference. Sometimes I draw towards an edge or a place I’ve cut already, sometimes I draw away from it. Both work, and for me, it honestly depends on the angle of the piece I’m working on.
As you slowly move, the edges of the fabric will darken slightly as the fabric burns and seals. If you move too quickly, the fabric will buckle and you may end up with extra cuts you didn’t intend. Too slowly and the fabric will meld itself back together instead of separating and you’ll need to trace the line with the iron once again.
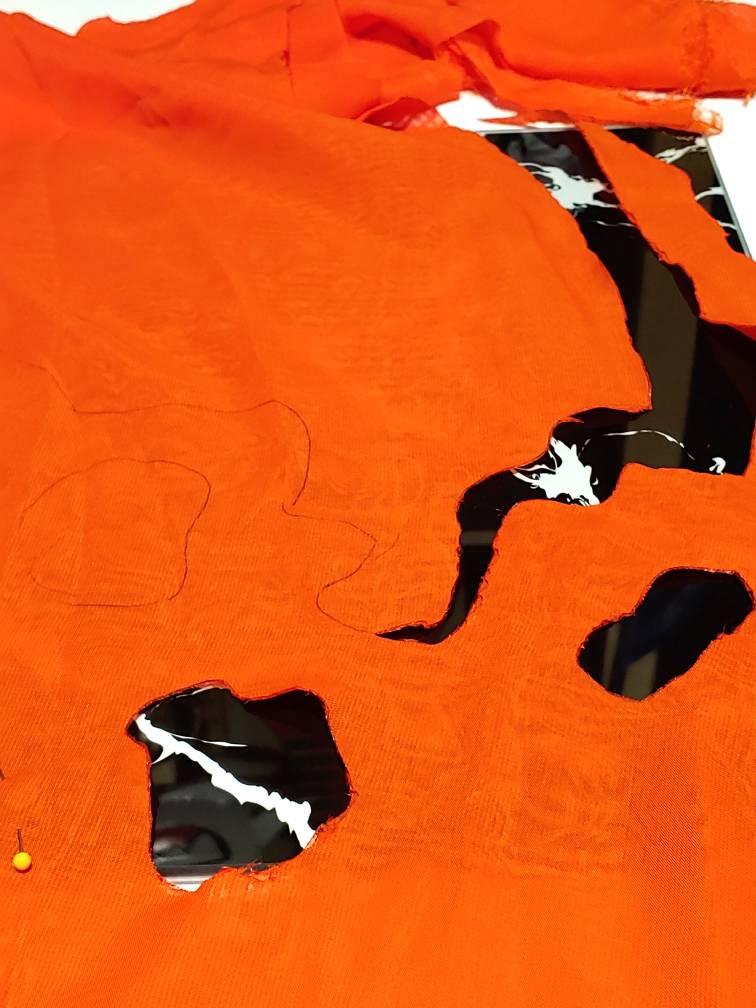
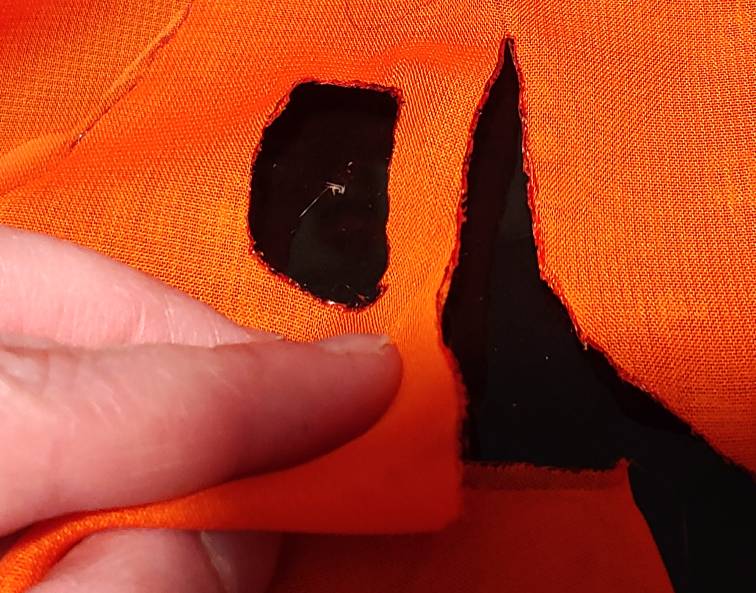
Once you’ve made your cuts, replace the iron back into its holder and separate the sections with your fingers. If you’ve moved at a good speed, you’ll notice the edges are sealed but come apart relatively easily. If you find any sections aren’t completely separated, retrace them with your iron and try to separate them with your fingers once again.
To make cutouts, trace the edges of the design completely, all the way around. You may have to draw in different directions to work your way around the hole and not burn yourself or the fabric in the process. Once you’ve traced the entire design and safely set the soldering iron back in its holder, simply pinch the fabric and pick up the cutout. If any of the cutout tugs, cut the fabric with the iron again and try to pick it out once more.
While working, make sure that your fabric isn’t near your sponge or your soldering iron holder. This ensures you don’t accidentally burn a hole into your fabric where you don’t want it to be when cleaning and storing the iron.
Keep going until you’ve finished the entire design!
Fusing two layers
For my flames, I needed some flames to appear solid and some to be more translucent. Sewing layers together wasn’t an option as the stitches would be visible, but we are burning fabric. Why not fuse two layers together with heat?
Sure enough, that’s exactly what you can do. It’s not a perfect process, and there are places where the fabric doesn’t completely fuse together. However, for most of the design, the two layers are permanently burned together and do not come apart, no matter how much you play with the fabric.
Fusing two layers of fabric together isn’t too different from cutting one layer. Trace the design onto the top layer of fabric so you can see your designs. Then lay that on top of another cut of fabric approximately the same size. I strongly recommend pinning the two layers of fabric together so they don’t shift as you’re moving the fabric across your workspace.
There is a slight difference in cutting the fabric as you now have to worry about two layers instead of one, and this comes from the angle you hold your iron. If you hold your iron at an angle like I do, then you have to be mindful of how the tip is moving over the layers of fabric. Cutting straight up and down still works the same as before, but if you’re cutting curves, you may have to move sideways.
When cutting sideways, be mindful of how close the iron is to the fabric. If the angle is too close when holding it, you can catch the edge of the tip holder on the fabric and burn the top layer but not the bottom. The best way to shift this is to move your arm so that you’re always moving the pen parallel to your arm. I lean on the table a lot when cutting two layers.
If you are unable to shift your arm for whatever reason, try making the iron slightly more vertical so that the side of the tip or the holder doesn’t drag along the fabric and make extra marks.
Keep going until you’ve cut out your entire design!
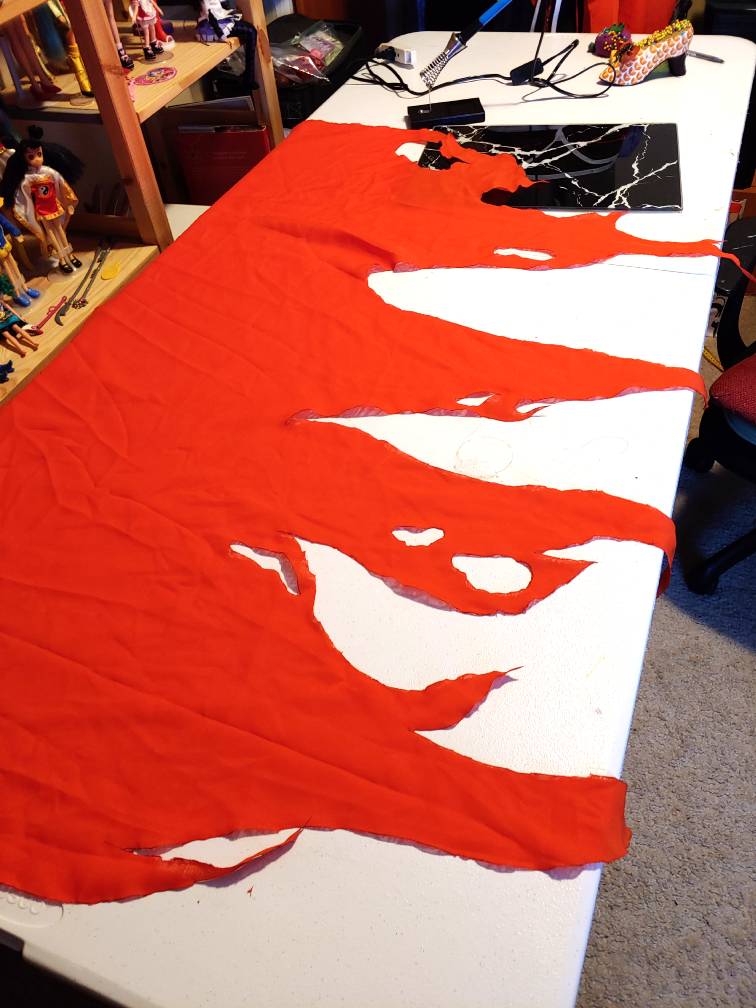
I hope you find this article useful! It’s a helpful trick to seal the edges of flowy woven materials and keep them from getting runs or shedding all over the convention floor. You can use it to cut all sorts of designs and even create tattered looks, good for fae and for cosplay.
While this technique here is shown with sheer fabrics, you can use this method on most 100% polyester fabrics as well. Experiment with different temperature settings and see what works for you!
Make sure to keep your soldering iron nice and clean, and you can use this technique for all sorts of projects! The possibilities are nearly endless.
If you use this technique, let me know! @ me on social media so I can admire your work!
