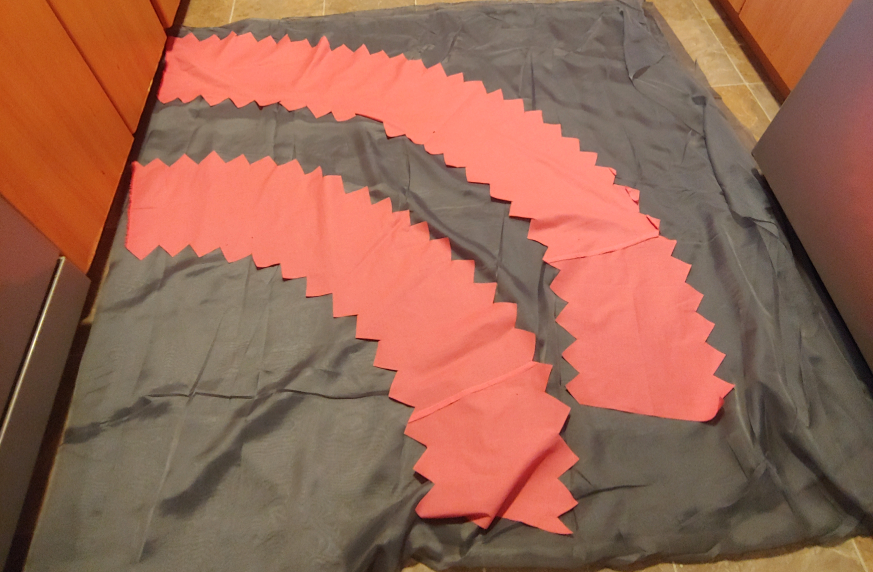
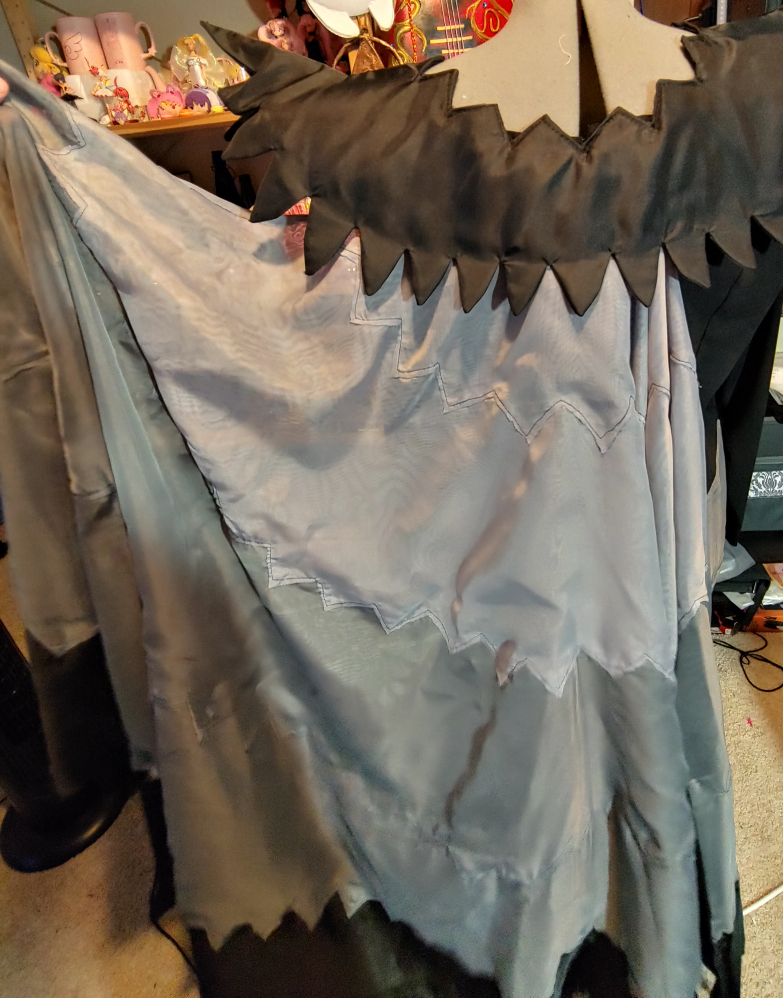
I’m a big Princess Tutu fan, and when I set out to make Raven Mytho, I knew I wanted to make Isis wings, tiered and seamless. His wings are a grayscale gradient of zigzags with feathers cut out at the bottom. These had to work for a contest performance and they had to survive a con, but most importantly, I wanted them to look really cool.
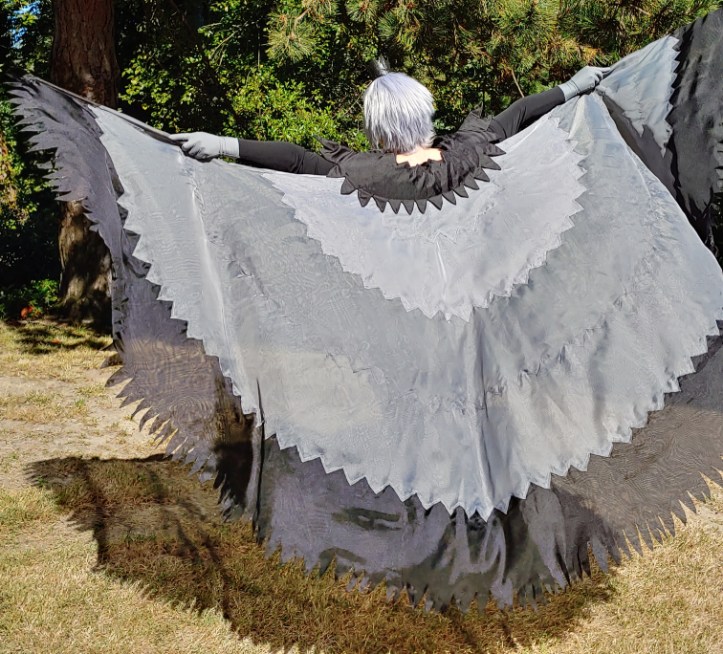
In general, Isis wings usually are made up of several wedges and segments sewn together to make a full or half circle. The seams are due to the width of the fabric. Isis wings require a lot of fabric, and typical Isis wing fabric (tissue lame, chiffon, usually) is usually found in 45″ – 60″ widths, which is not wide enough for seamless wings. But one fabric does, and it works great for Isis wings. Voile aka curtain fabric. It comes in 110″ width (sometimes even wider!), which is exactly what we need.
Voile is sheer, much like chiffon is, but it has a bit more structure and strength to it. It’s one of my favorite sheers due to its stiffer body which makes it the perfect fabric for lightweight flowy wings. Despite using 9 yards of fabric, these wings weigh less than 3lbs.
The measurements of fabric here are for someone who is 5’6, but they should be close enough for most adult heights since I had extra leeway on the sides.
Skill level: intermediate for dealing with sheers and angled lines
Cost: moderate. Go wholesale to get more bang for your buck.
Materials
- 5y bottom tier fabric – black voile, at least 110″ width
- 3y middle tier fabric – dark gray voile, 110″ width
- 1y top tier fabric – light gray voile (smaller widths fine for this)
- a few yards of muslin or scrap cotton for patterning
- a pair of 2′ dowels or sticks, about ¼” in diameter. I used bamboo plant sticks
Supplies
- Yardstick
- Tape measure
- Tailor’s ruler (recommended) or clear ruler
- Twine or thick string
- Pens
- White pencils (for marking dark fabric)
- Masking tape or similar tapes
- Sewing machine with a lightweight needle (80/12 universal will do)
- Clear sewing machine foot (recommended)
- Thread. Can be matching or contrast
- Small straight pins
- Soldering iron or hot knife to seal the edges of the voile
- Heat-resistant glass surface like a smooth cutting board
Safety notes:
Cutting voile does involve burning synthetic fabric, which may not be good to breathe for long periods of time. Take your time when completing this project and work in an area with good airflow to keep from feeling icky. See Cutting chiffon and voile with a soldering iron for full safety notes.
Additional notes:
You will need space to cut the fabric, particularly the bottom tier. A kitchen, a hallway, somewhere where you can lay out very wide fabric. I used my kitchen floor since it was the only space wide enough.
Making the base pattern
Before cutting into the voile, you need a pattern! Before you even draft the tiers, you need a base. And for a base, we need some measurements. Fortunately, these calculations are relatively simple compared to skirt math.
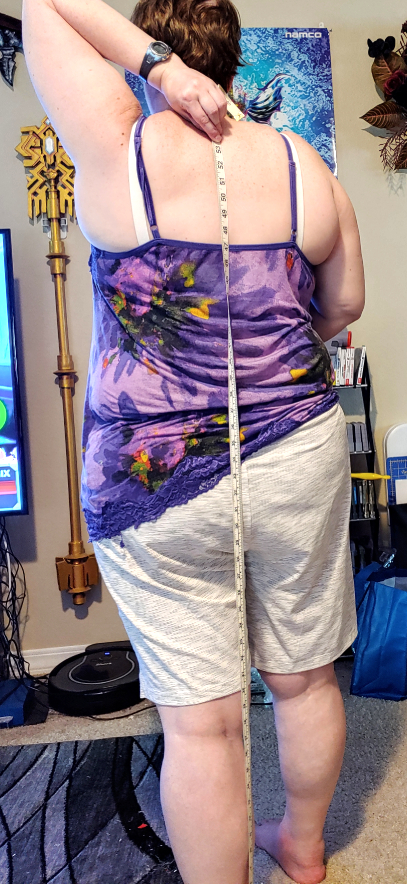
Take a tape measure, and step on the 1″ side. Stick it underneath your heel just slightly.
To get an accurate measurement, you may need to stand a little lopsided with the tape measure foot slightly back to account for the shape of your body. It gets pretty close.
Pull the tape measure up and pinch the tape measure about the center of your shoulder blades. This is the length of your back.
Now subtract 3″ to account for stepping on the tape measure and a bit more to make sure the wings don’t scrape on the floor. You’ll be wearing shoes (please wear shoes at a con), so you have some soles and heels to help keep the wings from touching the ground.
If you stepped on a good amount of tape measure, subtract 4-5″ to account for the difference.
Write this number down so you don’t forget it.
Now to make the pattern. Isis wings are circular, so the fabric has to be as wide as it is tall. And the golden width/height is that number you just measured.
Sew two strips of muslin or scrap together at the selvages to make a wide piece of fabric to work with. It should be about 90″ or so once you’re done sewing them together. It should be as long as your back measurement.
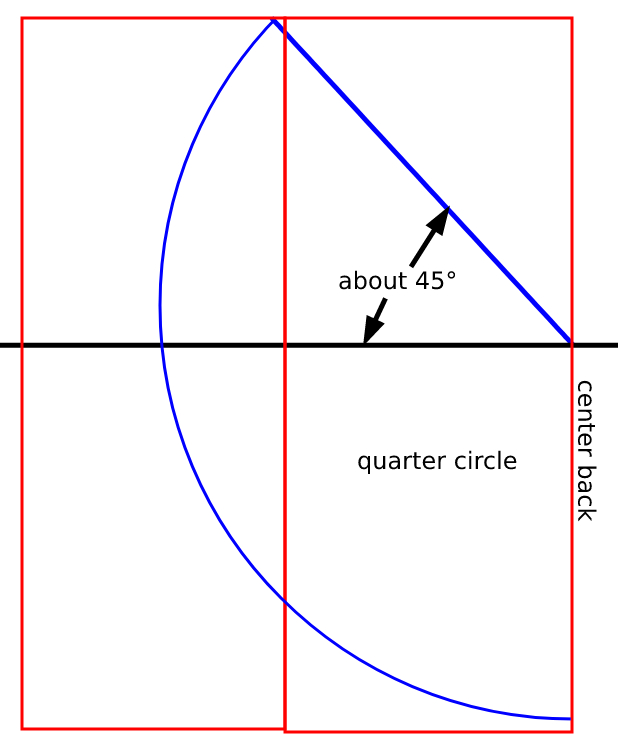
Full-circle wings are a bit too large to make seamless wings, so we’re going 3/4 circle. This means that we’ll have a half circle plus about 45° of fabric past that on both sides of the half circle (marked with a black line).
Since measuring 45° past a quarter circle is kind of a pain, we’ll be cutting out the half circle then the 45° section then sewing them together before drawing the tiers. And since measuring a circle is a pain, we’re going to make it easy on ourselves and of course cheat a bit.
I believe it was a tutorial from Mood where I picked up this idea, but it’s an incredibly useful trick to get a perfect circle every time.
Take your two strips of fabric and fold two caddy-corner sides together to make a triangle. Fold it again to make a giant skinny Dorito.

Now place your fabric onto a flat hard surface and tape down the corners using masking tape. Unwind some twine and tape it at the top skinny part of the triangle.

Take your tape measure and tape it down to the table as well, with the 1 starting at the taped string and going down one side of the triangle. Pull the string taught along your tape measure and tie it around a pen at your back measurement. Tape the knot with some masking tape so it doesn’t slip and you get a crooked circle.
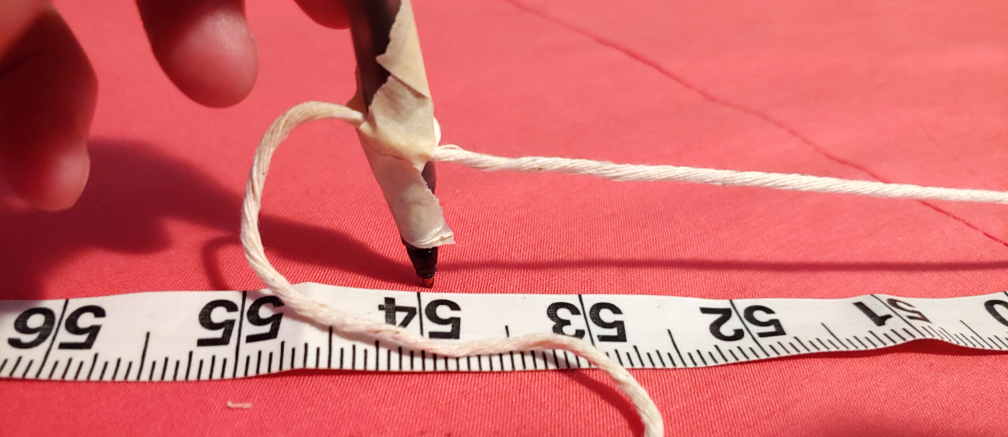
Now simply trace the line, letting the string guide where your pen goes to make a perfect circle.
Cut out the circle along your pen line. Unfold the triangle once and place the triangle over a piece of fabric. This will make the extra 45° angle that we need to complete our Isis wings. It’s half of a quarter circle, which is 45°. Trust the math.

Trace this 45° triangle with a pen and then cut out the single triangle from your fabric. Sew this triangle to one of the sides of the big quarter circle to make your full Isis wing pattern. Tape one side to a yardstick and you can use it to test how the Isis wings look when spread.

Creating tiers
Can’t have tiered wings without tiers! And to draw the tiers, we’ll use the same circle-drawing method as creating that bottom edge. Fold your pattern into a triangle once again. You may have to fold a 3rd time as you have more fabric to work with. Then tape the pattern down to a table. Tape the string down to the table at the top of the triangle once again and let’s get to calculating some tiers.
Divide the length of your back by the number of tiers you want.
So for me, it was 54″ back / 5 tiers.
If you get a funky number, you can find the closest number to divide by. Say for example, I didn’t like 10.8″ (which I didn’t honestly). I rounded the number to about 10.5 and put the extra length at the bottom to make the feathers appear longer. Which is legit, because the bottom tier does look longer than the rest.

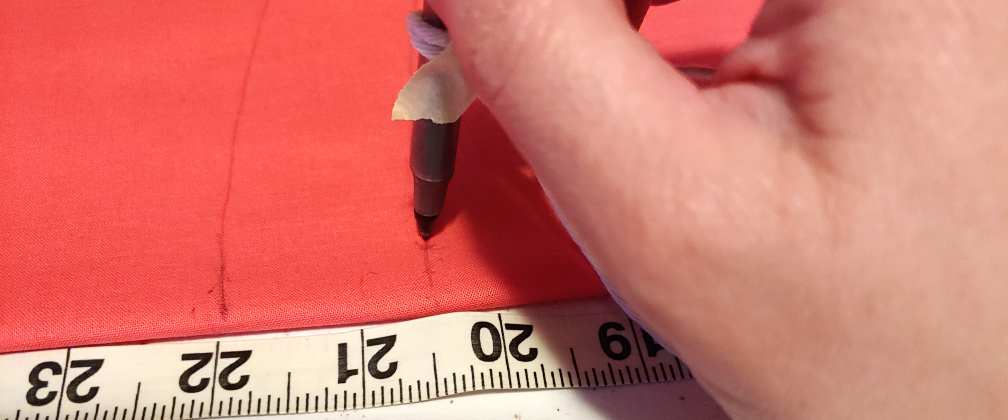
Whatever you decide, it’s time to mark some tiers. Mytho has zigzags for his tiers, and to make a proper pattern, the zigzags needed to be mapped out. This method will work for a variety of shapes, and the taped pen will help us make sure all our tiers are even.
Measure out a distance slightly above and slightly below your tier line. So for example, my second tier was at 21″ (10.5 + 10.5). I marked half an inch above that then an inch below that to make guidelines for the zigzags. 1½” is plenty large for visible zigzags (and any smaller would’ve been tedious to sew)
Whatever you decide, mark your lines with your taped pen at each tier.
Once you have the tiers marked, it’s time to make a ton of zigzags. Fold the pattern into a skinny triangle again and pin it securely above and below your guidelines so it doesn’t move.
Using a triangle or corner of a box, start by marking the zigzags. The zigzags should sit flush against the center back seam, though they can vary at the other end because it’ll be rolled into a seam for the sticks.

You can choose the back center to be either the top of the triangle or the bottom, it honestly doesn’t matter. I chose top for mine. But whichever you choose, remember which one it is and consistently mark the same direction for each tier.
The feather tier is simply feathers drawn freehand, leaving a few inches at the top of the tier to make sure it had enough fabric to stay put when the wings are spread.
Now with the fabric securely pinned, cut the tiers apart and label each one.

Cutting out the fabric
Honestly, this is probably the hardest part of this project due to space, mainly because of that lowest tier. It’s very large and requires a lot of space. So find a good spot to work, it’s time to take over the floor.

To make the wings less translucent, the trick is to double-layer each tier. For each tier, you will need to fold the fabric in half lengthwise (you might need to get help with the 5y one to match the sides up), then fold that in half (selvage to selvage). The result should have selvages on one side, and two folds nested in one another on the other.
Making sure the folds are flush next to each other, spread the fabric out along your floor as flat as possible. If you don’t have enough room, flatten out the fold side first then push the fabric towards the fold as you work.
Pin the center back of your pattern on the fold, stretching the rest out over the fabric. Use your hand to push out any folds or wrinkles in the fabric and the pattern as you move.
Cut the fabric out but don’t cut exactly next to your pattern. cut a way out to give yourself room for sealing the two layers together with the soldering iron later. You can cut along the flat outside edge or leave yourself room to seal it later.

Leave the pattern pinned and set the tier aside.
The next tiers feel a little trickier since you need to place two tiers together, but honestly, they fit pretty well next to each other.
Fold the fabric the same method as with the bottom tier, tucking the folds inside of each other to form two layers. Smooth out the fabric and lay the patterns out on the fabric.
When working with two tiers on the same fabric, make sure there is enough room between them to give yourself that leeway around the zigzag edges. You may have to zig and zag your cuts when the pieces get close to each other on the fabric, cutting in between the two layers and leaving enough room for sealing the edges later.
Once you’ve found a good placement, pin the tiers down and cut them out, setting them aside.
Repeat this for the remaining tiers until you have all the tiers cut out.
Cutting the details
Now it’s time to trace the details. You can do this on a table or the floor (though a table is more comfortable). You’ll want a hard surface like a desk or a table for this part.
Lay the fabric out with the pattern still pinned to it. Using a pencil or a pen, trace the edges of the pattern, giving yourself about ¼” seam allowance on all zigzags for sewing the tiers together. The feathers at the bottom do not need a seam allowance.
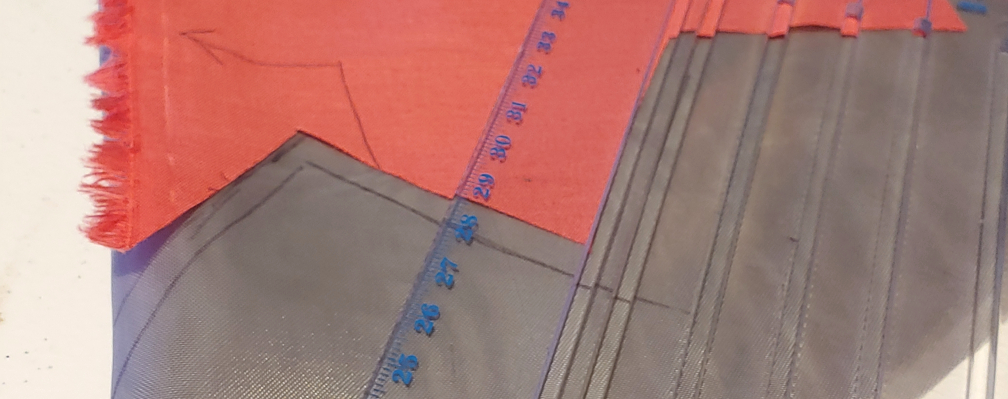
A tailor’s ruler will be your friend when adding small seam allowances. If you do not have one, use a clear ruler so you can see your markings more easily.
When marking, do not use chalk or a chalk pencil. Chalkdust is flammable and our next step involves burning fabric. So please don’t light your house on fire. Sharpies will bleed through your fabric, so avoid those too. Use a ballpoint pen, a white colored pencil, or a regular pencil to mark your fabric.
Once you’ve marked one side, keep the fabric folded and flip it over, moving the pattern to the other side and repeating the process until you have both sides traced. Remove the pattern and unfold the fabric, pinning the two together.

The best process to cut all these edges out is to burn them with a hot knife or a soldering iron. You could go and roll all your edges or serge them, but this process leaves the seams the least visible and fuses the layers of fabric together.
Cutting chiffon and voile with a soldering iron will walk you through the process, including how to do this safely and without burning yourself.
You will need to cut the zigzags, the feathers, and the edges of the wings (if you left leeway to do so).
This process is probably the longest part of these wings, especially those feathers on the bottom tier, so make sure to take breaks and work in a ventilated area (or at least by a fan).
Sewing the tiers
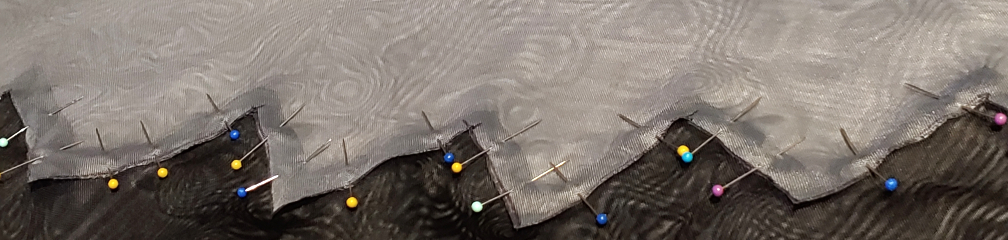
Now it’s time to piece everything together! Break out the straight pins and start one layer at a time. It doesn’t matter if you start with the bottom or top tier for this.
Slightly overlap the two layers at the zigzags, matching up the edges and the zigs and zags. I recommend pinning the lighter fabric over the darker one, making it easier to see the edges as you work (and keeping that consistent with each tier you add).
Pin the tiers down as you work with your small pins. Pin only two tiers together at a time to make it easier to sew.
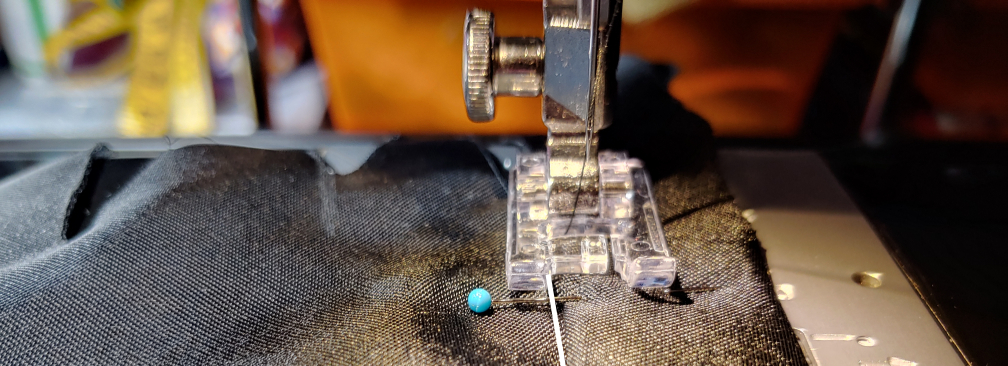
Once the entire tier has been pinned, it’s time to sew them together. Your seam allowance is pretty small, less than ¼”, so a foot that improves visibility like a clear foot is highly recommended.
When making your stitches, only the top layer may be visible as you work, making it hard to see where the underlayer sits. With a clear foot or an open-toe foot, you can generally guestimate where 1/8″ will be. It’s about the distance from the needle (at center position) to the inside of the toe. This only works for feet with skinny toes. A standard foot has wide toes, so you may need to simply mark your foot with some tape or a pen for the proper position.

To make the separation of the tiers stand out more at a distance and in photos, I stitched the tiers with black thread. If you want the tiers to be less visible, you can work with a matching thread.
Repeat this process for all tiers. The larger tiers will take the most time, but keep on going to make your full set of Isis wings.

Once all the tiers are stitched together, lightly iron the stitches. Make sure to set your iron on synthetic so you don’t burn your work.
Adding the sticks
While you can hold Isis wings by hand, you can’t get the full wingspan without sticks to hold out the edges. The sticks will need to be inconspicuous, and for that, we need a stick pouch.
For each side, roll the top edge of the wings down about an inch, then roll it again to make a double-rolled hem. The roll will get smaller the closer it gets to the center of the wings simply because of the angle of the wings. This is fine as we only need 2ft of the roll wide enough to shove a stick into.

The double rolling will hide the edges and helps make a nice tube for the stick to go into. This also ensures the loose voile fibers won’t rip from the stitches if put under any pressure.
Once you have the roll where you’d like it, pin it down and sew along the bottom edge to secure it. Much like when sewing the tiers together, the roll needs a very small seam allowance to keep it secure and still ensure you have enough room for the stick inside.
Repeat this for both sides.
Now take your stick. Choose a nice stick. If you’re using a bamboo planter stick like I used, choose the smoothest one and remove any branches that are sticking out.
Open the edge of the roll and gently push the stick inside, guiding it along with the scrunching method much like you would feed elastic into a casing.
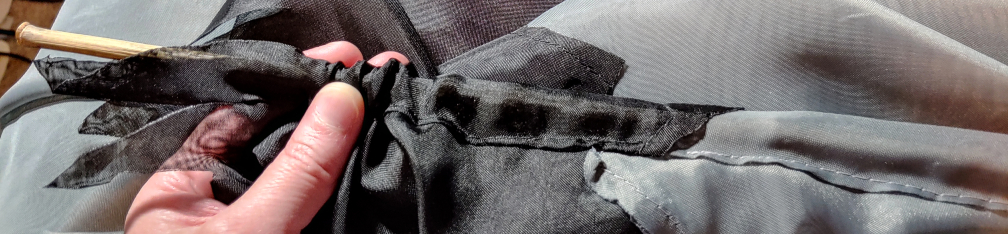
Push the stick in far enough that it’s no longer visible underneath the feathers. You should have around half to a whole inch of space between the feather base and your stick.
Once satisfied with the placement and that they’re easy enough to hold, sew a small seam at the base of the feathers then one with a little leeway (maybe an inch or so) from the other end of the stick to keep it from wiggling around and slipping out. If you want the stick to be removable, add a snap at the feather end instead of a stitch.
Attaching the wings
Attachments are more subjective when it comes to cosplay. For Mytho, I attached them to the underside of the collar with XL 1″ snaps. The typical way to wear Isis wings is to make a neckband and wear it around your neck, but personally, I don’t like anything pulling on my neck.
You can also create a shoulder harness that sits underneath a cosplay or attach them to armor or a shirt. The wings are lightweight enough that you shouldn’t notice any sagging.
When picking an attachment, you want to consider a few things:
- The attachment point should sit around the shoulder blades or higher to prevent dragging
- The attachment should be spread out a little to make grabbing the sticks easier
- Avoid having anything the wings could potentially catch on when spreading them out
As long as the wings have free range of movement and don’t snag, they’re good to attach to pretty much anything!

I hope you all enjoyed this tutorial! It’s a fun way to make cool Isis wings for cosplay without those pesky section seams. Voile comes in a bunch of colors for making all sorts of wings, Mytho’s or otherwise.
Isis wings are a lot of fun to play with and are pretty easy to store and transport. You can iron out wrinkles using the synthetic setting whenever you need to.
Just watch out for the wind. It’ll make the wings billow all about (but that does make for some fun photos anyway).
Let me know what kind of wings you make! @ me on social media so I can admire your work!
