Recently, I posted about Stenciling with Shiva Paintstiks, but what about large designs or fabric that takes work to get anything to stick? Stencil brushes don’t always cover large areas, and they work best on softer fabrics, but sometimes you want to create oversized patterns or work with shinier fabric. When I needed a large flame pattern, the stencil brush just didn’t live up to the job. But Paintstiks are literally giant crayons, so why not use them like one?
If you haven’t touched Paintstiks before, they are pigments mixed with linseed oil and wax. Basically, they’re oil paints and dye shoved into crayon form. They act closer to dye than paint when you use them on fabric, permanently bonding to your fabric fibers after you set them with heat. Once heat-set, the fabric can be washed and dried like any other fabric. And better yet, even heavy amounts of Paintstiks are flexible and not crunchy.
You can paint fabric in three ways with Paintstiks:
- using stencils and a stencil brush
- using a rubbing plate
- scribbling it like a crayon
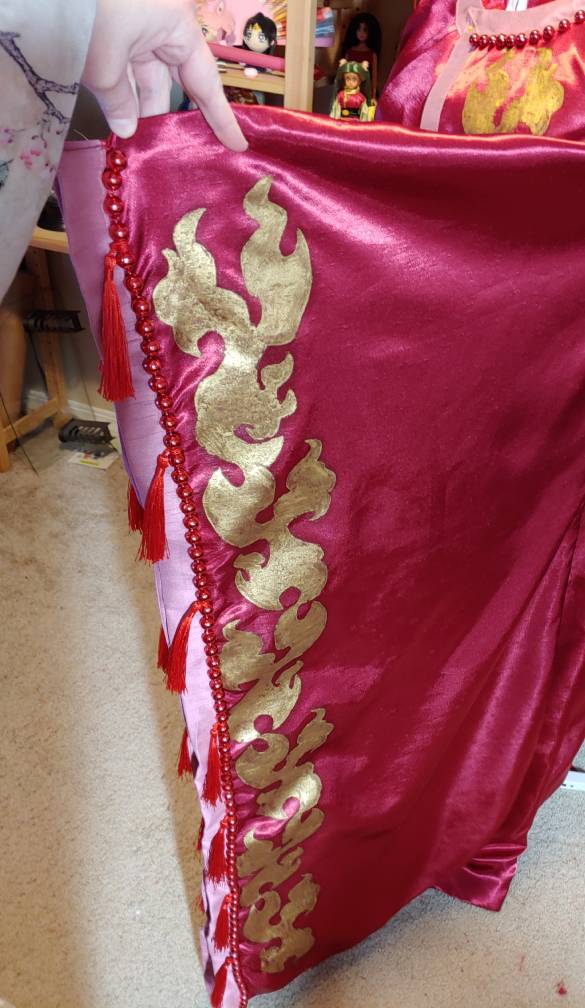
This tutorial covers the third one. We’re going to color like a coloring book with giant oil paint crayons on fabric. Depending on the size of your designs, this process may require several Paintstiks. These sticks are pretty large, but the larger the design, the more sticks you will need. For my flame chains, I managed to get two 5′ long sleeves, back and front, and part of a robe using one stick and a half, but for larger projects, I will definitely need more.
While you work with Paintstiks, this medium sticks to everything, and I do mean everything. So be mindful of your clothing while you work, as you can stain the sleeves of your shirt and pants, and this stuff does not come off. Be mindful of your workspace as well and try not to stain the carpet.
This process will take time, as the linseed oil takes nearly a week to properly dry and set the pigments. Make sure to allow enough time to complete your project! Trying to set the pigments before the oil is dry can result in muddied and faded colors (and make a mess of your ironing surfaces).
Skill level: beginner-friendly
Cost: higher-end of budget, depending on stencil supplies and how many sticks you need
Materials:
- A large work surface like a big table
- Fabric. Paintstiks will stick to nearly any kind of fabric as long as it is not water or stain-resistant. Shiva says they can stick to leather but something like tablecloth vinyl probably will resist this process.
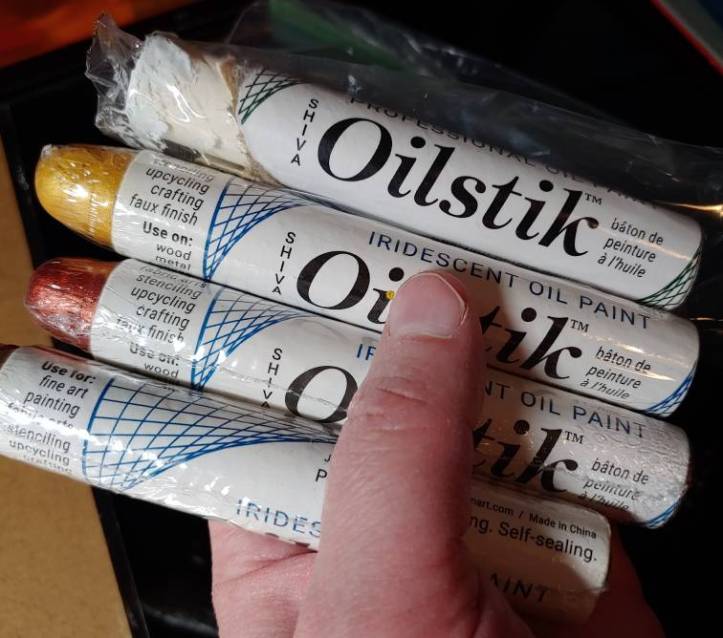
- Paintstiks. I buy mine at Dharma Trading.
- Painter’s tape
- Paper towels
- Large stencils
This process won’t work with small or detailed stencils but works great for larger stencils and designs. You can cut your own stencils using mylar or feasibly anything that resists paint. Stenciling and scribbling will leave sharp lines at the edge of your work unless you’re using something like freezer paper so keep that in mind as you work.
You will also need the following after painting:
- Drying rack, dress form, table, or a large space to let the fabric dry. You can hang the fabric up as well. Paintstiks do not drip.
- Iron and ironing board
- Parchment paper or scrap muslin/cotton
Working with Paintstiks
Unlike regular crayons, Paintstiks have a protective film layer that keeps them from drying out. If you leave a Paintstik out for long enough, that layer will come back. However, when coloring on your fabric, that film layer will leave pills on your fabric. So we’ll need to remove it.
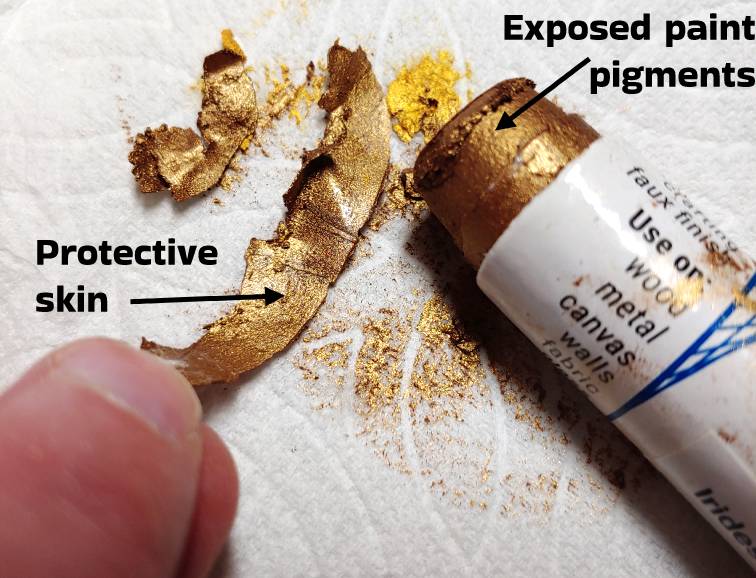
To start, rub the bottom of the Paintstik against something rough like a piece of painter’s tape stuck to a hard table. After a little bit of rubbing, you may notice this piece of skin starts sticking out. That’s what we want to peel off. If it doesn’t stick out, you can dig your fingernail into the side of the stick and pick it up with your nail.
The skin will feel hard and won’t have any paint on it. It feels almost like a crayon wrapping when you touch it. It’s not very thick so when you feel your fingernail sink in, you can pick at the skin a bit and it will start to come off with little resistance.
When working, use your fingernail to expose only a bit of your Paintstik at a time, maybe 1/2″ or so, so that you don’t get paint on your fingers while you’re working then accidentally rub it on the fabric.
Each time that your stick gets close to the protective skin, you’ll need to peel it away once again. The paper wrapper can be cut with a pair of small scissors and peeled away as needed. I would recommend keeping the wrapper on while working because it’s easier to grip than the skin is. If you try to use the Paintstik without the protective skin, it will start to melt in your hand and slip around while you work.
When you’re done with the stick, simply drop it in a baggie and a new layer of skin will soon form over the exposed pigments, preserving your stick for future use.
Prepping your workspace
Scribbling with Paintstiks is a very rough process, so you need to stabilize your fabric and your workspace to get the color to properly transfer without making a mess. You want your surface to be hard (no plush tables or carpets) and allow for your fabric to fully drape and not rub against anything while you’re working. Paintstiks tend to stick to the fabric after you place the color, but because the paint does stick to literally everything, you want to avoid accidentally rubbing paint on your furniture, other projects, or yourself.

Start by ironing your fabric and then laying it flat on your surface. Any wrinkles and the texture of your table will show up in the paint, so keep this in mind when choosing where to put your fabric.
Tape the edges of your fabric with painter’s tape to stabilize it. This type of tape will pull off fabric pretty easily, but be mindful of fraying edges as the tape will stick to that. Tape down any guides you may have on top of the fabric.
Next, you’ll want to position the stencil on the fabric, being mindful of any seam allowances so your work isn’t swallowed in the seams. You can use your fingers to guestimate or use a ruler for exact measurements. The width of your index finger is approximately standard seam allowance width for making quick estimates.
Time to scribble
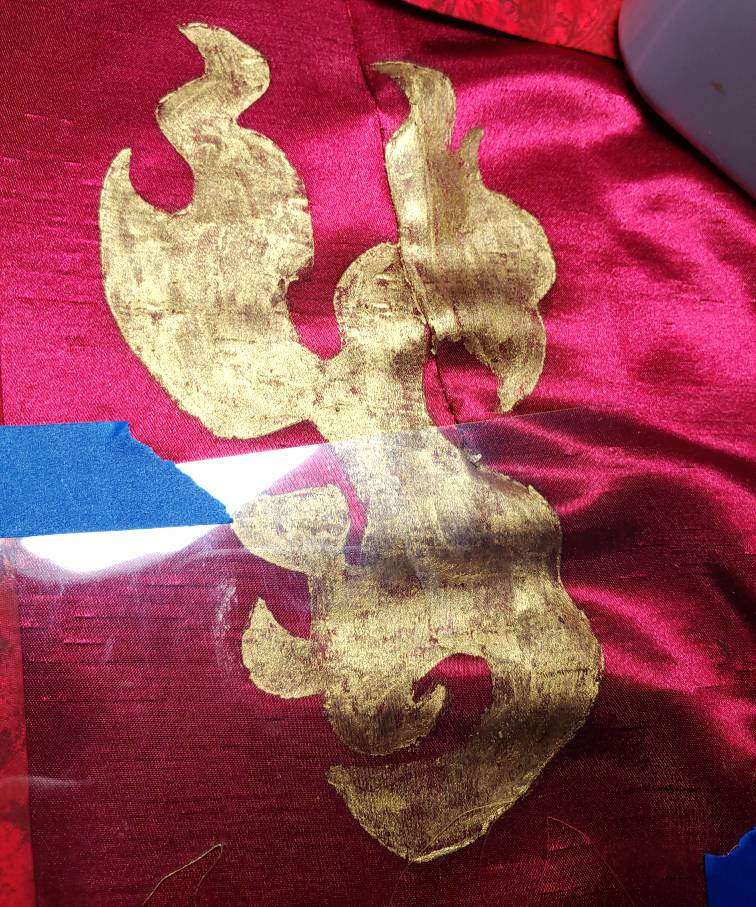
Now you’ve got everything ready, it’s time to scribble your design. Coloring with a Paintstik is much like coloring with one of those giant kid-friendly crayons. It’s not like painting where you’ll see your brushstrokes or the direction you colored in. It’s more like crayons in the sense that you can start wherever you want and color in any direction you want. I found it easier to trace the edges then fill in the shape, but another method may work better for you.
While working, stabilize the fabric and stencil as needed with your free hand by pressing down. When scribbling, the fabric will move a lot.
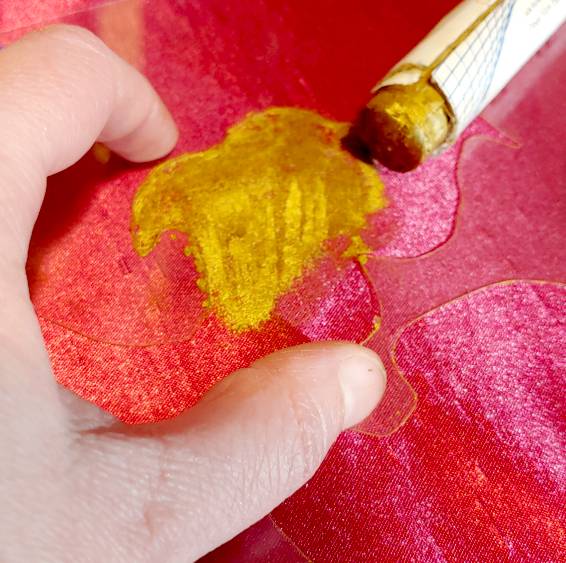
To cover the edges, push the bottom of the Paintstick into the side of your stencil and trace the edges with the side of the stick. This will drop some paint on your stencil, but it will also get you closest to the edge without moving the fabric around irregularly in the process.

To fill in the space, simply scribble the Paintstik back and forth, pressing into the fabric and your hard surface. Any direction for scribbling will work. You’ll want to rub to get a consistent color, hard enough to transfer the color but not so hard you’re grinding your stick into your table. It’s like making charcoal rubbings of raised faceplates in art class. You can get a bolder color by rubbing a bit harder, and a softer color by rubbing lightly and getting a more faded feel.
No matter how hard you scribble, there may still be some spots where the fabric barely shows through. If you have textured fabric, this method will pick up the texture. The examples here are using synthetic silk dupioni, which has textured threads. I could press as hard as I want, use up my entire stick, and that texture will still show through. No need to waste the stick. Embrace the threads.
Moving the stencil
At some point, you’ll likely need to move the stencil or flip it over. Scribbling with a stencil is a very messy process, so simply flipping it over will rub the excess pigments all over your fabric. Fortunately, with how thick the pigments are on the stencil, you can wipe them off easily with a paper towel.
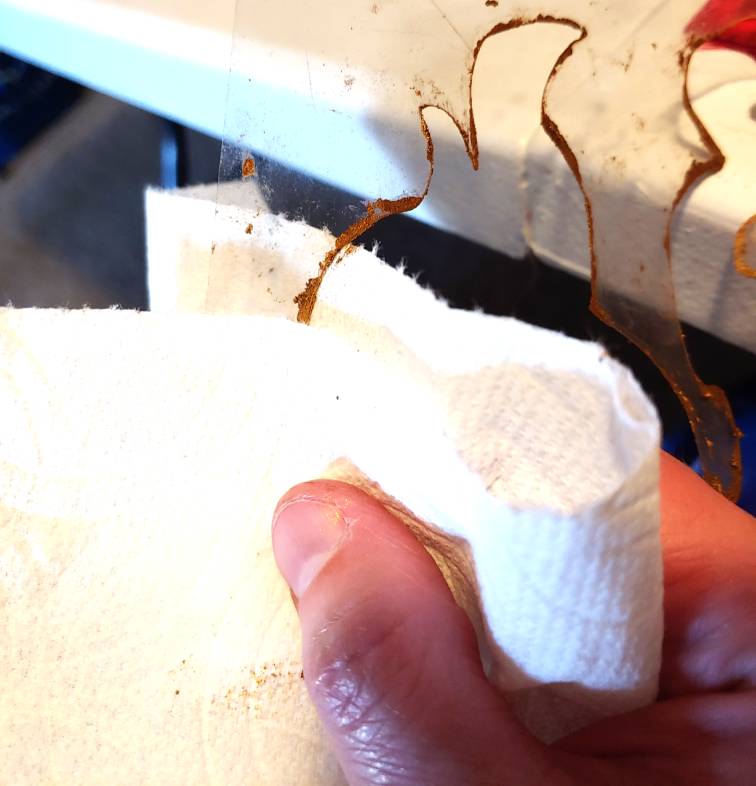
Depending on how wide your design is, you can push your hand through the opening and simply wipe the pigment off with a paper towel. You’ll want to clean both front and back as the paint gets on both sides while you’re working.
If your stencil doesn’t allow you to get your hand inside, lay the stencil down on some paper towels then rub another paper towel across the top of the stencil, following the border of designs as you move. Flip the stencil over and clean the other side as well.
If the paint is super stubborn, use a wet paper towel to clean the stencil instead. Add dish soap to the towel as needed if the paint simply won’t come off. If you get any paint on your counter or sink, simply clean it up with dish soap and a wet paper towel right away before the paint starts to dry.
Whichever method works for you, make sure to clean the borders of your stencil as well as any spots or collections of pigments that have gotten on the stencil itself. Anything left on it may rub off on the fabric when you set the stencil down again. The stencil eventually won’t be perfectly clean as the more you work with it, the more stained it may come depending on the type of mylar used. The clear type stains pretty easily but the cloudy mylar tends to wash off really easily.
Once you’ve cleaned your stencil, set it back down on the fabric. Paintstiks generally stick to the fabric after a few minutes and don’t come back up, though if you lean on the paint, it may come off on your sleeve. You can lay the stencil right down on top of your work and not worry about any smudging.
When taping the stencil down, avoid taping over the painted sections. While the paint isn’t exactly wet, it’s not exactly dry either, and tape can potentially lift the paint off the fabric.
After you’ve taped your stencil down, continue working as before, filling in the stencil and stabilizing it with your hand as you move. Each time you need to move the stencil, pick it up and clean it. The more movement you have to do, the more paper towels you may use simply because they get so much paint on them so quickly. Chuck them in the compost to reduce waste as needed.
Cleanup
Much like when moving the stencil, cleanup is relatively simple. Wash the stencil with dish soap and water. Use paper towels or a towel you plan to wash. Don’t use a sponge that you plan on using with the dishes later.
If you do not plan on keeping your stencils, mylar sheets are recyclable in many places in the US. Check with your local recycling rules and chuck them in the recycle bin if they’re accepted.
Drying
Once you’ve painted all your designs, it’s time to let them dry. The paint isn’t the element actually drying when it comes to Paintstiks. It’s the linseed oil contained within them. This oil is used as a medium to get the pigment to stick and be absorbed by the fabric, but you need that medium to dry completely before you can set the pigments with heat.

You’ll need to find a place to dry your work. The less humid the better, though in some places, it honestly cannot be helped. This location also needs to be away from potential rubbing points like in a closet or where a pet can go reach it. Paintstiks do have a paint-like odor to them, so if that bothers you, you’ll want to put your project into a more open space. Paintstiks do not drip so wherever you choose, it can be vertical and likely will be as it’s the most space-efficient.
Drying time for thick scribbling work like this is about 7 days.
If you’re working with a constructed garment, partially finished or completed, you can hang it up on a hanger, using clothespins or clamps to keep it upright. The laundry room or a portable clothes rack works pretty well.
You can also use a dress form for drying as well. Simply drape the project over it and pin it down, leaving it to dry.
If there are sleeves or long strips of fabric involved, neither of these methods may work. I could pin one long section to my dress form, but not the four I needed to accommodate. These pieces are each about 54″ long and pretty wide. But there’s another good option for drying large pieces of fabric.

Drying racks! They’re relatively easy to find in the laundry section and can accommodate multiple pieces of fabric. All four sleeve pieces fit on this rack pretty easily without the worry that they would stick together during the drying process.
If you plan on doing any large painting projects, Paintstiks or otherwise, a drying rack is really useful when protecting your work.
Whichever place you put your work, make sure to set it aside and leave it alone for about 7 days. After that, it’s time to set the paint with heat.
Heat setting
To make the Paintstiks permanent and washable, you need to heat set them.
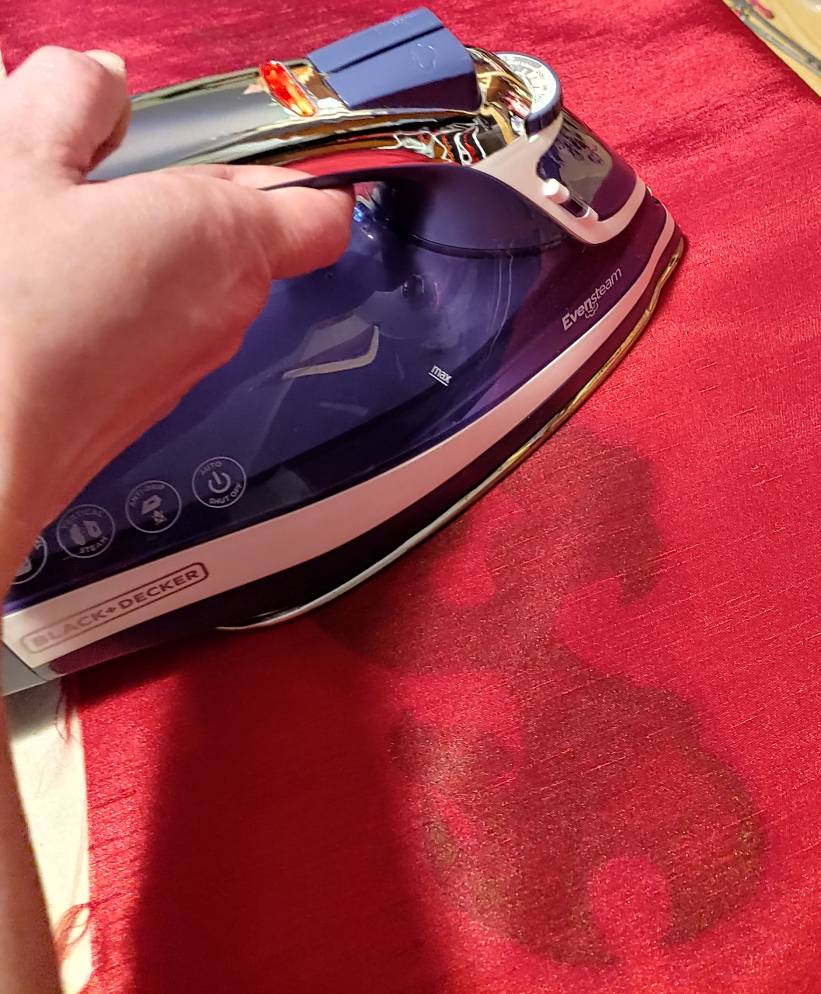
Cover your ironing board or surface with scrap muslin or parchment paper to protect it from any oils which may have not completely dried. Lay the painted fabric face-down on your surface and crank your iron up to whatever setting is recommended for your fabric type. You can set with or without steam. It does not seem to matter.
If this is a non-heat-tolerant fabric, lay a pressing cloth or some scrap cotton over the fabric.
Hold the iron in place over each section of paint for 15s. You do not need to press as the heat will do all the work for you. After 15s, move to the next section and continue until you’ve set all the paint.
During this process, it is likely you will smell the oil pigments as they heat up due to how thick the paint is. It can get pretty strong with larger projects, and your home might smell like an art studio for a bit. It’s not the most pleasant smell if you’re not used to paint smells, but it’s not toxic if you breathe it. If you have a problem with smells, work in a ventilated area or open a window.
Once the paint is set, you can wash it, dry it, sew it, whatever you like! It’s permanent now, and it’s time to finish that cosplay!

I hope this tutorial is helpful and inspires new ways to add color and paint to your cosplays. Scribbling with Paintstiks is pretty fun, turning fabric painting into a giant coloring book.
Let me know what you choose to create with some scribbling. Show me your finished work, your progress, your tests, and your experiments. @ me on social media so I can admire your work.
