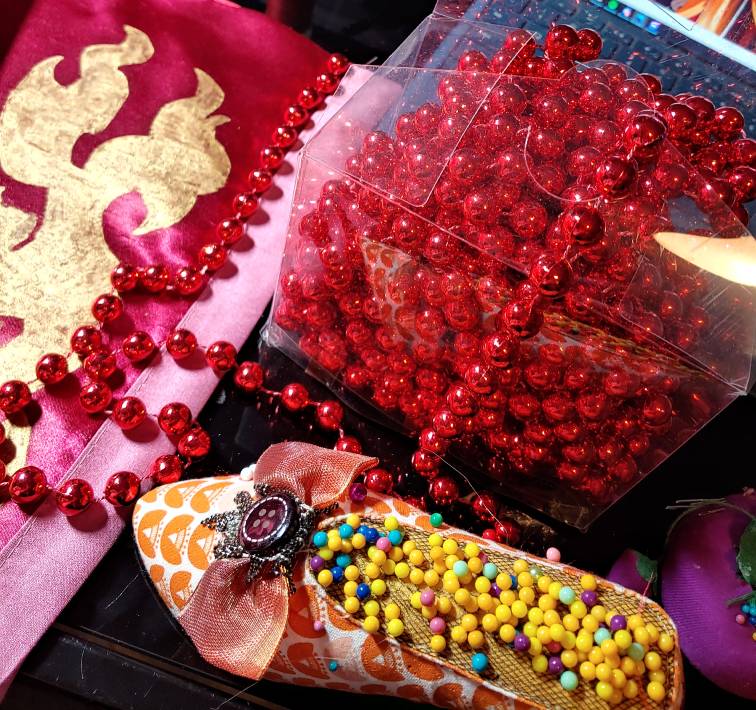
Who doesn’t love bead chains? They make great accent pieces to add some pretty bling to your creation. But what if you don’t know how to bead or individual beads are too expensive or heavy? No worries, you have alternatives.

The best kind of beads for budget and beginner-friendly beading are plastic beads that are melded to a string. They come in various sizes and you can buy them in bulk for pretty cheap, making this a budget-friendly alternate to hand-beading chains of beads onto your cosplay. Look for beads marked as wedding accents or Christmas garlands on spools or in boxes to get you the best bang for your buck.
This tutorial covers both large and small options as well as options to add things such as tassels into your bead chains. You only need a few simple supplies to get started and a little knowledge about sewing by hand.
Skill level: beginner-friendly
Cost: budget-friendly
Basic materials (add more to suit your cosplay needs)
- Bead chains in your desired color or size
- Polyester or all-purpose thread in the same color as the bead chain
- Hand sewing needle, a standard sharp will do
- Something to sew the chains to
- Small pair of scissors like embroidery or nail scissors. Make sure they’re sharp
To make the process easier to see, the tutorial will mostly show large bead chains, but much of the same method is used for all sizes of bead chains.
Prepping the chains
Before you even get started, test the placement of the beads and make sure it looks right against the fabric. The placement will depend on the look you want to achieve and the size of the beads.
The larger chains are best away from the seam to properly support their heavier weight, and smaller bead chains can work pretty much anywhere you want them to. Seams are generally difficult to sew through due to the number of layers, but with a sharp enough needle and a thimble, you can attach the bead chains pretty close to one.
Once you’ve set on the placement, it’s time to prep the chain itself. At the top bead, clip the connector string all the way down to the bead itself. This hides the string in the final chain.
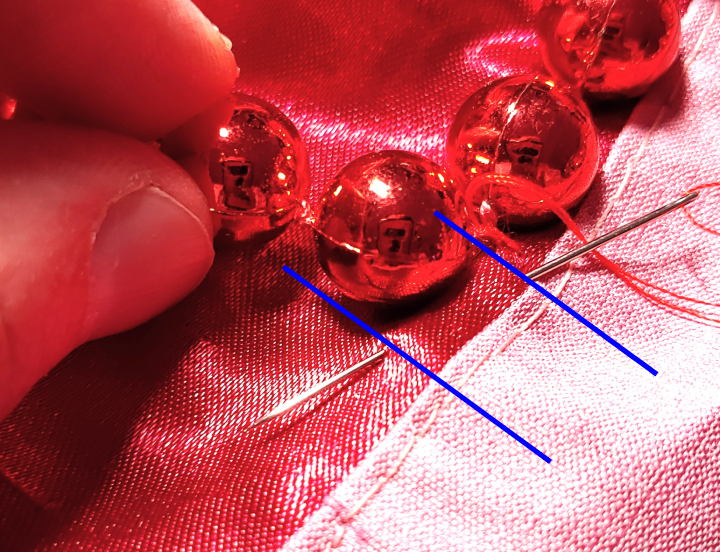
Thread your needle and let’s get sewing.
Sewing chains
When you’re sewing chains, you’ll want to use a few techniques to attach the beads and keep them steady as well as hide the tails of your thread. Let’s talk about each one one by one, from start to end of the thread.
Hiding the starting tail
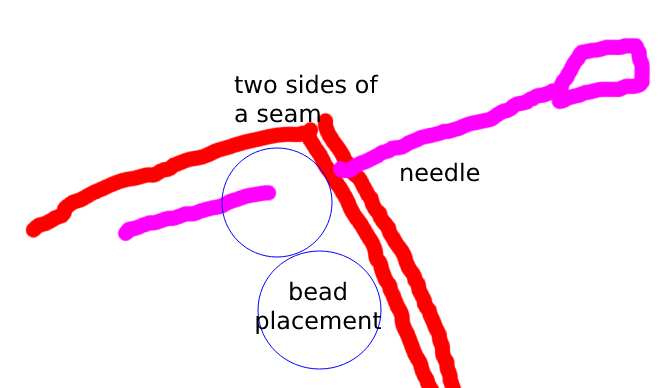
To start the chain, you’ll want to hide the tail. The easiest place, if your bead chain placement permits it, is to thread the needle into a seam itself. This works great with sleeve edges and when working with the smaller bead chains.
Separate the two sides of the seam and shove the needle right in the middle, bringing it out around where the beads will sit.
Pull the thread all the way through until the knot sits flush against the seam. If it sticks out in any way, use the eye of the needle to push the knot into the seam folds and hide it inside.
But what if you can’t put the knot inside a seam? Well, no worries. You can hide the knot underneath the bead chain.
For most size bead chains, you can hide a knot underneath the beads themselves. This is incredibly easy to do with larger beads but may take a little bit of maneuvering to hide the knot under smaller beads.
Start by moving the beads aside and poking the needle through the fabric about the middle of where the bead will sit. Thread it at an angle so the needle exits near the bottom of the bead. This will make the next stitches much easier as you sew the bead chain down.
Whichever method works for you, once you have the tail hidden, return the bead chain to where you want to sew it, and it’s time to sew all these beads down.
Sewing the chain
The chain is sewn down with a simple whip stitch (sometimes called by other names) and you move along with a straight stitch. If you’re not versed in hand sewing, no worries. These two stitches are among the easier hand stitches and probably some of the most useful to learn. You’ll probably find yourself using these stitches a lot for embellishing.
Here are the basics of how a whip stitch works:
Start on either side of the bead chain and pull the thread all the way through (but not so tightly that you pull the fabric into bunches. That’s a different technique).
Next, whip the thread around to the other side and insert the needle into the fabric on the opposite side of the bead chain string. Your stitch underneath doesn’t need to be long, just long enough that if you tug on it, the thread won’t pull through the fabric fibers. Bring the needle out on the other side of the bead chain string and then pull the thread. The thread doesn’t have to be flush against the fabric, but it should be tight enough that the chain doesn’t wiggle free.
For large or wide bead chains, you may have to use 2+ whip stitches to properly secure the chain to the fabric. For smaller chains, like party beads, only one whip stitch is really needed.
Now, this only covers one bead section, so how do we go to the next?
This part is a straight stitch. And in the case of larger beads, a really long straight stitch. This stitch will be about the width of your beads and at an angle. Angling it means you pull the needle back out of the fabric on the other side of the bead chain and you can continue your work on whip stitching the chain down to the fabric.
When pulling the needle through the fabric, make sure not to pull so much that the fabric begins to bunch. It should be just tight enough that the fabric lays flat but not so loose that the previous whip stitches or bead chains start to wiggle and loosen.
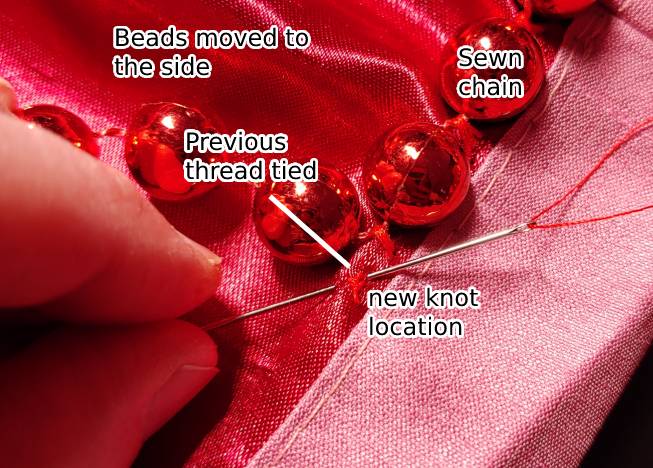
Tying off the thread
You’ve either reached the end of your bead chain or are starting to run out of usable thread. So it’s time to knot the thread and snip it. Much like with hiding the starting tail, you can tie the knot in one of two ways.
First method is to tie the knot on the edge of the fabric: in a seam or on a hemline. If your knots are tight (and they need to be as tight as possible to prevent that chain from unraveling), they’ll be barely visible on the edge of the fabric. And most people will be looking at the shiny instead of your knots.
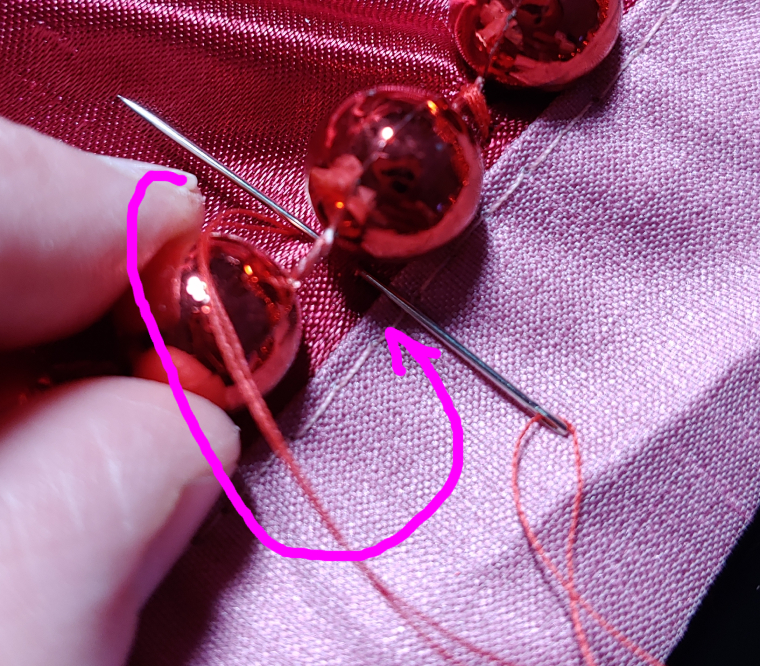
The second method is to tie the knot underneath a bead. The best hiding place for the knot is about the center of the bead, so you may have to use a short straight stitch to get the thread to the right location, the same kind of straight stitch used to move from one bead chain string to the next.
Whichever method you choose, make sure the knot is tight. My personal knotting method I like to call the pretzel. This knotting method involves making a very short stitch then drawing the thread through the loop you’ve made.

Two or three pretzels are usually enough to secure the thread before you snip the tails.
Hanging embellishments
Who doesn’t love hangy things? This particular cosplay I’d been working on demanded tassels wound in the bead chains, so I needed a lot of hangy things. While this method doesn’t work for all embellishments, it works for hanging things with a loop at the end and with larger bead chains.
First is of course to plan out how far apart the embellishment should be. For mine, I tied a tassel about every 10 beads. Because of how tightly the bead chains are sewn, you need to add the embellishments as you sew the chain down, so you’ll want to plan ahead of time where you want everything to sit. Lay the chain and the embellishments out on your desk or across the fabric and see where you like things. If you end up not liking them as you sew things down, there’s always a handy seam ripper to pull things out and start again.
Once you’ve decided, sew the bead chain down to the point where you want to add an embellishment then set the needle to the side.
Start by looping the embellishment string around the bead chain and slipping it through the loop to create your first loop knot.

Wind the string around again, slipping the embellishment through the loop until the string becomes tightly wound.
But we’re not done yet. This is cosplay. If there’s a chance something can move, it will, so we want to make sure it’s secure and doesn’t fall off. Before you start your straight stitch to go to the next section, slip the needle through the embellishment strings and sew them together then sew your straight stitch. This ensures that the embellishment never moves, even if it gets tugged.

Once you’ve done that, continue sewing the bead chain down until you reach the next embellishment location and embellish some more!

I hope this tutorial gives you all sorts of ideas on how to embellish your cosplay with a budget and beginner-friendly option to beading (and embellishing because who doesn’t like fancy hanging things?).
If you use this tutorial, let me know! @ me so I can admire your work and your experiments with bead chains. I’d love to see them!
