
Sometimes a character you want to cosplay has many piercings, more than you have. Or perhaps clip-on earrings bother your ears. I have trouble with clip-on earrings as I am allergic to nickel-plating and steel bases aren’t always nickel-free. So after a deep rabbit hole of shopping online, I came across an idea: wrap-around ear cuffs. These sorts of ear cuffs wrap around your ear to the front and make whatever decorations appear to float on your ear. Butterflies, flowers, gems, anything can feasibly float.
When I started planning Làng Wū Yáo’s cosplay, earrings had been one of the main problems with his designs. His design is pretty much Jpop star but what if Wuxia? He wears a ton of jewelry and has nearly a dozen earrings. I only have one piercing and I couldn’t figure out a good way to get gemstone studs to stay without cumbersome magnets.

When I came across the ear cuff idea, I decided to play with it. Turns out you can make secure ear cuffs with wraparound details fairly easily with Worbla scraps and it doesn’t involve burning your ears either. My ears are pretty sensitive and I had no problem with the heat while I was working. Still, if anything feels too hot, set your work aside and let it cool a moment before continuing.
This tutorial covers how to make the base ear cuff plus add floating details and even jump rings to attach beads and chains to. You can modify the location of the details and how much you want to add to the cuffs to suit your project. Make sure your workspace is heat-safe and let’s get started!
Skill level: late beginner – early intermediate
Cost level: moderate for Worbla and jewelry supplies
Materials:
- Worbla strips. 6″ will make 1 ear cuff + 2 wraps
- Heat gun or hair dryer
- Heat-resistant mat or surface. I use an ironing pad but smooth glass cutting boards and other heat-resistant surfaces work too.
- Sharp scissors to trim Worbla as needed
Optional materials:
- A pen
- Jewelry pliers
- Jump rings
- High-temp hot glue gun and tweezers
- Acrylic rhinestones, fabric flowers, jewelry findings, or other shiny accents
- Beads or charms, fishing line or invisible thread, and crimp tubes
- Necklace chains
Safety notes:
- As per their website, Worbla is safe to use indoors with regular heat. If you plan on melting it with a hot knife, work in a ventilated area!
- Please protect your workspace with heat-resistant mats or towels
- If the Worbla feels too hot to touch, don’t touch it! Protect yourself from burns.
Creating the base
To start, remove your ear jewelry so it doesn’t get caught in the plastic.
For each ear cuff, start with a single strip about 6″ long and 1/4″ wide. It doesn’t need to be exact as long as it’s something close. As the Worbla will be folded and mostly hidden behind your ear, close is good enough.

Using the heat gun or hairdryer, heat the strip up enough that it starts looking wet. If the strip tries to scoot away while you’re working with it, trap it by pushing the ball of a pen against one side. Once the strip looks wet, fold it in half then roll it along your surface. This will smooth out the edges a bit and make them less visible.

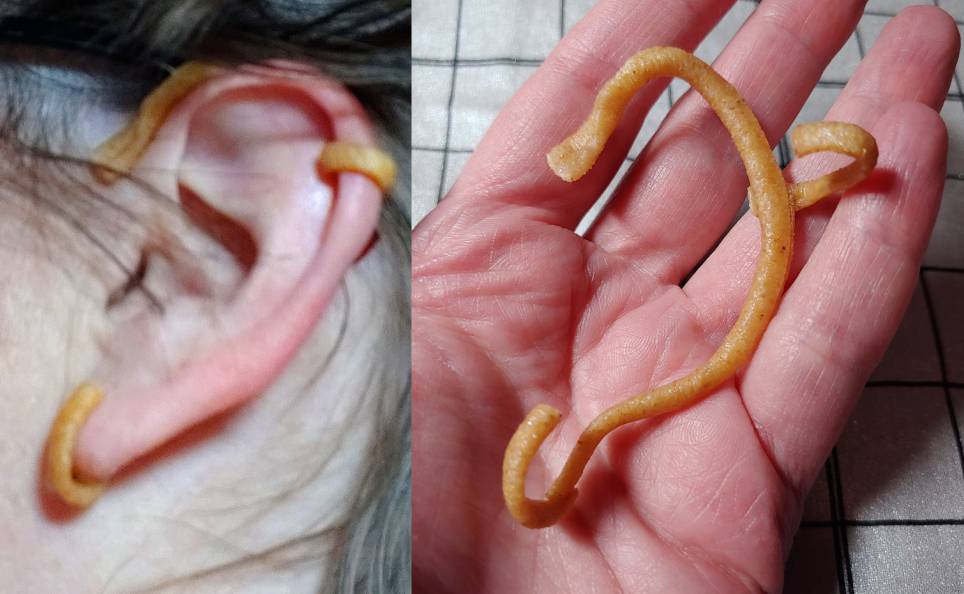
While it’s still warm, pick up the Worbla noodle and wrap it around the back of your ear, making sure to wrap part of the noodle around the front of your ear at the top. While the Worbla is cooling, press against the section behind the bottom ear lob and at the top of your ear to form the full shape. It will feel warm behind your ear but not hot. If it feels uncomfortable, remove the Worbla and let it cool slightly before you put it back on your ear.
You’ll need to trim the lower end. You can either do this while it’s warm and you feel comfortable putting scissors behind your lower ear lobe. If you don’t, wait for it to cool and trim it with a pair of sharp scissors. If your scissors can’t cut the rolled Worbla, you can heat it up just slightly to make the plastic easier to cut.
Once you’ve created the base, it’s time to add the bottom wrap. You could feasibly do the bottom and the base at the same time, but I found it wouldn’t conform to my ear properly so two steps work best.
The wrap here serves two purposes: to create a place for the base earring to sit right about where a pierced ear would be as well as create a stable loop around the lower part of the ear.
Take the noodle you cut off from the base and heat it up. You need it warm enough that it is flexible and malleable but not so hot it looks wet. Pinch the noodle to the backside of the lower base and squish it down so it sufficiently sticks. If it doesn’t stick, heat the noodle again. If you have any more trouble, lightly heat the back of the base so it becomes slightly sticky.

Once the noodle is stuck to the base, place the base on your ear. Wrap the noodle around the bottom part of your lobe and hold it there with a finger. You don’t need to pinch or press, as this will cause the loop to be too tight and uncomfortable. (If you find it uncomfortable after it cools, heat it up and reshape it. It’s Worbla!)
Once it cools, you’ll end up with a shape that looks kind of like a weird ear. Make sure to trim the lower loop as needed so the Worbla doesn’t look like it’s trying to crawl into your ear. Unless that’s what you want, then go forth!
Creating the wraps
While you could stop here and go with just the lower earring, we’re here to create floating jewelry, right? So we’ll need to create wraps that go along the lobe of the ear.
The basic idea of this is that pieces of Worbla stem out from the base and wrap around the outside of your ear, creating the illusion that jewelry is simply floating on your ear or that you have a ton of piercings. This is why these are sometimes called wrap-around ear cuffs if you search them online.
The number of wraps you make will depend on your project. For Làng, the number varies between both ears and which outfit he’s wearing, so make sure to get as many references as needed to create the full look.
Creating the wraps is much the same process as creating the lower loop. Take a small piece of rolled Worbla and heat it up until it becomes flexible and sticky. Pinch it to the back of the ear cuff where you’d like the wrap to be until it sticks.
While the Worbla is still warm, slip the ear cuff back onto your ear and gently wrap the Worbla noodle around the ear lobe. Hold the wrap there until it cools.
If you are wrapping around the upper lobe, make sure not to wrap the Worbla too far inward. This creates a massive loop that, while it looks cool, is near impossible to get off. You’ll want a gentle wrap instead to ensure the ear cuff is easy to take on and off without difficulty.
If you’ve created a wrap too tight, unhook the front of the ear cuff and slip the cuff downward so you can get the wraps off where your lobe no longer curls. Clip the edge or reheat and reshape as needed to make the ear cuff more comfortable.
Repeat this process for as many wraps as your ear cuffs require.
Adding jump rings
Some earrings may need to be danglies, and to make a proper dangle, you need something to attach a chain or earring findings to. While you could slip a jump ring over the lower loop, it’ll slip off every time you remove the ear cuff, and you risk losing your creation. Instead, we’ll use some Worbla to attach small jump rings to the ear cuff itself.
Pick out a small jump ring. I picked the smallest one I could find in my bag. Using a pair of jewelry pliers, close the jump ring gap and pinch it as needed.
Heat up a small strip of Worbla. You’ll need a very short amount, less than 1/2″, to make a proper loop for your jump ring. Once the Worbla becomes flexible, cut a very thin strip and feed it through the jump ring, pinching the loop shut.
Set the jump ring down on your work surface and stick a pen in the jump ring. Reheat the Worbla just a bit. A small strip like this has a tendency to cool a little quickly, so reheating it should give you more time to work.
Depending on where your jump rings need to sit will depend on which side you attach the Worbla to. For the lower wrap, you have to attach it to the outside to make it look right. On the upper wraps, you can attach it on the inside so that it appears to be hanging. See the image on how I attached each section:

With the jump ring Worbla warm, press the rings against the wraps and pinch them. You can use the back of a pen to push them down as well.
Let the Worbla cool before attaching any earring findings or chains.
Bling it
Naturally, we want to make earrings all shiny and blingy. Sequins, acrylic gems, tiny fabric roses, and jewelry findings are perfect to add to these ear cuffs and appear to float or be pierced into your ears. To attach bling, you’ll need a high-temp hot glue gun.
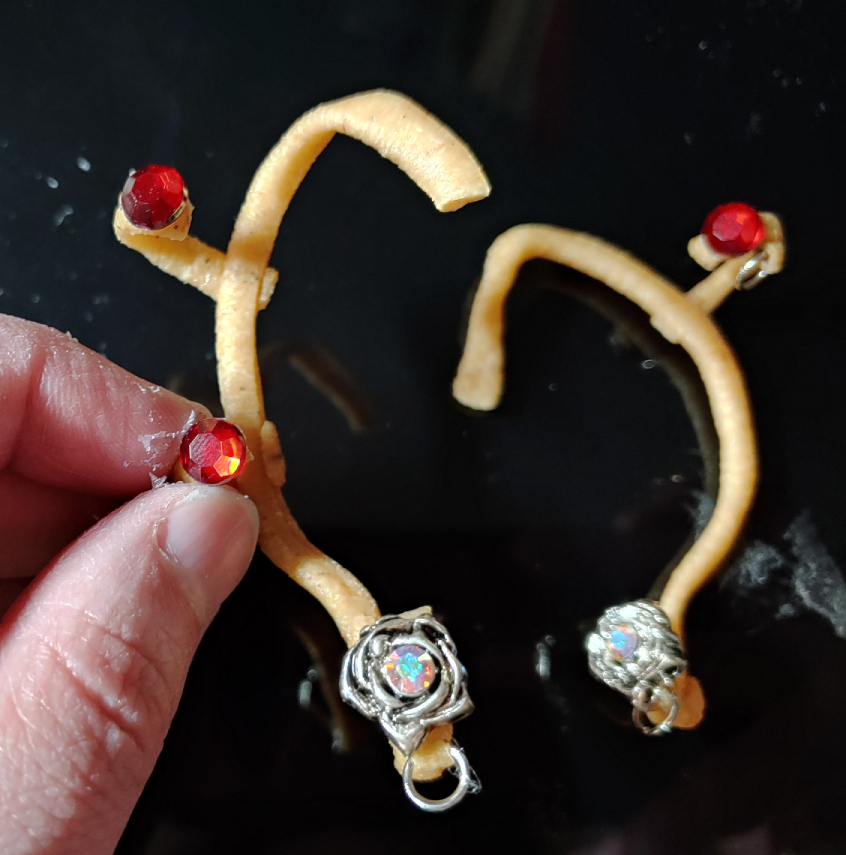
A word of note. Hot glue gets hotter than Worbla’s flexible point, so make sure only to put on what’s needed to attach the bling. You just need a little bit and the heat will fuse everything together. When placing gemstones, I recommend using a pair of tweezers to pick up the gemstone and place it so you don’t accidentally get your fingers in the glue. Ouch.
Before gluing your bling down on the ear cuffs, I recommend taking a look at the ear cuff in a mirror. This will let you see approximately where the cuff sits on your ear and where you should glue the bling. In general, you’ll want the bling to be facing forward so it looks like your ears are pierced. If it’s sitting sideways, it ruins the illusion and looks like it was haphazardly stuck to your ear instead.
Adding dangles
Who doesn’t love dangly things? I sure do. If you’ve added jump rings to your structure, it’s time to deck them out. Here are some tips on how you can get started with decorating with danglies.
Attaching with jump rings
Jump rings are great for attaching chains, jewelry findings, and other round things with a hole. They come in jewelry finding packs and often in multiple sizes.
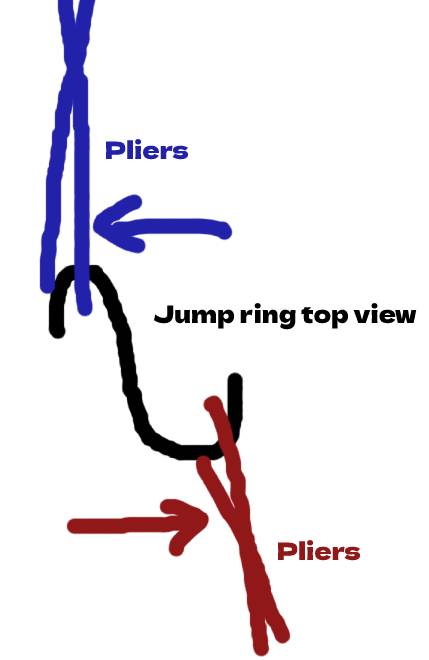
If you’ve never used jump rings before, they may seem hard to separate and push back together. But there’s a trick. Two pliers.
Instead of opening the jump rings wide and then trying to push the ring back together, you twist the jump ring open, moving the pliers in opposite directions until the jump ring opens. When you want to close the ring, simply move the pliers in the opposite direction to shift the ring back into place.
It may take a few tries to get the ring to shut fully, but keep trying and you’ll become a jump ring master.
Using jewelry chains
When you want to add chains to your ear cuffs, the ones with individual chains or rings are the best kinds to use. You can slip a jump ring in between one of the chains to attach to your ear cuffs or to other jewelry findings. And the chains are relatively easy to cut with a pair of wire cutters you find in a jewelry kit.
When picking out your chains, you can get the kinds wrapped on a spool (if you plan on making a lot of jewelry) or the small findings wound around cardboard that you find in the jewelry aisle. Either way, these findings should be more than enough to add chain accents to your ear cuffs and have some to spare.
When planning your chains, start by attaching one end to the ear cuff with a jump ring. Put the ear cuff on, and using a mirror, check the length of the chain and pinch it with your fingers where you desire to cut it. Carefully remove the ear cuff and clip the chain with a pair of pliers where you were pinching your fingers. You can then attach it to another part of the cuff, leave it to dangle freely, or attach it to other findings.
Bead chains
Bead chains are a cool accent, but getting them to stay on your chains and danglies can be a bit of a challenge if you’ve never worked with jewelry before. You could chain them together with wire, but I like to use fishing line or invisible thread to make the beads look like they’re suspended or dangling.

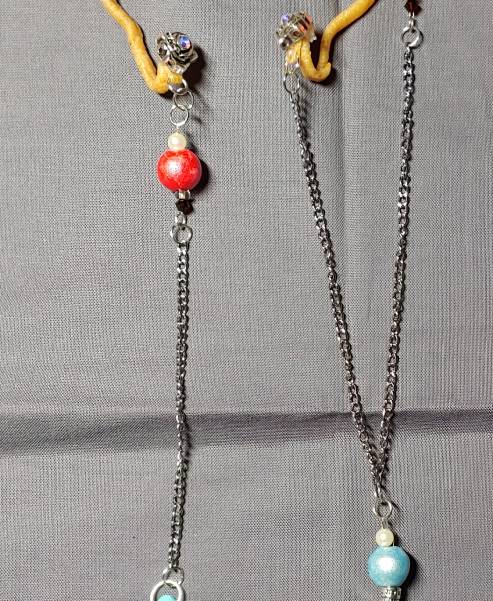
When chaining the beads together, you’ll want jump rings at least on the top end. For the diagram, I’ve used a jump ring on the bottom side, but for the second earring, there was a tassel instead.
The method is the same regardless of how many beads or what you use at the bottom end. You can use a beading needle but honestly, I threaded everything by just shoving the thread inside.
Start by feeding the thread or fishing line through the beads, starting with the top bead and working down to the bottom. Once you reach the bottom bead, thread the line through the lower jump ring or whatever you have at the bottom of your bead line. Loop the fishing line back upwards, feeding the line through the beads from bottom to top.

Once you have the beads threaded and the line tightened between each of the beads and the bottom accent, slip a crimp tube over both line pieces and drop it to the top bead. Loop both pieces of the line through the jump ring then push the tails down through the crimp tube, forming a loop around the jump ring.
Once you’ve made the loop, use your pliers to pinch the crimp tube tightly, securing the line and completing bead chain. Give a slight tug on the jump ring to make sure the line is secure. If it slips, pull the line back down to secure it once again then pinch the crimp tube with your pliers again. Make sure the tube is pressed as flat as possible. It may take a few tries to get the crimp tube properly secure, but you don’t want your beads falling off on the con floor, so always make sure it is completely secure!
Once you’ve completed your bead chain, you can attach the chain to the rest of the earring using the jump rings to connect them all together.

I hope this tutorial gives you all sorts of good ideas for making your own ear cuff earrings for cosplay and perhaps even general wear. Since you can add as many or as few wraps as you need, you can customize this however you like for whatever character or event you desire.
Let me know what you make with this tutorial! I’d love to see all your fancy ear cuffs and designs. @ me on social media so I can admire your beautiful work!
