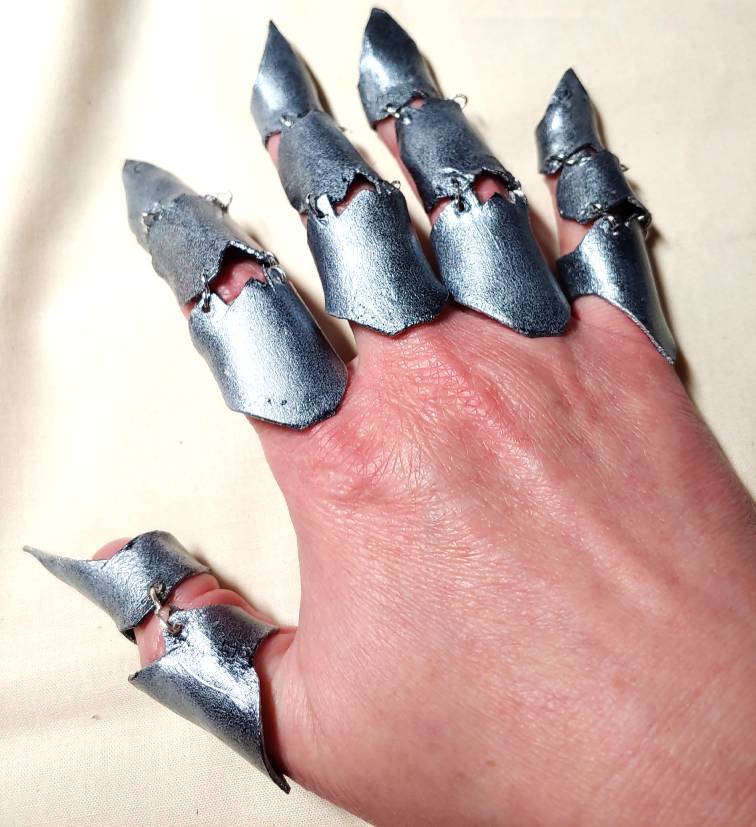
I’ve had to create many strange things for cosplay, and I didn’t expect jointed finger armor to be on the list. I remember as a kid, I thought finger armor rings were the coolest thing, even owned a few, but really hadn’t thought about them for a while. But when cosplay makes a demand, it’s time to get creative.

The reference art for this cosplay showed the fingers completely covered but still able to bend. They were metallic with no noticeable joints, but you absolutely need joints and gaps to bend metallic finger armor. So I referenced a number of premade finger armor styles to come up with a plan.
This method uses supplies that are relatively easy to find using jewelry-making techniques to create comfortable joints. If you don’t have funds for Worbla sheets, you can find strips of Worbla for a few bucks on Amazon. Make sure to get the beige stuff.
Skill level: intermediate
Cost: moderate (Worbla is involved. It’s always moderate)
Materials:
- 2mm foamies or posterboard for pattern-making
- Tape for patterning. Painter’s or masking tape sticks best to foamies
- A pen
- Strip of beige Worbla
- 18 medium-sized jump rings
- Pair of needle-nosed pliers or a jewelry set
- Heat gun or hairdryer
- Heat-resistant surface like a smooth glass cutting board. Something you don’t mind scratching a little bit and won’t be used for food.
- Seam ripper, ice pick, or other sharp pointy things to make holes for the jump rings
- Painting supplies. Sealant, paint, varnish, and a paintbrush.
Safety notes:
As with any Worbla project, heat is involved. Worbla becomes soft at about 150F and this may feel hot when pressed against your skin. If your fingers are sensitive, wait for it to cool a little bit before picking the Worbla up.
Also, make sure to work in a place that is relatively heat-resistant. Cover furniture with heat-resistant pads or thick towels as needed. Please don’t burn a hole in your carpet.
As per Worbla’s website, Worbla is safe to use indoors when heating it up. If you plan to melt it or cut it with a hot knife, work in a well ventilated area.
Patterning some fingers
Patterning is going to be the weirdest part of this process but is absolutely required. If you start wrapping your fingers with Worbla, you’ll find yourself wasting it, and that stuff is expensive! So let’s start with something relatively cheap for patterning: foamies and posterboard! Both can be found pretty cheap in the craft aisle and a pack will last you a pretty long time.
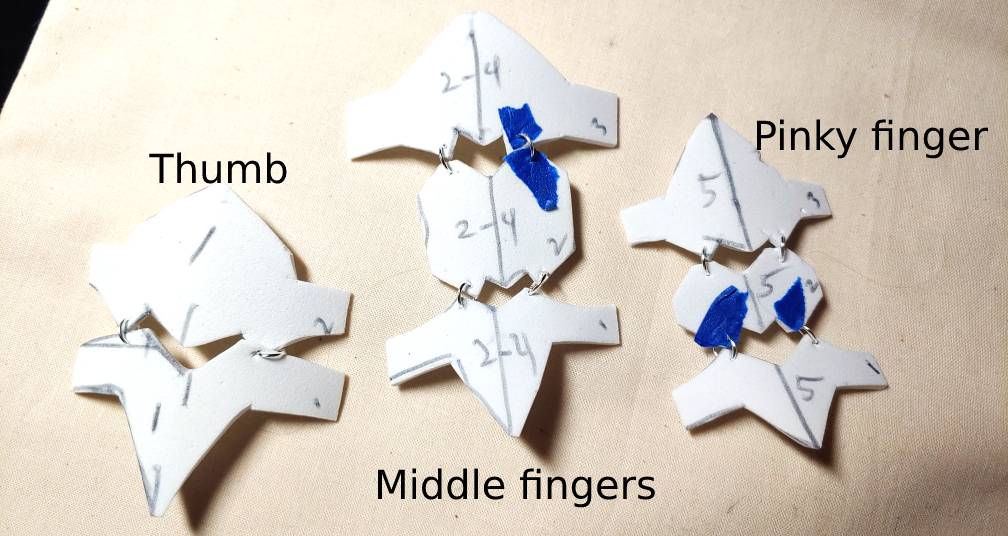
The finger pattern goes as follows: 2 segments for the thumb and 3 segments for all the rest. Only the outer segments of each finger will wrap around the finger itself. The tip wraps fully around while the segment closest to the knuckle will only wrap partially to make it easier to slide over finger joints.
In general, you’ll be making 3 sets of finger patterns. Since the middle 3 fingers are about the same size and close to the same length, you can use the same pattern for all three, adjusting the band size to fit each finger. Use your middle finger for the pattern since it is the longest. The other two patterns belong to the pinky and thumb.
Here’s how to make each segment. Repeat as needed for each pattern
This template is in PDF format and fits on regular letter printer paper. After printing, you still want to make your own template using foamies or poster board and make sure it fits your hand. Jump to the Pattern Test Run section on what to do next.
Fingertip segment
First, each finger needs a proper fingertip. As finger armor is usually nails, you want to make it a triangle shape with a band. The band has juts to allow for jump ring placement without hindering the movement of the joint

When drawing the fingertip template, fold the foam or posterboard in half then place your finger at the halfway point, lining your joint up just below the edge of the material. Draw half the shape then fold in half and cut like a hotdog. This will mirror your shape and make a complete pattern.
Tape the two sides of the ring together then slip it on your finger to pattern the other pieces.
Middle segment
Next is the middle segment. This segment is skipped for the thumb but included for all other fingers. It covers the middle section of the finger and has jump rings on both sides to connect to the other pieces.
The easiest (but also hardest) way to make the pattern is to draw right on yourself. If you have trouble with your material scooting around while you work, tape it to yourself as you draw your pattern.
To start, draw a line to mark the halfway point and line it up with the line from the fingertip. The shape of the pattern resembles a bubble M shape but more like those giant party balloon M shapes that are overinflated. The shape stops about halfway down the side of the finger. This segment is just a cap, so it sits on top of the finger instead of wrapping around it. If it wraps, it could hinder the movement of your fingers, so it sits on top instead.

The points on the M are where the jump rings connect. It dips down to partially clover the joint when you straighten your fingers but also move with your fingers when you bend them. The point should not be so sharp that it pokes your knuckles. It should be a gentle point.
Once you have your shape, fold the pattern material in half and cut the pattern out. You can tape the pattern to your finger or hold it there to make the final segment.
Knuckle segment
The final segment is needed for all fingers, including the thumb. This is the top segment that is closest to the knuckles and will also wrap around the bottom of the finger to hold it in place.
Creating the knuckle segment is pretty similar to the middle segment. Draw a line at the center of your pattern material and use that to align this piece with the other segments. The bottom of the knuckle segment resembles that inflated balloon M shape but instead of stopping halfway down the side of the finger, it wraps around it to the bottom.

The top of the finger involves a knuckle cover, a large jut of a shape that goes over the knuckles when your hand is flat. It doesn’t really add much functionality, but it looks cool.
Once you have the shape, fold the material and half and cut it out. It’s time to try out the pattern.
Pattern test run
Whether you used my pattern or created your own, you want to give it a test run. It’s best to try the pattern out and make sure your fingers can properly bend before committing to the expensive good materials. Worbla is much stronger than foamies and posterboard, but the test should be good enough to find any problems with the pattern.

You can poke jump rings through the foam and posterboard to link the segments together. If you have trouble poking the jump rings, use the tip of small scissors like embroidery scissors to create a hole for the ring to thread through.
Close the rings and tape the foam or posterboard to your fingers at the fingertip and knuckle segments. Then try to bend your fingers. It will feel a bit strange with the jump rings pressing against your fingers, but you should still have a decent range of movement. You won’t be able to curl your fingers completely, but you should still be able to bend your fingers comfortably.
If you find that the ring bands start pinching, remove the finger armor and clip the corner of any sharp edges. Foam is naturally much softer than Worbla will be, but if something is already pinching, you’ll want to make adjustments now. You can always further trim the Worbla later if needed.
Making Worbla fingers
Now that all the patterning and tests are out of the way, it’s time to make the actual fingers.
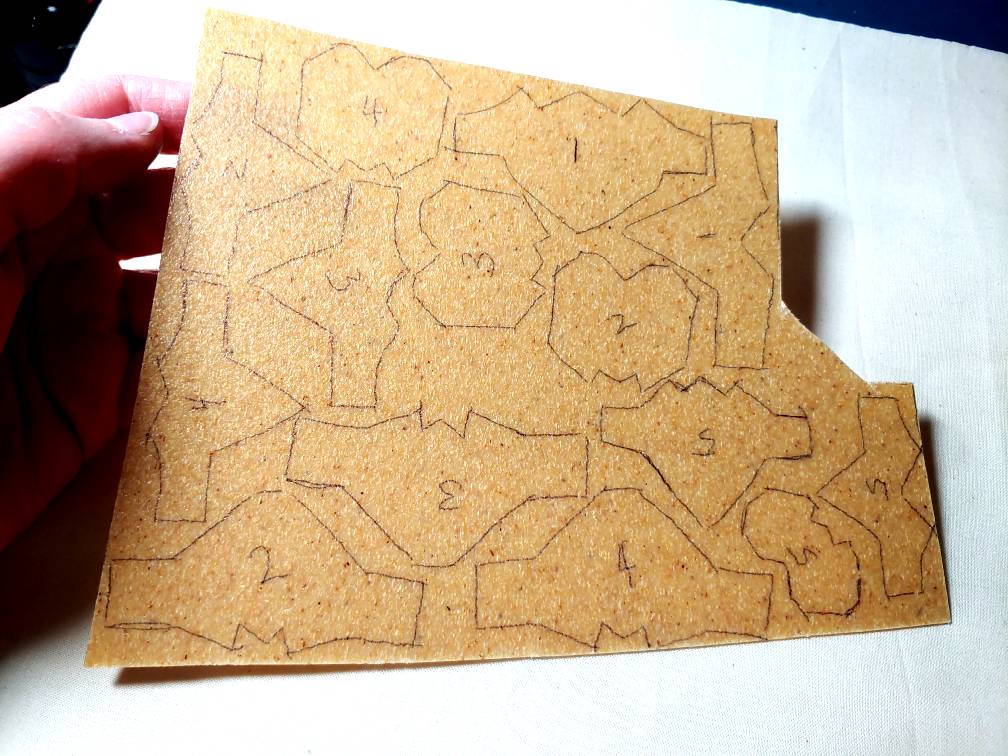
First things first, you need to transfer the patterns onto the Worbla. When transferring the pattern, remember to make 3 sets of the middle finger to match the index, middle, and ring fingers else you’ll be short two fingers.
When transferring the patterns, make sure to indicate which piece goes to which finger. For me, I use numbers, 1 for the thumb to 5 for the pinky. It made it easier to remember when I was assembling the finger armor.
Because of the pattern shapes, you can squeeze the pieces relatively close together to save as much space as possible, wasting as little Worbla as possible. Scraps can be reused, but why waste extra space when you don’t need to?
Poking holes in armor
To make the joints connect and move, you’ll need holes for the jump rings to sit. And for that, you’ll need all your heat supplies. Get your heat gun or hairdryer out with all your heat-resistant surfaces and it’s time to make some holes.

First, you’ll want to mark the holes. They need to be near the edge but not so close that there’s no plastic to support your jump rings. Give yourself a small amount of room next to the edge.
For connecting pieces, place one piece on top of the other, matching at where the knuckles would sit, and mark where the juts of the weird inflated M shape overlap the other piece. Place the jump ring marks inside the overlap.
To make the holes, you’ll need something strong and pointy. I used a seam ripper but you could use an ice pick or something similar as well. Something which could bend like a sewing pin wouldn’t work but a stiff sewing needle probably could.
Set the segment you want to poke holes in on a smooth glass or heat-resistant surface. Avoid metal surfaces as this will get hot. You want it solid and nonstick so that the Worbla will pop right off once cool.

Use the heat gun and heat up the Worbla until its soft. When Worbla gets to the point of flexibility, it starts to darken and look wet. After that, heat it up just a bit more then don’t move it. It’s very malleable with the consistency of tissue paper at this point, and we want it to keep its shape.
Take your sharp point and dig into the jump ring location. Swirl it around a little and you’ll notice a hole start to form. It doesn’t have to be perfectly round, just large enough that a jump ring will fit through it.
Sometimes the Worbla will be stubborn. You may have to press into the Worbla a bit before it gives to the sharp object. If it’s really stubborn, heat it up a little more to make it softer and pliable.
And now to wait. You need to let the piece cool substantially before moving it else the Worbla will stretch out of shape and try to stick to your surface. Once it’s cool enough to the touch, it will pop off the surface pretty easily and you can set it aside to finish cooling. Make sure not to stack the pieces until completely cool else they will stick to themselves.
Repeat this for all segments.
Bend the armor
It’s time to heatform your hard work. When heating up the Worbla this time, stop about when the Worbla starts to look wet. It will be pliable enough to form but not so pliable that it becomes butter and is as delicate as tissue paper. This will allow you to shape each piece without distorting it. This will also keep it from getting too hot. It will feel like hot water against your skin, and if this is uncomfortable, wait just a little bit for it to cool and not be so hot.
For each segment, you’ll need to let it cool before removing it from your fingers. It doesn’t need to be completely cool, but if it’s too warm, it will collapse in on itself when you put it on your desk. Make sure you set the pieces on a smooth surface so they don’t stick while cooling.
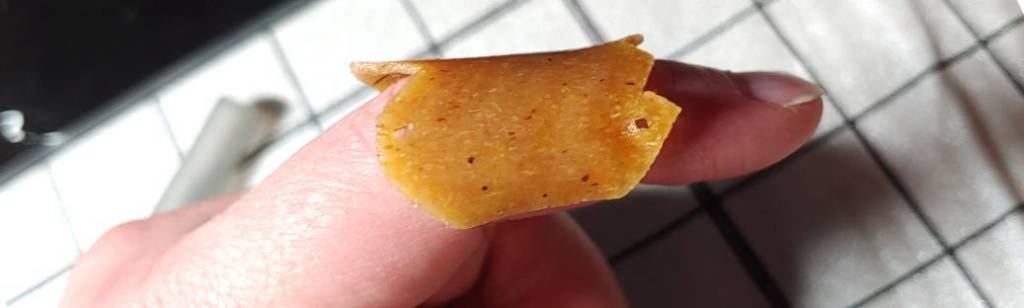
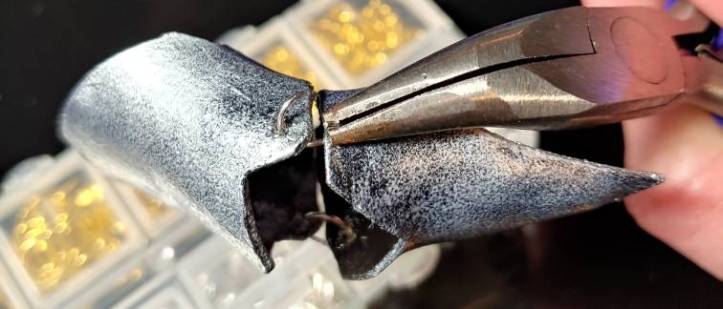
The easiest segment to start with is the fingertip. Wrap this segment completely around your finger, connecting the pieces on the underside. If the pieces overlap, you can trim them with a pair of scissors. The Worbla should be pliable enough that you can cut it like a piece of paper.

To make the rounded nail shape, pinch the nail section against the side of your finger. The Worbla will try to stick to your fingernail. This is okay, as when the Worbla cools, it will slide off easily. It’s just because Worbla is sticky when hot.
The next segment is the middle segment, which is skipped for the thumb. Unlike the other segments, this one should not wrap around the finger at all. It should only sit along the sides of the finger. You can press the segment around your finger with your free hand, pull the sides outward just a smidge. This will make this one nice and loose and allow it to slide around when you bend your fingers.
When placing this segment on your fingers, make sure the bottom of the M shape is pointing towards the fingertip. As fingers are tapered, the segment should be heatformed in the correct direction. If you find out it’s backward, lightly heat it up again and reshape it to the correct tapering.
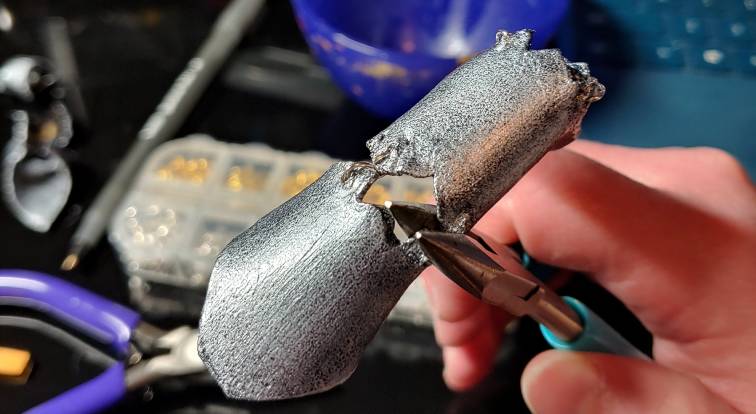
The final segment is the knuckle segment. It is a bit of a hybrid of the middle and fingertip segments. While working on this segment, make sure not to curl your hands and keep your knuckles flat so the knuckle cover has something to lean against when hot.
The underside of the knuckle segment is not connected, unlike the fingertip. You want it open so it can freely move as you bend your fingers. It will generally stay in the same place in the end, but it does need a bit of movement room. This also lets you pull the finger armor easily over your finger joints without irritating them.

If the sides of the ring wrap are too long, simply snip it short with a pair of scissors.
When this section has cooled, bend your fingers a bit. If the corner of the ring wrap starts knocking against your palm, cut off the corner to remove the sharp edge.
Repeat this for all fingers until you have a full set of finger armor.

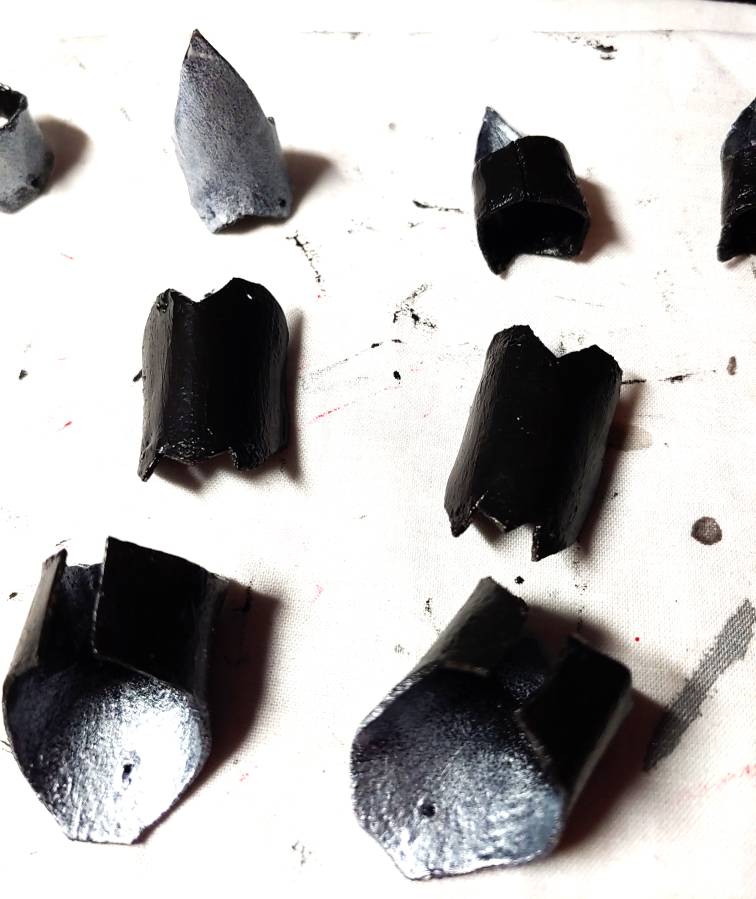
Painting
While you could certainly leave the finger armor a beige Worbla color, they don’t exactly look very metallic. You’ll want to give them a nice coat of metallic paint with a high gloss varnish to give them a proper look.
Worbla at this size is very lightweight, and most likely you’ll be painting these by hand. If you do plan on using spraypaints or an airbrush, you’ll want to mount them on a stick like a set of forbidden cake pops to keep them from skittering away the second you blast them with paint.
If you are painting by hand, there are a number of methods you could use to get a proper metallic look. My personal favorite is Painting weathered metal with a makeup wedge but you can use whatever method you like, from Rub n Buff to dry brushing or even weathering with an old sock. Whichever method you choose, here are a few tips:
- Use a base. I normally would suggest Flexbond, but it’s becoming increasingly more difficult to find the stuff, so anything from wood glue to school glue, gesso, and Mod Podge should give you a nice surface.
- Use black as a base coat. This will make the metal look more like metal and less like cheap plastic.
- Seal with a high gloss varnish. My favorite is DecoArt. You can get a big bottle for a pretty good price at Joann. This varnish will protect your paint from normal wear and tear at a con and from the jump rings rubbing against it.
You want your paint job to last. Make sure to protect it.
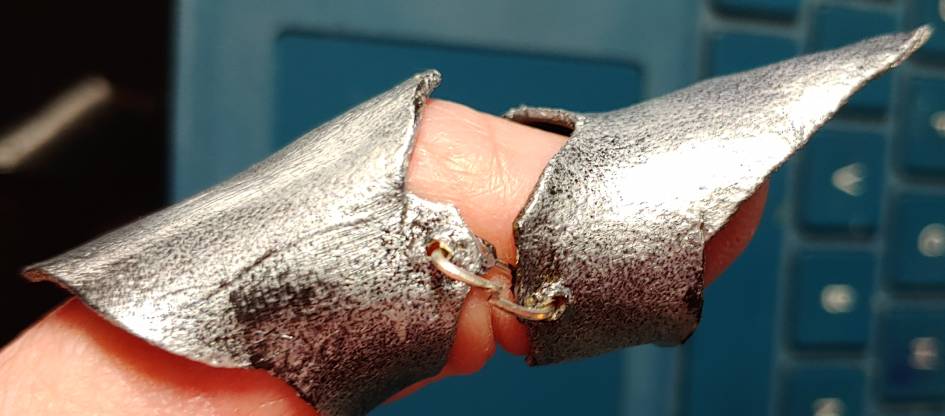
Chaining it all together
You’ve heatformed and painted everything and made the segments, but leaving them like this certainly won’t do. The second you move your hand, the pieces all fall off. We’ll need to connect them with jump rings, so whip out the jewelry kit and let’s chain these pieces together.

First, check to make sure that your holes are still usable. Paint likes to pool in the holes, so you may need to poke the ice pick or seam ripper back into the holes to reopen them.
With all the jump ring holes open, it’s time to put the actual jump rings into the hole. You’ll want to use a medium-sized jump ring. If you’ve bought a finding bag or a jewelry set, pick one from the middle of the sizes. It will have enough strength to withstand the movement but is small enough that it won’t be an annoyance when you move your fingers.
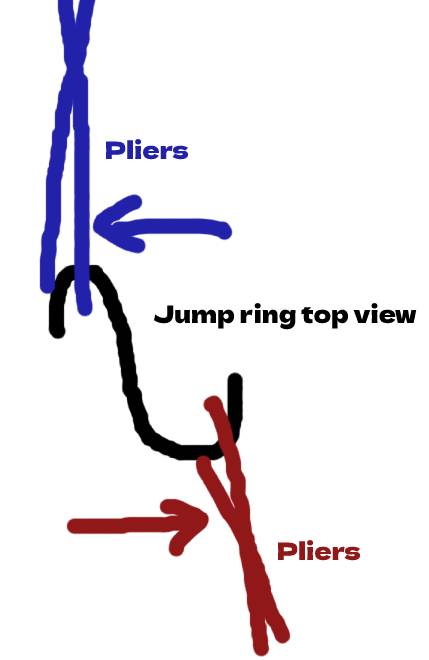
If you haven’t used jump rings before, you’ll want two pliers to work with them. Take the pliers in both hands and twist in opposite directions to open the jump ring and towards each other to close it. This will keep the jump ring from bending out of shape.
Once the jump ring is open, set one of the pliers aside, using the other to hold the center of the ring. Slip one finger segment on one side of the pliers while slipping the other on the opposite side and then check to make sure they’re both facing the same direction. This means that you should see the inside of both of the segments. If you’ve placed them in the opposite direction, you will see just the outside of both of the segments. Either way, both segments should match.
Once you’ve threaded both sides, close the jump ring.
Threading the other side takes a bit more work. Using the pliers, thread the jump ring through both the holes from the inside of the segments. Make sure the two sides are threaded as closely as possible so you can grip the jump ring with both pliers and pull it shut.
Now it’s time to crush.
While you can leave the jump rings round, it’s actually incredibly uncomfortable to move your fingers this way. The segments will feel a bit tight and close together and the rings will quickly bore into your joints. So to fix this, we must crush.
There is honestly no easy way to do this, and I found myself replacing several jump rings to make this right. It’s the gap that jump rings have. Sometimes it moves during the crushing process, and it’s something that really can’t be helped But once you have the rings crushed, it will feel much better on your fingers and give you better mobility.
Flat needle-nose pliers work best for this process. Take the ring in their plier-y grip and just squeeze. Crush it. You don’t have to squeeze very hard. Jump rings are not made out of a stiff metal and will take to pressure relatively easy. When you notice the pliers start closing more, remove them and check out the progress. The shape you want is an elongated oval but you might accidentally end up with something else.
If the jump ring opening has moved to one side or another, remove it and replace it with a fresh jump ring. With the opening close to the hole, you risk the ring slipping out and the finger armor falling apart.
If the ring starts looking more like a staple, take the pliers and carefully bend the jump ring edges outward to give it a more oval shape. This prevents the jump ring from scratching you when you move your fingers.
A bit of a journey, but you’re now at the end of the process. Repeat the jump ring threading and crushing until you’ve threaded all fingers and enjoy your work.
I hope you find this tutorial useful in making your own jointed Worbla finger armor. You can make just a few fingers or enough to cover both hands if you so desire. They’re pretty easy to store in a jewelry box when not in use and easy enough to transport to a con in a makeup bag. They also make a delightful tapping sound when you tap on a surface. Tappity tap tap.
Let me know what you make with this tutorial! @ me on social media so I can admire your work. And make sure to give them a good tappity tap.
