Chinese historical fiction and fantasy, wuxia, and other genres are getting more and more popular, so there’s a chance you’ve come across a top knot ornament in one of these. There are a few older anime too that also had top knot ornaments, ones with Chinese influence or ones from a period where China and Japan had similar fashion.
You can buy topknot ornaments all over the place now. There’s been a big movement to embrace traditional hanfu and style lately (Japan has had one too with kimono recently) and so they’re practically everywhere.
Ornaments were a huge part of traditional dress and practically required in many of the dynasties. There were ceremonies around getting your own hair ornament, and not wearing one was considered uncouth and uncivilized. I recommend reading New Hanfu’s history on hair ornaments and hairstyles if you’d like to know a lot of the history behind all these styles. I have a huge appreciation for traditional historic dress, and this site is a wealth of knowledge for hanfu and Chinese clothing history.
But back to cosplay. Cosplay doesn’t necessarily follow a traditional style. By tradition, these hair ornaments were often made of metals or hides, and I don’t know about you. I don’t have a metal workshop or tanned hides in my apartment. So that leaves us with more modern methods that work for cosplay instead of tradition.
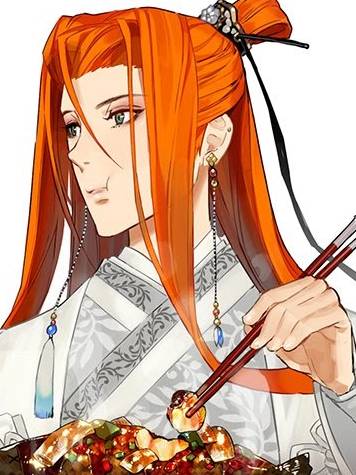
This tutorial covers a simple method to create a fabric-colored topknot ornament since that’s the style Làng wears, though the method could be modified to create metallic-looking ones as well.
Skill level: late beginner to early intermediate
Cost: the lower end of moderate
Materials (these are specific to Làng’s style so yours might vary):
- Posterboard and pens for patterning
- A couple inches of regular Worbla
- Sharp scissors
- A scrap of your main fabric. I barely used a quarter of a fat quarter
- A scrap of synthetic suede, microsuede, or felt for backing
- 1/4″ metal eyelets x 2
- A long stick. I used bamboo knitting needles, 9″ No. 10
- Paint and matte sealant if the stick isn’t the right color
- Hot glue
- Heat gun or hair dryer with a high-heat setting
- Heat-resistant surface, smooth cutting board, or an ironing mat. You’ll want a surface so the Worbla doesn’t stick to your table.
- A jar or glass cup roughly the size of the top knot
- Aluminum foil
- Accents or accessories
- Wig prestyled with a topknot
- A wig head to make patterning easier
Safety warnings:
This requires space to work with heat. You can work indoors as long as you are using low heat on a heat gun and not melting the plastic, but make sure wherever you work, you aren’t going to scorch your carpet. I work with a large ironing mat big enough to cover a work table, though I’ve seen people use a very large glass cutting board too. Just make sure to protect your workspace.
If your fingertips are sensitive to heat, I recommend either ironing fingertips (they’re little rubber heat-resistant fingertips found in the ironing section of a craft store) or heat-protective gloves. Worbla becomes malleable at 150F, so if your fingers don’t like heat, make sure to protect them.
Gathering references
The first step of any project is to gather references. Get as many images from different angles as you can. Topknot ornaments come in a variety of styles, some based on historical designs while others are more based on fantasy. So the more angles, the better idea you have of its construction. Once you have some solid references, start breaking down the construction of the hair ornament into pieces.
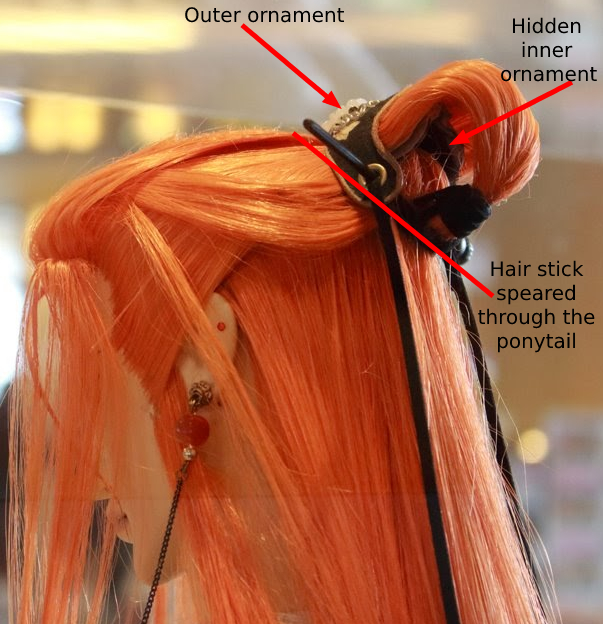
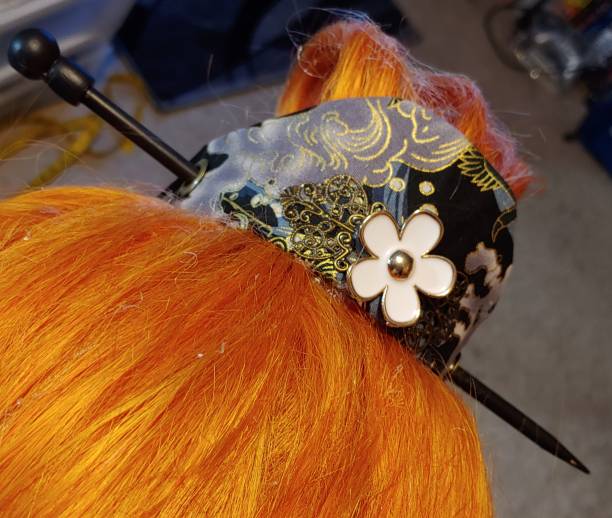
Làng’s topknot ornament comes in two pieces and is curved, attaching with a hair stick that is plunged into the ponytail. Looking at a number of hair ornament designs that have hair sticks, the stick tends to be plunged into the topknot itself to keep it from moving. Since this is attached to a wig, plunging it through the hair ties should provide a good amount of stability to keep it from moving around.
Creating a pattern

Once you’ve planned out construction, it’s time to make a base pattern. Worbla will stretch a bit when you heat it up and wrap it around a jar. That’s just the nature of Worbla in general. When making the pattern out of posterboard, you won’t need to add any extra onto the sides. You can honestly just eyeball the size.
While Làng’s hair ornament is actually two pieces, I only made one pattern for the Worbla. The outer larger ornament was patterned first, then the inner ornament and inside support layer were cut out of the larger pattern. This reduced the amount of guestimation I needed to do during the process.
Cutting out the Worbla
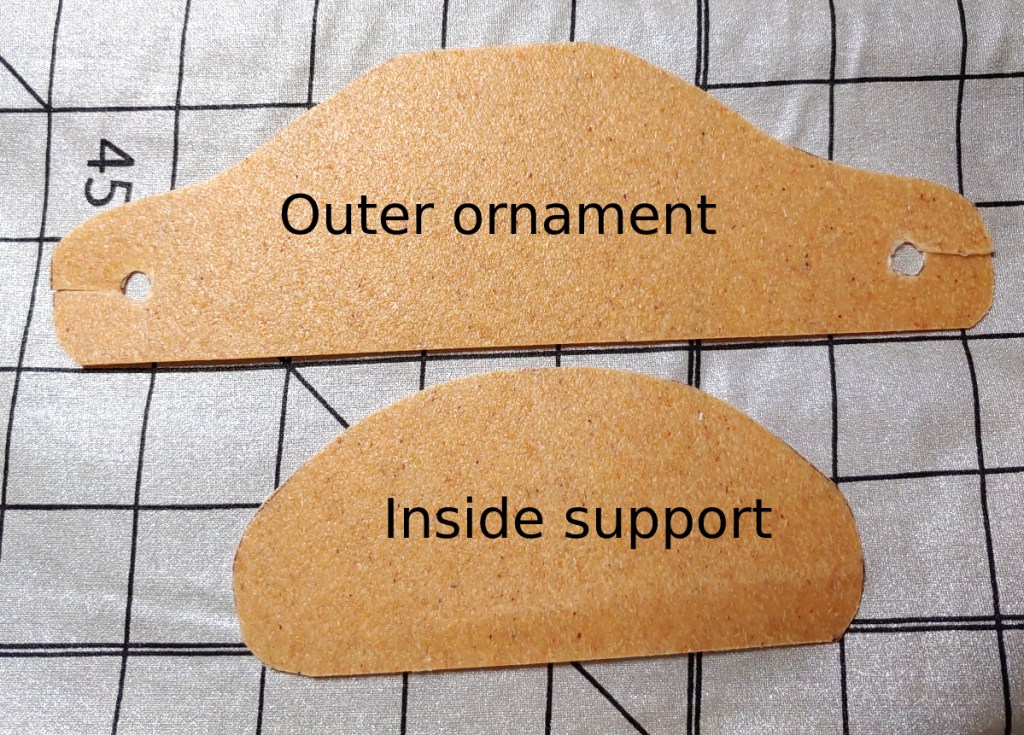
Regardless of if your ornament is one piece or two, you’ll need to cut out two pieces for the main ornament. Worbla is thin, and despite being plastic, it still has a bend to it. It won’t snap, but if you want to have it not shift the entire day of a con, you need two layers.
But matching up two layers of Worbla evenly is an absolute chore. Instead, you’ll want to cut an inner support shape that’s smaller than the outer shape. As you’ll need to make holes for the hair stick, make sure it’s shorter than the position of the holes as well.
When cutting out the holes, you can simply cut the side of the Worbla then the holes themselves. Because Worbla is sticky, you can close this cut up by sticking the two sides back together when hot and letting them cool.
If you need a hidden inner ornament like with Làng’s design, this one will also be shorter than the outer ornament. For Làng’s, I simply cut two pieces of the inside support simply because it was easier. The inner ornament is smaller since it will need to tuck behind the hair and not interfere with the hair stick.
Heatforming the Worbla
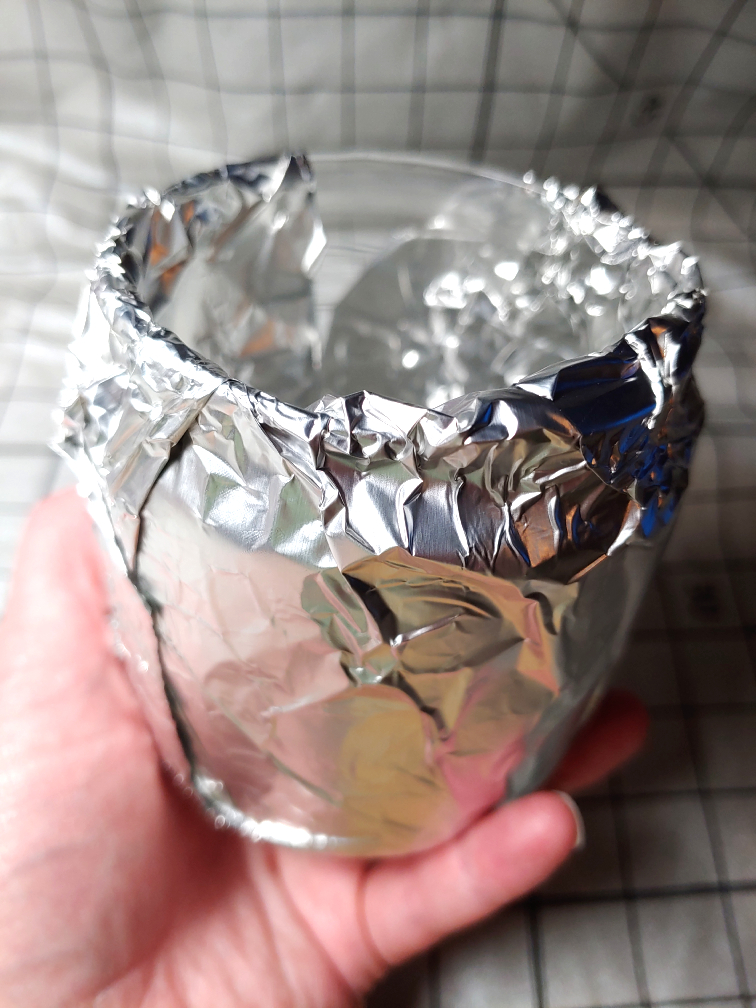
Before anything else, you’ll need to find a jar or mug that is about the same shape as the ornament you wish to shape. I went through a few options before I found a simple storage jar in the cabinet. You want it to be glass so it survives the heat. Avoid thin-walled glass such as wine glasses as you don’t want to damage them with crafting. You can use anything from jars in the recycle bin to canning jars and even coffee mugs.
Cover the glass with aluminum foil. Worbla is sticky when hot and will try to fuse itself with your work surface. Make sure to wrap most, if not all, of the glass so that no matter how far you wrap the Worbla, it won’t get stuck. Tuck the edges of the aluminum foil into the mouth of the glass so it won’t move, and smooth out any large bumps.
Now it’s time to heat it up. Cover your work surface as needed and put on any heat gear to protect sensitive fingers. You’ll want to work with each Worbla piece one at a time. Move your heat gun back and forth across the piece’s surface to begin heating it, using the lowest setting on your heat gun. Worbla only requires 150F to make it malleable and it will hit this temp rather quickly. The surface will start to darken just a bit. At that point, pick it up and see how malleable it is. If the surface starts to look wet, then it’s too hot and will start to stretch strangely.
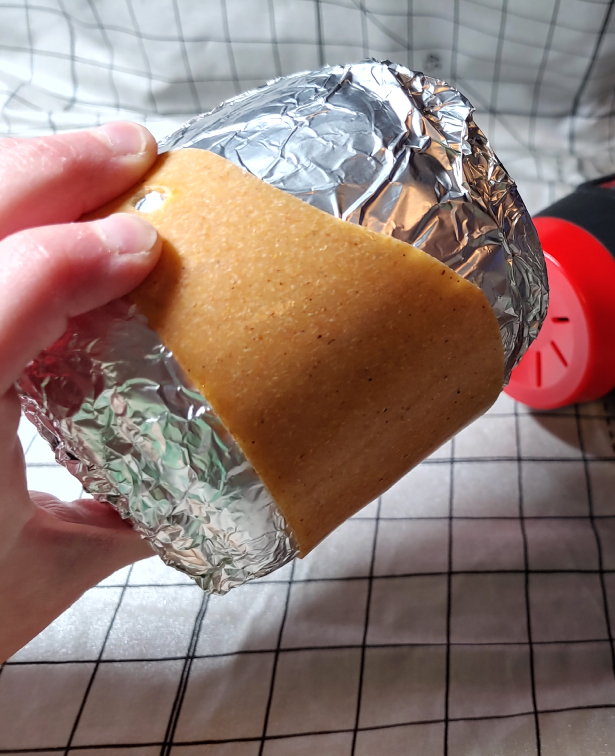
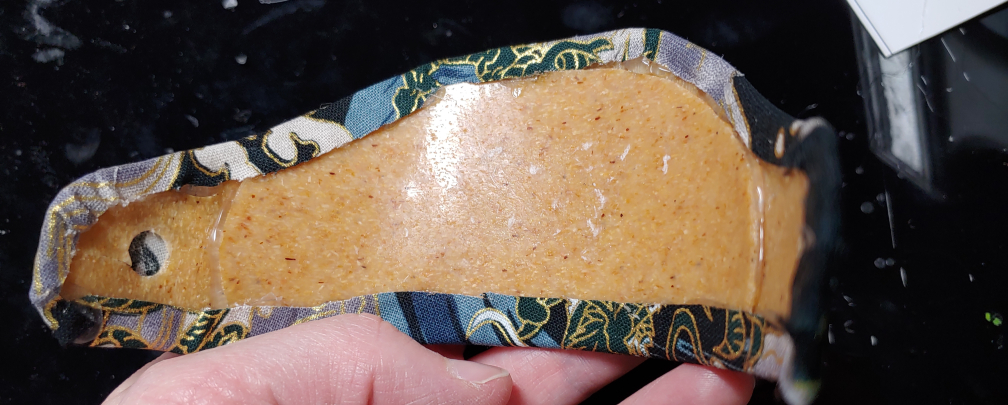
When the Worbla is warm and malleable but not so hot it’s a puddle, pick it up and wrap it around your glass. You’ll need to hold it here for a few minutes while it cools into the desired shape. If the shape isn’t right by the time it cools, heat it up again and wrap it back around the jar.
For the most part, the cuts next to the holes will close up on their own when you press your fingers against them. But if they do not, heat up just the edge and press the two pieces back together and let them cool. When you heat up this piece, don’t point the heat gun at your hand. It’s much hotter than 150F and can potentially cause burns. Instead, hold another section of the ornament and point the heat gun at a section you’re not holding.
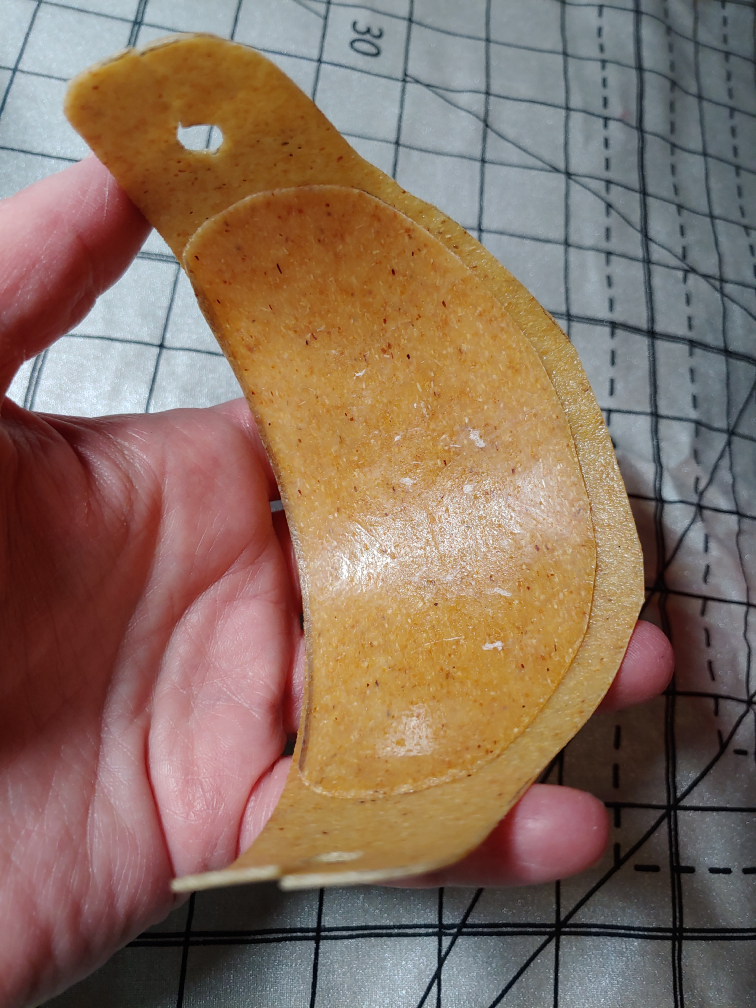
After you form the outer ornament, set that aside and heat up the inner support. Once you’ve wrapped the inner support around the jar, heat up the inside of the outer ornament just slightly and place it over the support. Double-check that none of the support is visible outside the ornament then press down on the outer layer.
When everything has cooled, you should have a nice double-layer ornament that’s strong in the center.
If your ornament has a hidden inner ornament, repeat the process you did with the outer ornament. Heat up the Worbla piece and wrap it around the glass, holding it until it completely cools.
After heatforming all your pieces, you’ll need to make sure the eyelets fit into the holes you’ve cut. The heatforming process will cause a certain amount of stretching and the eyelet may no longer fit. The eyelet is good to seal the edges of the outer layer fabric and also looks really nice, so you’ll want it to fit.
Take the eyelet piece with the longer stem and smaller hole and attempt to push it through the Worbla hole. If it doesn’t fit, take a sharp pair of scissors to the hole to cut it larger. If you have trouble cutting the Worbla, heat it up a little so the plastic is softer then cut the hole larger.
Adding fabric
Unfortunately, you can’t just sew the fabric to the ornament. Worbla is plastic, and you cannot sew through plastic. The next best option is gluing. Superglue tends to turn fabric a strange white color, so that leaves hot glue. High temp hot glue is the best (low temp tends to just come apart on a hot day), but there’s a difficulty I found when working with hot glue and Worbla together. Hot glue reaches temperatures higher than 150F.
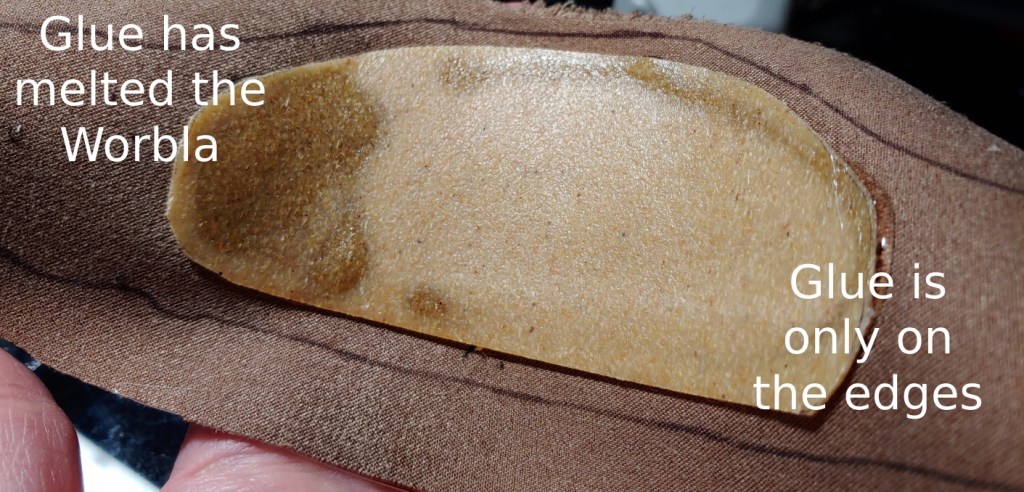
When using hot glue on Worbla, you cannot glue everywhere. This will cause the Worbla to heat up and appear melted and wet, much like it would if you blasted it too much with a heat gun. So when gluing the fabric down, you can only place glue on the very edges. As this is a hair ornament, this is more than sufficient to fuse the fabric with the Worbla. And as Worbla is sticky when it’s hot, it will stick to the fabric in return.
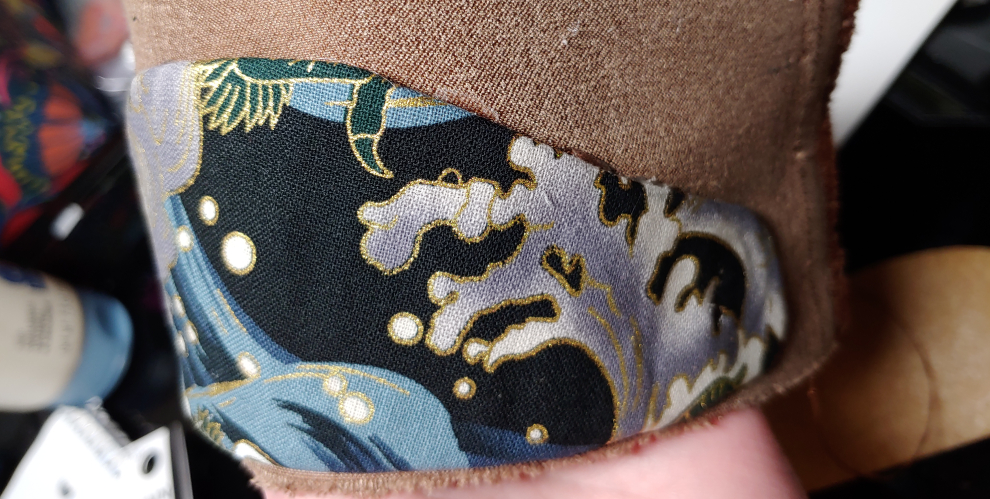
Start with the colorful top layer for the hair ornament. Cut out extra space on the fabric, larger than the Worbla piece as you’ll be rolling the edges over to hide the Worbla. Glue only small sections at a time to prevent any warping at the edges of the Worbla due to the glue’s heat. Glue around the holes as well to prevent slipping. Touch up any sections that might’ve not stuck as you work across the length of the ornament. Worbla sometimes absorbs the heat of the glue and may prevent the fabric from sticking.
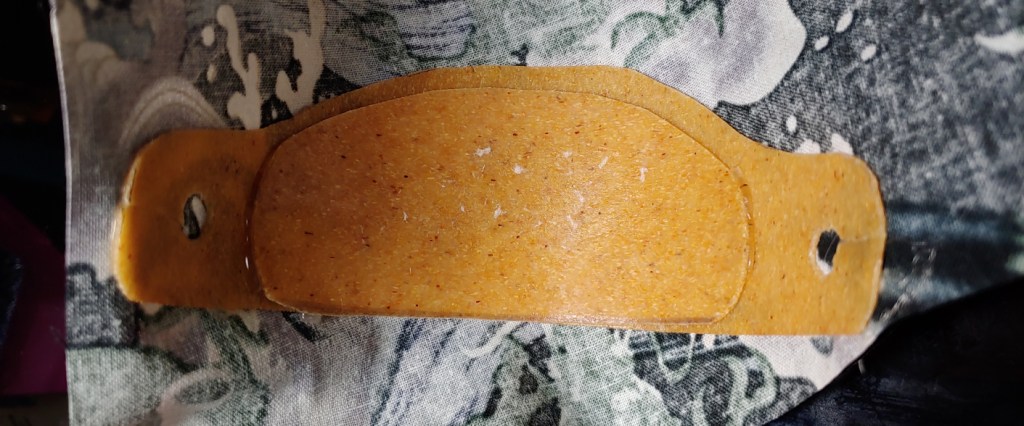
Once the glue has cooled and the fabric is sufficiently stuck, cut the fabric around the ornament, leaving yourself 1/4″ or so to fold over. It doesn’t have to be exact, just enough that you can sufficiently fold it over.
To prevent odd fabric buckling, start at the center of the ornament and work towards the edges. Like with the previous section, glue only a short section at a time. Apply the glue to the fabric, fold the fabric over, then press down. The heat will fuse the fabric and Worbla together pretty quickly.
Once you get to the rounded edges, repeat the same process, pushing the edges down as much as possible. Once the fabric has been fixed to the Worbla, take any raised fabric folds and glue them down too or trim them.
Once the outer fabric is glued securely, take a small pair of scissors and cut the fabric out of the holes. You may need something small like embroidery scissors to be able to properly cut the fabric out.
Cut out a piece of backing fabric larger than the ornament and glue the backing to the backside of the ornament, wrong side to the Worbla. When gluing, glue slightly away from the edge so that there’s a gap between the edge and the fabric. Work one section at a time, much like with the outer fabric, to keep the glue from cooling too fast and the Worbla from warping.
Once the backing fabric is sufficiently glued, trim the edges below the edge of the ornament so it’s no longer visible. Depending on the curve of your ornament, you may need smaller scissors like embroidery scissors to get close enough to the ornament’s edge.
Cut the hole out of the backing fabric. As suede is thick, you may need to stab the scissors through the hole to make your first cut.
Adding eyelets
Now is time to stick the metal into the hole. Before even laying any glue down, try to insert the eyelet into the hole, the side with the longer, thinner stem. Make sure it can sit flush against the Worbla and fabric. If it cannot, trim any fabric that might be in the way.
Once the eyelet can sit flush, remove it and place glue around the hole on the front side of the fabric. You just need a thin line to make the eyelet stick. Slip the eyelet into the hole and push it flush.
Flip the ornament over. Normally I’d say to use the other half of the eyelet and a pair of pliers to finish this off, but the layers are too thick. Instead, trace the circle edge with some hot glue to make a nice smooth surface that won’t get caught on the wig or the hair stick.
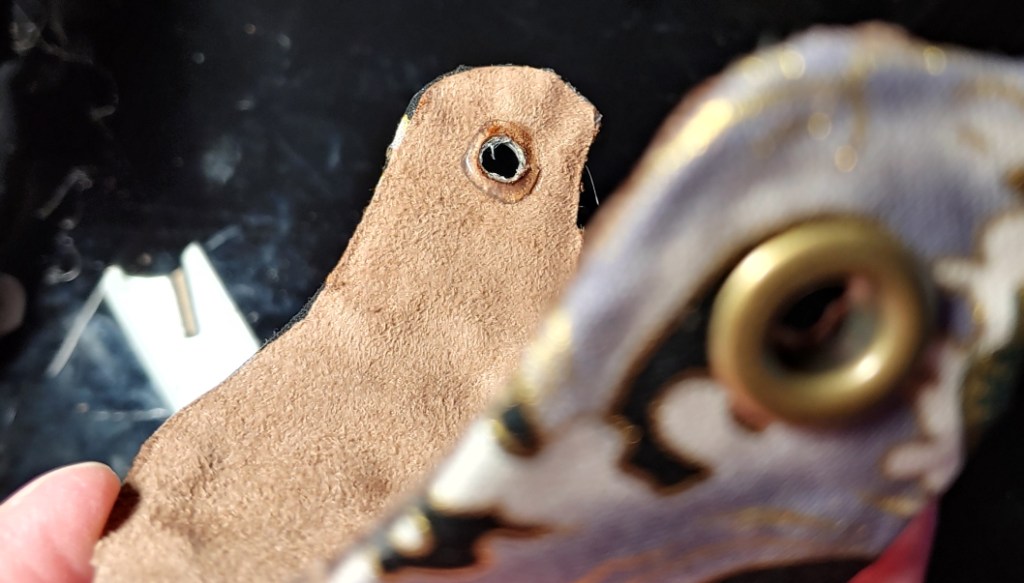
Repeat for both eyelets and let the glue cool.
If you have an inner ornament, set the outer one aside and repeat much the same process for the inner as the outer.
Glue the outer layer along the back first, as that will be the part visible underneath the top knot. The fabric will likely be the same backing fabric as you used with the outer ornament. Trim and fold the edges over, gluing them to the top side of the inner ornament.
Once the first layer is glued, attach the back layer to the top side, trimming the edges so they’re not visible in the final ornament.
Assembling and attaching
You’ve created the ornament and decked it out. Now it’s time for getting it on the wig. You can feasibly make it removable if your ponytail permits and the stick is close enough to the side of the eyelets that it does not move. If you don’t plan on doing any performances or perhaps there’s a large ponytail to support the ornament, you could easily make it removable with no modifications.
However, for Làng, it was a bit of a different story. His topknot is actually a loop, and the ornament leans against that loop instead of the ponytail. It left for little room to support the ornament and it flopped around when I put the wig on. So I permanently fixed the ornament to the wig.
Here’s how I attached Làng’s. You can pick and choose what methods you need for your particular ornament
Attaching the hair stick
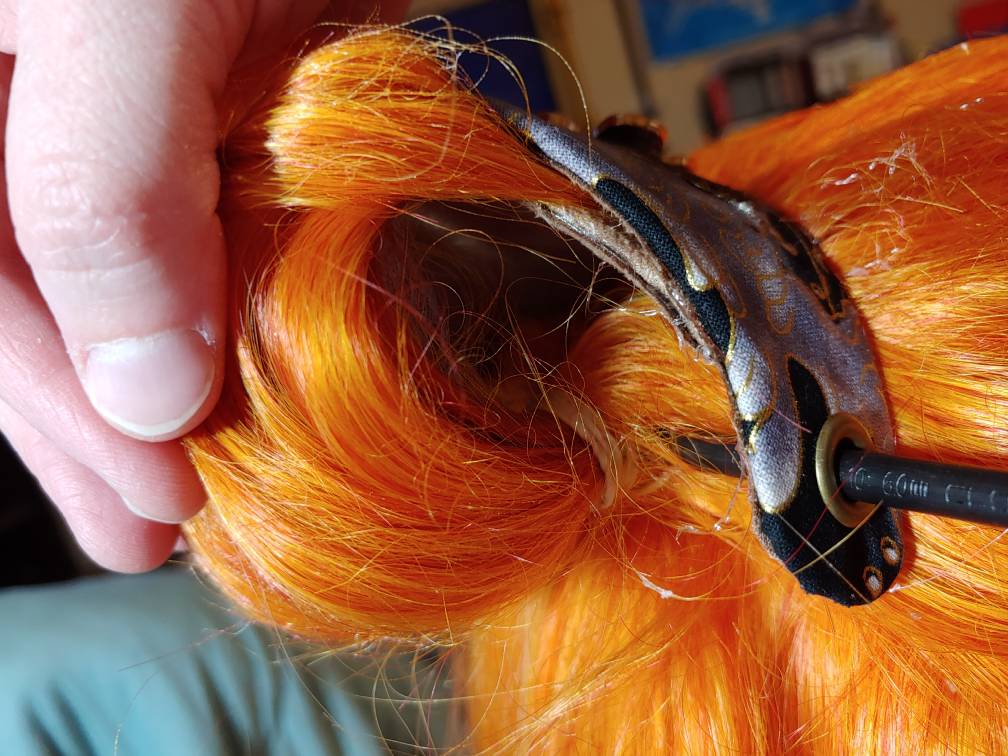
A big part of the support is the position of the hair stick. If you have a topknot or a ponytail, make sure it is tied tightly with an elastic or a cord and does not come loose. It should sit close to your head when you wear the wig.
The best place to plunge the stick is between the wig net and the elastic. Because of the pressure between your head and the elastic when you’re wearing the wig, this position keeps the ornament in place just by the stick alone (given the stick is tight enough in the eyelets).
The second best place is to plunge the stick between some of the hair ties. If you have a thick ponytail or top knot, the elastic ties will help hold the stick between them.
Gluing the ornament to the wig
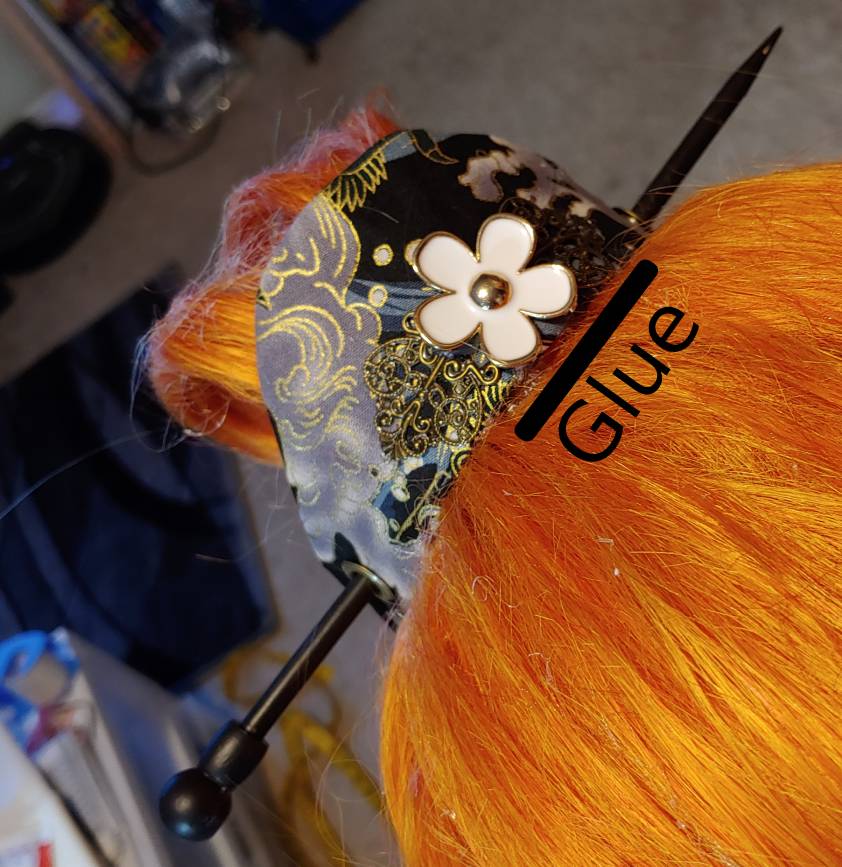
If you aren’t making the ornament removable, you’ll want to fix it directly to the wig so it doesn’t move. Because the ornament is made out of relatively lightweight materials, it doesn’t require a lot of glue to get it to stay put.
Hot glue works best here as it doesn’t stain the fabric like super glue does and it has a stronger bond than tacky glue (which works great for hair fibers, not so much for accents).
You only need a little bit of glue along the bottom center edge of the ornament. Spread glue across that bottom edge then press the ornament to the wig, holding it there as the glue cools. Use only a little bit of glue along the edge so it doesn’t squish out and glob on your wig.
Adding decorative ties
If you don’t want the hair elastic to show, you can add decorative ties to hide it and further secure the hair stick as well. Làng’s design showed he had leather twine wrapped around his ponytail. I found thin leather cording that matched his design perfectly.
When choosing your cording, it cannot be stretchy but still must have some flexibility to it. Thick cording will be difficult to properly wind around a topknot. Suede and thin leather cording work pretty well here.
When starting to wind the cord, tuck the tail into the rubber band to keep it steady, then start winding. Every few winds, dab some hot glue onto the cord and press it down to keep the cord from shifting.
You may find that hair gets wound around the cording as you work, especially if you have a loop instead of a topknot. If that happens to you, you’ll need to wind the cord around the ponytail several times, covering the previous work and the tangled hair. I wound Làng’s hair ties twice over to cover hair that became tangled in the process.
Once you reach the end of your winding, dab some hot glue on the cord and press down, clipping the extra cord and finishing the wrap.
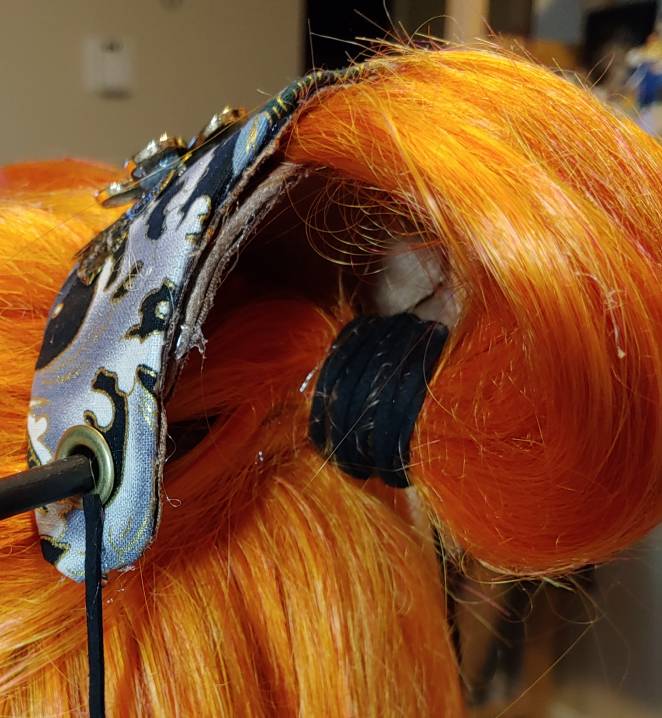
Adding an underlayer
Làng’s hair ornament has a second layer underneath the main ornament, and perhaps yours does too. It wraps both sides of his hair loop, keeping it steady and from getting unwound. This is definitely a less traditional ornament and likely something more modern.

There are two ways you can attach this hidden underlayer.
If you plan on making the hair ornament permanent, you can glue both layers together with hot glue. To make the hidden inner ornament stay put, you only need glue along the two side edges. This leaves the hair movable in case you want to make any adjustments. Simply put hot glue just on the edges of the inner ornament to start. Bunch the loop hairs together and press the hidden underlayer to the back of the ornament. Press and hold until the glue cools and sticks.
The second method is to make it detachable. Since the ornament is mostly hidden, you can use a magnet and metal washer on each side to fix the inner ornament to the main one. Using a washer on one side lets the ornament sit a bit flatter than if you used two magnets together. The inner ornament can now be separated from the outer, making the entire hairpiece removable for transportation.
And there you have it! A means to make a modern Chinese-style hair ornament using modern materials in a minimal amount of space. You can add any sorts of decorations and accents you like, customizing the hair ornament to give your character a fashionable accessory.
Let me know what hair ornaments you make with this tutorial! @ me on social media so I can admire your work!
