Fabric painting is a cool way to change the look of your fabric, adding patterns or colors to them. You can paint them on with a paintbrush, but sometimes you need something a bit more organic, weathered, or splotchy. I found that I needed that after weathering armor, and the pants no longer matched it.
After researching fabric weathering methods, I took to my own methods, making spray paint using acrylics I knew would match my armor exactly. You’ll need only a few supplies but enough room to work as this is an incredibly messy process.
This method is good for adding weathering or darker colors. I have not tried this with adding lighter colors to darker fabric. This is recommended only for cotton and cotton blend fabrics. It will stiffen the fabric a bit, but even after an entire day and cosplay competition at the con, I couldn’t even tell my pants were painted.
Skill level: beginner-friendly
Budget: budget-friendly
Materials:
- plastic to protect your table and your floor. A drop cloth for painting works great. You can find rolls of them in the painting section of hardware stores and Walmart.
- plastic to insert into your garment, if it is not a flat piece of fabric. A piece of drop cloth works great for this.
- a garment to paint
- acrylic paint of your choice. Any paint brand will do, but I get the best results from cheap $1 paints from Walmart.
- textile medium, a large bottle. Any brand will do. My go-to is DecoArt
- cheap spray bottles. The paint pretty much impossible to clean out of them so don’t use anything you want to keep
- paper towels
When working with textile medium, you may have to set the paint once you’re done. Each medium has its own set of requirements so you’ll need to read the bottle to know exactly what you need to have on hand. Most media are set using heat, so you will likely need the following
- iron with a steamless setting (or pour the water out)
- ironing board or mat
- parchment paper
Mixing your paints
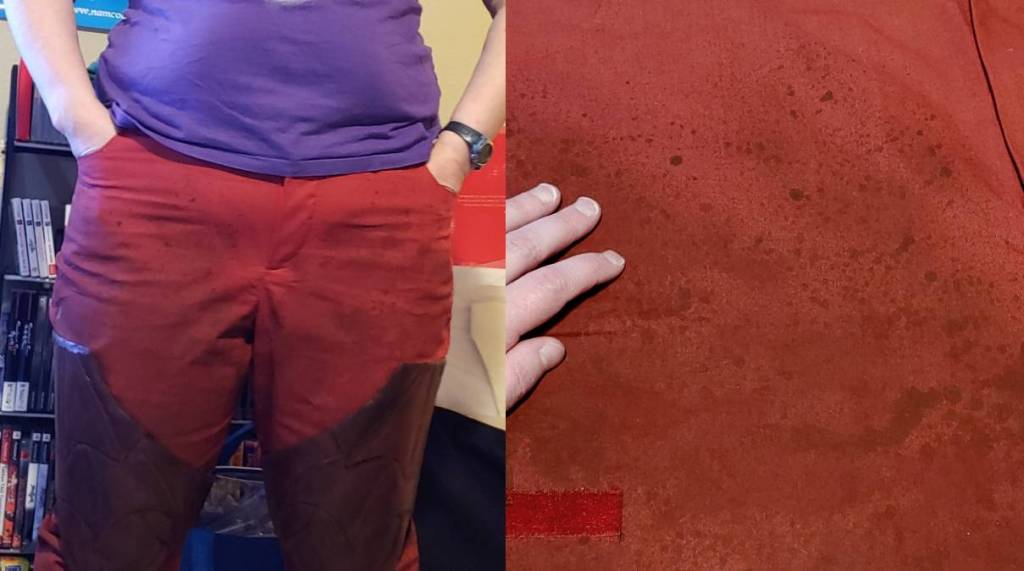
Before you even get started, you’ll want to pick out your paints. When spraying fabric paint, the paint tends to not be as dark as if you painted it on with a brush. With that in mind, you may need to go a few shades darker or mix paints. To get the paint dark enough for my pants, I settled on two colors to mix during the spraying process: dark red and chocolate brown. It is strongly recommended to do swatch tests before spraying your final garment.
Mixing fabric spraypaint doesn’t exactly follow the recommended ratios on the textile medium bottle. If you do follow those ratios, the paint will be too thick to pass through the nozzle and spray. It just clogs the nozzle up. Instead, you need to change the ratio of medium to paint.
The golden ratio is approximately 1:1 of medium:paint. Squirt the medium into the bottle then do a rough approximation of paint to match. Some bottles have measurements on the side to make it a little easier, but as medium is thinner than paint, it tends to not be 100% accurate. So make a guestimate.
How much paint you want to add to the container depends on how much fabric you need to cover. To cover a pair of shorts, I used about a quarter of my 8oz textile medium bottle per color. Spraying requires a bit more than you might expect, but the advantage is that you can always mix more paint later if you need it.
Once you’ve squirted both the medium and the paint into the bottle, use the sprayer straw to stir it up. Close the bottle and shake it too. There’s a lot of medium in there, and that will greatly thin the paint out, making it easy to shake and stir.
Making a huge sprayed mess
Now is the fun and messy part. It’s time to paint. Please make sure your surface is covered because this will absolutely make a mess. There is also a good chance that the paint will dribble out of the spray bottle onto your hand, so be prepared to wash them.

Spread your garment flat on your covered work surface and shove plastic inside. This is still acrylic paint and the sides of your garment will stick together if not properly protected. Avoid any coated plastic and use things like drop cloths or plastic trash bags to prevent sticking.
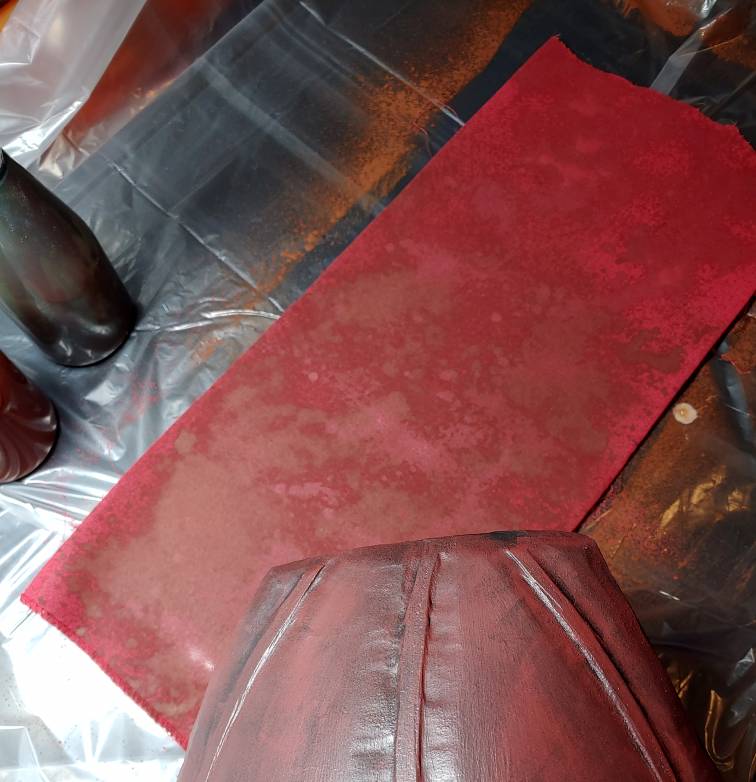
Now start spraying. It works much like any spray bottle would. Stick about 6″ to a foot away from the fabric and start spraying. To make a splotchy effect, spread out your sprays so that it has random paint blots in irregular patterns. This is good for weathering effects and blending multiple colors together.
For multiple colors, work with one at a time. You can honestly do them in any order as the medium will cause them to start blending together during the drying process. I swapped back and forth between colors a few times for my shorts to ensure I covered every section I wanted to. For several spots, I left the fabric color showing through to add a third color into the painted mix.
Work on one section at a time since you can’t flip the garment over when wet. For my shorts, I worked on one leg at a time, just the front or just the back. My table was also not large enough to work on both legs at the same time. This prevented any sticking to my drop cloth or unfortunate smearing during the painting process. You want it splotchy, not smeared, after all.

Once you’re satisfied with how much paint you’ve sprayed on, it’s time to blot it.
No matter how careful you are with spraying, there will be pooling across your fabric. It causes large patches of strangely saturated color and increases drying time. To even out the paint and to ensure good drying times, use a paper towel and pat it dry. You’ll likely need several paper towels. If getting messy is a concern, wear gloves as you will get paint on your hands.
Repeat this spray-blot process for all sides of your project. For shorts, I did one leg and one side at a time, folding the plastic beneath my pants as needed to ensure a clean workspace at all times.
Hang the garment up and allow it to dry overnight. Place plastic on the floor so nothing drips on your nice clean floor. Avoid carpets. I hung mine over the washing machine.
Setting the paint
When acrylics are mixed with fabric medium, you have to set them to make them permanent. The specifics are listed on the fabric medium bottle and not the acrylics bottles, as it’s up to the medium what’s necessary. Most fabric media are set by heat. Dry heat. No steam, so you’ll have to pour the water out of your iron.
If your medium requires heat to set it, you’ll want to protect your ironing board and your iron. If you iron directly onto the paint, you can risk gumming it up and the paint traveling to your next project. You could use a press cloth, but I found it got a bit nasty when ironing paint. So I went with the same materials I use to set heat-transfer vinyl: parchment paper.
You can get parchment paper in rolls pretty cheap from any place that sells food supplies. You’ll find it around the same area as the aluminum foil and plastic wraps. It just needs to be the most basic type of parchment paper on the shelf. It doesn’t have to be marked or nonstick, in fact, it’s better if it isn’t.
Cover part of your ironing board with parchment paper, then lay some on top of the garment. Move your iron over the parchment paper much like you would over fabric at whatever heat setting the fabric medium bottle tells you to use. Use whatever methods the bottle says to do. It may tell you to let the iron sit for a moment on the fabric or it may tell you to be constantly moving. The bottle will know best.
Once you’ve set the paint, you may have to wait before you can actually wash the garment. I would definitely recommend washing the garment as it will soften the fabric up and make it comfier to wear. My medium said to wait about a week before washing, but each medium bottle will say something different.
Now stand back and admire this unique work of art you’ve made.

I hope this spray paint method gives you all sorts of ideas for future projects. The speckled effect could be used for all sorts of designs, everything from a speckled gradient to weathered and greasy looks. As long as you can find the acrylics (or mix them), you can make spray paint with them. The possibilities are bountiful.
I’d like to see what you come up with using this method. @ me on social media so I can admire your speckled, spray-painted work!

[…] To guarantee proper adhesion, consider using a textile medium mixture. […]
LikeLike