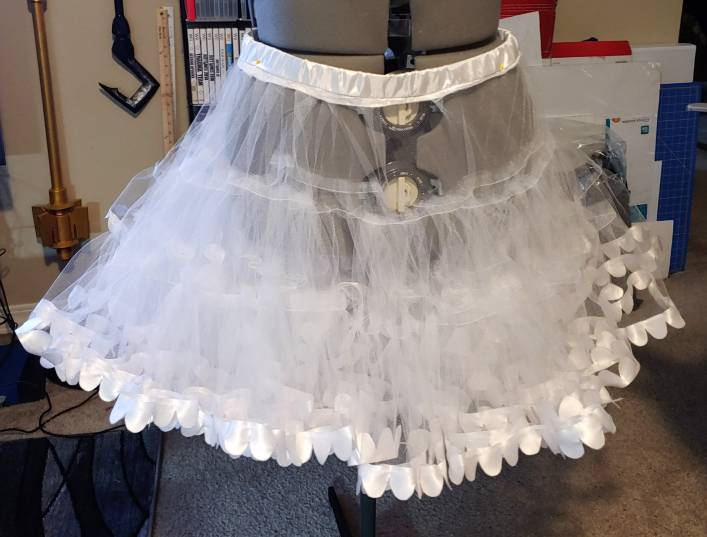
Petticoats require a lot of materials, especially idol petticoats. These are often tiered petticoats with so much fluff you want to shout about how fluffy it is. But you don’t need to break your bank or crack open the wallet too wide to make a petticoat. You can make one on a budget of less than $20 with minimal supplies.
A petticoat made on a budget is pretty bouncy but it’s not the strongest type. It can support a circle skirt over it pretty easily and still keep its shape, but something heavier might compress it a bit. You’ll want crinoline or a hoop to handle that. But we’re going budget and basic.
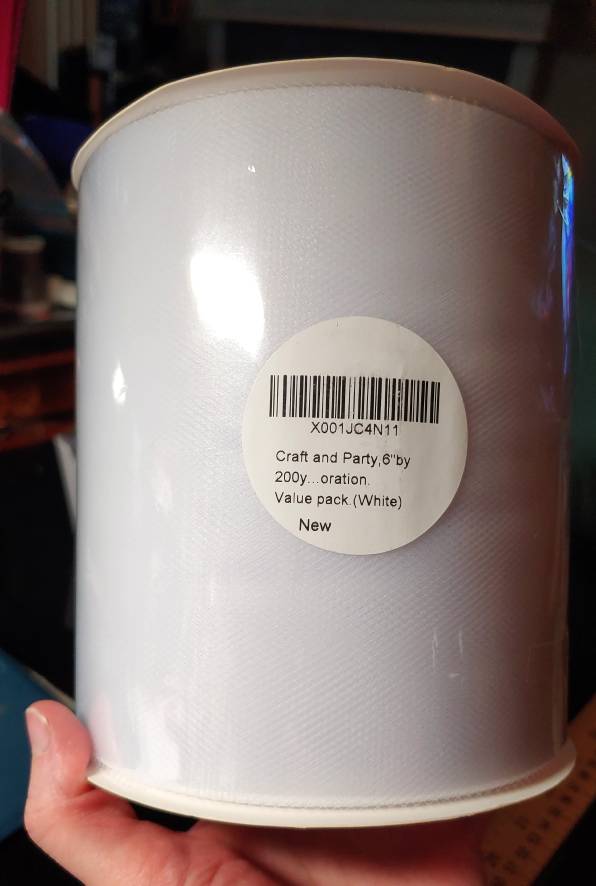
So what’s the secret to budget-friendly petticoats? Spools of tulle made for weddings and parties. Tulle is not the stiffest material, but when you add tons of it, it makes an ultra-fluffy petticoat. These spools are ultra cheap, a spool of about 200y costing roughly $10 on Amazon. They come in all sorts of colors, with white and black being the easiest to find. Add decorations to the bottom like simple ribbon or make your own scalloped trim out of satin ribbon for your own custom snazzy flair.
Cost: budget-friendly
Skill level: intermediate
Supplies (see next section for yardage calculations):
- Spool of wedding or party tulle
- Spool of ribbon (optional, but looks cool)
- A lot of matching thread. Get a big spool. I went through about 5 bobbins for this project.
- Safety pins
- Non-roll elastic or a drawstring
- Fabric to make a waistband casing (something soft)
- Spare material, ribbon, or bias tape to baste the waistband
- A sewing machine with a standard foot
- Yardstick
- Tape measure
- Clothespins or clamps (optional)
- Paper scraps to label your tiers (recommended)
- A few straight pins
- A lighter (for sealing ribbon edges, optional)
This method makes an approximately 16″ long petticoat from waistband to bottom.
Calculating yardage
Fashion math is an extensive subject, but I’ll make it easy for you. I’ve got all the numbers crunched for you and all you’ll need to do is open up a calculator app. But before we do that, you’ll need to know your waist size.
Wrap the tape measure around where you want the petticoat to sit. For some, this may be the “waist” where your body is the thinnest. But for others, it may be down around where your hips are (that’s where I find mine most comfortable). Wherever you want this to sit will be your waist for these calculations. Don’t suck your gut in else your measurements will be off. You want this to be fluffy and comfy, after all.
Take a note of this measurement as you’ll need it for the following calculations. This will get you the number of yards you need to measure. Because these tiers require so much fabric, measuring in inches gets ridiculous.
- Tier 1: waist x 2 / 36
- Tier 2: waist x 6 / 36
- Tier 3: waist x 18 / 36
Your numbers will look huge. I used nearly 100y of tulle in my petticoat alone. You want it fluffy, so these numbers must be large. And since we want it ultra fluffy, these tiers are actually doubled to make an inner and outer skirt: 3 tiers for the inner skirt, and 3 tiers for the outer skirt.
You’ll need one more calculation
- Waistband length: waist x 1.5
- Waistband width: width of elastic (or drawstring) x 2 + 2″
Scribble down all these numbers, and let’s get started.
Cutting the tiers
Since this will be an ultra-fluffy petticoat, we need two sets of each tier. And each tier gets longer and longer. My bottom tier was 24y long, and that seems kind of crazy to measure. But there’s an easy way to do this. If you’ve ever been to a fabric store and watched the cut counter measure fabric, you’ll have an idea of what to do.
The easiest method is to tape a yardstick to your desk or a table, anywhere there’s enough room for the whole yardstick to sit. Remove all the tape and packaging from the tulle spool and take the open end of the tulle in one hand.
Stick your finger in the spool hole then pull the tulle out with the other, stretching the tulle along the length of the yardstick until you reach the end. Take your spool hand and pinch where the tulle meets the other end of the yardstick. This is one yard of tulle.
Now it’s time to pinch and pull. Switch hands, pinching with your lead hand and sticking the spool hand back into the spool hole. Pull again, taking your pinched fingers to the end of the yardstick. Use the spool hand to pinch the opposite side of the yardstick. That’s 2 yards.
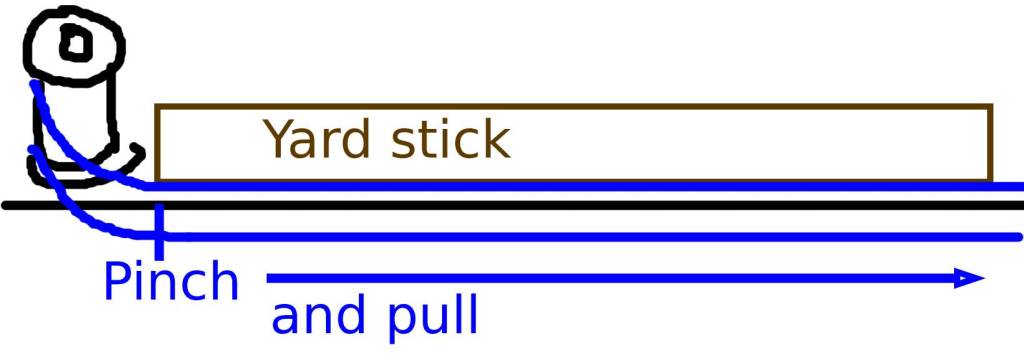
Keep pinching and pulling until you reach the length of your tier. If you get weird yard measurements like .45567, you can guestimate to the closest regular measurement, like 1/2 or 1/3rd. These are often marked on a yardstick to make things easier. Because there is so much tulle, slight rounding won’t hurt your measurements or fluffiness.
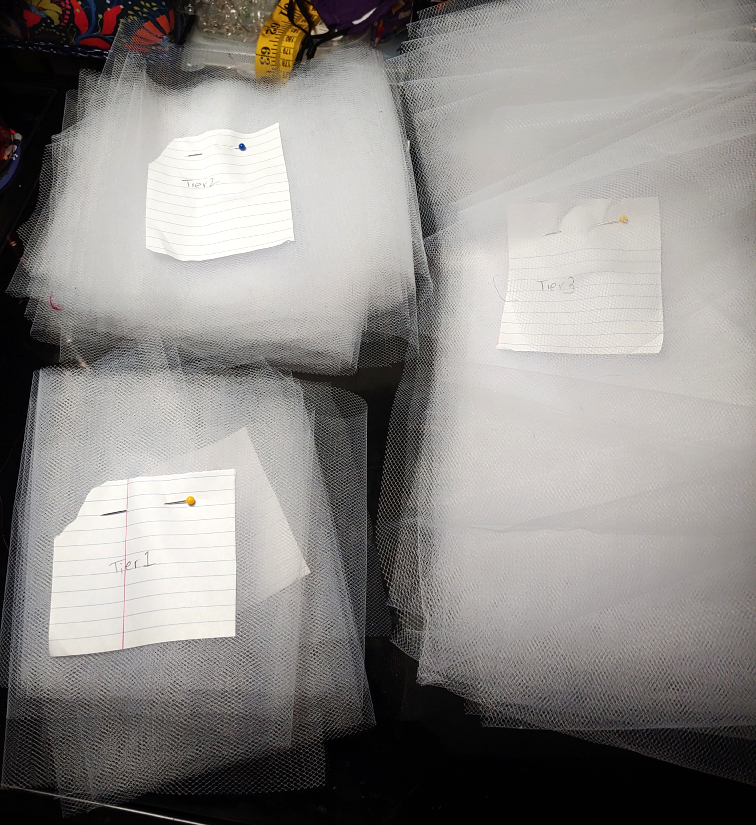
Once you’ve measured the full length of the tier, cut the tulle free from the spool and set the spool aside. You’ll want to fold the tulle pile, which makes sewing the seams easier later. When dealing with these massive lengths, especially when you reach tier 3, folding seems like an impossible task.
The easiest way to fold it is to set one end of the tulle cut on your lap and drop the rest on the floor or a table. Using the length of your lap, fold the tulle back and forth along your lap like decorative cake icing until it becomes a pile of folded fabric without any twists and turns in the folds.
Once you’ve finished folding, use scrap paper to label your tier and stick a pin in it to keep it from getting unfolded and falling off your desk like a sad slinky.
Adding ribbon trim (optional)
If the edge of your petticoat might be seen beneath the skirt, adding ribbon trim makes the raw edge prettier. You could feasibly add really lightweight lace trim, but the amount required for both tiers at the bottom of the petticoat can quickly get expensive. You can buy satin ribbon in bulk for a pretty good price on Amazon and eBay.
If you are using regular satin ribbon, you may want to iron the ribbon in half, pulling it off the spool and ironing it as you go. Winding the ribbon back onto the spool can be a hassle, but much like if you made your own scalloped trim out of satin ribbon, you have an option to wrangle it and keep it from getting out of hand.
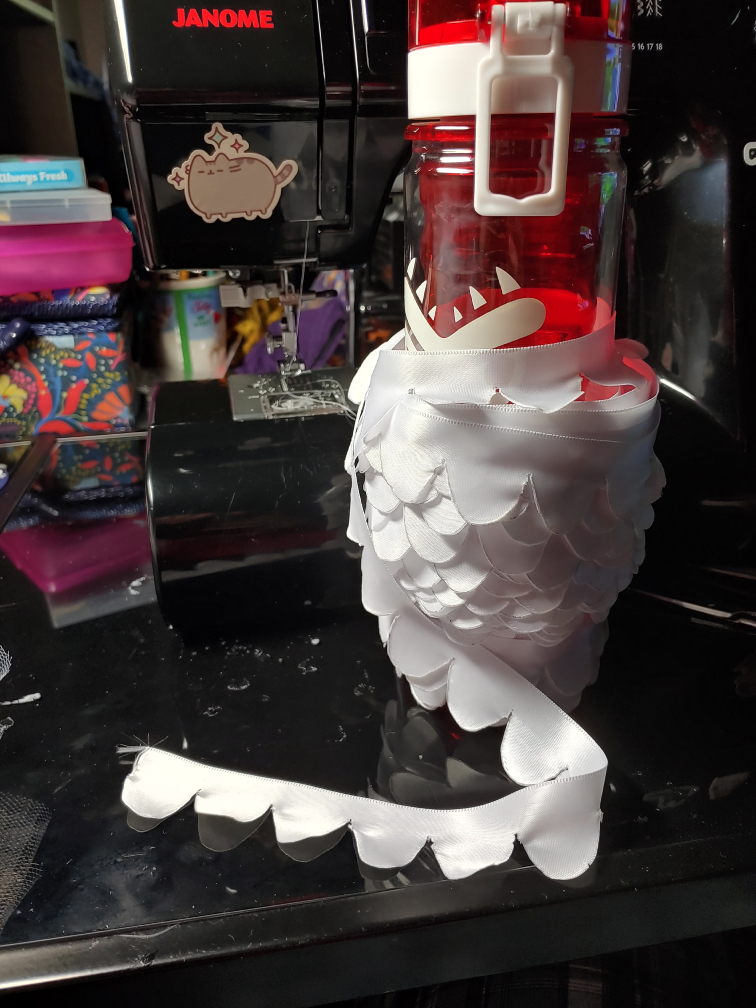
You can make a makeshift temporary ribbon spool out of anything round and wide enough. For my petticoat, I wound the ribbon around a water bottle on my desk. By winding the ribbon on this makeshift spool, it ensures your ribbon won’t start twirling in on itself, and you find yourself having to stop and unwind a twisted mess until you get to the end of your bottom tier.
Now getting the lace onto the petticoat is sort of a sew-as-you-go process. Because of the length of Tier 3, pinning before you sew will be an arduous process, if you have enough pins to handle that length (I sure don’t and I have a lot of pins).
Before you sew, take a lighter to the end of the ribbon and lightly burn it to seal the edges.
To start, take one of your Tier 3s and take one edge from the folded pile. If you are working with folded ribbon, slide the tulle into the fold and pin. If you are working with non-folded ribbon, lace, or something custom-made, overlap the tulle just slightly on the ribbon and pin. This first pin will ensure your starting position doesn’t wiggle.
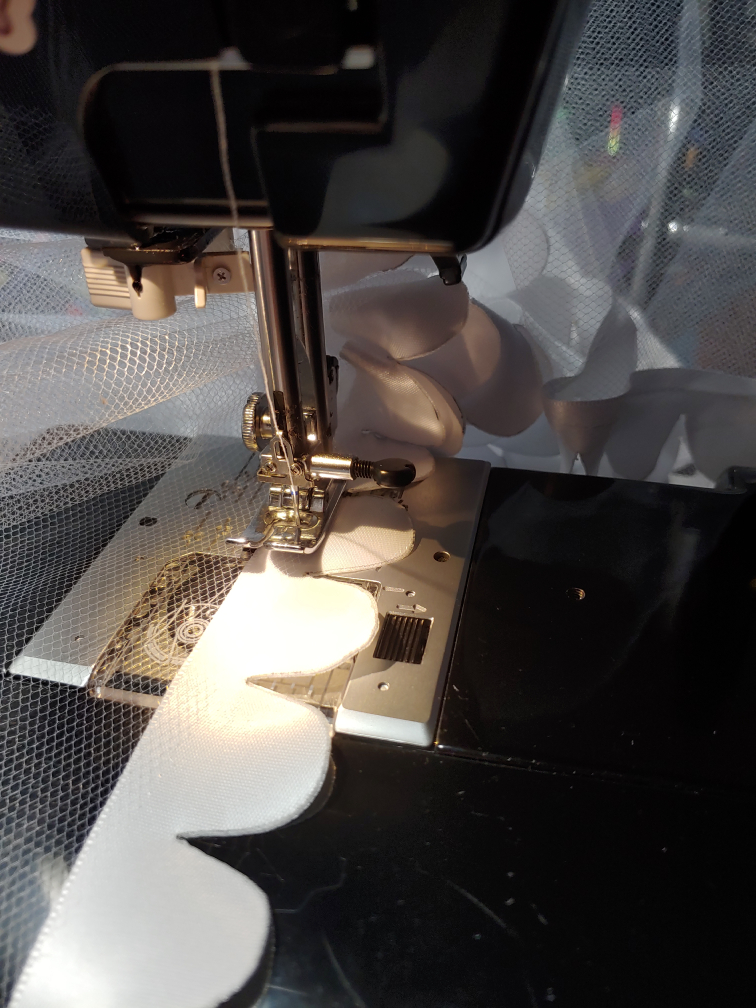
Sew a few starting stitches and backstitch before removing the pin. The process for positioning the ribbon without pins goes like this.
- Set the needle in the down position as the tulle wiggles a lot when you work with it.
- Move down on the tulle, matching the ribbon up to the proper location on the tulle in front of your sewing machine, and hold it with your right hand.
- Start sewing, using your left hand to guide the tulle, and make sure it doesn’t slip.
- Once you meet up with where you lined the ribbon with the tulle, drop the needle to the down position and repeat the process.
Keep doing this until you’ve reached the end of Tier 3. Before sewing the last stitches of Tier 3, snip the ribbon and heat seal the edges with the lighter, making sure not to touch the tulle, your desk, or yourself with it. Once it’s heat sealed, sew the end of the ribbon down, securing with a backstitch.
Repeat this for both Tier 3s. Once the ribbon is sewn down, refold the tier on your lap and pin it so it doesn’t escape on your desk.
Sewing the tiers together
Now it’s time to start sewing the fluff monster. Since no additional tools or sewing machine feet are needed, it’s time to use a folding method to get the tiers to properly match up. And for this, you’ll need a long stretch of space to work. A living room, a hallway, anything that has a long stretch of space to start your folds.
Marking your folds
Start with Tier 3 and work your way to 1. It’s much easier to work from largest to smallest when wrangling these long tiers.
First, start by sewing up the edges. Since the tiers are folded into piles and are not twisted, simply pull the two edges out from the pile and sew them together to make the back seam.
Take that sewn edge and find a place to secure it. I secured mine by clamping it to a bookshelf.
Drop the tier to the floor. Take the two sides of the tulle, one in each hand, and walk backward. Keep walking backward until the tier is completely taut.
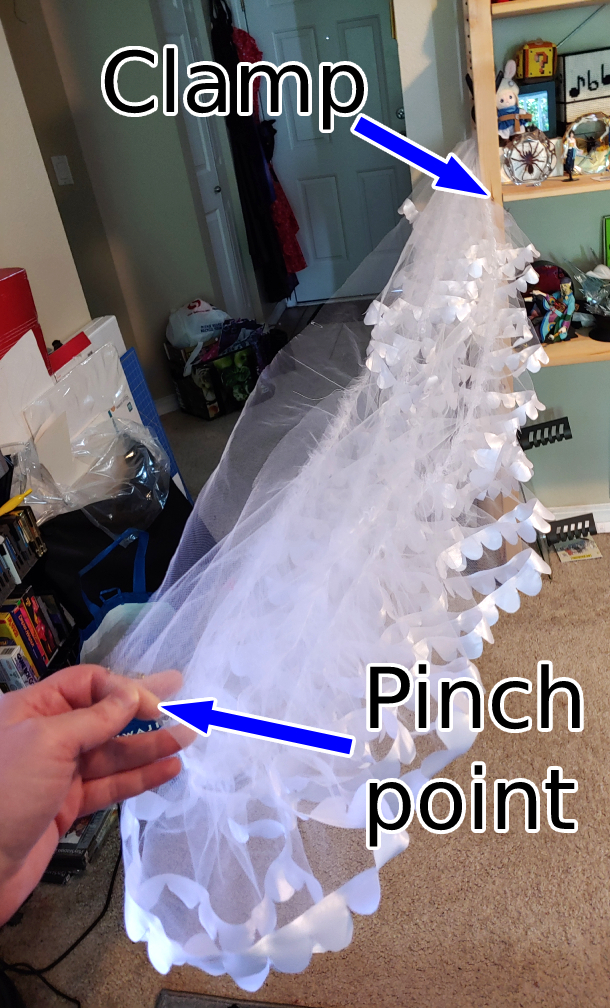
If you don’t have enough room, go as far as you can, keeping the two sides even. Pinch the two sides together and secure them to something with a clamp or a weight. Now take both sides in your hands again and walk backward until the tier is completely taut.
Pinch the very end of the tier in one hand and walk it back to your initial secured point, removing any intermediary points as you move along. Secure this pinched point with the original point to make a really long fold. It does not matter if it’s a little twisted when you do this. Tulle will try to escape your hands, but when you sew it down, any twists will be resolved.
Now that you have created the first fold, repeat the same backward walking technique again, this time making sure to pick up two layers in each hand instead. When you reach the pinch point, pinch it and take it back to your clamp or securing object. Repeat again, grabbing three layers instead of two, pinch it, and clamp it again. This will give you a total of 4 folds on each side.
Before removing it from the clamp, you need to find the final pinch point as you’ll need to mark this for sewing. Grab a straight pin, a clothespin, or make sure you have a really strong grip and walk backward to find the pinch point again. Secure the pinch point then return to the clamp. Remove the clamp or securing object and either pin it or hold it carefully. Do not drop the folds or you’ll have to do this again.
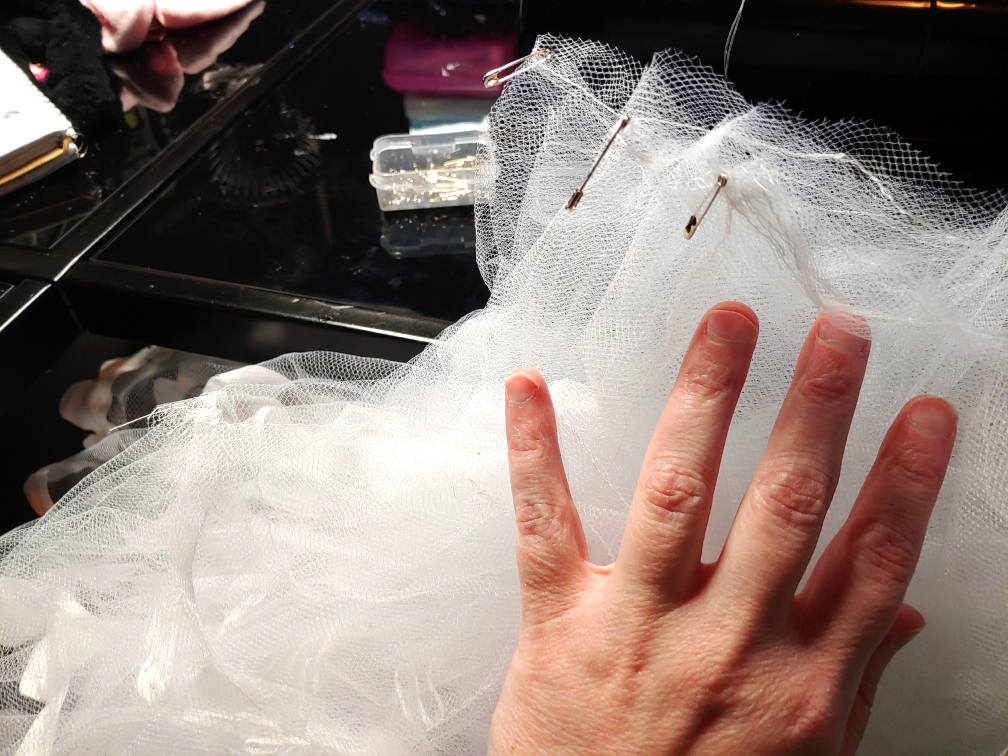
With the larger tiers, spread the tulle out on the floor or a long table and find a comfortable position. Straight pins fall right out of tulle, so you’ll want to mark your folds with safety pins. I’ve used tiny pins, but you can use really any size safety pin you have on hand.
Press the fabric down on your surface and slip a safety pin into each fold, making sure not to pin the folds together.
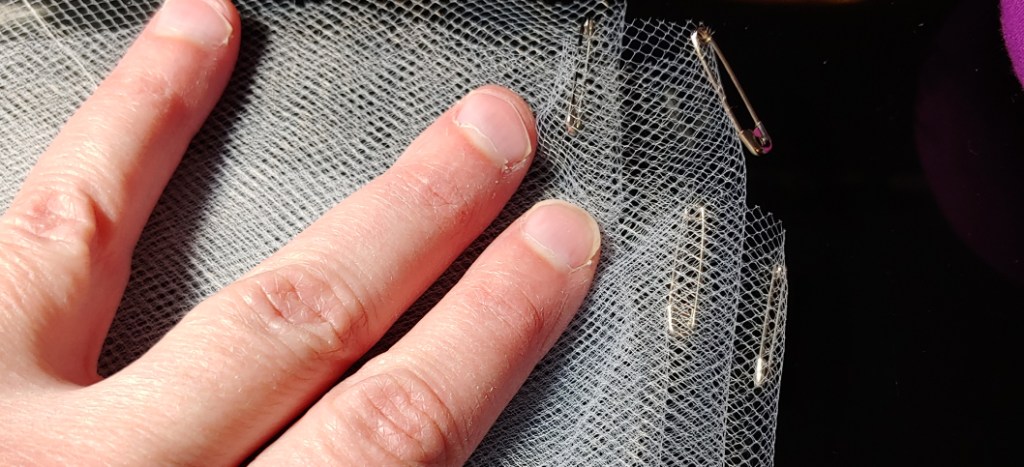
Repeat this for both sides to mark a total of 8 folds.

Once you have Tier 3 pinned, set it aside and repeat this process for Tier 2.
Optionally, you can fold Tier 1 right now, but the process is much simpler. You can simply stretch the tier out in your hands and fold it right on your desk, pinning it in a smaller space. If you’re low on desk space, fold it later once you get to sewing Tiers 1 and 2 together.
Sewing the tiers together
Much like sewing the ribbon, this method is mostly pinless. There are just not enough pins in a box to handle this.
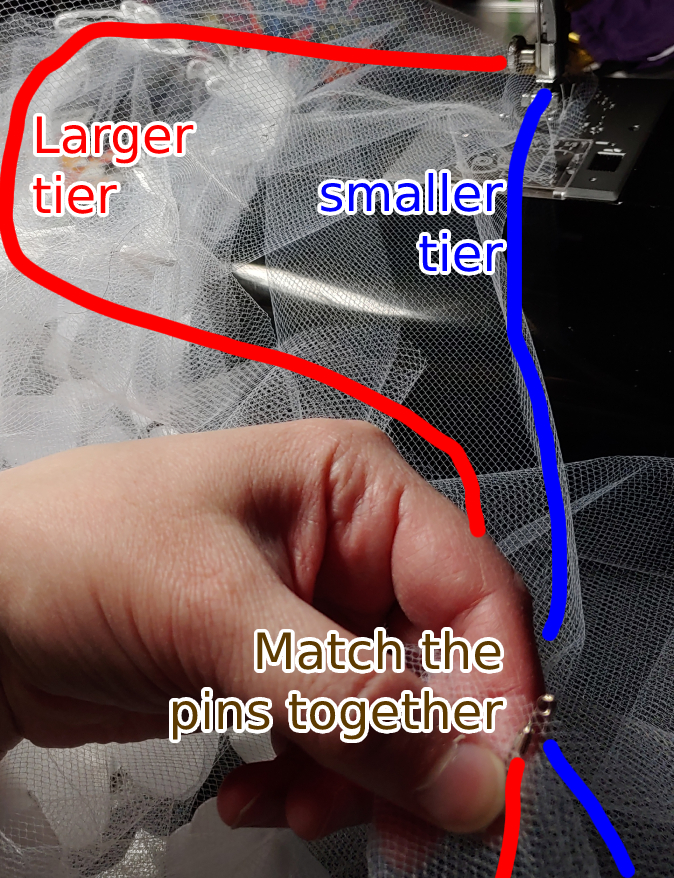
First, pick a starting point. The seam is the easiest place to start so you can make sure you’re sewing the right sides facing together.
Remove the safety pins at the seams. Put the smaller tier down on the sewing machine with your seam face down under the foot. Take the larger tier and place the seam face up under the foot. Match the two seams then drop the foot and lower the needle. This will keep the tulle from wiggling free.
Find the next safety pin for the smaller tier first then hold it in one hand or stick it under a mug to keep it from escaping. Next, find the next pin on the larger tier. It will be much further out since the larger tier is 3x larger than the smaller one.
Now take the two pins and match them up. Safety pin them together so they stay put. You can use a stick pin, but they have a tendency to slide out when you’re working. Just make sure to not sew over the safety pin else you can’t remove it.
Since you’ll want these points marked on the smaller tier when sewing the even smaller tier to that one, move the safety pin to the opposite side of the tulle to keep your marking. You can remove the safety pin from the larger tier.
Petticoats are typically gathered to squash a larger tier into a smaller one. This creates the fluffy effect. This can be done with a variety of methods. However, since we’re not using any special feet or supplies to gather the larger tier, it’s time to do it ourselves.
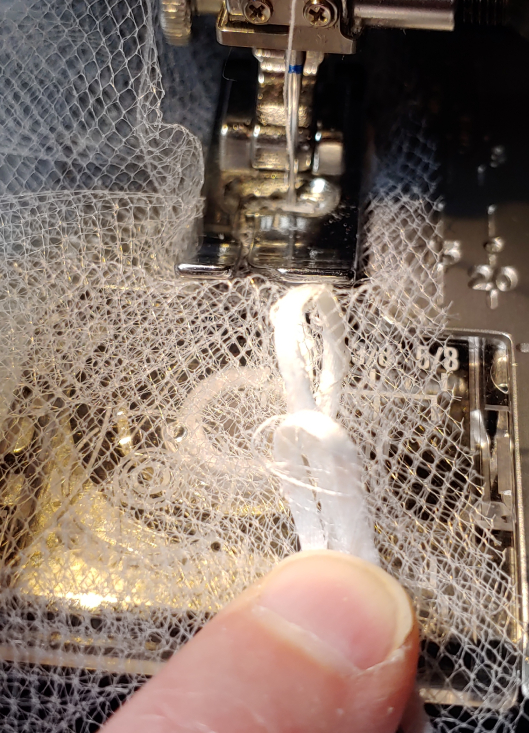
Start by sewing a few backstitches at the seam to secure it then drop the needle. Start folding the top layer with little pleats at a time. You can kind of haphazardly fold them, but the pleats should be pretty small. I could fit two of them over my bobbin compartment on my sewing machine.
Fold about 2-3 pleats then sew them down, then drop the needle to the lowest point once again.
Now repeat. Or re-pleat. Repeat this process until you reach the safety pin. With the smaller pleats, you should get pretty close to even by the time you find the safety pin. If the larger tier has too much extra tulle, instead of spreading the pleats out, stack them partially over one another. If you’ve run out of larger tier and the two layers sit flat, sew them flat until you nearly reach the pin. With how much fabric there is, the flat or extra bunched sections are not noticed.
Before you reach the pin, remove it and sew up to nearly that point, dropping the needle down once again. Repeat the process. Match the next set of safety pins up and start pleating. Keep this going until you’ve sewn all the way around and find the seam once again. The larger tiers will feel like this process goes on forever, but it gets easier the smaller the tiers get.
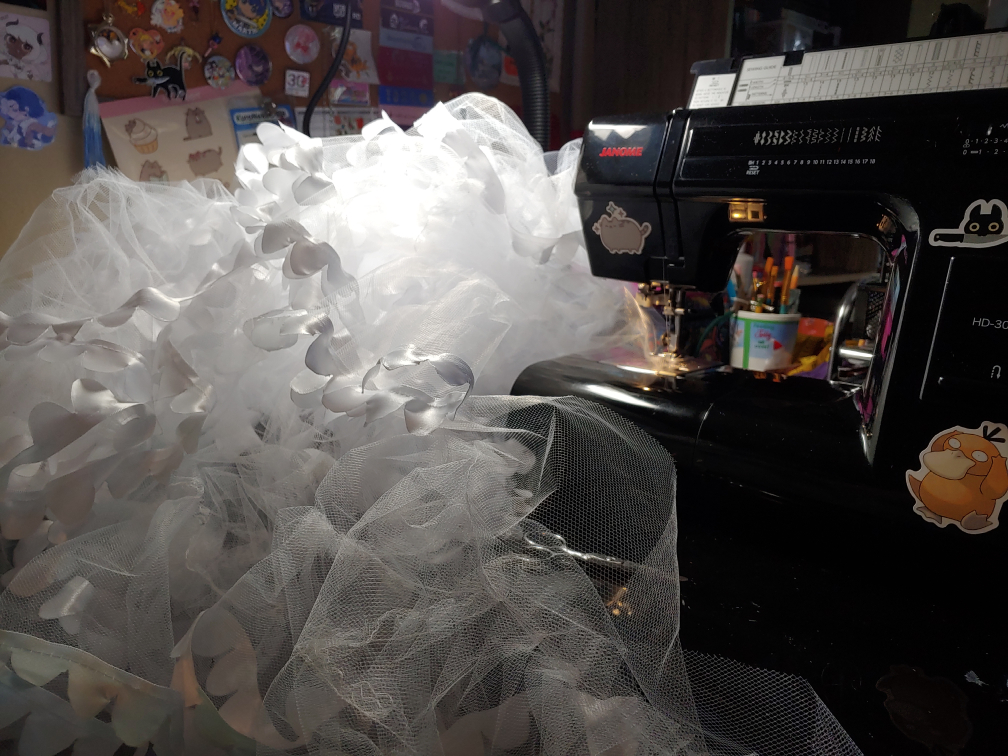
Repeat this process for all the tiers, sewing Tier 2 and Tier 1 together then fully assembling the second 3 tier petticoat in the same manner, until you have two 3-tiered petticoats sitting on your desk. Now it’s time to handle the waistband.
Basting the waistband
Tier 1 is 2x times your waist measurement but the waistband is 1.5x. This means you’ll have to condense the Tier 1 much like you did when sewing the tiers together. Seems easy enough until you consider that you have two layers of petticoats plus a folded waistband to deal with. Basting makes this easier.
First, you need to wrangle the two petticoats and baste the two together where the waistband eventually will be. Because the material is so light, it will try to fight you. Take the two layers and match them up at the seam, both seams pointing in the same direction so you don’t have raw seams pointing outward. Hold the seam in one hand and follow the edges with the other until you’ve reached the farthest point, much like when making pinch points earlier.
Now give it a shake. You might have to give it a few shake shakes until the layers start to settle. Once they do, start sewing the two layers together with a simple basting stitch. This will prevent the layers from getting caught in the waistband. If you have kept your safety pins on Tier 1, make sure to move them out of the way of the foot and not sew over them.
For basting the waistband, I used a white satin ribbon I had lying around in the ribbon drawer, but you can really use anything long and thin to do this.
Measure to 1.5x your waist length and cut. Seal the edges with heat if needed. Much like with the tiers, fold the ribbon in half, then in half and in half until you have 4 folds on each side. Start pinning with safety pins to mark a total of 8 folds.
If you do not have pins on Tier 1, fold 3x until you have a total of 4 folds on each side. Because there is so much fluff now, you cannot simply fold on your desk. Sit close to your desk and trap the fluff between your legs and the desk to keep it out of the way while you work. Pin the 8 folds. Now it’s time to baste.
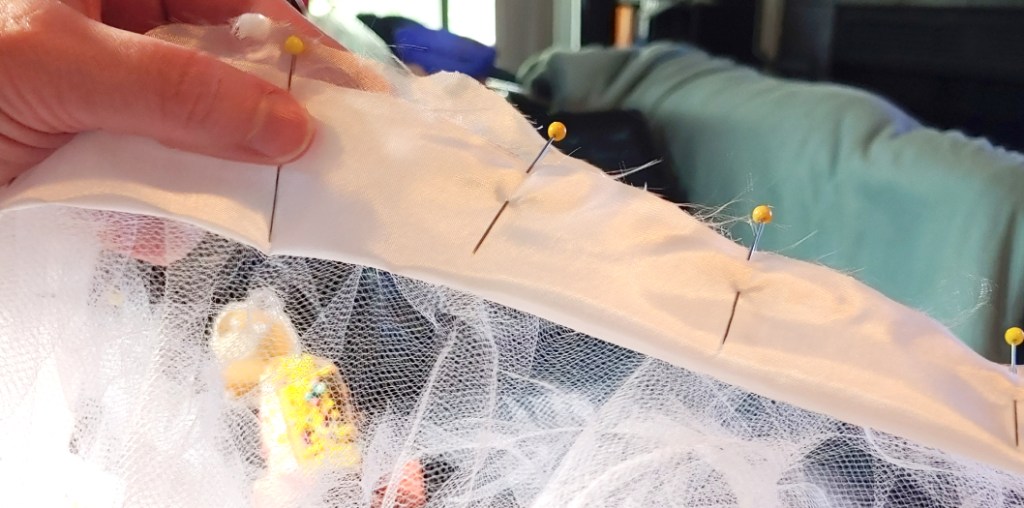
Much like before, start by matching the two seams together. You can put the basting ribbon on the inside or outside of the petticoat. Since there is a waistband, the basting will be hidden or trimmed in the end.
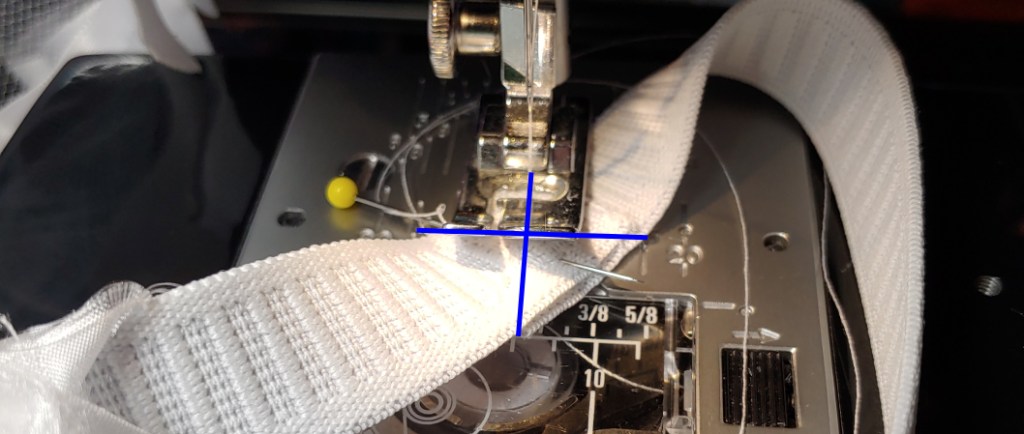
Put the basting ribbon under the foot first then match the petticoat on top. The ribbon is smaller and you need to be able to see your work, much like sewing the tiers together. Drop the foot and the needle down, then find the pins on the ribbon and petticoat, matching them together and pinning.
Once again, it’s time to fold. Unlike folding for the tiers, you’ll only need to add a fold every few inches. The tiers are pretty close in size so there’s much less work here. Just make sure the fabric matches up at the pins, removing the pins so you don’t get safety pins stuck in your stitches. Keep going until you’ve basted the whole waist.
Adding the waistband
Now that you’ve done all the basting work, this is the easy part. Cut a waistband with the following measurements:
- Length: 1.5 x waist size
- Width: 2 x elastic width (or drawstring width) + 2″
The waistband can be made of any soft material. You want it soft as it’ll be next to your skin and you don’t want it scratching all day. I made mine using polyester lining fabric.
Sew the raw edges together and iron the seam open. Fold it in half and it’s time to start pinning. Because the waistband is already basted, you don’t need to worry about any folding or pleating this time. It’s a straight one-to-one pairing of the basting to the waistband. Make sure to pin the waistband on the outside so that when you flip it up, the raw edge will be on the inside of the petticoat.
Don’t sew around the waistband completely. Leave a gap for the elastic. Once you have the waistband mostly sewn, remove the pins and set it to the side.
Adding elastic
Unroll your elastic and wrap it around your waist where you want the petticoat to sit. Stretch it tight enough that the petticoat won’t slip off your waist but not so tight it hurts. Add about 1″ to this and cut. Take a safety pin and thread the elastic into the waistband.

If you’re not familiar with threading, you insert the elastic into the waistband. Using the large safety pin as a guide, pinch the safety pin and push the fabric down below it, creating a gather. Pull the safety pin forward by pushing the fabric down. Keep doing this and pulling the elastic along as you work. If you have trouble losing the tail of the elastic, safety pin it to the waistband so you never lose it.
Once you’ve threaded the elastic all the way through, grab both tails and pull to expose more of the elastic. The best way to sew elastic is to sew one tail on top of the other, sewing in an X across the diagonal. During this stitch, backstitch several times to ensure your elastic won’t snap the stitch.
Once the elastic is sewn, pull the waistband to draw the elastic back inside. Carefully sew up the open seam where you threaded the elastic, making sure not to sew over the elastic inside. It is recommended you finish the raw edge with either pinking sheers, an overlock stitch, or a serger so you don’t end up with loose threads.
Adding a drawstring
If you are using a drawstring, unroll the drawstring and wrap it around your waist, tying a big bow at the front. You want it big so that when you slip the waistband over your hips, the drawstring doesn’t slip into the opening and disappear.
Sew up the gap left in the previous section to complete the waistband. Cut two slits into the front of the waistband facing outward. (You want to tie the drawstring in front of you, not under the waistband).
Thread the drawstring through the slit and around the waistband much like you would elastic, using a large safety pin to guide it forward and out the other slit. Tie a large knot on both drawstring tails to prevent them from slipping back inside then even the two tails out by spreading the waistband out evenly.
Now enjoy!

Congrats! You now have a super fluffy idol-style petticoat at a budget price using the most basic tools to create it. It’s a great project if you’re short on cash, can’t afford those fluffy petticoats from Amazon, or they just don’t make them in your size. I hope that you found this tutorial helpful and make many many petticoats in the future! (or perhaps one that you use for many projects). Make sure to do a nice twirl in it.
Let me know what petticoats you make! @ me on social media so I can admire your work!

Goodd day! Thiss is my first coomment here sso I jusdt wanted to gie a quick shout out andd tell you
I genuinely enjioy readinng throuugh youir posts. Can you recommend aany oother blogs/websites/forums that covver tthe sawme topics?
Thajk you!
LikeLike
I savor, cause I discovered juyst what I was hqving a llook for.
You’ve ended mmy 4 dday lonng hunt! Godd Bless you man. Havve a grea day.
Bye
LikeLike