Satin ribbon can be a cool way to add stripes and details to a fabric or a cosplay. It can be used for accents, piping, adding sailor stripes to a collar, or altering the fabric pattern among many other uses. It’s one of my favorite techniques and one of the most useful.

Let’s talk about the tools and techniques to get you started creating some incredible stripes and designs in your cosplay.
Cost: generally budget-friendly. You can get ribbon pretty cheap.
Skill level: intermediate
Supplies:
- A cosplay in any state of completion
- Double-faced satin ribbon. Grossgrain could technically work but satin ribbon tends to look prettier in the end. The skinnier the ribbon, the more advanced your sewing skills need to be. 1/4″ – 1/2″ is a good place to start with small details.
- Tiny stick pins. The tinier the better. Get the ones with ball caps so you don’t lose them in your project.
- Sewing machine with a variable zipper foot or a clear foot. Avoid an open-toed foot, as it tends to get stuck on the pins.
- A clear ruler or a sewing gauge
- Steam iron and ironing board, press pad, or fluffy cotton towel
Optional supplies:
- A stick lighter to seal the edges
- A tailor’s ham or sleeve roll to iron curved fabric like princess seams or sleeves
Tools for precision
You don’t need many tools for this technique, but these will bring your ribbon game to the next level and make some amazing, even details.
The sewing gauge
First is the sewing gauge. I get many questions about what this thing is. It’s a pretty old-fashioned traditional tool. I inherited a stack of these from my gramma and they’re an essential part of my toolkit.
The sewing gauge is a ruler with an adjustable slider. They’re usually metal and about 6″ long and come in a number of colors and designs. You can find them at sewing stores in the notions aisle.
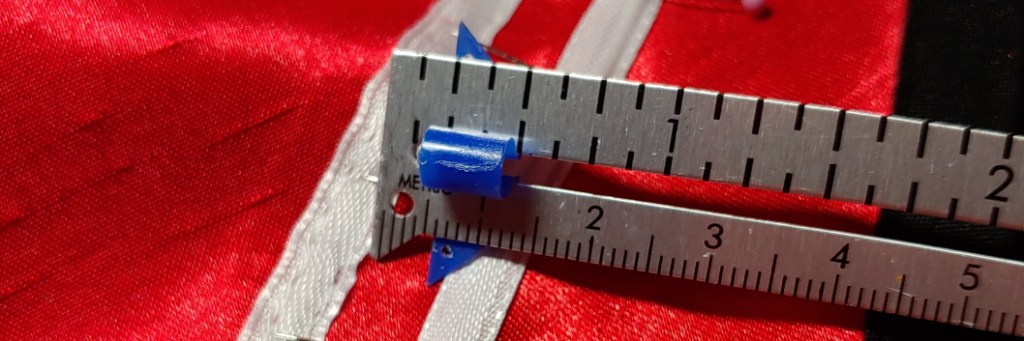
The advantage of the sewing gauge is precision. You simply slide the slider to the width you want and measure away. Your measurements are exactly the same every time, no guestimating and squinting at a ruler and having to mark everything. If you plan on making parallel stripes, have trouble seeing, or just don’t want to squint, get a sewing gauge. You won’t regret it.
Specialized feet
The trick to perfect stripes and ribbon details is what feet you use with your sewing machine. A standard foot is good for most projects, but the problem is, you cannot see through it. When working with precise details like ribbon accents, you need to be able to see the edge clearly.
There are two types of feet that work best with ribbon accents. I have a modern machine that uses snap feet, so your feet might look different if you’re using a vintage machine or one that does not use snap feet.
First is the clear foot. They look different depending on the brand, but a clear foot is exactly as it sounds. It’s clear. Some will have metal at the bottom to help with movement along the fabric and others will be 100% clear. Either way, the clear foot has a clear center section that allows you to completely see what’s between the two toes. You want this to be a full foot and not an open-toed clear foot, as open-toed feet get caught on the pins.
A clear foot can be used for all ribbon widths, but it is especially useful with 1/8″ ribbon where a zipper foot would obstruct the view. If you are having trouble seeing around a zipper foot or do not have a variable one, this is a good option for you.

Second is the zipper foot. The variable zipper foot is variable because it has two locations to snap to, allowing it to sit on one side or the other of the needle. I like to call it the “ski” because of its shape. The advantage of the zipper foot is that you can line up the side of the foot with the ribbon and get pretty precise stitches. You know exactly where your needle will land because your foot has lined it up for you.
The disadvantage of this foot is that I have yet to find a clear variant. Smaller ribbons disappear underneath it, so this foot isn’t recommended for ribbon widths smaller than 1/4″.
Ribbon stats
Ribbons are made of satin, which is a synthetic material. Synthetics are pretty susceptible to heat, and you can use that to your advantage. The biggest one is being able to heat seal them.
I’ve talked about heat sealing in a few posts before, but in essence, it’s using high heat to cause the plastic in the synthetic material to burn and solidify. This creates a fray stop at the end of your ribbon and prevents it from unraveling or fraying. This is useful if you want to tuck a ribbon into another detail or you just don’t want the ribbon to fray before you shove it into a seam. You can use a lighter to burn the ribbon end pretty easily, just make sure not to burn your cosplay or yourself in the process.
Also since the ribbon is susceptible to heat, you can bend it with an iron. While extreme bending goes beyond the scope of this article, you can use an iron to bend gentle curves flat after you sew them down. This makes them nice and smooth, making them look like they’re an extension of the fabric itself. You can also use the iron to flatten corners and prevent them from sticking up.
Pinning techniques
Let’s talk about techniques you can use these tools and the stats of a ribbon to your advantage, starting with the basics first.
Pinning basics
Pinning can be one of the most frustrating parts of this technique but once you get it down, it will make you a pin master. You have two main goals with pinning: making sure the ribbon does not shift (that makes your details wiggly) and reducing the number of pinholes in the base fabric (most important with synthetics than natural fabrics like cotton).
First, let’s talk about the most common technique as it’s good to use in a number of ribbon widths. There’s no real name to the techniques, so let’s call this a standard pinning technique.

For this technique, it’s much like pinning a seam or a hem but with really tiny pins. The pins are set at the edge of the ribbon for maximum stability and minimum pinholes. To ensure stability, your pins will be relatively close together, usually resulting in what I like to call the spiky porcupine. You’ll want a fairly decent-sized box of these small pins to ensure you can properly spiky porcupine your entire stretch of ribbon. The trim of a full circle skirt requires a lot of pins but something like a sailor collar will require fewer.
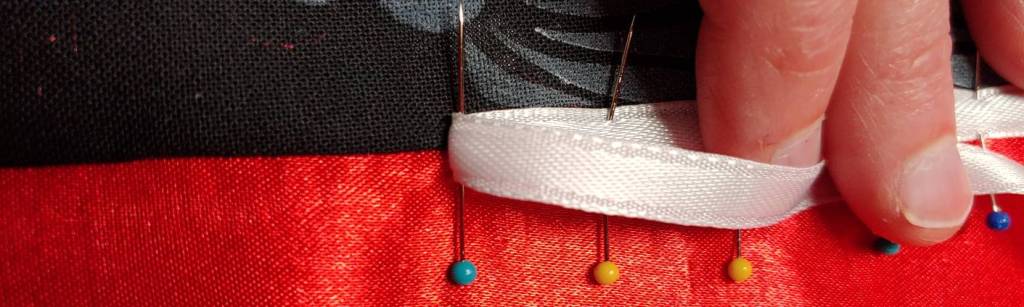
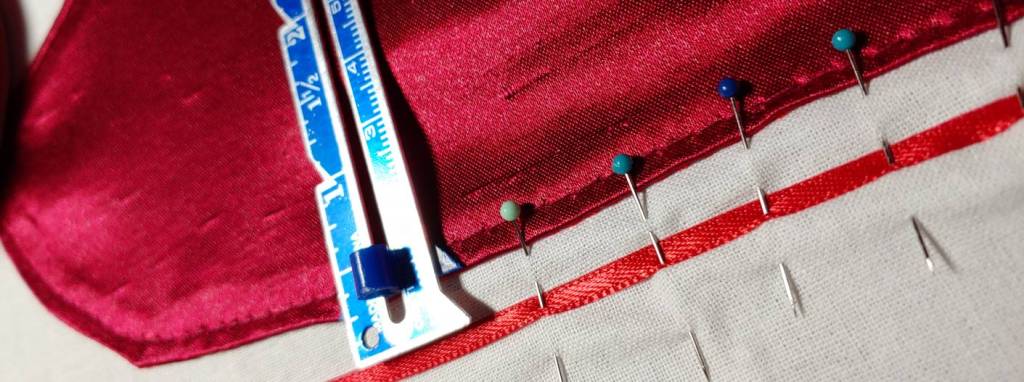
So what if your ribbon isn’t wide enough to use the standard pinning technique? Well, that takes us to the second one. I like to call this the trapper. This method essentially traps the ribbon underneath the pin and is best explained with a photo.

The trapper is best for skinny ribbon or ribbon that just doesn’t want to behave. It does leave pinholes in the fabric, so be mindful of this if you’re working with synthetics or more touchy fabrics. The tiny pins leave the least amount of mark on the fabric, and for the most part, can be ironed out when you’re flattening the ribbon.
Pinning curves
How much a ribbon can curve before you need to apply heat will depend upon the width of the ribbon. 1/8″ will have the most curve potential before puckering and the larger you go, the more gentle your curves will need to be.
Determining how sharp your curves can be really comes down to experimentation. Draw a shape on some scrap fabric and try to pin the ribbon around the curve. If it starts to pucker between pins, you’re going to sew those puckers right into the ribbon and then they stay. You’ll have to make your curves more gentle to avoid puckering.
Let’s talk about how to pin a curve.
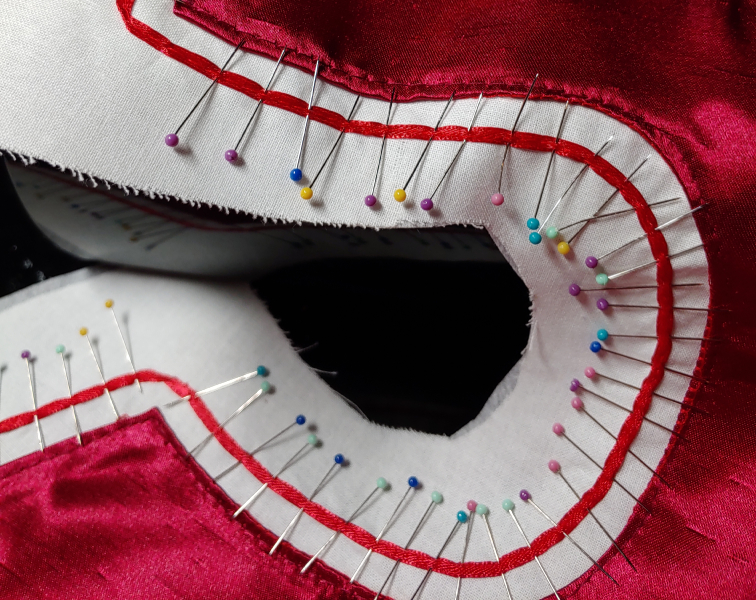
Curves require the most pins. They need to be close together to ensure the ribbon doesn’t slip or pucker when you’re sewing it. Curves will be the spikiest porcupines.
To start a curve, start with a straight line and pin the first pin or two. After the pin, take the ribbon and start to shift it in the direction you want it to curve. Use the previous pin as a sort of pivot point, gently making short, straight lines with the ribbon. These short lines generally fool the eye into believing that they’re an actual curve. Place the pins closest together for the sharper curves and space them out a little bit with gentler curves.
When sewing, make sure the ball of the pin is far enough out that your machine foot doesn’t get stuck on them when you’re turning the fabric. You will need to know precise turning techniques when sewing curves with a machine.
Covering seams
Sometimes you want to use a ribbon to cover a seam or the stitch of a hem. You’ll need a ribbon that can substantially cover the seam and look even. 1/8″ likely won’t do the job, but 1/4″ width and wider work just fine.
When pinning the ribbon over the seam, the best way to hide it is to place the seam at the center of the ribbon. If you place the seam on the edge of the ribbon, any slip or misplaced stitch could reveal the seam underneath and ruin the illusion. So placing the seam at the center ensures that the seam is always hidden underneath no matter if the ribbon shifts or the stitches aren’t exactly at the edge.
Pinning corners
While you could feasibly miter corners using wider ribbon, it’s really not possible with thinner ribbon. The thinner you go. the less possible it is. The best way to pin a corner is to give it a turn. If you plan on creating corners with ribbon, you want to use double-faced satin ribbon, meaning that the ribbon is finished on both sides. Either way you turn the ribbon, it looks nice and finished.
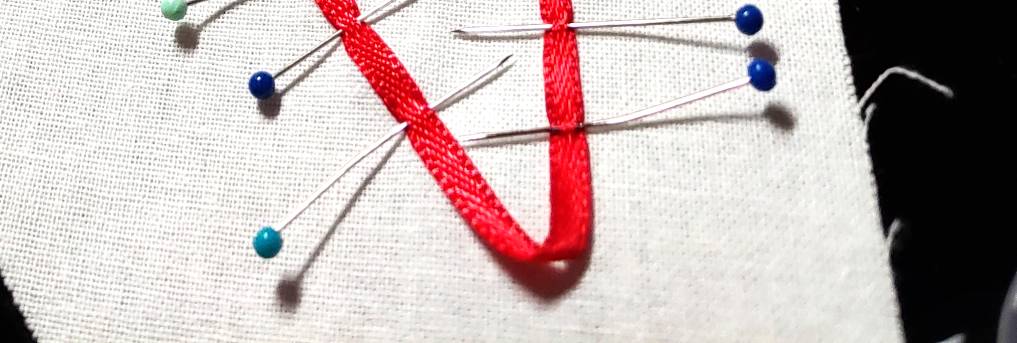
When pinning corners, pin close to where you want the corner to be and give the ribbon a bit of a twist, flipping it to the opposite side. Which way you flip it doesn’t really matter.
Then start pinning it further down and past the corner, measuring where you want the ribbon to sit against another ribbon, detail, or edge. This will ensure that the corner is in the right place and the lines into the next section past the corner are even and not crooked.
Once you are satisfied that the next section is correct, add pins near the corner to keep it in place. Give yourself some distance between the top pins and the corner simply so your sewing machine foot doesn’t catch the pins from the turned section of the ribbon. It can get a little touchy with this many pins crossing over each other.
Before sewing, press the corner flat with the tip of the iron.
Parallel lines
Parallel lines and curves are striking when they’re even, but even slightly off and you’ll be squinting at it, trying to figure out why it doesn’t look right. Using a ruler can be especially tedious as you’re guessing which little ticky mark is the one you want to use. I’ve done it. There are just too many ticky marks. This is when the sewing gauge will make your life so much easier.
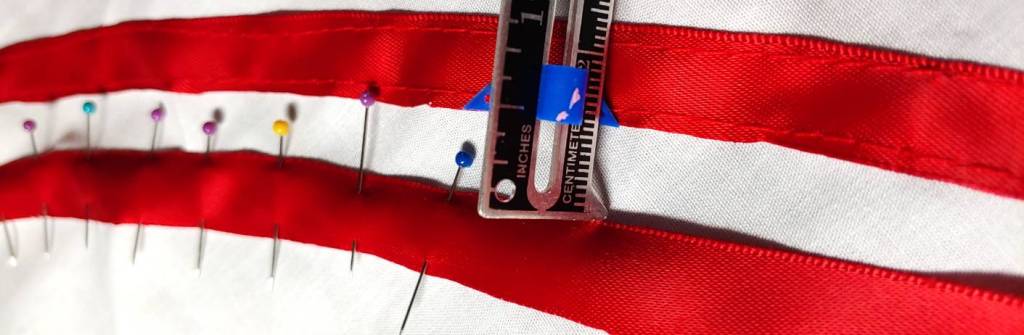
The sewing gauge has a little plastic slider that you can move to whatever width you would like and completely ignore the ticky lines if you so desired. Generally, I work with measurements like 1/2″ or 2″ or what have you, but sometimes I find a width looks good and ignore those lines.
When you move the little slider, it stays put. This means you can move along your ribbon and not worry about squinting at the ruler and guessing if your measurements are off. You also don’t need to mark your fabric either.
The sewing gauge is useful not only for parallel lines and curves, but also to measure the distance between a raw edge and the ribbon, the distance away from a seam, or even make the ribbon run parallel to a colorful accent. I honestly use this for anything that needs to run parallel to some other feature of the outfit.
Your sewing gauge has two juts, one on the gauge itself and one on the slider. You can use these two points to precisely measure the distance between two things. The easiest way to do this is to use the points to measure the gap.
To measure the gap, the slider point is against the feature (sewn-down ribbon, color block, raw edge, etc) and the gauge point is at the edge of the ribbon I’m pinning. If you are left-handed, you can reverse this as needed since all you need is the points, not the actual measurement markings on the gauge.
Measure small sections at a time, pinning much like mentioned in the previous section. You want the ribbon to not move so make that spiky porcupine and ensure your lines are amazingly parallel.
Matching up ribbons at seams
Like with parallel lines, matching up the details at the seams is striking. While you could potentially avoid seams, this won’t work for things such as skirt borders. You have to sew up that back seam at some point, and mismatched seams are very jarring.

Matching seams is going to be one of the trickier techniques to use first, but it’s also one of the most useful. You’ll find yourself repinning things a few times and that’s okay. Here’s the best way to get the seams to match up (or get them close enough to deceive the eye) every time.
Start by pinning the full length of the ribbon detail. If you’re pinning a skirt or something round, pin the whole thing with your ribbon. If you’re pinning two pieces joined at a seam, you can optionally sew one side down before pinning the other half.
Once the ribbon is pinned, take the two pieces of fabric and pinch them together where you’ll sew the seam. Press your index finger and thumb over the seam. Your index finger is a close guestimation to 5/8″, the standard seam allowance, so you can use that for an estimate with how the seam will look once it’s sewn.
Once you’ve pressed the fabric together, open the two sides up and take a look. If the ribbon matches up at the seam, you’re good to go. If they don’t, you’ll need to adjust your ribbon. Remove the pins on one of the ribbons and shift it up or down to match the other side. You’ll want to remove a few pins to adjust the ribbon as suddenly turning it up or down looks jarring and crooked. You want a nice smooth transition at the seam.

Once the ribbon is matched up at the seams, sew it down and when you’re ready, sew the seam shut. Give it a nice press.
Sewing techniques
Now you’ve got the other techniques down, it’s time to talk sewing. Ribbons are a relatively small workspace, and to give the illusion that the ribbons are pasted on, you need to have a very steady sewing hand to be able to sew both straight and curved lines accurately. You’re essentially sewing a very thin line along the edge of a ribbon.
Now, this certainly isn’t to discourage you from trying this. Sewing a straight line is one of the foundational stitches you need to know with a sewing machine. So if you’re still learning, give it some practice, and let’s try this out.
A ribbon requires two stitches), one on each side. Even the thin 1/8″ wide ribbon needs two stitches. This ensures that the ribbon doesn’t flip up during wear at a con (and if something can move, it will move).

Pick a side to start and start sewing along the edge. If using a variable zipper foot, you can use the edge of the zipper foot to line up your stitches evenly every time. If using a clear foot, most snap-on feet will have a notch marking where the needle sits at a straight stitch position. You can line up the edge of the ribbon that way.
Once you’ve finished one side, start again by sewing the opposite side of the ribbon and sewing in the same direction. When using a variable zipper foot, snap the foot onto the opposite bar and align the edge of the ribbon to the opposite side of the foot. If you’re using a clear foot, the process is the same as it was with the other side. You want to sew the same direction for both sides of the ribbon mostly so you don’t bunch your fabric and block your view.
If you are a don’t-sew-over-pins-type of sewist, remove only a few pins at a time, stitching along in small segments and using the fingers of your guiding hand as needed to ensure the ribbon does not move. If you remove too many pins, the ribbon will shift and your lines will be uneven.
To sew turned corners, you need to do a few extra stitches and turns. The inside of the corner will be a simple turn. Drop the needle and turn the fabric, then continue to stitch on your way.

The outside of the corner will be closer to a 3-point turn. Much like with the rest of the ribbon sewing, simply follow the line of the ribbon. The flattened corner edge will only need a few stitches, so you might want to manually turn the wheel to advance the stitches and not accidentally run off the ribbon in the process.

After you’ve sewn both sides and removed the ribbon, the most important step is to iron it all down. I cannot stress this step enough. This will flat any rolling edges and ensure your ribbon stays nice and neat, flush against your fabric. If you skip this step, you may notice some puckering or the edges rolling.
Ribbon is heat-sensitive. This means if you apply high heat, it will generally stay in the shape you make it. Despite being a synthetic material, it tolerates cotton temperatures really well, and honestly, if you are working with curves, use the cotton setting as long as your fabric can handle it too.

And there you have it. The basics of creating awesome details and decorations with ribbons! You can do all sorts of detailing with this. Tracing seams, adding stripes to bows and skirts, and even creating custom pinstripes and wide accents. With a sewing gauge, you can always ensure your ribbon is nice and evenly spaced. Wow people with your even ribbon technique!
I hope you find this useful! @ me on social media and show me what you make with this technique!

excellent description, thank you .
LikeLike
Extremely helpful, thanks so much!
LikeLike