Sometimes you just need a colorful rainbow or gradient skirt for cosplay. Sometimes you want one just for fun. Dyeing skirts and gradients can be a fun project, but it’s a bit difficult if you don’t have the supplies or the space to do it. Fortunately, with a bit of pattern knowledge, you can modify any skirt pattern, including commercial and homemade patterns, to make an amazing colorful gradient.

This tutorial covers how to use multiple colors to make a gradient skirt using May from Pokemon ORAS as an example. You can use this same concept to create borders or horizontal color blocking in as many colors as you can fit on a skirt. This tutorial assumes you have basic sewing and pattern-reading knowledge.
Cost: Moderate
Skill level: intermediate
Materials:
- Commercial skirt pattern or homemade pattern.
- Pattern paper or regular paper (optional) if you don’t want to mark your pattern
- Pens in different colors (makes determining rows of colors easier)
- Ruler. Clear is recommended to make marking easier to see
- Fabric scissors
- Fabric for each color
Planning the color tiers
First, you’ll want to choose your pattern. As I wanted a very full skirt, I went with McCall’s M7455. It’s a staple magical girl cosplay pattern of mine (and makes really comfy spandex shirts to boot). You can honestly choose any pattern you want and fit it to the design of your cosplay.

Next is to plan the tiers. Here’s where the math comes in, and you can’t do this without some form of calculation. Fashion math is a deep subject, for this project, you need just some basic 4-function math to get you going.
To start, you’ll need to know a few things about your project:
- How long you want the skirt to be
- How many colors
- If the colors are evenly spread
For my rainbow skirt, the top color was the widest, about double the other colors. I knew I wanted the skirt to be about 8″ long as it is a short bouncy suspended skirt. Now it’s time to calculate.
The thinner your color tiers, the more difficult it will be to draw out seam allowances and track the pattern markings, so making tiers about 1½” width is honestly a good place to start, if not wider. With 3 small tiers at 1½”, that left about 3½” for the top tier, which is a pretty good balance of color.

With fewer colors or longer skirts, you can go wider. Similar ideas can work pretty well for Super Sailor Moon or other characters with gradient skirts.
If you’re not sure how big the tiers should be, cut a wedge or strip out of some poster board or paper in the length of your skirt. Mark the tiers in pencil on the paper and then hold the paper up against your body in a mirror or on a dress form. While a skirt will likely be fuller than your paper, it gives you a good visual reference of where the tiers will sit once you’re done. Use this to adjust the width of each section.
Guestimating fabric requirements
When picking out fabrics, you’ll need to guestimate how much you need depending on what kind of skirt you have. If you are working with full circle skirts, you can use a circle skirt calculator to estimate how much you need depending on the length of each tier, but for other patterns, it can be a bit more difficult.

If you’re doing the full length of the skirt in the pattern, likely you’ll want the recommended fabric length for each color, but if you shorten it or want to save fabric/money, you can guestimate how much you need.
The best way to guestimate is to open up the pattern instructions and take a look at how the pieces are shaped and laid out on the pattern diagrams. If a skirt is more rounded and sits on a fold, Your fabric length may be closer to what’s listed on the back of the pattern. If it is segmented or you want to segment the skirt yourself, you may be able to line the pieces up next to each other. Pleated skirts with straight panels may require you to buy the same amount of fabric as a regular skirt, but if the panels are broken up, you can line them up next to each other.
In the end, for my project, I bought about the amount recommended for the skirt in each color, using whatever was leftover for the shirt and accessories. I used approximately half of the yardage recommended for each color, made possible by shortening the skirt by half and then splitting the front skirt pattern piece into two sections instead of one solid piece.
Marking the tiers
Now it’s time to mark things up. Get your pattern, your ruler, and your colorful pens, and let’s make some rainbows. I’m marking right on the pattern (most of my patterns are actually marked) but if you don’t want to mark your own pattern, transfer it to some pattern paper or tissue paper. Make sure your pattern paper is partially translucent so you can see your markings when cutting.
When marking skirts, you may not be able to simply draw a straight line across the pattern to make your color tiers. Many skirt patterns are actually curved, and drawing a straight line for your tiers will come out misshapen and awkward. Instead, your markings will need to follow the curve lines of the pattern and this is where a clear ruler comes in handy.
I find it easiest to work from the bottom of the skirt upward. Since the bottom hem is wider, it makes marking the sections off a little easier as you work larger to smaller instead of smaller to larger. It also helps if all your sections are at the bottom of the skirt.

When marking the distance between sections, choose an easy-to-see measurement like I did with 1½”. Whole and half markings are very easy to see on the ruler and to make sure you’re making accurate measurements. Start each section by measuring from the previous section and making little ticky lines at the desired distance. I like to use the top of the ruler to ensure my lines are reasonably even.
Continue making ticky lines across the entire section, making a mark every few inches. For skirts with sharp curves, you can add more ticky lines to make it a little easier to see the curve. Once you’ve finished all the ticky lines, roughly sketch out the curve between the lines. It doesn’t have to be exact but it should be close as the next section will rely on these rough lines.
Marking the sections
Now to make your sections. I recommend making the sections with a black pen and labeling each black line with the distance from the waistband so you know which section is which.
First, start by marking the bottom edge of the skirt. You’ll only need to do this if you’re shortening the skirt from the pattern.
Next, add the bottom section. Add about ½” to your bottom section to allow for seam/hem allowance. So for my bottom section, I wanted it 1½” wide. I measured 2″ to allow for the bottom seam/hem.
Continue to the next section. This time, do not add ½” to your measurements as you’ll be adding in seam allowance later.
Keep going until you’ve marked all your pattern pieces and all your color tiers.
Marking the seam allowance
You could simply go and cut your markings out right now, but it’s going to look really strange once you sew the pieces together without a seam allowance added in. Here’s where you’ll want those colored pens so you can keep track of which allowance marking is which. I used blue for the bottom seam allowance marking and purple for the top.
The bottom seam will not need any markings at the bottom as you’ve already added the seam allowance. The waistband will not need a marking at the top as it’s already included in the pattern.
Marking seam allowances is easiest with a tailor’s ruler. This type of ruler has seam allowances marked already and 5/8″ is very easy to see. If you don’t have a tailor’s ruler, ½” seam allowance is going to be the easiest to mark because of how easy it is to spot on a standard ruler. Just remember which seam allowance you picked and sew that width when sitting at the machine.
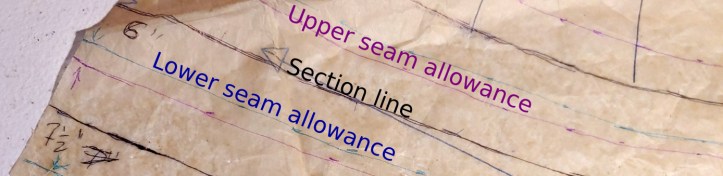
Mark each section line with both an upper and lower seam allowance, marking with arrows to keep track of which one is which. I used a down arrow for the lower allowance and an up arrow for the upper allowance. This will make the cutting process easier to follow as well.
Repeat this until all sections are marked.
Cutting out the colorful tiers
Here’s where having good notation on your pattern will make your life easier. For each section, note where the upper and lower section lines are. When you place the pattern paper on the fabric, don’t cut at these lines. Instead, cut at the lower seam allowance line below the lowest section line up to the upper seam allowance line above the top section line.
This diagram should make that jumble of words easier to visualize:

Essentially what you’re doing is cutting a full section + seam allowance on top and bottom. This will ensure that once you sew everything together, your sections will be the right size.
When cutting the lowest tier, you can ignore the lower seam allowance as it’s already included.
When cutting the highest tier, you can ignore the upper seam allowance as it is also already included.

When cutting out each tier, you can cut underneath the pattern if you have experience with it or trace the pattern lines onto the fabric directly and cut each tier out by following the lines. If you cut underneath the pattern, I recommend using scissors as I got inconsistent curves with the rotary cutter.
Once you’ve cut out all your tiers, it’s time to sew them all together!
Sewing a gradient
Now it’s time to sew everything together. The tiers should fit together pretty evenly, making for nice even stripes. I recommend starting from top tier to bottom simply because it’s easier to go from the thickest stripe to smaller ones. If all your colors are even, you can go whichever way feels right to you.
You’ll want to work one tier at a time. Sew any seams together on the tier, save where you might be putting the zipper if you have one. These seams will make it easy to line everything up and you won’t have to worry about uneven sewing at the seams.
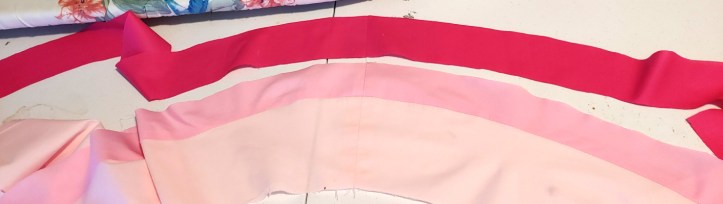
Pinning
When sewing the tiers together, make sure the right sides are together. Pin at the seams and at the open edge if there is one. clip the edge of the larger tier to make pinning the curves easier.

You’ll want to section these tiers off using the seams as location markers. Go section by section. Start by pinning from the seam towards the center of the section, opening the clipped edges just a little to stretch the lower tier across the upper tier.
Don’t pin all the way across yet though. Get about ⅓rd the way there then stop. Now pin from the opposite side of the section and repeat the process, getting about ⅓rd of the way across.
Set this down on a table and make sure that everything appears to be laying flat. Fix any bunches or pulls that may be forming by this stretching process. Once you’re satisfied, it’s time to pin that last ⅓rd. Pin from either side. It honestly doesn’t matter. As you go, stretch the lower tier as needed by separating the clipping. You may find that near the center, the clipped sections will not need to be opened. I found that happened with a few tiers but not all of them. It depended on the fabric cut I used.
Once you have the whole tier pinned, it’s time to sew.
Sewing
Fortunately, this part is really straightforward.

It’s just sewing the seam with a straight stitch, using the seam allowance you drew on your pattern. That’s it! That’s all you need to do.
Ironing
Once the tier is sewn, you need to make it sit flat. And for that, you need an iron.

Don’t skip this step. You’ll end up with awkward buckling between the tiers and ruin the gradient effect. Iron it with the seam facing towards the darker color. This hides the seam underneath and helps create the illusion of dyed fabric.
I would recommend ironing after sewing each tier as it keeps your workspace flat and ensures pinning and sewing the next tier goes smoothly.
Finishing the rainbow
There are a number of ways you can finish your skirt.
If you aren’t planning to use lining, finish off with a serged stitch or pinking shears then sew up the bottom edge. You can add horsehair braid as needed for the magical full skirt effect.

If you are using lining, you’ll need to complete the illusion underneath. You don’t need to make a full rainbow skirt as the lining as likely only the edges will be seen. Instead, you only need the bottom tier to be the right color with the rest of the skirt in a light color that won’t show through the outer layer of the skirt.
For May’s skirt, I cut the bottom tier out of purple to match the outer layer. The rest of the skirt was cut using white fabric as it wouldn’t show through the light pink fabric and would blend in with the lower white skirt.
Once you’ve finished your bottom hem with either a hem or lining, it’s time to finish the rest. Add a waistband or roll the top over to finish off the raw edge then add a zipper or elastic to your liking. It’s up to you how you want to finish this edge off.
For May’s skirt, I used a very thick waistband to support the full structure, but that’s a discussion for another day.
For now, enjoy your rainbow gradient skirt!
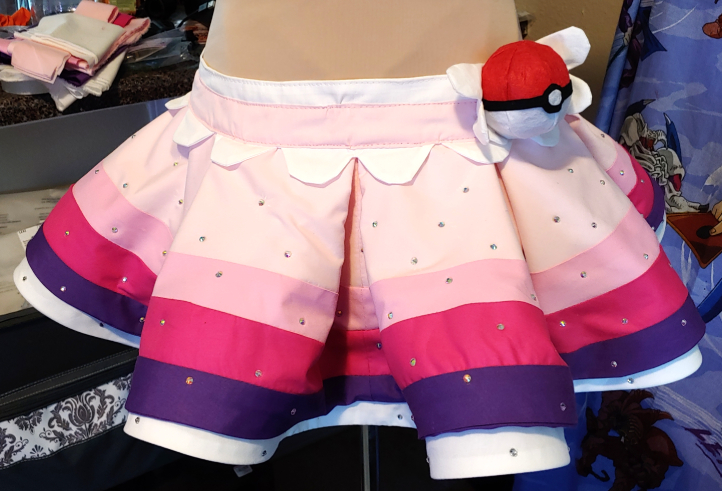
I hope you found this gradient tutorial useful! You can use it for all sorts of things beyond skirts, but skirts are definitely fun to make. There are so many characters who have thick stripes or gradients in their skirts, and this is one way to add that in there without the use of dyes or paints.
@ me on social media. Show me your lovely gradient skirts you make with this tutorial and let me admire your work!
