In cosplay, we’re often on our feet for hours at a time. I’ve clocked myself at 14mi of walking per day at cons. So naturally, you need a comfy pair of shoes to keep your feet happy and healthy. Now I don’t know about you, but I don’t have the space or the budget to have a new pair of shoes for every cosplay and most of them are custom. So let’s make shoe covers instead!

My flats are my favorite pair of shoes. I’ve had them for years and use them in most of my shoe covers. When choosing a pair of shoes to use for cosplay, you want something with a comfortable (or replaceable) insole, that doesn’t slip, and is low profile. The closer the shoe is to your foot, the better, but please don’t squeeze your feet into shoes a size too small.
Once you have that one pair of shoes, it’s time to deck them out for multiple cosplays. This project is budget and space friendly and makes packing multiple cosplay “shoes” a breeze. Let’s get started!
Skill: late-beginner to early-intermediate, for seams and velcro
Cost: budget-friendly (after cost of shoes)
Materials:
- Roll of plastic cling wrap
- Roll of clear box tape
- Permanent marker
- Ruler. An ordinary ruler or a tailor’s ruler will do
- Pencil, pen, or chalk to mark fabric
- Sewing pins
- Sharp scissors
- Sewing machine or a hand sewing needle
- Small piece of velcro close to the color of your shoe cover fabric.
- 1/4″ black elastic. Black matches most shoe soles.
- Thread matching your shoe cover fabric
- Shoe cover fabric. Approx 1/4 yd will make most shoes with fabric to spare. The fabric must be non-stretchy and can be any sort of fabric with some flex to it. Cottons, canvas, vinyl, suede, etc. Probably not expensive things like velvet, because these are shoes.
You will need to be able to reach your foot sitting down, pull it up to your opposite leg, or have an assistant help you during the patterning process.
Making the pattern
First up is the pattern. Since we’re covering flat shoes, the pattern needs to be relatively close to your foot shape. What better way to make a pattern than using your own foot to make it exactly your size? And this is where the cling wrap comes in. It conforms to your foot and clings to itself when you’re working.
Start by slipping the shoe on your foot and then wrap your foot with cling wrap. Whole thing. Make sure the wrap is close to your foot but not so tight you can’t get a pair of scissors underneath and accidentally cut your foot or your sock. Wrap the entire foot two or three times to ensure you haven’t missed any spots.

Cling wrap is pretty flimsy so if you cut the pattern off your foot right now, it would slip all over the place and give you bad measurements. So next we’ll need to stabilize it. Wrap box tape around your foot and shoe. You do not need to wrap the sole of the shoe since we won’t be placing fabric there, but make sure the tape goes all the way down to reach the sole.

Once your shoe and foot are sufficiently wrapped and taped, it’s time to start drafting the pattern. For simple shoe covers, you need to mark several key locations.
- Center back of your heel
- Center of the bridge of your foot
- The top of the shoe (my example had shoes that nearly reached the ankle)
Mark all of these with a permanent marker, careful not to mark yourself or your sock in the process. Try to get the two center lines as close as possible to the center. You don’t need to measure it as feet are often crooked anyway. As long as it looks right, you should be good.
Next, carefully cut along the center back line to release your foot from its plasticky bind and slip your foot out of your shoe, leaving the shoe still in the plastic. You’ll need one more pattern line before you can cut this thing apart. Flip the shoe on its side on your desk and trace the sole of the shoe all the way around.

Now I’m terrible at getting the center lines even, so instead of having a shoe cover too small or too large, we’re going to make an inside and outside shoe pattern. Flip the shoe up on your desk and label where your arch would sit I or Inside and label the opposite side O or outside.
Carefully pull the shoe out the back of the pattern, and you should have a shoe double.

Using a pair of sharp scissors, carefully cut along all the pattern markings you’ve made. Discard the sole section and re-label the inside and outside of the pattern as needed. You should have two sides to a shoe cover that lay flat on your desk.
Cutting the fabric
Your pattern is a pretty close fit to your shoe and foot, but it’s missing something. Seam allowance. This is the extra fabric that hangs out below your stitches and keeps the fabric from pulling apart with any pressure on the seam. You’ll need to add the seam allowance before cutting the fabric out else you’ll have a very tight shoe cover.
For drafting seam allowance, you’ll want to use a pen or pencil that is visible on your fabric. White pencils or chalk for dark fabrics and ball pens for light fabric. Do not use a marker as it will bleed right through your fabric and ruin it.

Fold your fabric in half, right sides together. Pin both the inner and outer shoe to your fabric, leaving some space between them for seam allowance. The standard allowance is 5/8″ and if you have a tailor’s ruler, this will already be marked for you. If you have a standard ruler, 1/2″ is very close, but you’ll need to make sure to sew your seams at that width.
Start with the bridge and center back seams. Draw the lines at 5/8″ or 1/2″ width in short bursts to follow the curve of the pattern evenly.
The neck of the shoe and the edge bordering the sole can be at 5/8″. If you’re an experienced sewist or plan to serge your edges, you can mark these two at a 1/4″ width. If you haven’t worked with small seams before or have a particularly sheddy fabric, stick to the larger allowance and use pinking shears to stop the fraying.
The back seam should be at least 5/8″. If you aren’t used to working with smaller hems, add more seam allowance here.

Next cut the fabric out, following the lines you’ve drawn along the fabric. Cut both the inside and outside pieces out. Make sure there are two of each since you need to make two shoes and not just one.
Remove the pattern pieces and lightly mark which is inside and which is outside. You can discard the pattern or save it for a future project.
Seams and hems
Now it’s time to sew everything up! Each shoe will have an inside and an outside piece together to make sure both shoes properly fit your pattern. When sewing, make sure to match the two edges together, sewing with the wrong sides together so your seam isn’t visible in the final shoe cover.
First, start with the one seam on the shoe. Pin together the inside and outside pieces at the bridge of the shoe, sewing at 5/8″ or 1/2″ seam allowance, whichever you measured out when tracing the pattern.
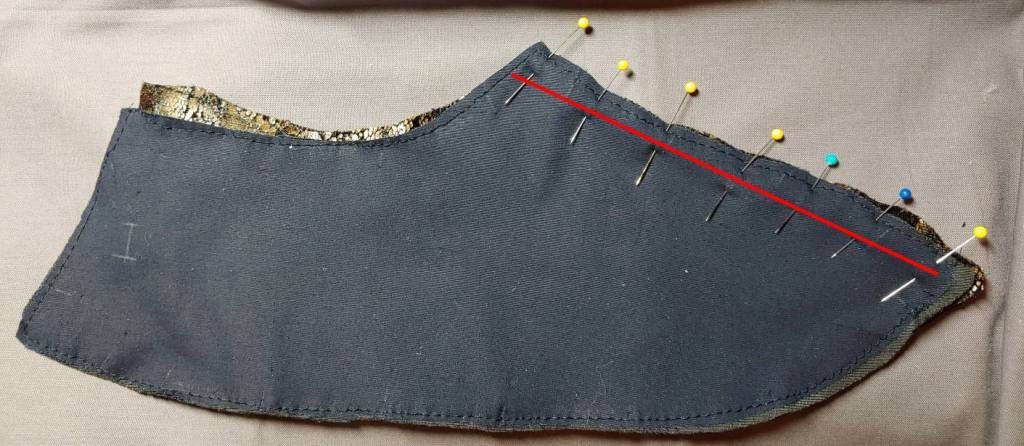
Now why is the bridge seam the only seam on the shoe?
When working with shoe covers, the biggest challenge is getting them on the shoe. You can try to finagle the shoe in through the bottom and around the elastic but this can overstretch the elastic and be just plain difficult. To make using the shoe covers easier, the back edge will have velcro instead of a solid seam.
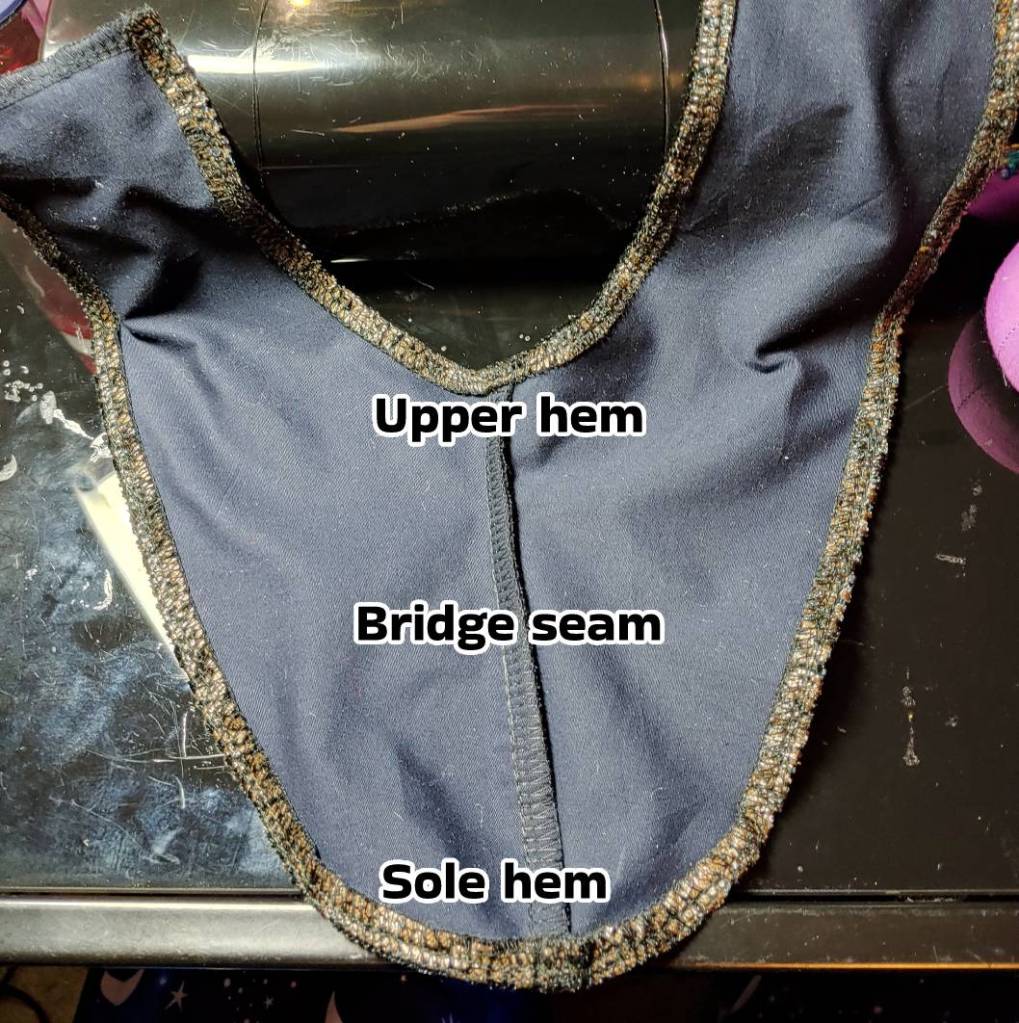
Start hemming your edges on the upper (top of the shoe) and lower (bottom by the sole) edges.
To make even hems, you’ll want to measure each time you fold the fabric over and pin it. Use a ruler to measure the seam allowance, making sure even before pinning it down. Match whatever seam allowance you added in the previous section, whether it be 1/4″, 1/2″, or 5/8″. Make sure it’s even so your back edges will match up.
Once you’ve pinned your hems, sew them down with a straight stitch to secure them.
Last is the back hem. If you added a 5/8″ seam allowance from your pattern, use only a 1/4″ hem. If you added more, add whatever extra you have larger than 1/2″ (approximately 5/8 – 1/4, yes I know that’s not exact but the math is simpler this way). Roll the edge over, measuring the hem much like you did for the upper and sole hems. Pin them then sew them down. The raw edges will be covered by velcro.
Velcro
Now that all the edges are finished, it’s time to add the fasteners. The velcro in the back will help with getting the shoe cover on and off, but we want to make it as low profile and as not noticeable as possible. The best way to do this is to make the overlapping side the outside of your shoe cover and the underlapping on the inside. This means that when you see the shoe from the outside of your foot, you won’t see a gap or velcro, just fabric.

First cut some velcro slightly shorter than the back edge of your shoe cover then peel the two sides apart.
Place the rough side on the inside of the outer half of the shoe cover. Make sure it’s flush against the edge to give you as much room to work with as possible. If you’re using a sewing machine, using a zipper foot will get you pretty close to the edge to secure the velcro without trouble.
You want to use the rough side so that when the shoe cover is on, the rough side is facing the shoe and not the rest of your cosplay. Or gathering fuzz or dust while you’re walking, because velcro is a horrible fuzz collector.
Sew the velcro down. You can sew around the entire piece or just up the long sides with simple straight stitches. I prefer the latter since it’s less noticeable in the final version.
Once you have the rough side sewn down, remove the pins and slip the shoe cover over your shoe. Use small pins to tack the shoe cover down to the shoe if your shoe has a rubber sole. If it has a harder one, you can tape the shoe cover down temporarily. It needs to not move while you work with the other side of the velcro and get the exact fit you need.

Pull the rough velcro (outside) side of the shoe cover around the back of the shoe and take note where the rough side overlaps the soft velcro (inside) side. Use your finger to mark the edge of the rough side of the shoe cover, then let go of the rough side.
Take the soft side of the velcro and carefully pin it to the soft side of the shoe cover. Pull the rough side back over and velcro the two sides together.
Set the shoe down on your desk and make sure there aren’t any gaps at the back of the shoe cover that would show your actual shoe and foot. If there are gaps, pull the two sides apart and reposition the soft side again, testing to make sure the velcro sits properly with each adjustment.
Once you’re satisfied with how the back of the shoe cover sits, sew the soft side velcro down and remove the pins.
Adding elastic
As much as I’d love to say the shoe cover will just sit there with all the fittings we’ve done, it won’t. There’s a general rule of thumb with cosplay: if it can move, it will. So we’ll need elastic to ensure that it won’t move.
Pin or tape the shoe cover back to your shoe and flip the shoe on its side on your desk. To keep the shoe cover from moving during an entire con day, you’ll want to place elastic in 3 key locations: near the toe, the middle of the shoe, and near the heel.

Because we’re working with fabric, these three points offer the most stability.
- The toe to keep the front from shifting and showing the shoe.
- The center to draw the shoe cover in towards the natural curve of your foot
- The heel to keep the shoe cover from sliding upward as you walk
Most guides will suggest two, but those are for heavier fabrics. If you’re working with softer fabrics like cotton (and even when I’m working with stiffer fabrics), I always go for the stable 3.
To pin your elastic, I recommend very small pins. Start on either side of the shoe. It makes no difference. Slip the elastic underneath the shoe cover, giving yourself about 1/4″ or more extra elastic for a tail. This ensures the elastic braid won’t fray and pop your elastic right off when walking.
Pin one side then gently pull the elastic to the other side. You’ll want to have some give to the elastic so the shoe above won’t bunch and tug, but not so much give that the elastic starts bowing. Wrap the elastic around the edge of the sole and cut the extra off, giving yourself at least a 1/4″ tail. You can always trim it later.
Slip the elastic tail into the shoe cover and pin it to the fabric.
Repeat for all three straps.
Once you have all the straps pinned, undo the velcro in the back and pull the shoe cover off. Sew over each elastic tail repeatedly using a forward and back stitch, following the hemline at the bottom of the shoe cover, making a few stitches past the elastic on both sides. I go over my elastic back and forth at least three times a piece. If you’re sewing by hand, sew a zigzag stitch up the tail of the elastic for the best strength.
Once you’ve sewn each piece, remove the pins and gently tug on them to make sure each one stays strong. If any come loose, sew over them again.
Now add details and admire your work.

I hope you find this tutorial useful for many projects ahead. Finding premade shoe covers and new shoes for each project can be a chore, and they’re never exactly what you need, so why not make your own? I’ve used this method for a wide variety of projects, each one with different decorations and designs to make something truly unique for each cosplay.
Let me know what you make with this tutorial! @ me on social media so I can admire your work!
