Anime and game characters like giant beads and pearls. While you could go buy glass or large wooden beads, that gets heavy, especially when you have to make an entire necklace out of them. The weight causes the necklace (and your neck) to sag.
When I first wanted to make a cosplay with a giant pearl necklace, I racked my brain over what materials to actually use and not kill my neck and my wallet. And that was when the season descended down upon me. Winter holidays.
The winter holidays bring a ton of gaudy décor, but that is a huge advantage for cosplay, especially when you have a small budget. While tinsel garlands have limited use, beaded garlands and ornaments work very nicely for accents and don’t threaten to break the bank. Beaded garlands are one of my favorite things to use during the season, and this necklace was no exception.
I’ve made several necklaces from beaded garlands, both large and small beads, and never had to worry about my neck hurting the entire day. Some of them had been painted or modified with foam clay while others were simply modified garlands used to make string pearls.
So let’s make jewelry from a holiday garland and talk about all the wonders you can do with the beads for cosplay.
Skill level: beginner-friendly!
Cost: budget-friendly
Materials you’ll need:
- Beaded holiday garland or string beads
- Fishing line, preferably not heavy-duty line (if you restring the beads)
- Crimp tubes
- Jewelry clasp of your choice
- Jump rings (optional)
- Needle-nose pliers or a jewelry plier kit
If you want to paint the beads, you’ll also need
- Sandpaper, 220 grit. Look for wet/dry sandpaper at the hardware store
- Primer such as Flexbond or Mod Podge (recommended)
- Acrylic paints. $1 paints will do
- High gloss finishing sealant. My favorites are DecoArt and DeltaCreative
Choosing your garland
There are two types of garlands you’ll generally find. I have no idea if they have a proper name or not, but I’ll describe each of them for you.

The first kind is beads fused to a string I like to call party beads. Usually, the string is either white or matches the colors of the beads. You can find them on long spools, advertised as garlands for holiday decorations, or in the party section year-round as party bead necklaces. The garlands tend to come in more wintry holiday colors, but the party beads will come in a whole variety of colors. They tend to be solid and make a click-clack sound when you knock the strings together.
This type of garland generally has small beads and is good for bracelets or necklaces where you don’t need the ridiculously large beads or pearls to finish the look.

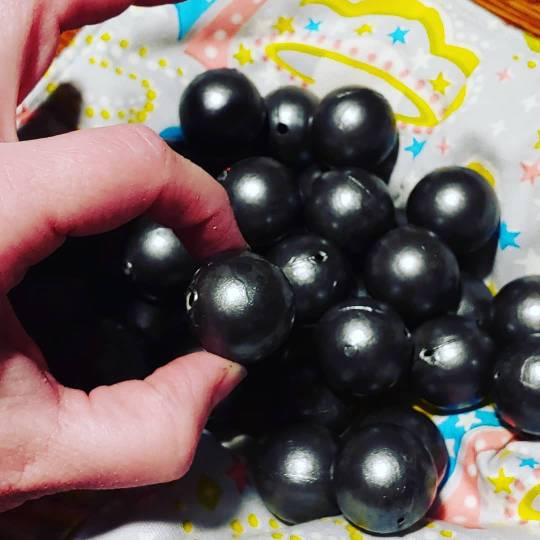
The second type tends to come much larger. Like the party bead garland, this type of garland has a bunch of beads on a string, but that’s about the only similarity the two types have.
The beads for this type of garland are hollow on the inside, usually two pieces of plastic fused together with a seam and a hole on either side for the string to thread through. These beads are not fused with the string but instead are free moving and can be shifted back and forth.
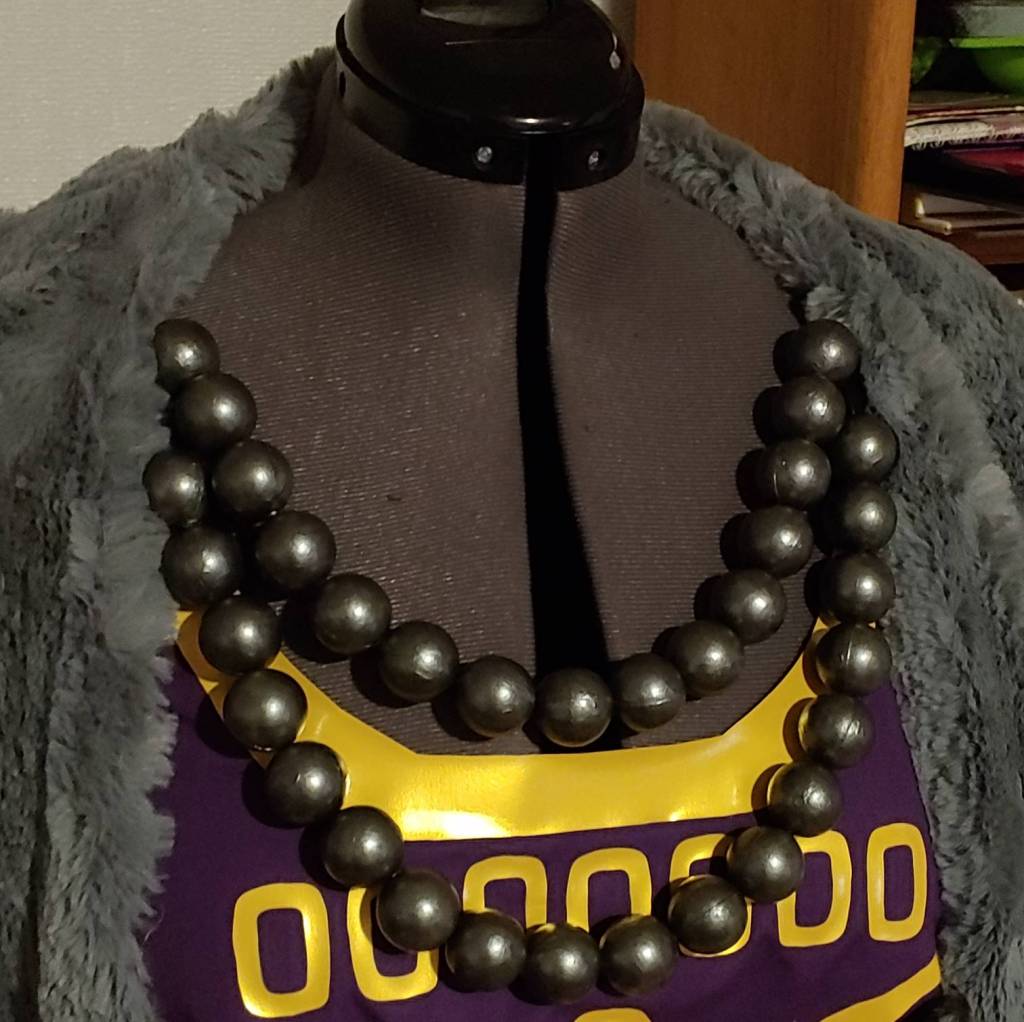
These types of garlands tend to be pretty long and are deceptively lightweight. They’re probably used for mantle or tree decorations, who knows, but for our purposes, they’re good for oversized large beads. Giant pearls, oversized prayer beads, whatever can use a giant bead, these are good for those and not to kill your neck or wrists with the weight of a glass or stone bead. They’re also ridiculously cheap. This strand cost me $10 before I threw a coupon at it.
Painting garland beads
If you’ve ever tried to use acrylics on plastic, you’ve probably had the same headache I’ve had. Plastic is horrendously difficult to paint, or so I thought until I discovered sandpaper.
When it comes to plastics and sandpaper, you have to be gentle. A coarse grit (smaller number) will tear the plastic away and leave these nasty pucker marks, so you want to use a finer grit (larger numbers). 220 grit seems to be a magic number in terms of working with plastics. You can find it in sheets online or at the hardware store pretty easily. Look for dry sandpaper.
Prepping your beads
If you’re working with the large, free-moving beads, cut the string and separate them. This will make the bigger beads easier to work with. The smaller party beads are fused with the string, so you’ll have to work around this.
Take one bead at a time, and scuff it up with the sandpaper. As this is an incredibly fine grit, work over a cleanable surface or a trash can as this fine plastic dust gets everywhere. You don’t want it on you or your cat or your face, so make sure to work safely. Scuff the surface quite a bit, covering as much of the bead as possible. It’s a bit hard to actually feel the scuffing since it is so fine, but you’ll start to notice the shiny surface rub off the bead. Once the bead is not so shiny, it should be sufficiently scuffed.
Next is priming. I strongly recommend priming the surface after scuffing it up. It’s best to use a brush for this step since beads tend to roll around when trying to use spray paint primer. Paint one side and set it down on some scrap fabric to dry. I’ve found that painted objects, beads or otherwise, tend to stick less fabric instead of plastic during the painting process.
Once you’ve primed one side, roll it over and prime the other. You’ll probably want 2-3 coats of primer as even after scuffing, the primer will absolutely resist sticking. After several coats, the primer becomes smoother, and the paint will have a good surface to stick to.
Painting and sealing
Next is painting. Because you’ve done all this prep work, you’ve given yourself a very good surface to work with. The paint shouldn’t have any problem sticking to the bead.
Much like with the primer, work one side at a time and ensure that the paint is fully dry before putting on the next layer. Metallic and pearlized paints especially are terrible at pulling off if the layer hasn’t fully dried. Use that scrap fabric to keep the beads from rolling and sticking to it during the drying process.
Once both sides have completely dried, it’s time to seal your work. This outer layer protects the paint but also can make even matte paint look incredibly shiny. Like the rest of the process, seal one side, letting it completely dry before flipping it over. Use about 2 coats to fully protect that nice paint job you just completed.
Restringing
If you cut the string during the painting process or to reduce the number of beads in your jewelry, you’ll have to restring it. Fishing line is the easiest to use for this process, and honestly one of my favorites for jewelry because it’s cheap and easy to work with. You can find it at any place that sells fishing equipment.
If you’ve strung beads before, go forth! But if you haven’t, here’s how you can do this.

Pull a generous amount of fishing line off the spool. Tie one end to something or clamp it so you aren’t constantly fighting with the fishing line.
If you have stiff fishing line, you can slip the bead over the end and let it slide down to the other end. You may have to poke the line through a few times to get it to come out the other side. Fishing line does bend so sometimes it gets intertwined with the inside of the bead and you just have to try again.
If you’re using thinner fishing line, you might need a hand sewing needle. Make sure the needle is longer than your bead, long enough that you can grip it, and that the eye of the needle fits into the bead hole. Slip the bead over the needle and push it down gently over the needle eye.
After threading a few beads, you’ll want to check your work. Hold both ends of the fishing line together and hold the jewelry up to your body or the dress form. You can remove beads or add more during this process until you get exactly the length you desire. Remember to leave room for the clasp. It’s better to have too much extra than not enough.
Adding a clasp
Clasps have two parts to them, a ring then either a claw or a bar. Having clasps makes it easier to handle necklaces and bracelets, so you’ll need to attach the jewelry to both sides of the clasp. Which side goes to which piece doesn’t really matter. Clasps are not directional

If you’ve restrung your garland, this process will be the easiest. For this, you’ll need a crimp tube, your pliers, and one half of the clasp.
Thread the fishing line through the crimp tube. Loop it through the ring on whichever piece of the clasp you’re attaching. Then take the tail of the fishing line and thread it back through the crimp tube in the opposite direction to form a loop.
If left as is, the fishing line will slip right back through the crimp tube, so you have to crimp it. Use the pliers to flatten the crimp tube with just a bit of pressure. Crimp tubes aren’t made from very stiff metal, so they should flatten with minimal effort. Once it’s flattened, give the fishing line a little tug. If it moves, flatten the crimp tube some more.
Once you’ve done both sides, there you have it. You have a nice jewelry clasp on your holiday beaded garland!
But what happens if you’ve used the party beads and there isn’t enough room to use the crimp tube? Sometimes that happens, much as it did with my Lulu necklace. I couldn’t get the string long enough to properly crimp the tubes. You can try crimping the party bead string to fishing line or string, but it gave me trouble and the string kept slipping out because it wasn’t long enough. So there’s another option if crimping goes awry.
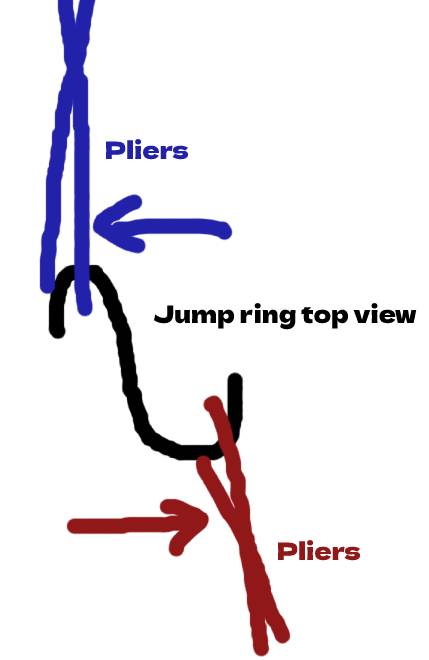
Jump rings are a jewelry finding that is a ring with a gap on one side. They usually come in silver or gold, but sometimes you can find other colors as well. These rings are used to make jewelry and connect chains, but they work great for party bead garlands.
If you’ve never worked with jump rings before, they may seem a bit tricky at first, but let me tell you the secret I learned. You need two pairs of pliers to move the jump ring then properly close it. Use the pliers to grip either side of the gap but instead of pulling the ring apart, pull one plier towards you and one away, just far enough that you create an opening.
Once you’ve threaded the ring, you pull the two sides back towards each other, and the ring lines up almost every time. As long as that gap doesn’t allow for anything to slip through it, you’ve successfully closed the jump ring.
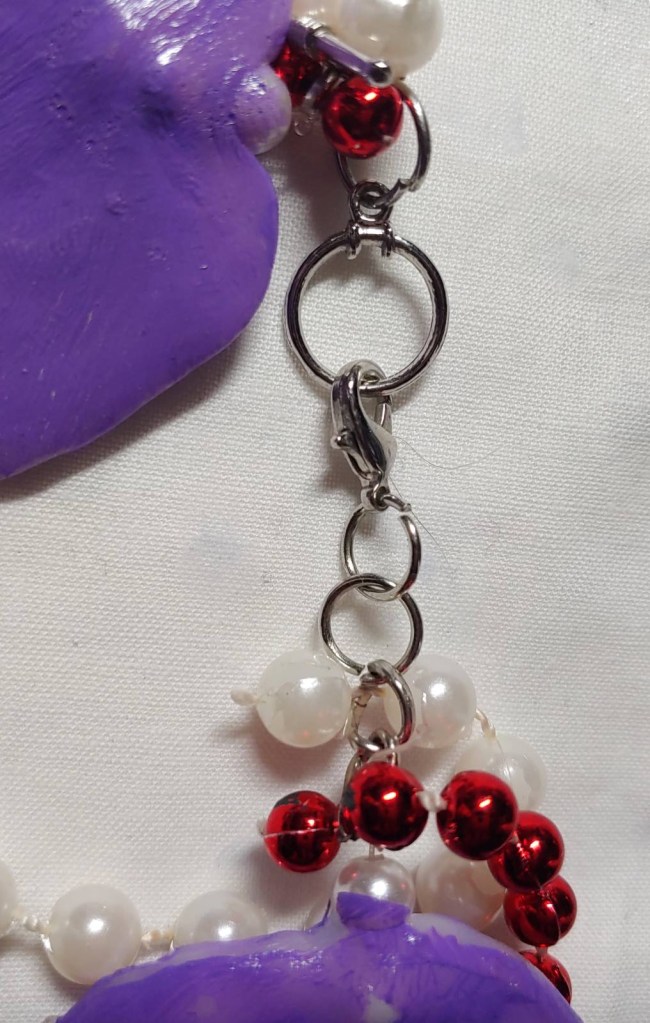
So how do you use jump rings for a party bead garland? Jump rings often come in multiple sizes to a pack, and the smallest ones fit around the string and essentially trap the bead in the middle of the ring. For my Lulu necklace, I had to do this three times to properly trap three necklaces and join them into one, but for most projects, you may only have to trap one bead on each side.
Each of these jump rings can be chained together, trapping one bead garland at a time until you’ve trapped them all.
Once you’ve successfully trapped all your party beads together, take one last jump ring and open it. Thread it through the trapping ring then also through the clasp ring before closing the jump ring. This will make the final connection between the party bead necklace and the clasp. You could feasibly thread the trapping ring, but it gets really hard to use the clasp. You have to leave room for your fingers! So adding that extra jump ring in the chain makes things easier to work with.

And there you have it! Holiday garland jewelry on a budget in any color you can find paint in. It’s lightweight, easy to transport, and does not wear a hole in your neck the entire day. Just because you didn’t spend a lot of money making something doesn’t mean it has to look cheap. You can make expensive jewelry out of a budget holiday garland, some jewelry findings, and some paint.
Happy crafting! If you make your own holiday garland jewelry, share it with me! I’d like to see your work!
