Rope backpack straps, rope-like accents, even rope belts. They’re often too wide for actual rope, and if you find a rope that big at the hardware store, it would be uncomfortable or heavy. Cosplay can be difficult enough as it is, so how do you make big rope and not make it annoying?
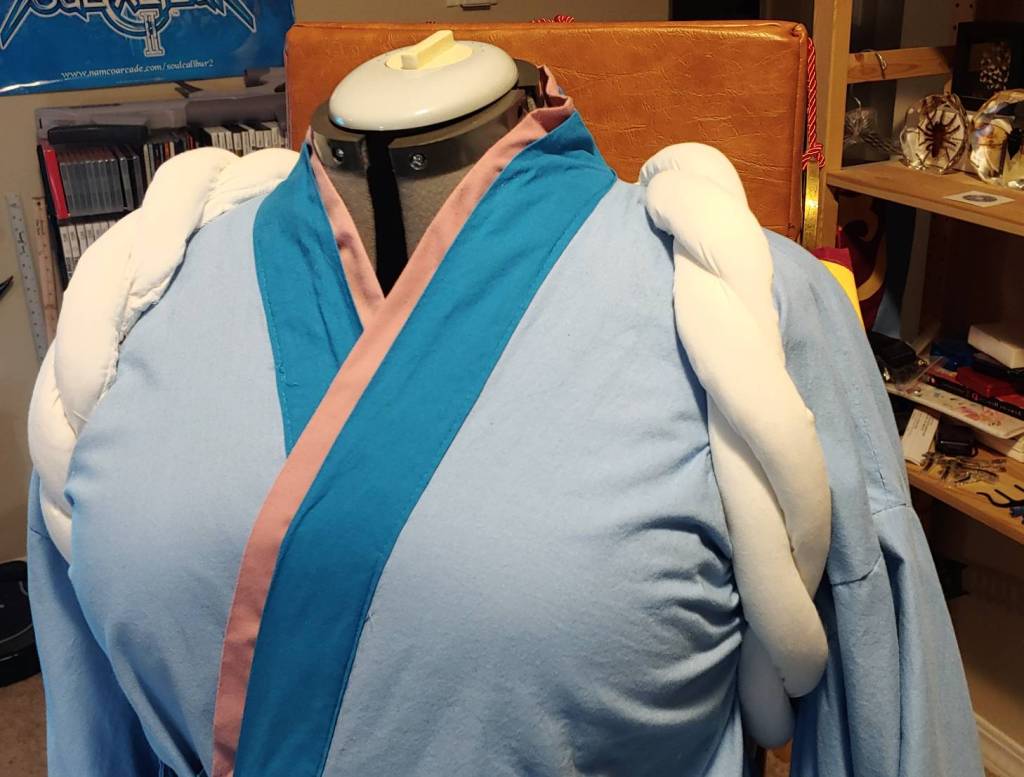
One possible solution is to make your own rope out of cotton stuffed with polyester batting. I originally made this for the medicine seller from Mononoke, but the same technique could be used for any rope accent where the back of the accent isn’t visible. The result is comfortable plush straps that look like traditional Japanese twisted ropes.
Skill level: intermediate for slightly difficult seams and hand sewing
Materials (for 30″ straps):
- Approx 50″ (measured along the grain) of cotton or polycotton fabric in each color
- Small bag of polyester batting
Tools
- Tape measure
- Sewing machine
- Standard foot
- Zipper foot
- Heavy pins, like quilting pins
- Hand-sewing needle
- Something to stop the edges from fraying. Serger, pinking shears, Fray Stop, etc
- Clamp (recommended)
Getting measurements
Before you start, you’ll need to know how much rope you’ll actually need to make. It’s easier to trim rope down than it is to add more length. So to make sure you have fabric for the rope, let’s measure first.
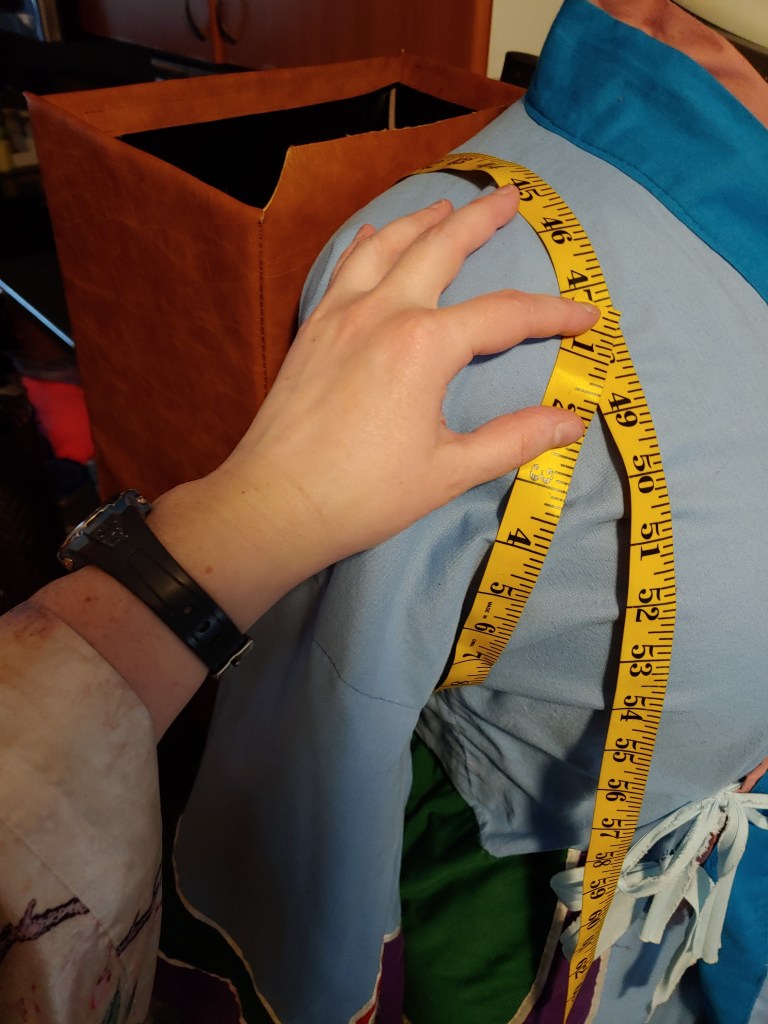
If you’re making backpack straps, you can adjust a regular backpack to where it’s comfortable and measure the straps. But if you have a custom-made backpack or one requiring a crossbody strap, you’ll have to measure it manually.
Backpacks without straps wiggle and slide all over the place. The easiest way to keep one still is to use a counter, table, or desk. Thread a tape measure through the opening where you plan on securing the straps. Prop yourself up or a dress form up against the counter and use that to measure the straps. If you’ve threaded the measuring tape through the backpack, subtract the amount measured inside the backpack from the total length. Remember to give yourself a little leeway on the edges so you can sew the straps into the seams later on.
So for example, my measurement was 45″. The inside of the backpack was 15″. So 45-15 gives me 30″ straps. I added about 1″ on either side to secure inside the backpack.
If you have a cloth backpack, you can also pin cotton or webbing where you want the straps, try the backpack on to ensure the length is correct and comfortable, then measure the cotton or webbing to get your final strap length.
For belts and other accessories, when you take your measurements, make sure to add a few inches as the final rope will be much wider than your tape measure.
Preparing the rope strands
Traditional Japanese rope tends to have two strands for the twist. So for each strap or rope you make, you’ll need two strands aka noodles (since they look like noodles once stuffed). You’ll need to do a rough calculation for how long and wide the strands should be.
The rough estimate is the untwisted strand is 2/3rds longer than the desired strap length. So for a 30″ strap, the strand is approximately 50″. But to make calculations easier, you could start with double the desired length. So a 30″ strap would have a 60″ strand.
The width is a harder one to estimate. For my straps, I went with a 4″ width to make it easier to sew and work with. You can make them larger or smaller, ensuring that you leave about 1″ for seam allowance (1/2″ on either side). Keep in mind that the smaller the width, the thinner the strap. The thinner the strap, the harder it is to hide the raw edge.
When cutting the strands, make sure to cut along the grain to ensure the final rope is strong enough to hold a backpack and whatever you shove inside of it.
Stuff the noodles
If you’ve ever tried to stuff very long strands, you’ll probably know how difficult it is. You can’t really shove your hand inside the noodles to get the batting inside, and using a ruler just seems to crush the batting and flatten it out. It also gets obnoxious after a while. So the best solution is to sew the seam on the outside. But that leaves an edge on the outside, right? Well, no worries. We’ll cover how to hide that. Let’s start with stuffing first.
To start, thread the machine using a universal needle and change to a zipper foot. Fold one strand in half and sew a seam at the top about 1″ down. Rotate the strand and start a seam at about 1/2″.
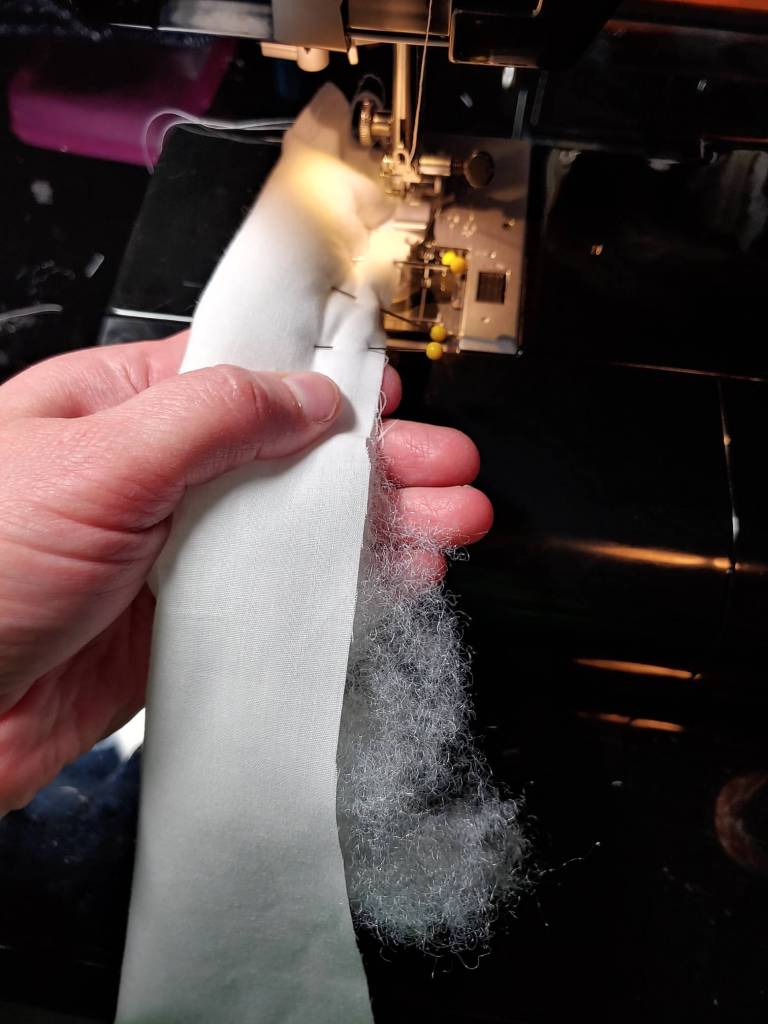
Grab a small handful of batting. Roll it between your hands and pull it with your fingers to spread the fibers a bit and make it look like a long noodle. This makes the stuffing process easier.
Push the batting against the folded edge of the long strand and squish it into the noodle. Pull extra batting fibers downward if it’s too wide for the noodle strand. You’ll want your strand to be stuffed but not so much that the batting is spilling out and you can’t get the zipper foot in to sew the seam.
You also don’t want it so stuffed it isn’t able to move. You’ll want a little give to the strand so you can twist it around another strand and have it still bend around a curved surface like your shoulder, body, or waist.
Once the section is sufficiently stuffed, use a quilting pin to secure the edge. Repeat this process until you finish your handful or reach the edge of your desk. When pinning, jab the end of the pin into the fluff so that the fabric lays flat for sewing (and you don’t stab your hand).
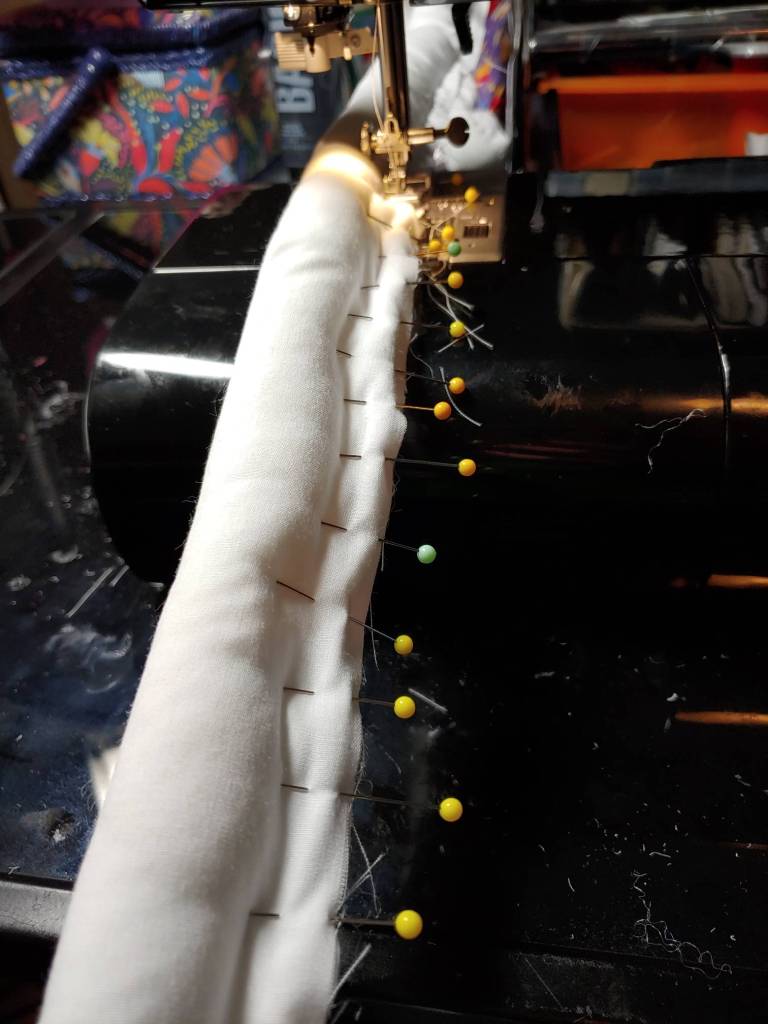
Since these strands are very long, you’ll want to work in sections. The strands are about as manageable as a giant wet noodle, so moving section by section saves you a headache and time fighting with them as they bend and wiggle around your desk.
Sew the length of the pins, using the zipper foot to get as close to the fluff stuff as possible. Your seam probably won’t be exactly even, but it’s a rope. In the end, no one will notice.
Once you reach the end of the pins, drop the needle down to keep the fabric from moving. Remove the pins from the stitched section and repeat the stuffing process.
You don’t need to stitch the bottom end. Once you finish your twisting, you’ll sew up the ends. Until then, leave the bottom end open with an inch or two without fluff.
Repeat this for all the noodle strands you need for your project.
Stop the fray

Before you can twist the rope, you’ll need to stop the edges from fraying. There are a few methods you can use to do this.
If you have a serger, this is going to be the quickest option. A three or four-strand wide stitch is all you need. With the heavy presser foot, it may not be the easiest option but it is certainly one of the more effective ones. When serging, you’ll need to wedge the stuffed edge partially underneath the foot as you work.
Fray Stop is a liquid that you can add to the edges of the fabric to do exactly what it says: stop fraying. It may be the more tedious of your options, but it’s rather effective.
Another option is using pinking sheers. These scissors are cut in a zigzag pattern and prevent the edges from fraying. If you don’t have a serger, pinking shears are a good and rather inexpensive option. Before I purchased a serger, that was the best way I kept edges from fraying.
If you choose to cut the seam allowance down before sealing the edges, don’t cut down smaller than 1/4″ seam allowance. As straps will generally be under pressure, you want at least that to ensure the fabric
Twist the rope
Now it’s time to make the rope!

First, you’ll want to sew your two strands together at the top, one on top of the other. The raw edge of the strands should face the back, both of them in the same direction.
To make hiding the raw edge easier, put it in the center back when sewing the edges together. When you’re twisting the strands, you’ll want to keep the raw edge in the back of the twist as trying to keep the edge in between the strands tends to result in the edge sticking out in places.
Once you have the top edge sewn together, clamp it to a table, and let’s start twisting. You can twist either with the raw edge up or down, whichever is visibly easier for you.
You want to twist tightly enough, it’s believable to be a rope, but not so tight that when you let go of your rope that it starts twisting even more in the wrong direction. When you start your twists, try twisting it tighter and looser to see what looks right to you.
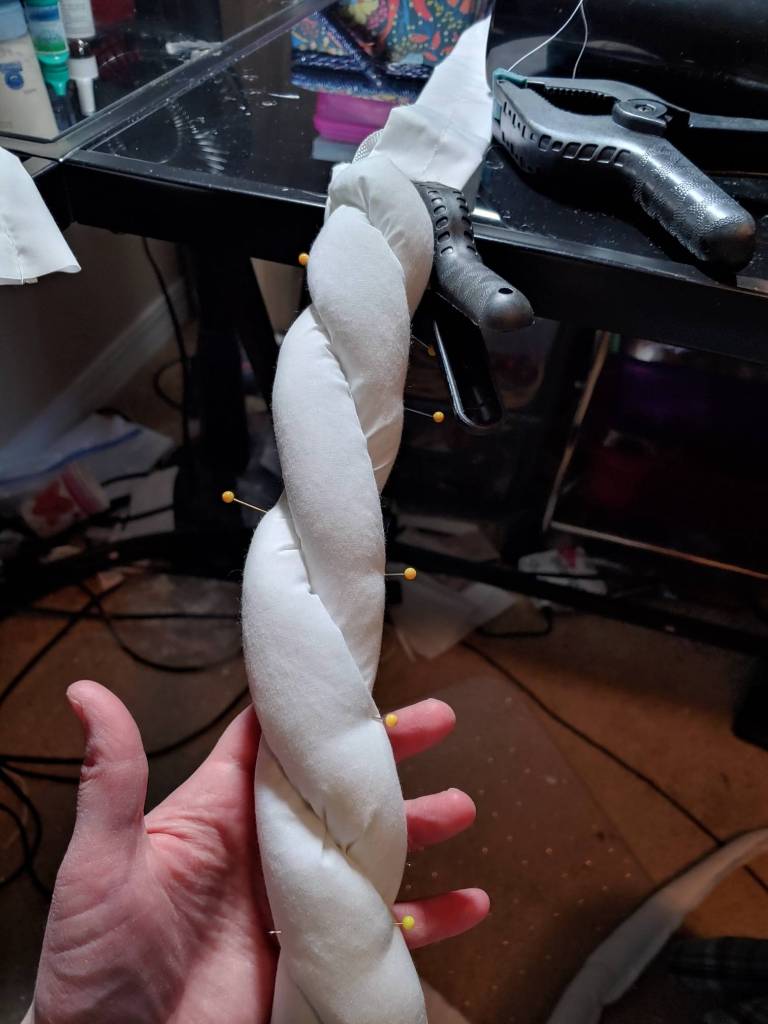
Once you have a twist you like, it’s time to twist twist twist. You’ll want to pin as you go, using the length of the quilting pins to your advantage. There’s really no good way to do this other than honestly jamming the pins into the fluff or trying to weave the pin into the fabric where the two strands meet.
You’ll want to pin the rope first instead of sewing it in case you don’t like the twist and want to redo it.
Continue twisting and pinning as you go along. When you start getting a longer rope, take the tape measure and measure the length of the rope. You can clamp the end of the tape measure to keep it from moving if needed.
Once you reach the desired length, pin or clamp the end in case you need to adjust the rope twist as you hand sew the rope together.
Securing the twists
It’s time for lots and lots of hand sewing! Hooray!

To start, clamp the rope raw-side up. You’ll want to keep the rope clamped to maintain the tension on the rope and not let it unravel as you work. When you thread the needle, double up on the thread to make sure it’s nice and strong.
You’ll want to secure two sections of the rope along the back. First is securing the raw edge. If you used pinking sheers, you’ll likely only be able to sew the raw edge flat against the back, much like I did in the image.
If you serged the edge or sealed it with Fray Stop, you can sew the edge flat or fold it under first. Tuck the edge down towards the seam and fold the edge in half. Press the fold down so the raw edge is tucked neatly underneath.
When sewing the edge down, the easiest stitch to use is either a straight or a backstitch. It doesn’t have to be exact, as the point of this stitch is to secure the raw edge so it doesn’t wiggle free.

The second section to hand sew is the section between the two strands. Since you want to hide the sewing to make an illusion of a rope, you only want to sew about 1/3rd of the rope in the back. This is strong enough to keep the rope together on the front and keep the stitches hidden.
When sewing the strands, a whip or basting stitch is most effective. Since the stitches are in the back, you don’t need to worry about using a ladder or other hidden stitch.
Make sure these stitches are pulled tight as they will be under some stress when holding up a backpack., so give yourself a generous stitch length.
Finishing and attaching
Once you’ve finished your hand stitching, you’ll need to finish the bottom end. If you didn’t use the full length of the stuffed noodle strands, cut the remaining noodle off while giving yourself at least 1″ allowance.
Pin the two strands together, one on top of the other, where you want to sew your bottom seam then pull all the extra batting out of the noodle strand. You can put the batting back into the bag for later use. Once you’ve defluffed, sew the bottom seam of the rope with the sewing machine, using a zipper foot to get close to the end of the rope twists.
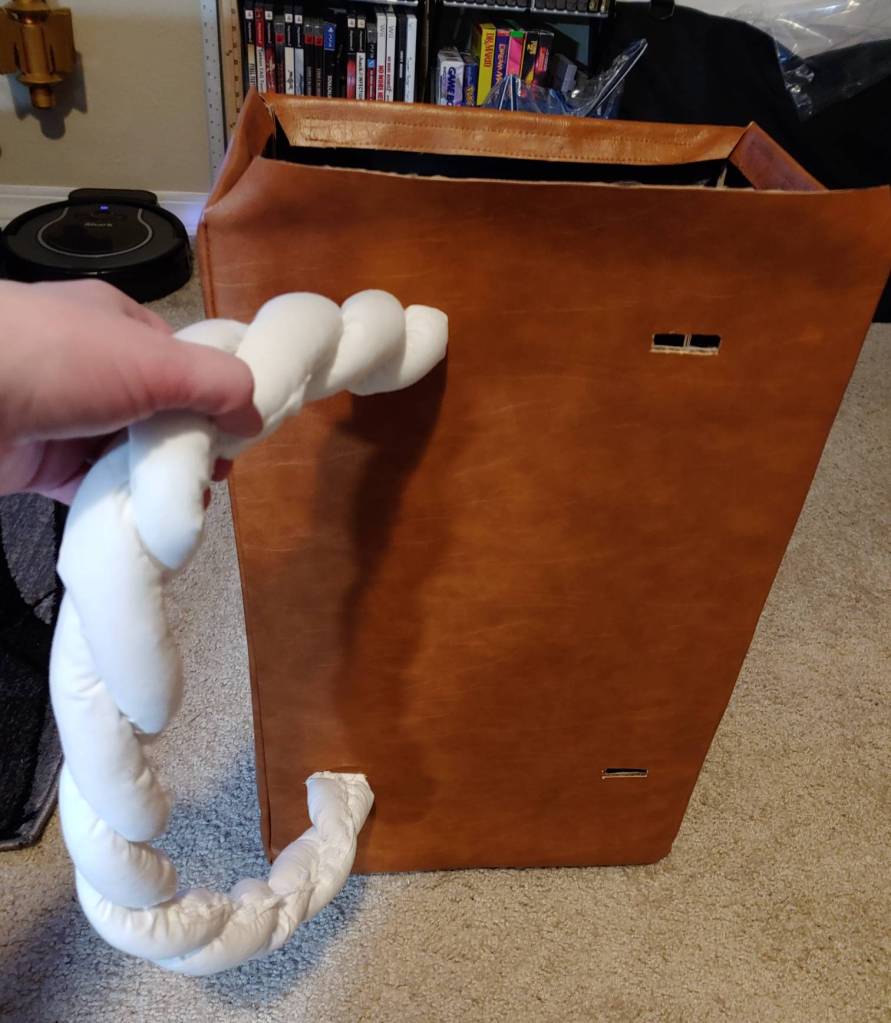
Once you finish the rope, you of course need to attach your creation so you can use it! If you’re attaching the rope as backpack straps, you’ll need to be mindful of which direction the raw edges are actually facing so you can hide them when wearing the backpack.
The top strap should have the raw edge facing downward.
The bottom strap should have the raw edge facing upward.
Before you sew or glue the strap into the backpack, double-check to make sure the rope isn’t accidentally twisted. The raw edge should be facing the body of the backpack for the entire length so when the backpack is worn, the raw edge is against your shoulder and body.
Once you’re satisfied, go ahead and attach that strap! Repeat for the second or however many straps you need.
I hope this tutorial helps! If you make your own fabric rope, share it with me on social media so I can see your creations!
