Paper mache isn’t all flat surfaces, and neither is your prop. Your project may include raised accents to create unique patterns or designs. Anything from medallions to details on a blade, even runes or faked laces using supplies you’ve already got for paper mache. It’s all done with the magic of food boxes.
When I first started working on Noir’s axe, I really wanted to make the raised details but I didn’t want to use foamies (nor did I have any on hand). What I did have was a large bag of discarded food boxes I was using for paper mache. These food boxes aren’t very thin and are easy to cut into small complex shapes, making them ideal for a variety of designs and patterns.
I’ve since used this technique for creating belt buckles and medallions as well as working on other props that needed delicate details.
The thicker the food box, the more noticeable your details will be. Freezer boxes for things like nuggets and frozen dinners make for thicker lines while cabinet food boxes like taco shells and cereal boxes are good for finer details and thinner designs.
So dig the food boxes out of the recycle bin, and let’s make some designs!
Skill level: beginner-friendly
Cost: budget-friendly
Materials:
- Unpainted prop. Must not be finished with anything waterproof as paper mache cannot stick to it.
- Food boxes. The amount will vary depending on how many designs you have
- Newsprint, non-glossy. You can use the weekly ad, a discarded newspaper, or store-bought newsprint
- Mod Podge or glue (mixed with water) for paper mache recipe
Supplies
- Posterboard or paper for patterning
- Pens/pencils for marking
- Masking tape
- Scissors for paper. Large ones for larger designs and smaller ones for intricate designs. You can optionally use a XActo knife or a small box knife to cut out details, but watch the fingers, please!
- Towel for your fingers (paper mache is messy)
- A cover for your table
- A small bowl for your glue mixture (while Mod Podge and school glue are non-toxic, don’t use a food bowl for your crafts!)
- Paints and paintbrushes for the finish
- 220-grit dry sandpaper
If you aren’t familiar with paper mache and its techniques, I have a primer! Paper mache for props and accessories
Raised pattern basics
I’ve been working on a Link cosplay, and it needed a bunch of medallions with raised designs on them. These medallions are only a few inches in diameter, so the pattern was relatively simple. If you’d like my medallion pattern to follow along, here it is!
When creating your patterns, the easiest way is to create a pattern for the whole shape, in this case, the circle for the medallion, then create the details from that shape. This means that the base shape and the raised details will match up exactly when I put both layers together.
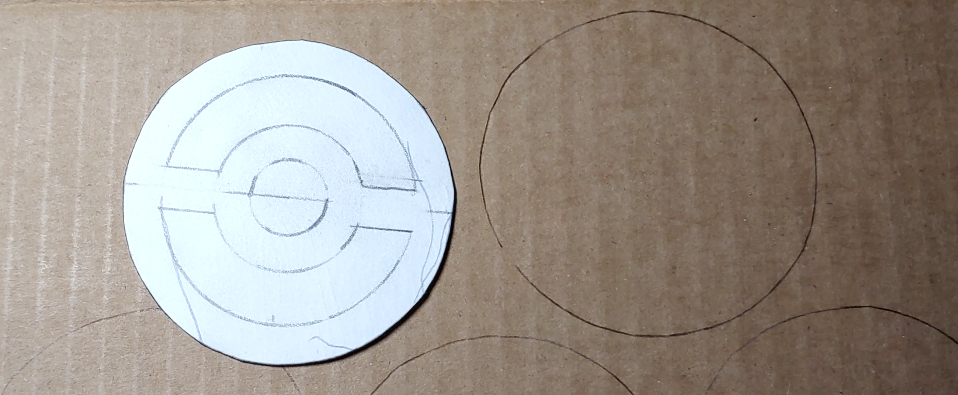
More geometric designs work great with a ruler or a compass (or even a cup from your cabinet) while more organic designs you may need to freehand. If you have a good reference shot of the object you want to create, print it out in the size you want then use that as your pattern.
Whatever you choose, you’ll want to construct your base first. For most of my projects, the base is made of cardboard, usually whatever Amazon box I pull out of the recycle bin that day. Cardboard bases are good because you can press on them and into them pretty easily (you’ll need to be able to do that when applying the designs), but this technique also works for regular food box bases or other types of bases as well. You’ll want your base solid since you’ll be pressing down on the designs.
Adding designs
Once you’ve made your base, it’s time to add the patterns. Trace your pattern out on the food box of choice (for the medallions, I used one chicken nugget box for all four medallions) and cut them out. For difficult inner details, you can use a box knife or XActo knife to carefully trace the details and pop the pieces out.
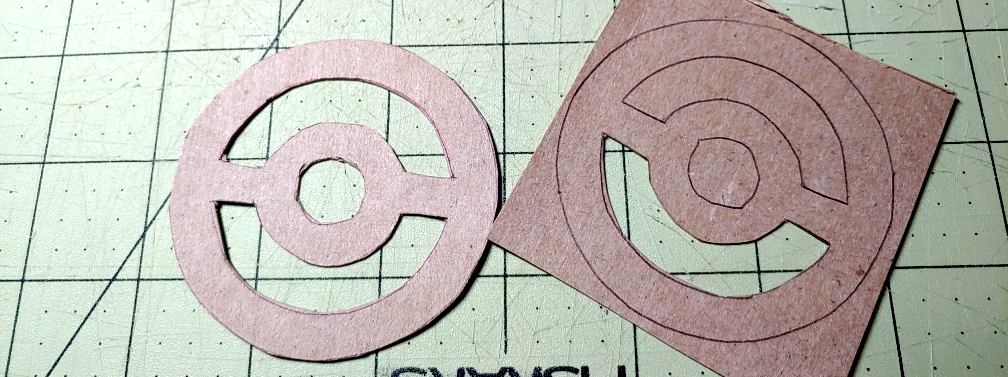
When working with cutouts like with the medallions, cut the inner details first so you have more material to hold onto while working. Then cut the outside to finish your work.
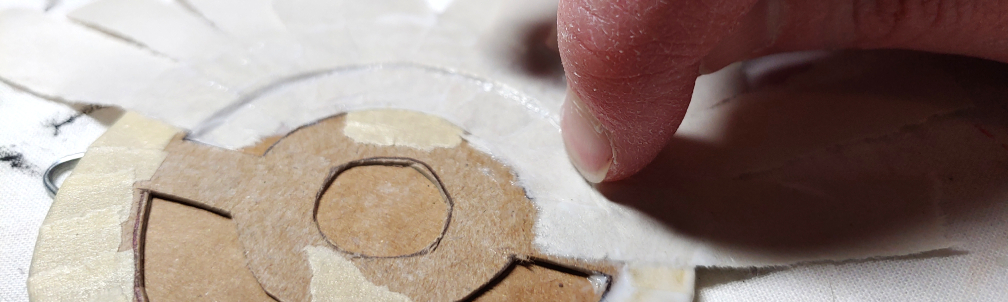
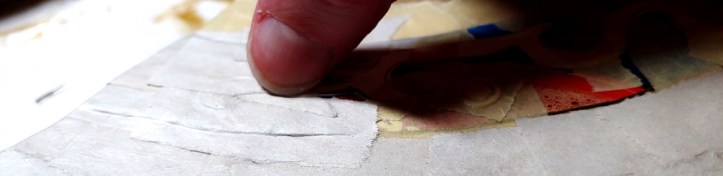
The biggest trick when working with raised details is how you tape these details down. If you simply tape across the raised details, you lose that edge and wherever you taped will have more of a slope than a sharp corner. You’ll want to push the tape into that edge to make it seem invisible when you add the paper mache later. And for that, you got a fingernail!

Tape the tape partially down then push your fingernail into the edge. I like to use my thumbnail because the angle lets me see what I’m doing more easily, but any fingernail will do. Push the tape inward towards the edge but not so hard it actually breaks the tape.
This pushing method works for all kinds of raised details. Curves, runes, lines, anything that’s raised, you can use this to remove the tape slope.
You only need to tape the raised details enough to keep them from moving, though if it’s a particularly large piece or your food box was slightly bent, you’ll want to tape it at several key points to keep it securely in place. When a pattern reaches the edge of a base, wrap the tape around the base and the raised details to keep it securely in place.

If your edge is straight, you can just use strips of tape. If the edge is curved or a more complex shape, use smaller pieces of tape for more control and to avoid making little sharp corners along your curves.
Breaking down complex patterns
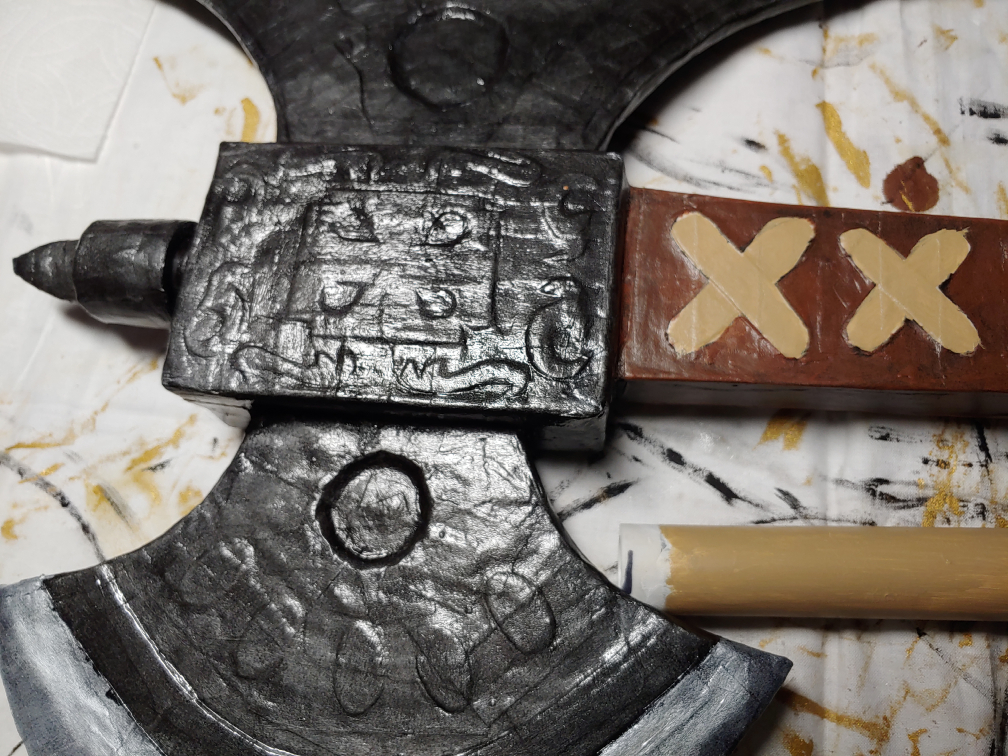
Not all patterns are made equal, and that was true for my axe head. Noir has a lot of details on the axe head, everything from lines to squiggles. It seems intimidating at first, but breaking them down makes approaching this much easier.

With complex designs, start with the largest details and work towards the smallest. This will help with placing the designs on your prop as well. For Noir’s axe, I started with the curved lines crossing much of the axe head.
To start, you can use the same pattern paper used to make the whole prop or create a new one using some poster paper. Let’s use Noir’s axe as an example.
Trace the designs onto the axe pattern paper then locate several food boxes to cover multiple designs. For Noir’s axe, I used about 4 food boxes to cover both sides of the axe head. You’ll want to find a food box with adequate space to avoid any creases or edges in the larger designs, but the smaller ones you can easily cut out of box flaps or leftovers. I used large cocoa boxes for the larger designs and taco boxes for the smaller ones. If you don’t have cocoa boxes, cereal boxes work great.
Start with the larger designs like the lines and curves, cut the food boxes out, and tape them down to your axe. You only need to tape them down enough so they don’t move. You don’t need to cover all the edges. Dig your fingernail into the tape much like with the simple designs to avoid the tape slope.

Now that you have the larger details, start designing the smaller ones using your remaining poster board. Noir’s axe involved a lot of squiggle and circles which I freehanded and kind of made up until they looked close enough to the artwork’s designs.
Once you have the designs patterned, cut the design out and trace the placement of the pieces onto the axe head. Trace the pieces onto a food box and cut them out as well, carefully taping them down to the axe head in their proper location. Dig your nail into the edge of the tape to push it down along the edges of the designs to maintain that raised feature look.

With complex designs, this may be one of your most time-consuming steps, but believe me, the details are worth it. They’re going to look great. Keep going!
Paper mache
Now that all the base work is done, it’s time to get messy and apply some paper mache. If you haven’t used paper mache before, I strongly recommend my primer Paper mache for props and accessories. This’ll go over the recipe you need for paper mache as well as basic techniques and how to get that paper to actually stick and stay stuck.
In addition to the basic techniques, you want to preserve the raised detail pattern when adding the paper here too, and it works much like when adding tape. No tape slope, no paper slope! And once again, the fingernail saves the day.
Work with smaller, shorter strips to give you the most control. Paste the strip on the raised detail first, pushing the strip down around the raised food box details with your fingernail. before pasting it down to the lower section. You can push the details in a bit more after pasting it to the lower section as the paper can slide around for a little bit before the glue sets in.
For curved edges and intricate details, you want smaller strips. You can push them into the edge much more easily, and it gives you more time to work. With larger or straight edges, bigger strips work just fine.
Work slowly as you go. This isn’t a technique that can be rushed else you end up with paper slope. The more details you have, the longer it will take, but it’s definitely worth it in the end.
Sanding
You don’t want all these little strips of paper showing up in your final paint job. Sanding with 220-grit sandpaper helps smooth those edges and makes them nearly disappear. Paper mache for props and accessories goes over the basics of how to sand. With details, though, you may need to get creative so you don’t accidentally over-sand an edge. Sanding creates a lot of dust, so make sure to work in a safe space and wear a dust mask if you have problems with dust!
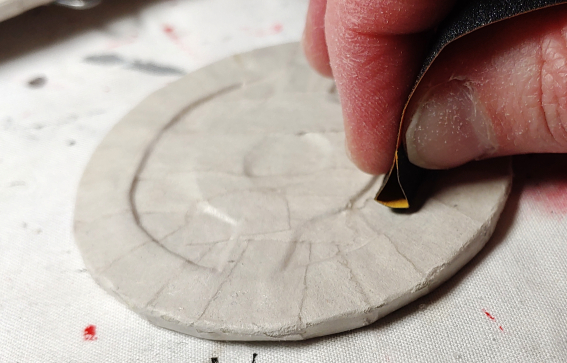
Folding the sandpaper into a triangle works great when trying to sand in tight spaces. The triangle lets you sand almost like using the eraser on the back of a pencil, smoothing out the tight cutouts or spaces without rubbing at the main design.
This will wear your little triangle out pretty quickly, so make sure to cut off the worn paper and create a new triangle if you have a lot of small details to work with.
Painting
Since paper mache uses glue, and glue is already a sealant, you don’t need to seal it again! You can paint right on the surface of your work. Whatever way you’d like to add paint is up to you. As I work almost exclusively indoors, I use paintbrushes and makeup wedges to paint my designs, but you can use spray paint or airbrushes or whatever you like to paint.
My favorite technique when painting metal is Painting weathered metal with a makeup wedge. It’s cheap and indoor-friendly, so if you want a weathered metal technique, check it out.
Here are some other tips that can help you paint raised details.
Masking
Masking is the process of taping off sections of your prop to paint only specific details. This works great if you want to paint just the raised or lowered details but don’t have the steadiest of hands or want to use a messier painting technique.
When masking, apply masking tape or painter’s tape to the section you don’t want to paint. For painting my fake laces, I taped off only the laces so I could paint around them safely before painting the lace details by hand.

Once your paint is dry, carefully peel the tape off so you can tape or paint the next section. Don’t rip the tape off. Acrylics are plastic paint, so if you rip the painted tape too hard, it’ll rip like thin plastic. Be gentle so your paint job isn’t ripped!
Details by hand
Sometimes masking doesn’t fit into a section or it’s easier to just paint in layers. That was definitely true for the medallions. It took less time to paint the cutouts than it did to mask them.
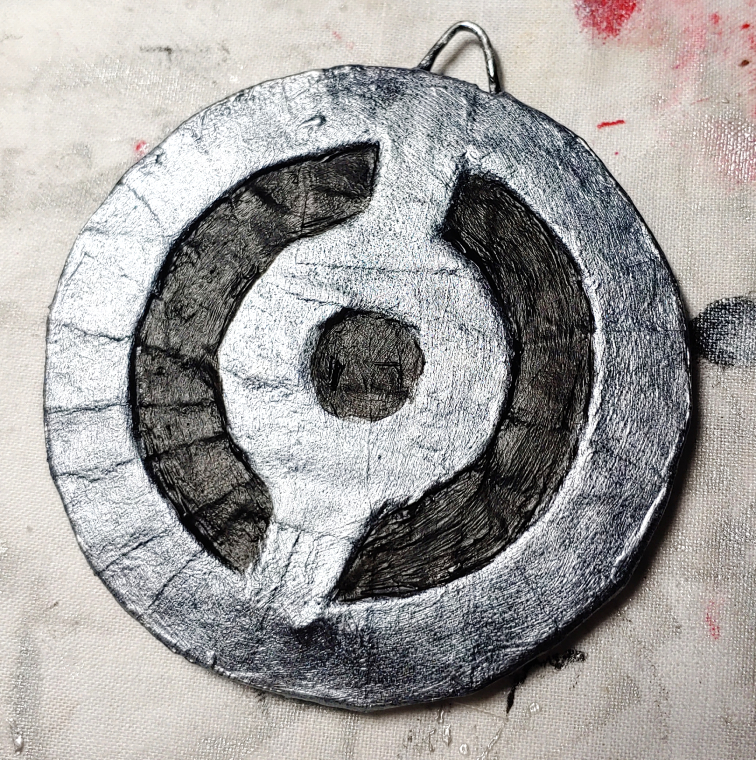
When working with two or more different colors, it’s best to work from lightest to darkest. When dealing with silvers and golds or monochromatic designs, that’s pretty easy to figure out. Metallics to black, or white to metallics. Paint the lightest first, overlapping the edges slightly, then paint the darker color to cover the borders between colors.
But when it comes to color, that’s where it gets tricky as you have to worry about the colors accidentally blending together and having your borders turn the color of sewage water. You may want to consider masking at that point, but if you have a steady hand, you can paint these sections with a small brush, avoiding overlap as much as possible while you work.
Finishes
You always want to finish your paint job and protect it with a kind of varnish. Cons are notorious for bumping paint jobs and scuffing them up, and you want to protect your hard work. The type of varnish you use will depend on if you want it shiny or not.
Glossy varnish will make your work shiny and matte will make it not shiny (there’s always a little shine, but it’s not that noticeable). If you’re working with Mod Podge, this works as a finisher too! You can also use paint varnishes or spray sealants as well. Use about 2-3 coats per side, allowing each coat to finish before applying the next.
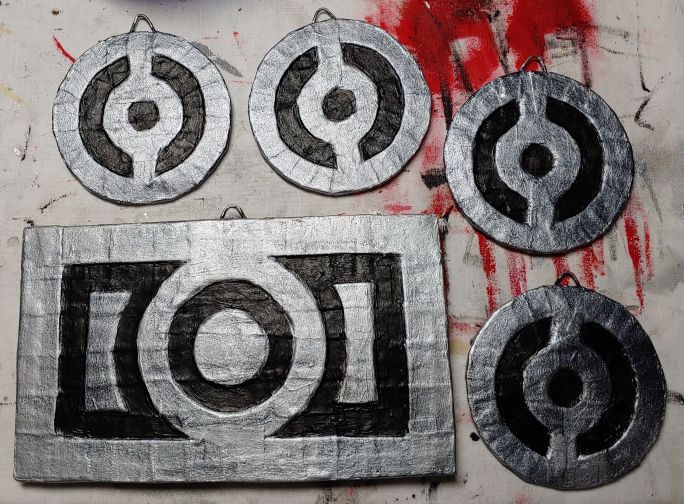
I hope you enjoyed this tutorial on how to make cool, painted, raised designs you made out of stuff from your recycle bin! It’s a cheap way to add any pattern you want with very little cost and it’s eco-friendly too. It works on everything from larger belt buckles and medallions to smaller squiggly or runic patterns. Whatever you want, if you can cut it out of a food box, you can make a design for it.
Let me know what kind of raised designs you end up making with this tutorial. @ me on social media so I can admire your work!
