Tassels come in all shapes and sizes, and they’re pretty popular in all sorts of costumes and designs across many types of media. They show up as belt and cloak accents, on traditional backpacks, and sometimes even as hair ornaments. They’re especially prevalent in designs influenced by historical Chinese and Japanese styles, but I’ve spotted them in modern and fantasy designs as well including Final Fantasy and Pokemon.
You could go out and buy some trim or tassel packs, but why not make your own? Giant tassels, chunky ones, even ones with gradients and rainbow colors. Let’s make tassels!
Depending on the look you’re going for, you could make your tassels from a variety of materials. The softer materials will swing more and tend to blend together like a typical tassel. The stiffer cord will appear more blocky and stiff, but also make the individual fibers more noticeable and distinct.
This tutorial goes over three types of materials as well as an easy method of tying your own tassels.
Types of materials
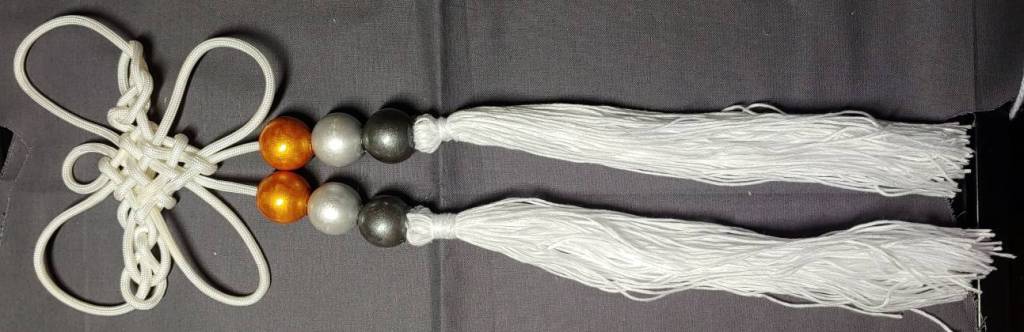
There are three types of materials I found work well with tassels. Each one has a different look to it and will behave a bit differently when you put it on cosplay. I made massive tassels in each type of material measuring around a foot long to demonstrate what each type will look like on a large scale:

Each one has its own benefits and difficulties, so let’s talk about each so you can decide the right kind of tassel for you.
Embroidery floss
Floss is probably the most common type of tassel I make. You can buy floss in bulk in nearly any color and even in rainbow packs. It’s sometimes listed as embroidery floss, cross-stitch floss, or friendship bracelet floss. You can buy them by the spool, but I tend to buy them in skeins to know exactly how much to use to make the tassel size I want.

There are a few advantages to using floss for your tassels:
- Floss tassels look close to purchased tassels and traditional designs
- Relatively easy to work with
- Generally 100% cotton unless you’re using pearlized or metallic thread
- Can be dyed and painted with various methods
- Can be sewn
- Fibers don’t get tangled up
Floss tassels can also cause you a few troubles
- Requires dye painting to dye with fabric dye, due to the finishing on the threads
- Final knotting may be difficult if you’ve never worked with floss before
- Large amounts of floss may become expensive if you’re on a budget
- Must manually combine individual skeins during the construction
For the most part, floss tassels are friendly to work with and have a lot of advantages once you get used to working with them. If you’re looking for something that looks like traditional tassels, this may be the option for you
Rattail
Rattail is a stiff cording usually with a satin finish used for making Chinese knots and creating shiny raised details. This type of tassel tends to be shiny with distinct tassel fibers.

This type of tassel has a few advantages:
- Rattail is cheap and easy to buy by the spool
- The fibers do not split easily, making them easy to learn how to tie the knots
- The cut ends can be left open or they can be burnt with a lighter to seal them
Rattail tassels also present a few difficulties:
- The colors are limited to what you can find in spools
- Difficult to dye
- Cannot be used for small tassels
- Individual threads do tend to spread apart
If you’re looking for a tassel that’s easy to tie with very distinct individual threads, rattail may be the option for you.
Macrame cord and yarn
Macrame cord and yarn are both pretty similar in composition. The threads are several strands tightly wound together and for the most part, are pretty soft to the touch. They come in all sorts of thicknesses, which can be used to make different size tassels.

A few advantages when making this kind of tassel
- Cording is incredibly cheap and can be bought by the spool
- Yarn can be bought in large skeins
- The resulting tassel is very soft and fluffy
- Yarn colors are nearly endless
- Can be found in metallic, satin, and specialized threads
- Regular macrame cord and yarn are often cotton-based and can be dyed and colored
- Both cording and yarn can be found in a variety of widths to control how big or small your tassels are
A few troubles you may encounter with this type of tassel
- The fibers must be unwound by hand before tying the tassel
- Most time consuming of the three options
- Unwound fibers tend to cling together and may start to twist a bit.
This type of tassel requires extra steps to look properly fluffy and tassel-like. But even with the extra work, if you’re looking for a very fluffy tassel, this option may be the one for you.
Making your tassel
Now that you’ve picked out your material, it’s time to create the tassels!
Winding
First, you’ll need to make the actual tassel strands. You could feasibly measure out strands, cut them one by one, and hope they’re all about the same length, but that’s too much work. Instead, we can wind the cording or thread around a solid flat-ish surface and let that measure out our strands for us.
First, find something somewhat flat and around the same length as you want your tassel strands to be. This thing should be solid with little give, no lip or notches on the side, and something light enough to hold in your hand. I’ve used everything from an eraser box to my jewelry kit case and even my phone. Nearly anything can work for this.

Unwind some cording from the spool or remove the label from the floss skein and take one end of the cord, pressing against one side of your flat object. I tend to hold mine on the left side of the object because I’m winding the cord with my right.
Now start winding the cord around your object. Just keep winding and winding. The more cord you have on your object, the fuller your tassel will be. Thinner tassels will need less winding.
If you are using multiple skeins of floss, each time you run out of floss, simply start the tail of the new skein in the same place as the last skein. So when winding multiple skeins, I always tuck the tail underneath my thumb on the left and wind until I run out of floss.
Cutting
Next, you’ll need to cut the ends. After all, tassels aren’t looped at the bottom.
Carefully pull the winding off the flat object. If you’ve wound it tightly, you may need to wiggle the wound cord a bit, a little wiggle on the top then a little wiggle on the bottom. Once the cord is off, it’s time to cut it. Cut the side with the loose ends of the cord to make your strands. It doesn’t matter if they’re completely even at the moment. You can trim them later.

Once the strands are cut, pull one of them out of the loop and tie a simple loop around the center of the other end. This will keep the strands in place while you’re tying the final knot.
Unwinding macrame cord
If you’re working with macrame cord or yarn, you’ll need to unwind the fibers to make them look like a regular tassel. If you’re working with other cord or embroidery floss, you can skip this section.
The cord itself is just twisted fibers. The easiest way to separate them is simply by pulling them apart at the bottom. This is easiest to see with macrame cord:

The cord will tend to separate in a very specific way. First, it will try to split the two smaller twists apart and cling together. Separate those two first. Then once you have the two smaller twists, separate them much like you did the larger cord.
An alternate method of unwinding the cord is to start up at the top near the center tie you made in the previous section. Press the cord between your fingers and start rolling it between your fingers. As you roll the cord, you’ll notice it starts separating all the strands at once. Wedge a finger in between the strands and gently separate them. Move your hand further down and roll the strands apart again. Keep rolling and separating until you are close enough to the bottom to simply separate the strands without them getting tangled.
Once you’ve separated all the strands, it’s time to give them a nice comb. It doesn’t need to be wide-toothed, but the teeth cannot be too close together else the fibers get stuck on the comb teeth. The comb should be plastic as other kinds of teeth may get stuck in the fibers and yank. While combing, make sure not to tug as the strands will easily slip right out of the knot.

An optional final step is to flat iron the tassel. You’ll want a flat iron that you don’t use for hair. I used my wig flat iron, but if you don’t have a spare one, you can do the same thing with an iron and some parchment paper.
Take a few sections at a time and with medium heat, iron the fibers flat and crisp. If you’re using a steam iron, place the parchment paper on top of the tassel so that the fibers don’t get stuck to the bottom of your iron.
This process doesn’t straighten the fibers completely but it does help with keeping the fibers from twisting around themselves too much once you’re done.
Knotting
Now it’s time to tie the tassel together with a knot. This is easiest to show with rattail, but the process is the same with all types of cording.
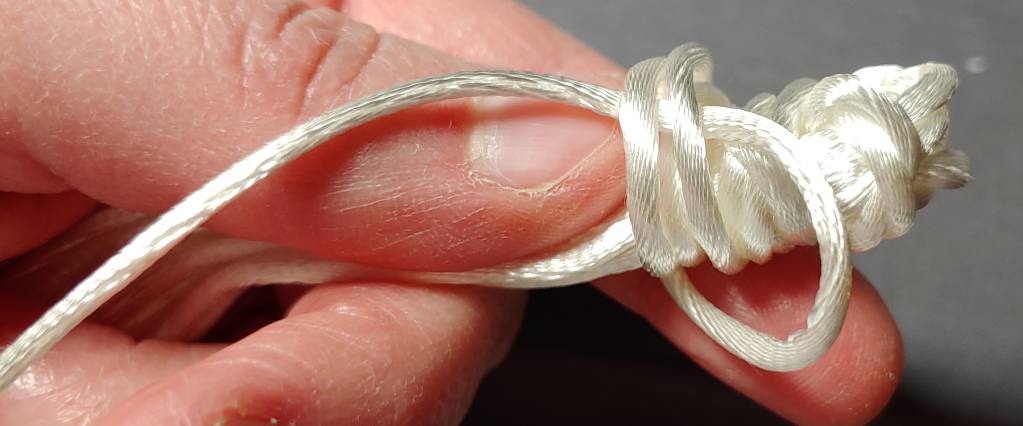
When starting the knot, you can take either a new cord (useful for when the knot is a different color) or use the tails of the cord you tied on the top center. When using a new cord, start with a simple crisscross tie like when you start to tie your shoes. When using the tail, slip the tail through the other cord like shown below to keep the knot from slipping while you’re working:

Now wind the cord tightly around the tassel several times. How many times is up to you but make sure it’s enough times to solidly hold the tassel in place and not slip.
Once you have sufficiently wound the cord, wind it two more times loosely and then slip the tail through the two winds.
If you are having trouble slipping macrame or floss through the winds, fold the cord near the end and slip the fold through. This prevents the macrame and floss from slapping against the winds and it should smoothly go through before fraying apart. If you’ve ever threaded floss through a needle, it’s much the same technique.
Once you’ve made your loop, tug on the winds to pull them taut then pull the tail to finish off the knot. Once secure, push the tail into the middle of the tassel to hide it.
Trimming
Now that you have a finished tassel, hold it by the knot and give it a shake or two. This will make all the fibers sit straight. Once you have the tassel straightened out, take a look at the ends. If you notice a few strays longer than the others, trim them with a pair of scissors. Tassels are generally even at the bottom, but you can also cut the ends at different lengths for a more layered look.
Once you’ve trimmed, admire your work. You’ve made a tassel!

I hope this tutorial helps you create any kind of tassel you want! You can add different colors into your winds to make the tassels multicolored, or stick with one color and make fluffy or stiff tassels to suit your cosplay’s needs.
I’d love to see what sort of tassels you create and where you use them. @ me on social media so I can admire your work!
