
I’m pretty deep in Asian historical fantasy shows lately, and one thing a number of them have is coins, amulets, and other similar shapes chained together by knotting or cording. Coins are sometimes easy to find, but getting into jade and other amulets can be more difficult to find and may grow really heavy.
So why not make your own coins and amulets and chain them together with simple knots? This tutorial shows the square coins I used for my Thunderbolt Fantasy, but you can modify them to make any shape you desire. You can also use the same knotting technique for purchased coins or amulets, as long as they have a hole. Scroll down to the knotting section to see how to chain them. All you need is some knotting cord!
Skill level: relatively beginner-friendly
Cost: lower-end of moderate (it’s Worbla, it’s almost always moderate)
Materials:
- Worbla scraps (size varies depending on coin size and how many you need)
- Synthetic knotting cord like satin rattail (see below on choosing your cord)
- Stick lighter (to heat-seal the cording)
- Pen or pencils
- Ruler (for squarish or similar coins)
- Compass or circle stencil guide (for round coins)
- Small sharp scissors like embroidery scissors
- Heat gun or hairdryer
- Heat-resistant mat to protect your table
- Paint sealant. Flexbond is my go-to but with it becoming harder to find, you can use gesso, mod podge, or wood glue as a base sealant
- Acrylic paints
- Glossy varnish. I use DecoArt high gloss varnish
- Paint brushes, makeup wedges, buffing cloths (depends on the method you use)
Safety notes:
- Worbla is safe to use indoors with regular heat. If you plan on melting it with a hot knife, work in a ventilated area!
- Make sure to work in a heat-safe area. Pad your workspace up with a heat-resistant mat or thick towel to prevent damage
Choosing your cording
The coins are honestly the easiest part. It’s Worbla. But to make the proper chains, you’ll need to plan out what kind of cording you want to use first. And here’s why.
Coin chains use a traditional knot which translates to a passthrough knot. It does pretty much what it sounds like. The back cord passes through the hole, and the front cord is fed through the loop that back cord makes. This means the hole in the coin needs to be large enough for whatever your back cord is.
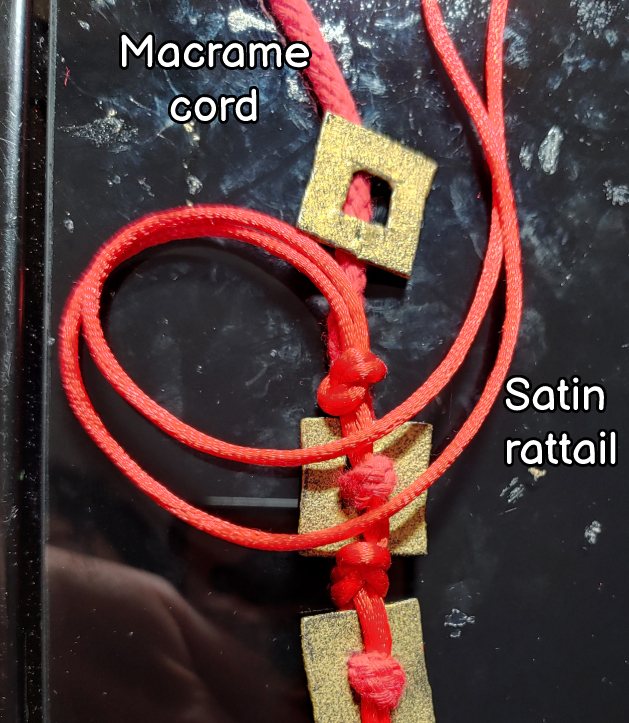
The most common cording chosen for coin chains is satin rattail. It’s a synthetic cord, slightly shiny, and found pretty cheap on large spools. But what if you need a thick cording for a belt chain? I had that problem with my Lang cosplay. The cording was very thick in the concept art, but doing a passthrough knot with two thick cords is very difficult and annoying. So I used two different types of cording instead.
The back cord is a cotton macrame cord, which is a bit plush and easy to shove through coin holes. The challenge with cotton cord is that the edges fray, so this wouldn’t work for knotting as you need to heat seal the ends to hide them.
The knotwork is primarily done with two strands of satin rattail. One strand caused the macrame cord to collapse through the back of the coin but two strands kept the knot in its proper place.
So if you’re planning on doing a thinner coin chain, perhaps one on a tassel or a fancy Chinese knot, satin rattail will work pretty well. If you need a thicker look, use macrame or other cotton cordings along with the satin rattail.
Planning and cutting out the coins
First things first, you’ll have to plan how big your coins should be. To make them large enough to see past the knotting, a minimum size of about 2cm diameter/width and a hole size of around 1cm or just shy of ½”. This size hole works great with macrame cord. You could go smaller if you’re using only rattail, but smaller holes can be a bit harder to cut out of plastic. Larger than ½” hole size may leave the coin to slip and slide about in the knotting, and we want the knots to stay in place.
Ultimately the size is up to you. For Lang, I used both 2cm coins and 4cm coins to make varying accents along the belt. It was easier to flip into metrics for the measurements to keep them even.
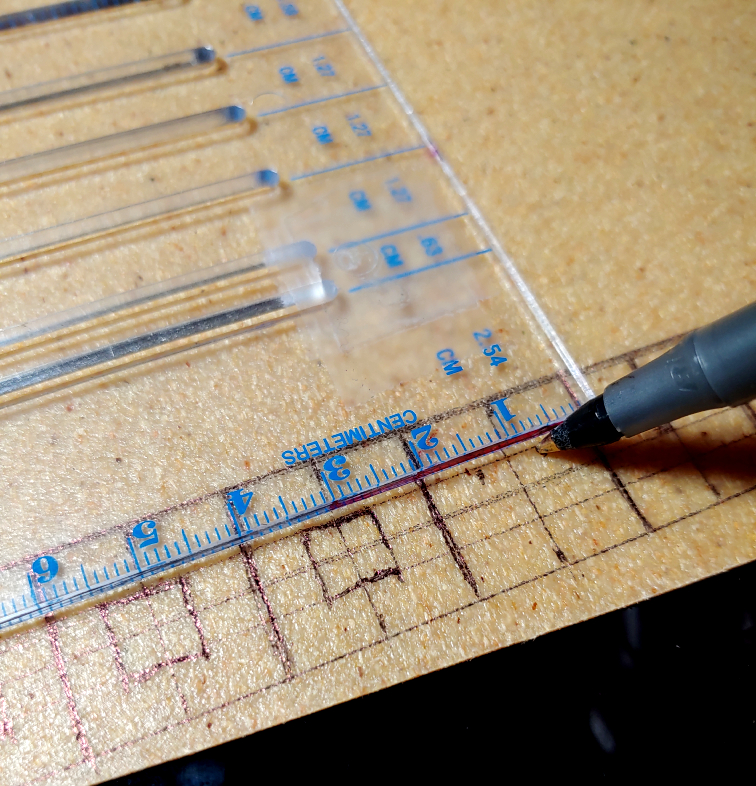
Once you’ve decided on the size, it’s time to draw your coins. If you’re drawing square shapes, it’s pretty easy to stack them together. Use a clear ruler to draw all your guidelines and keep the coins close together to use as little of the Worbla as possible. It’s expensive so you want to stretch it as long as possible.
Round coins aren’t so easy to stack together, but you can get them pretty close. Start with drawing a centerline that serves as your guideline. Use your compass or circle template to draw your outside coin circle. With a ruler, measure the diameter and mark the center of the circle and use that as a guide to draw the inside circle. You can also draw a square hole, as many round coins do have square holes.
Once you have all your pieces drawn, it’s time to cut them out. The outside part is easy. Simply cut along the lines and free your shape from its Worbla sheet grasp.
But that leaves the challenge of the holes. You can’t really punch a pair of scissors through the Worbla to cut the hole out and heating it up too much will warp the shape. So you have to do something partway in between and this is where your heat gun and mat will come in.

Worbla’s malleable point is about 150F when the plastic becomes very flexible and starts looking wet. You can reach that point with a hairdryer, but a heat gun tends to be faster and more consistent.
But we don’t want to reach that point. If you heat it up just slightly, the plastic will become a little soft and allow you to get your scissors in pretty easily without warping the coin itself. You’re not going to stab the coin, as that will cause the plastic to bend and then cool and harden that way. We want to retain the flat coin shape after all. Instead, we’ll need to cut out the hole from the side.
To get the coin warm enough, wiggle the heat gun or the hairdryer over the Worbla on your heat-resistant mat. As you start to notice it turn a little darker or look slightly wet, stop heating the Worbla. At this point, it will be a bit warm but not so much that it becomes putty in your hands and hard to handle.

Pick up the coin and cut one of the sides. Any side will do as you can cover it later using the cording. Cut straight into the area where your hole will be and start cutting around the hole shape you’ve drawn. The square shape will be easiest to cut but with a little bit of maneuvering, you can cut circles as well.
If the plastic becomes too difficult to cut, you can heat it up gently with the heat gun and make it softer again.
Now it’s time to close up the cut on the side. At this point, you’ve likely also bent the plastic out of shape a little too in order to cut the hole in the center. We need to fix that to make our coin flat for knotting.
Lay the coin back down on your mat and heat it up again. If it starts trying to escape, stick a pen in the hole to keep it from moving. Heat the Worbla up enough that it becomes soft and it will start flattening itself out against your work surface. Once it has cooled a little bit, use your fingers to push the two sides together, causing them to stick as it hardens.
If you have problems with the coin warping during this time because your mat is soft, you’ll want to use a glass cooling surface. A smooth glass cutting board, the surface of a glass desk, and even a ceramic dish will help out with this process. While the coin is still warm, carefully pick it up so it doesn’t stretch out in your hands, then lay it flat on the glass surface. It will try to stick to this surface, but don’t try to move it once you’ve set it down. When the Worbla is cool, it will lift right off the glass without any resistance.
Painting
While you could certainly leave the coins raw, they don’t really look like coins at all. You want them to look like real coins or charms, perhaps ones that have been used before being stuck on or perhaps have been through some battles. Pure gold or silver will look rather fake, but with some weathering, you can make your coins look more realistic despite being little circles and squares of plastic.
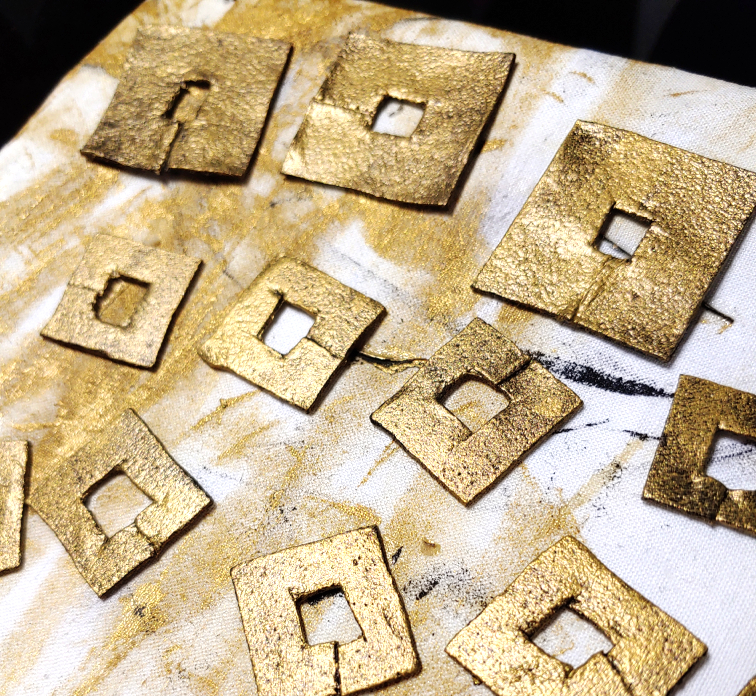
My personal method is painting weathered metal with a makeup wedge. It’s a pretty easy trick, where you use the bottom of a makeup wedge sponge to create a stippled effect that looks like weathered metal.
There are probably a dozen methods you can use including dry brushing and rub n’ buff. But either way, you’ll want to use a few simple tricks to paint these
- Start with a solid base like flexbond or wood glue. this gives the paint something to stick to.
- Use a black coat as the base before painting your metallics. This deepens the metallic color and makes it look a bit weathered.
- Use a gloss varnish to protect your paint job and give it a sheen even old weathered metals often have. Use at least 2-3 coats to protect your paint.
Conventions are not kind to accessories and paint jobs. You want to make sure that your paint has a good foundation so it doesn’t come off at the smallest of bumps. The varnish will protect it from extra damage and from rubbing off against the knots and the cording.
Knotting
Now that you have your coins, it’s time to chain them together. You’ll be using two primary knots: double overhand and passthrough. Grab your cord and coins, it’s time to learn how to make these knots.
First, let’s talk about the three pieces to this knotting puzzle. You have the thicker bottom cord, which is likely coming from a belt or some other decoration. The coins sit in the middle, and the top cord likely consists of two smaller rattail cords for strength.

Starting knot
To start your knotting, start at the highest point of the bottom cord and work downward. Take a long cut of rattail, longer than you think you probably need. You’ll probably want at least a yard for each coin chain, more if you want longer chains. The knotting reduces the length of the cord incredibly fast, and that yard of cording will start looking a lot shorter the more knots you make. There’s no good way to really calculate it, just grossly overestimate and that’s probably what you need. I used about a yard of top cord for every set of 6 coins, leaving enough room to make the final knot without worrying that the coin would slip out before I finished.
After you’ve cut your top cord, fold it in half and take the crook of the fold in your hand.
Lay the crook on top of the bottom cord and wrap the top cord around the bottom cord and then through the crook. Pull it tight and position the knot on top of the bottom cord facing towards the side where the coins will sit.

This first looping knot is the only different knot in the whole chain and will serve as a stabilizing point when making your chain. Make sure it’s secure.
Passthrough knot
Next, it’s time to make your first passthrough knot. Press the coin flush against the loop knot and make sure the seam where you cut the hole is running parallel to the bottom cord. The top and bottom cord will hide this seam once the knot is done.
Gently push the bottom cord up through the coin hole to make a loop, making sure to keep the coin itself flush against the previous knot. Pick up the tails of your top cord and pass them both through the bottom cord’s loop, essentially threading the needle and pulling the top cord tight.

To tighten the knot, gently pull on the bottom cord until the loop starts to pull the top cord back into the coin hole. The top of the loop should sit slightly above the coin to allow for the top cord to sit properly. If you’re using thinner cord, the knot can actually sit right in the coin hole itself.
If the top cord loosens during this process, pull it taut by gently tugging the tails. Both top and bottom cord should be tight against the coin but not so tight one cord or the other starts to buckle.
Double overhand knot
Overhand knots are a pretty common knot. Double simply refers to the direction it’s tied. The top knotting cord remains vertical so it’s neither tied on the left nor the right. An overhand knot really looks like a giant pretzel. Pretzels are very strong knots and this will secure the coin to the cords and prevent it from moving.
Start first by looping the top cord around the bottom cord and then bring the top cord back up towards the coin. This makes a loop. Don’t tighten it yet. You’ll need to make the pretzel.
Bring the top cord back around over itself then pull it down through the loop, pulling the tails downward in between the top and bottom cords.
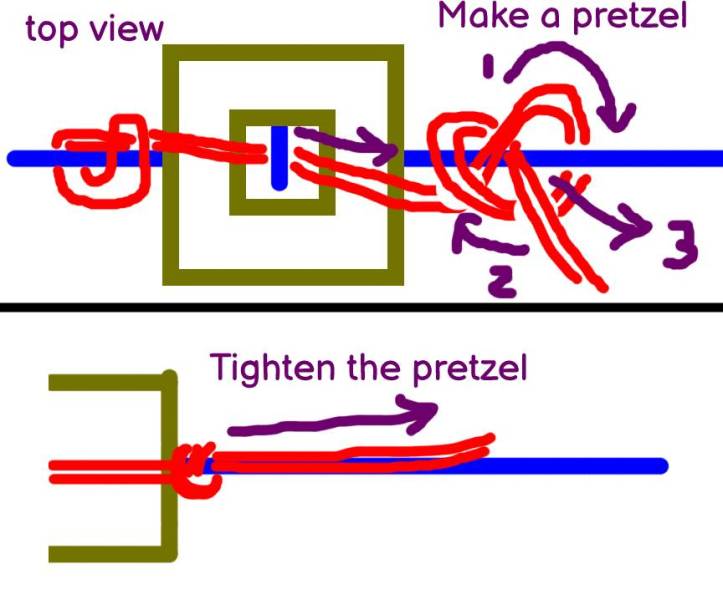
Once you’ve made the pretzel, gently tug on the tails, pushing the pretzel knot upwards toward the coin before giving the tails one final tug and tightening the knot securely. The pretzel knot should sit flush against the bottom of the coin.
Chaining and finishing
Chaining coins together simply involves repeating the passthrough and double overhand knots over and over until you get to the last coin. As long as you have knotting cord left, you can keep knotting coins.
Once you reach the last coin, make your final double overhand knot. Instead of pulling the tails to the front of the bottom cord, bring them to the back so you can hide them.
Cut the rattail cords short, near the knot but not so close to it that the tails slip right through the knot you just made. Leave yourself a little bit of a tail that you can heat seal with the lighter.

Heat sealing works best with a stick lighter as you have less of a risk of attempting to heat your fingers or burning the bottom cord, especially if it’s a cotton macrame cord.
Take your coin chain in one hand, moving the bottom cord out of the way of your double overhand knot. Make sure not to hold the top cord and keep your fingers out of heat range while doing this.
Take the lighter in the other hand and use the flame from the lighter to melt the rattail. It’s made of plastic, so heat melts it pretty easily. This will shrink the tails a little bit but it will keep the ends from fraying. Don’t touch it while it looks wet, but once it cools just slightly, pinch the two tails together to fuse them. You can also pinch the tails to the knot itself or leave them in the back.

And that’s it. You’ve made traditional chained knots with nontraditional materials. Go forth and create many chained coins and trinkets of all shapes and sizes with minimal weight. Coins are heavy. Cosplay doesn’t need to be.
I hope you’ve found this useful! Let me know what coin chains you make, whether it’s just lucky coins for accents or parts of your cosplay. @ me on social media so I can admire your hard work!
