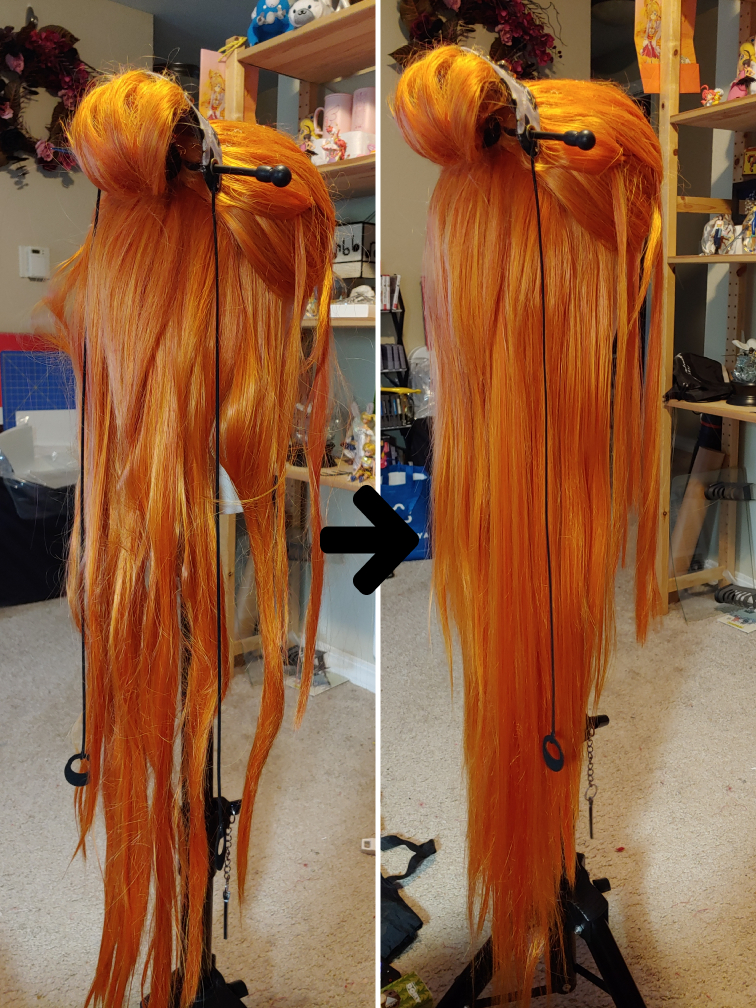
If you’ve ever worn a long wig at a con, you understand this problem. After a few hours (sometimes less), the wig is a matted, stressed-out mess. Combing the wig seems like an impossible task, much less trying to get the thing to stop frizzing.

When I began to cosplay more long-haired characters, I found this to be a consistent problem. At the end of a long con day, the wig was matted or frizzy (sometimes both at the same time). The longer the wig, the more of a problem it became.
Fortunately, there are a few simple tricks to make a wig go from frizz to fresh once again. After some trial and error and some advice from theater and cosplay friends, I found a tried and true method to get my wigs back to good working condition every time.
This works for heat-resistant straight wigs. As this process uses heat, it will take out any curls in the wig and you’ll have to recurl it.
Since you will be using heat, make sure to keep your tools on a heat-absorbant pad when not in use so you don’t burn your desk or yourself. When working, never touch the flat iron’s surface. Keep the cords away from chairs, feet, or pets, so you don’t accidentally yeet a flat iron into your arm.
Skill level: beginner-friendly
Cost: moderate (mostly for cost of a flat iron)
Tools and supplies:
- A stressed-out, heat-resistant, synthetic wig
- A wig head (styrofoam or fabric, does not matter)
- A wig stand, either a table clamp or a free-standing tripod
- Straight wig pins
- A plastic comb with teeth on the smaller side (wire combs tend to pull too much)
- Large alligator styling clips
- A flat iron you don’t plan on using on your hair
- Leave-in conditioner spray. Any kind will do, though I prefer Aussie because it smells nice
The magic of heat
Fibers can get tangled for a number of reasons. Getting caught in your backpack, ensnared by the details of a back of a cosplay, or just from turning your head and the fibers repeatedly rub against your back. It doesn’t exactly take much to distress long fibers. And now imagine that happening all day and you get a matted wig.

When stressed out, the fibers themselves are puffy and sometimes even crinkled up a bit depending on how much abuse the wig itself took. The crinkling isn’t really noticeable in a stressed wig, but if you’ve ever teased a wig, you can see the crinkling makes the fibers look puffy and even thicker at times.
But that puffy thickness isn’t doing us any favors right now. The best way to depuff fibers is to use a flat iron. To apply heat. It’s like ironing a wrinkled cosplay, and it works pretty much the same way. It removes the crinkling and the puffy effects and makes the wig more manageable.
The magic all comes from a flat iron. You don’t even need a special one, just one you don’t plan on using with human hair. It won’t cause your hair damage if you use a wig iron on it, but you generally want to keep your wig and personal tools separate.
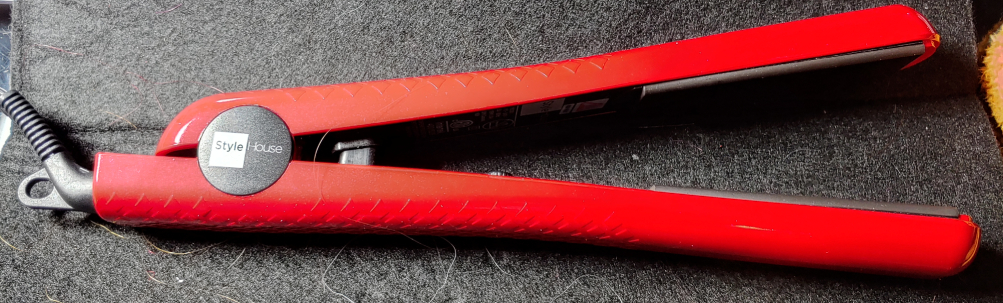
Any flat iron with a temperature setting on it will do the trick. You don’t need a super expensive flat iron or one with fancy settings or dials. Just a regular full-size flat iron.
You’ll also want a heat-resistant pad to set it on when you’re not working, so if your iron didn’t come with one, make sure to get one to go in your kit!
Combing out the knots
Before you even get started, rinse out any hairspray in your wig. Run it under cold water in the sink then leave the wig out to dry flat on a towel on the counter overnight. Hairspray will gunk up your flat iron and sometimes crisp the wig fibers. You can add it back in later if desired.
Once your wig is clean, pin it to the wig head and place the wig head securely on your stand.

Take a small section of hair at a time, clipping the rest of the wig off to the side using the large alligator clips to keep the hair out of your workspace. The easiest way is to work from one side to the other. It doesn’t matter which, honestly, but it’s easier to keep track of where you’ve worked as you go instead of haphazardly picking sections out of the wig.
When working, also pin to the side any hair decorations or accessories so they don’t get in the way.
For each section, lightly spray the leave-in conditioner throughout the entire length of the fibers, then gently pull your comb through the fibers. The combing process spreads the conditioner throughout the fibers which keeps your wig in good working order.

Do not yank the comb during this process as it pulls the fibers out of the wig and causes even more matting and knots in the process. If you come across a knot, use your fingers to gently pull apart the knot. You can also hold the hair above the knot, using your comb to spread the fibers apart and break open the knot as well.
If you end up with a little rat’s nest at the bottom of a wig, take a pair of scissors and gently cut the knot out. Do not do this with big knots as you’ll end up cutting out a lot of fibers. Just the little nests that refuse to come out of the tip of the fibers.
Repeat this for all sections of the wig, conditioning the wig and gently combing the tangles out of the fibers. Let the wig dry for a few moments and the conditioner will set into the fibers.
Add a little heat
Heat is the big de-stressing factor here. It returns the fibers to their non-frizzy, non-crinkled state. But as it is the biggest factor, it is also the most sensitive.
Fibers will generally have a heat tolerance, much like certain fabrics will burn if ironed too hot. If you get a wig from Arda, Kasou, or the like, they’ll give you a temp, but most of the time, there isn’t one listed on the site. Or perhaps you have a basic flat iron like me and don’t have a temperature gauge. It just has “low” and “high” then a few notches in between to indicate temperature scale.
You can test on the fibers on the underside of the wig (the side that sits against your back when worn), starting at a low temp then working up until you get the smooth result with the fibers that you want. I set my flat iron to medium and that works great for my projects. Your number might be different.

If anything smells hot or burning, stop! That’s too hot and you’re cooking your fibers! Turn the flat iron back down and continue working.
Now that you’ve gotten a heat setting, it’s time to defrizz the fibers. Work section by section as you did before. You can pin the other sections off with alligator clips or do it free-hand. You can feel where you’ve worked as it will be warm!
Take each section and start at the top. Clamp the flat iron down on the fibers and pull downwards slowly (and gently, don’t yank!) as you apply the heat evenly to the fibers. Do this twice to fully defrizz the fibers.
Repeat this for all sections, working from one side of the wig to the other.
Once you’ve applied heat, let the wig cool a bit. If you’re still finding the wig frizz and attempt to mat, partition the hair off once again and apply more conditioner to the fibers, combing the conditioner through and allowing the wig to dry once more.
Now that the wig is super de-stressed, make sure to properly store it! If stored in a bag, wrap the wig in a hairnet with tissue paper in the wig cap to ensure that your wig lasts a long time.
And that’s it! Your wig is now ready for the next con!
I hope you enjoyed this little tutorial about defrizzing and de-stressing! Wig care is important for the longevity of your wig and to keep it looking its best. Conditioning the fibers helps detangle them and keeps the wig from tangling up a lot, a fun little trick I learned from musical theater! It also works great with cosplay.
That wig will get tangled, and keeping your wig detangled and distressed will make it last for many cons in the future.
Let me know how your wig care is going. @ me on social media so I can admire your work!
