When you pull a wig into a full or half ponytail, you might notice the ear tabs just aren’t long enough to cover your sideburns. This is especially noticeable when the wig also is bangless. And this becomes a problem when you have large sideburns like I do.
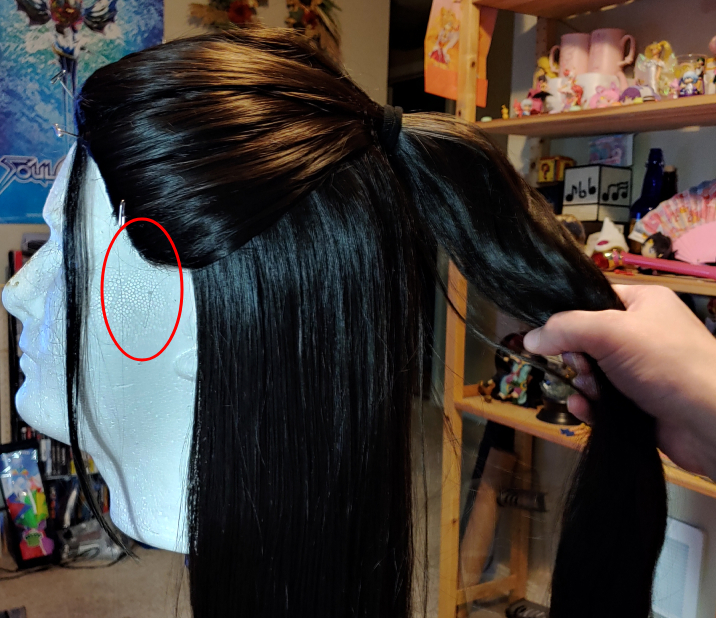
When I set out to style my Wei Wuxian wig, it quickly became noticeable that the ear tabs weren’t long enough. Chinese historical drama wigs often have exceedingly long sideburns, and wigs just don’t have sideburns that long. You may also just need sideburns for a wig that just don’t cover your own. Fortunately, you can make your own sideburns.
This technique requires very little wig experience and optionally a bit of sewing. It works best when you have a half ponytail or a higher full ponytail as the sideburn hair will be pulled up and over your ears when worn.
Skill level: beginner-friendly
Cost: Moderate (mostly for wig cost. modification supplies are pretty budget-friendly)
Materials:
- A wig either thick enough to be pulled back or prestyled this way
- Extra wefts (optional)
- Felt that matches the wig color
- Wig lace or soft tulle with small holes that looks close to your skin tone
Supplies and tools:
- Wig stand (either a table clamp or free-standing tripod)
- Wig head close to your head size (you can pad it up with paper if needed)
- Large alligator clips
- Plastic small-tooth comb
- Leave-in spray conditioner (to condition the wig fibers). I like Aussie’s Leave-in Conditioner because it smells good.
- Tacky glue. I use Alene’s. It’s the one that comes in a brown bottle.
- Straight pins or wig pins
- Plastic cling wrap (a small square)
- Seam ripper
- Small sharp scissors
- Rubber bands
- Paper and pencil for patterning
Conditioning the wig
Before we get started, you want to condition the wig. We’re going to do a lot of pulling fibers, and wigs can get tangled pretty easily. Especially the long ones. While there are many methods of conditioning a wig, the easiest one I’ve learned is from theater. And it involves using spray leave-in conditioner, the same type you can use on your own hair.
Work section by section, spraying the fibers from top to bottom with the conditioner. Using a plastic comb, comb the conditioner through the fibers. This evens out the conditioner and separates the wefts, making them easier to work with. If you notice the wig frizzing, you can also flat iron the fibers as well to destress them (make sure your wig is heat-resistant first!).
Allow the wig to dry. Should only take a few minutes at most.
Harvesting wefts
Wefts are the rows of fibers that make up the whole wig. The fibers are sewn together in rows before being sewn onto the wig to mimic natural hair.
Push up some of the hair, and you’ll start noticing the rows of wefts sewn into the wig. If you have a particularly thick wig, you’ll notice wefts sewn close together or even double the hair. But most will have single rows of wefts evenly spaced out.
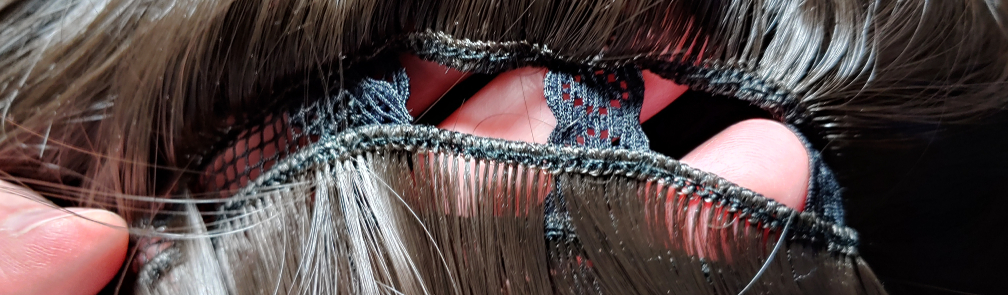
And if you cannot see the netting underneath when the wig is worn (this means your wig is thick and full of fibers), we can borrow a few rows to make the sideburns and the lack of a row of wefts shouldn’t be noticeable. If you purchased a pack of wefts, you can skip to the next section. If not, it’s time for wig surgery.
The best place to harvest the wefts is near the bottom of the back (for a half-ponytail wig) and underneath the half-ponytail. For full ponytail wigs, you might have better luck harvesting from the center of the wig. The ones at the bottom will be shorter (the bottom ones are pictured above) and the ones hidden underneath the ponytail and at the center will be long ones like this one here:
Ultimately, you need to pick a place that is least visible and will affect the weight and shape of the wig the least. The bottom of the wig will have the rest of the wig to cover it for half ponytails, and the wefts under the ponytail will be covered by the ponytail itself when styled. When choosing which wefts to harvest, you want ones that are separated by a few rows. If you pick two next to each other, you risk the net showing and ruining the illusion of hair.
Once you choose your spot, it’s time to remove the weft. Using a large alligator clip, pin the hair up and out of the way completely so you see the entire weft you want to work with. If you’re harvesting underneath the ponytail, clip the elastic and pin the ponytail out of the way. You can loosely tie an elastic around the hair to keep it from getting mixed up with the rest of the hair if needed.
Take your small scissors and snip the stitched wefts slightly away from the side of the wig. You may have a net near the edge as mine does, and if you do, snip right next to it.
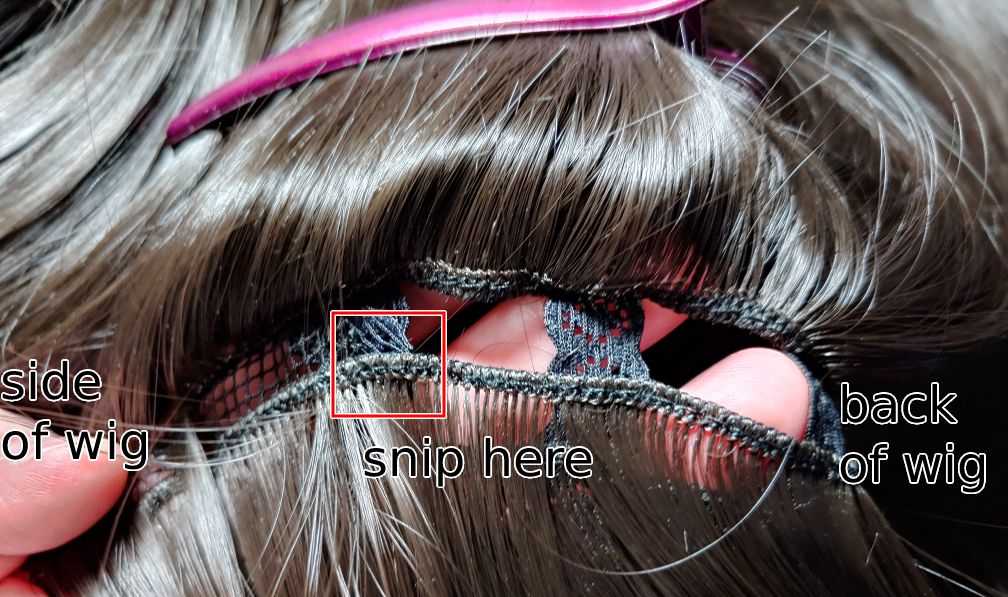
Try to snip in between the hair fibers if possible. If you snip some fibers, you can just pull them off later. Now it’s time to free the wefts from the wig. Take your seam ripper. The thread you want to rip isn’t the one immediately visible on the weft itself. That holds the hair fibers to the weft and we want to keep those intact. The thread you want to rip is actually behind it, holding the wefts to the wig structure.
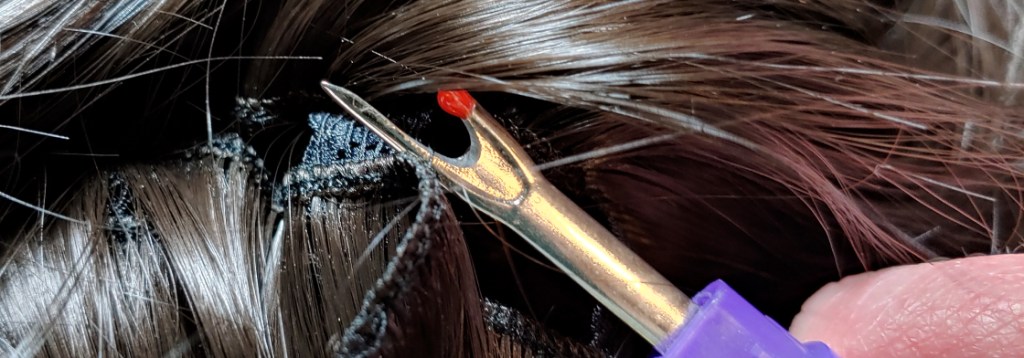
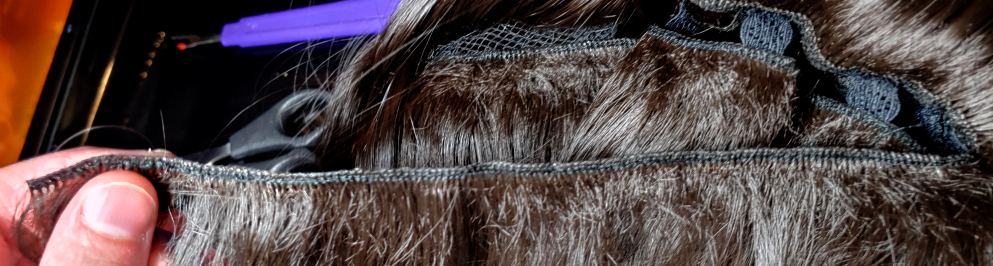
Keep ripping the threads until you reach the other side of the wig, snipping the wefts someways away from the side. It’ll be about the same distance as you snipped the weft when starting the removal. A guess is fine. It’s just to cover the edges of the wigs and not make it obvious you’ve removed a weft there.
Once the weft has been removed, it’s time to extract it. Don’t yank. That’s the quickest way to tangle the fibers back up. Instead gently pull the weft down, using your fingers to separate the fibers as needed, until the weft is free.
You will need about 2 short wefts from the bottom of the wig and 1 long one that spans across most of the width of the wig for the sideburns. 2 long ones should also work fine.
Creating the sideburn base

After tying the ponytail back into the wig as needed, put the wig on and position it where you’d normally wear it. Match the smaller ear tabs up with the front of your ears to make sure the wig is on straight.
Slip a piece of paper up underneath the wig by the ear tab, careful not to give your ear a papercut. Using a pen, draw the rough shape of a sideburn which looks kind of like a V. The back is straight while the front curves toward the hairline. You may need a mirror or someone to help you with the sketch.
After drawing the sideburn, mark the position of the wig against it, where the wig’s current ear tab sits, then remove the paper to make a final pattern, evening out the lines as needed. Remove the wig and pin it to the wig head. Slip squares of plastic cling wrap underneath the ear tab and wig, pinning it down to the wig head. This prevents the wig from sticking to the wig head during the gluing process.
Cut two sideburns out of felt adding extra room at the top of the felt for attaching. Using the paper pattern as a guide, glue the top of the felt with tacky glue.
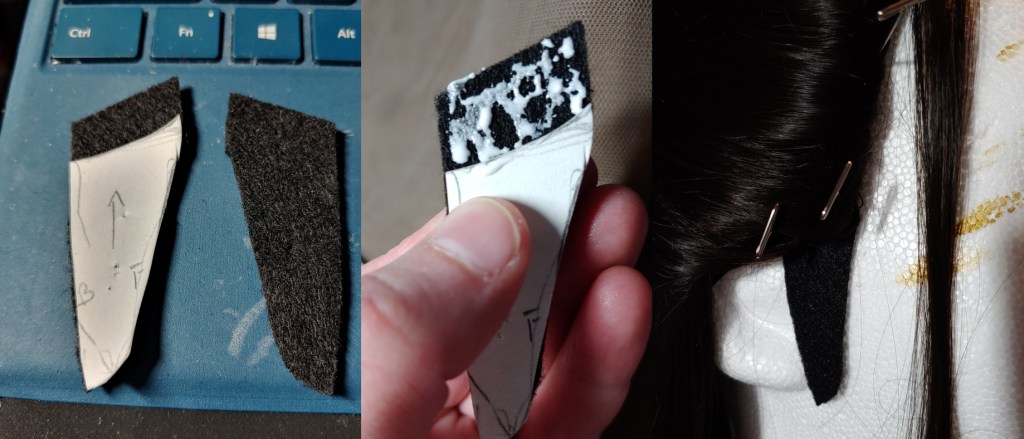
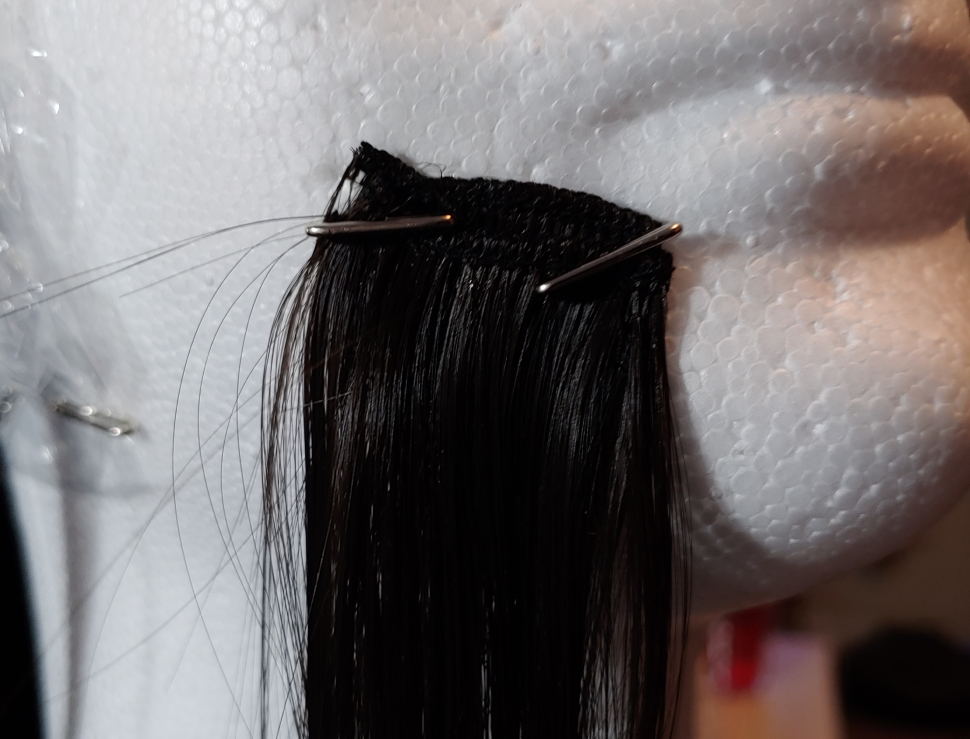
Slip the felt underneath the ear tab, glue-side up, then position it underneath the wig using the paper pattern as needed. Press the wig down onto the glue and then pin the wig down to the wig head, spearing the felt underneath it. Push the pins all the way in to apply pressure.
Repeat for both sides.
Allow about 15 minutes for the tacky glue to completely set and dry. While a simple craft glue, tacky glue is incredibly strong once bonded. You can optionally sew the sideburns to the wig, but as long as you do not touch the sideburns with glue solvent, this attachment will stick forever.
Adding wefts
Before adding wefts just yet, it’s time to destress the wefts. Fold them a few times and pin them to the face of the wig head, using the same method as before. Spray some leave-in conditioner on the fibers and comb them out. The wefts likely got a bit distressed when they were pulled from the wig, and we’ll be pulling them some more. So the less tangled they are, the better.
Once de-stressed, it’s time to get those fibers onto the sideburns to get them looking like hair instead of felt.
Wefts are glued in one line at a time on the sideburns, starting with the closest section to the existing wig. Since the wefts will be brushed backward into the ponytail, we don’t want to be gluing underneath our work and potentially gluing the hair fibers in the process.
The wefts are added at a diagonal to make the hair sit naturally and flat against the face. The wefts are facing backward, meaning that the sewn part is facing the front of the wig while the fibers are facing toward the back. When choosing the length and placement of a weft, hold the whole string up where you want to glue it then using the small scissors, cut the weft in between the fibers and separate your fibers with your fingers to pull them apart.
Each row of wefts is glued with tacky glue before being pressed down onto the felt then pinned to the wig head. Pressure is what makes the glue truly stick, so make sure to push those pins all the way down to the wefts while the glue is drying.
After gluing each weft, pull the weft back and pin it using alligator clips to keep it out of the way.
Now that we’ve talked about the basics, let’s talk about where to add the wefts onto the sideburn itself. This is a bit subjective to how big your sideburn pieces are, but here’s a general guide, layer by layer:
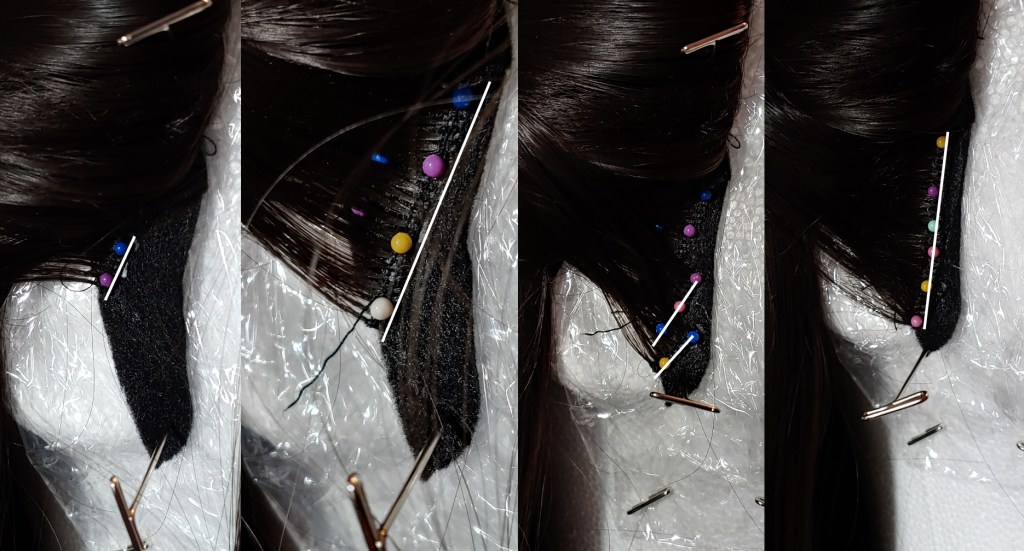
- Start with the top section closest to the ear. This one will be short as it’s just covering the gap between the existing ear tab and the edge of the sideburn.
- Next is a longer piece, angled steeply and covering most of the sideburn.
- Then two small wefts finish off the plunge of the sideburn and fill the volume out.
Let these wefts dry for about 15 minutes then remove the pins. Add one last line along the front edge of the sideburns. This edge should span from the top where it meets the wig to nearly the bottom just a smidge away from the edge. This covers up any gaps the sideways wefts may have left behind. Allow about 15 minutes to dry.
But that leaves a bit of felt along the side, doesn’t it? We’re going to cover that up too but with a different method.
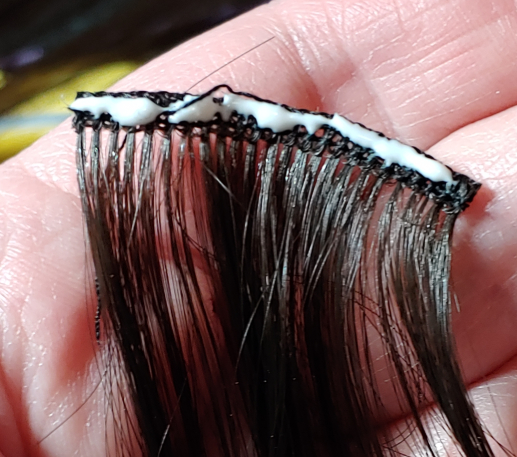
To mimic a hairline, the wefts need to be glued underneath the sideburn then brushed back. To fully cover the felt and make the hair look thick enough, there must be two lines of wefts glued underneath like this.
Start by gluing one row of wefts. The row should go from the very tip of the sideburn about 1/4″ into the wig hairline. This will make a smooth transition from the extension to the wig itself. After putting glue on the weft, insert the weft glue-side up and press the felt down upon it, pinning the felt into place. Allow 15 minutes to dry before removing the pins and gluing the second row of wefts.
Repeat this for both sideburns until you have two full sideburns!
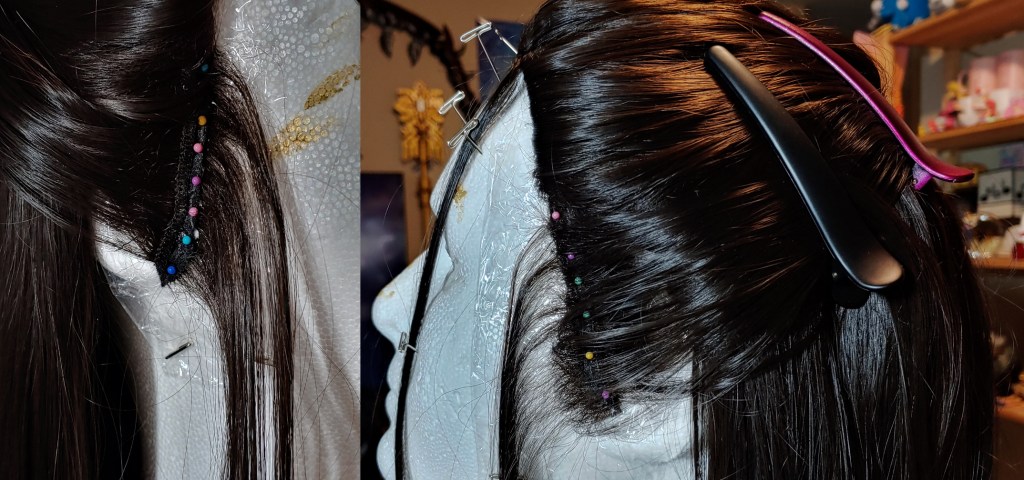
Tying the ponytail
Tying the ponytail seems as easy as clipping the previous elastic and tying everything together. But since the current ponytail is already sized for your head, we can do it an easier way to ensure that the ponytail fits properly. I learned this trick from a few expert wig stylers.
Leaving the current elastic as is, pin the wig to the wig head, dropping two pins along the front edge of each sideburn as well. Without tugging, draw the sideburn hair back, smoothing it out with your hand. Clip it down to the wig with a large alligator clip as you do the same for the other sideburn.

Once you’ve gathered all the sideburn hair, tie the hair to the ponytail using elastic at about the same place as the current ponytail elastic. This ensures the ponytail fits and does not squeeze your head when you wear it.
Adding lace
No matter how much we want this wig to magically sit against our face, it just doesn’t work that way. So we’ll need something to use that can adhere to wig glue, wig tape, or other adhesives to keep the sideburns from moving and rubbing against your ears.
You can buy wig lace, though it can be a little hard to find at times. If you cannot find it, buy some soft tulle with small holes. You can find it at fabric stores. Just make sure it is soft and matches close to your skin tone, close enough that it fools the eye at the distance that this is material and not skin.
Cut a square of wig lace. It should be wider than the sideburn and slightly taller. It can stay square as you’ll trim it later.
Pin the wig to the wig head but leave the sideburns unpinned. Pull the sideburn up and scribble glue on the bottom of the sideburn to the height of your cut lace. Place the lace against the glue, lining the lace up with the ear-side of the sideburn and letting it hang over the bottom and front side.
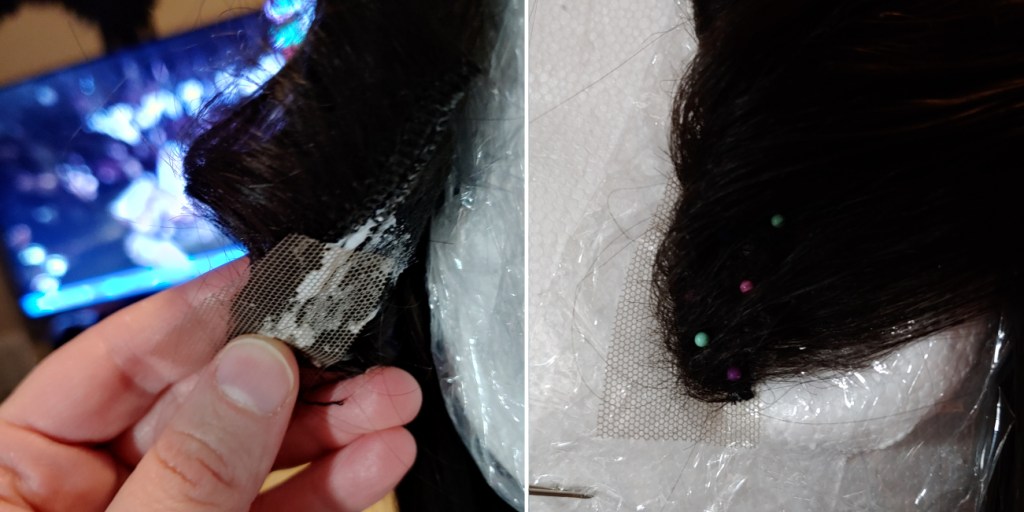
Once you have it in place (you can readjust it now as the glue hasn’t set), press the sideburn down against the wig head and pin it in place. Use a lot of pins, making sure to pin the edges and a few along the interior of the sideburn. Ball-head pins work great here as they don’t tangle with the hair fibers.
After about 15 minutes, remove the pins and wedge the sideburn off the wig head and plastic, leaving it to hang for a bit and dry underneath.
Repeat for both sides. Trim the lace as necessary, leaving about 1/8″ to 1/4″ on the side for the wig glue or wig tape. And now you’re done! You have your own sideburns!

I hope you like this tutorial! It’s a great way to add more sideburns to cover your own (I have troublesome ones myself) or to give yourself those oversized C-drama sideburns their historical drama wigs tend to have.
Let me know what wigs you decide to modify and for which characters! @ me on social media so I can admire your work!
