I love a good sailor-collared school uniform cosplay, but sometimes, premade cosplays or commercial patterns don’t fit properly. Or perhaps you’re like me and struggle with side zippers. Fortunately, if you find that absolutely perfect tailored dress shirt pattern, you can transform it into a sailor-collared front-zip school uniform with a little bit of pattern magic.
This tutorial requires you to have two patterns to start
- A favorite dress shirt or tailored pattern with single pattern-piece sleeves
- A sailor collar pattern
Though this tutorial won’t go over it, you can make your own sailor collar pattern as well. For simplicity’s sake, I’ll be using a commercial collar pattern.
This transformation method works best if you have a long tie, a sweater, or a vest that covers the front seam. The zipper should be hidden to complete the transformation. Part of it may show if you lean and the tie shifts, or you take off the sweater, but for the most part, the idea of magic is to hide how you did it.
Skill level: intermediate
Cost: moderate (for pattern and materials)
Materials:
- Enough fabric to make a waist-length shirt with sleeves (according to the pattern envelope for the dress shirt)
- Extra fabric for large puff sleeves (as needed)
- Collar fabric. A lined collar takes about 1y of fabric
- Collar ribbon, about 1 spool of ¼” width (as needed for collar stripes)
- Fabric for the tie (about ½ – 1y)
- 8 snap pairs or some ribbon to hold up the collar tie or extra ribbon to tie the tie under the collar
- 1 separating zipper. The length will vary. Mine was 14″ but I am long-waisted.
Supplies:
- A dress shirt or similar pattern with sleeves that you really like how it fits
- A sailor collar pattern (or one you made yourself)
- Sewing machine with universal sewing needle
- Matching thread for your fabric colors
- Fabric scissors
- Pinking shears (recommended)
- Printer paper to make patterns
- Pens or pencils for fabric marking and patternmaking
- Paper scissors (please don’t use your fabric scissors!)
- Tailor’s ruler or a clear ruler for adding seams
- Hand-sewing needle for snaps (as needed)
- Point turner
What dress shirt patterns work?

When picking out a dress shirt pattern, you want to find something that is flattering for your figure. For the most part, you want to look for something that is A-line or princess seams as that flatters a large number of body types. If you are curvier, look for a plus line that is more suited to curvy and plus-size body types.
The second thing to look for is that the pattern has sleeves made of a single piece. Seems like a no-brainer when working with dress shirt patterns, but the reasoning is this. Body patterns have a certain make to them depending on whether the pattern has sleeves or not (and even what type of sleeves). This determines how closely the body of the garment sits against your shoulders and your range of motion when wearing it. Having a garment with a sleeve in a single piece is going to give you the best range of motion and ease along the shoulders when wearing it.
My go-to dress shirt pattern is McCall’s M6124. It has a plus-size variant, which is great for pear-shaped bodies but also has a standard-size line to fit smaller forms.

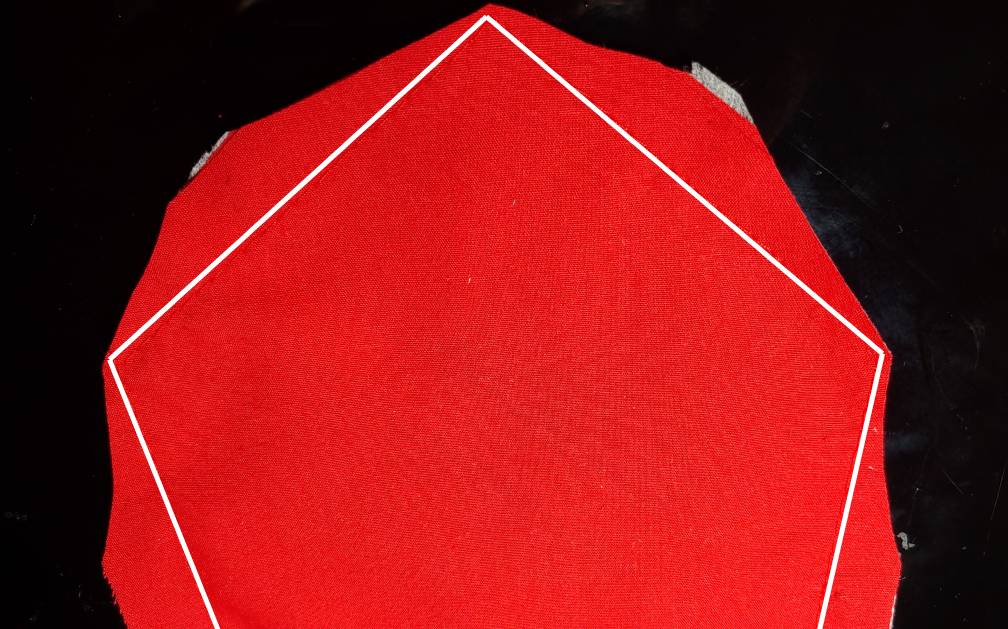
For the sailor collar, really any will do. You want one that looks like it could be straight out of an anime. The collar is square in the back and appears to be more triangular in the front (the front of the collar is slightly curved along the outer seam). A wider collar will do you better when patterning out where it should sit against your modified dress shirt pattern. My go-to pattern is Simplicity 8481, but there are probably a dozen commercial patterns out there with a good collar pattern. You can also check Etsy to support a fellow crafter!
Creating the base
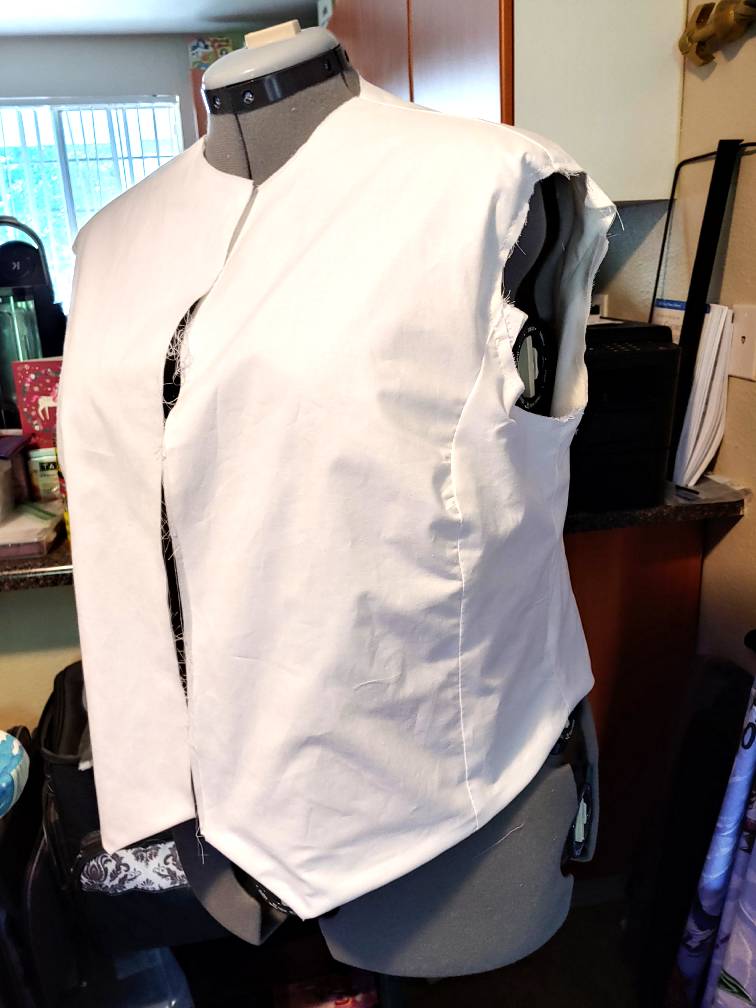
The base of this seifuku is just the body of the shirt pattern without sleeves! Simply follow your pattern’s instructions to sew the pieces of the body together, ironing the seams flat so the shirt sits nice and proper.
But that’s where you stop. Don’t attach the collar, buttons, or sleeves. Instead, the only seam you should finish is the bottom hem as it’s much easier to finish this right now.
If you are working with white cotton for your shirt, I recommend lining your shirt! Cotton is notoriously thin and you don’t want to show your underwear to everyone in cosplay. You can use cotton or muslin lining to keep cool if needed (my go-to is muslin).
When using lining, only sew the two pieces at the bottom hem together. Baste the two layers together at the armhole, collar, and front opening to prevent them from moving while you work.
If you are not using lining I recommend pinking raw seams on the body to prevent fraying along the princess seams (if you have them) and the side seams. You can additionally pink the raw armhole, center, and neckline edges if desired or pink them once you’re done!
Sewing the collar
Much like the shirt, you can follow your pattern to sew the collar. I recommend using a lined collar so that if the wind flips it up, the collar looks nice and uniform underneath too.
If you haven’t made a sailor collar before, check out my full tutorial on how to sew it and add evenly-spaced stripes: Adding stripes to a lined sailor collar!
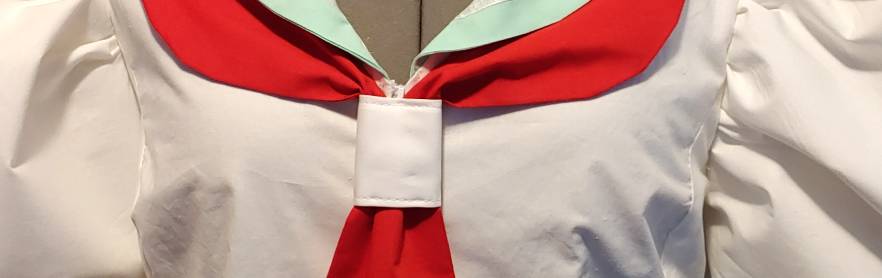
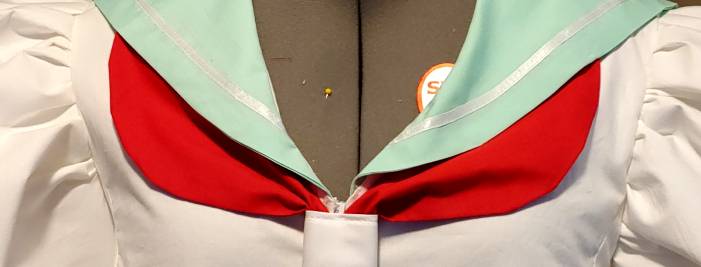
Attaching the collar
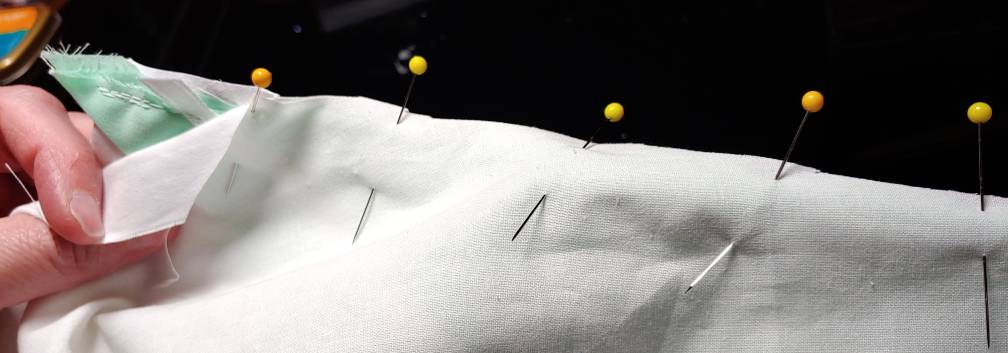
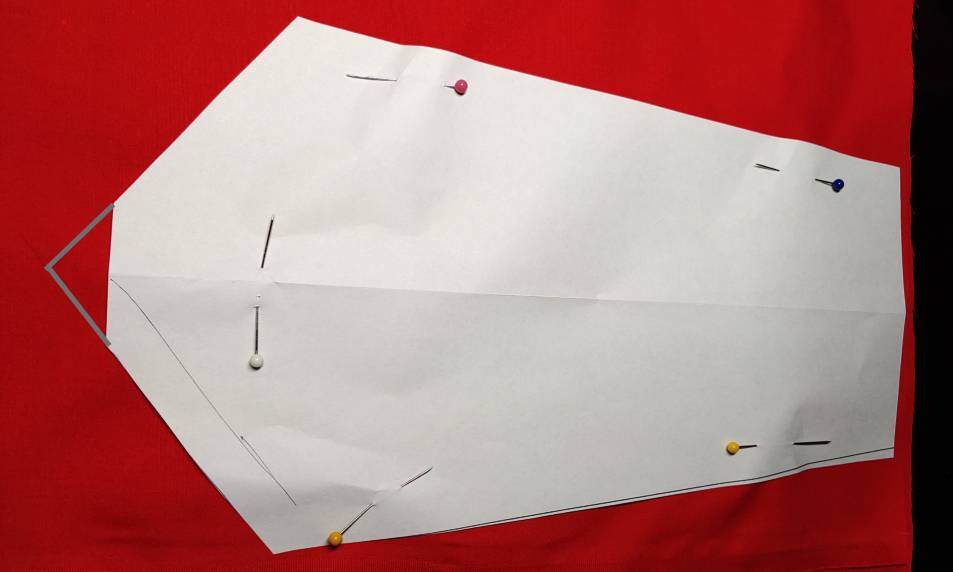
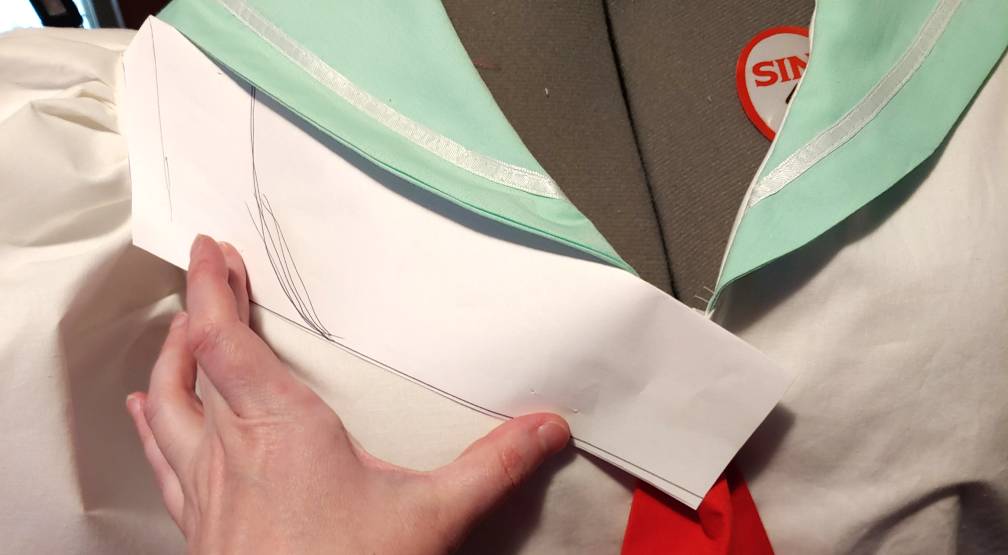
Since the neckline of the sailor collar doesn’t match up with the shirt’s neckline, we’ll need to modify the shirt to match the collar. Instead of taking measurements or guessing, we’re going to make the collar and shirt fit exactly together. You’ll want a dress form, body double, or another warm body to make this easier to match up
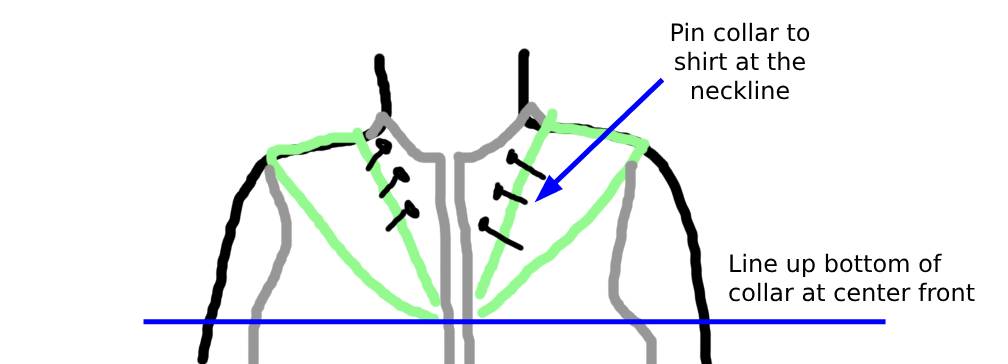
Start by folding the collar in half and marking the center back. With the collar stripes up, match the center back of the collar to the center back of the shirt and pin the two together. For simplicity’s sake, if you’re using lining, pin the two layers of the shirt and the collar together.
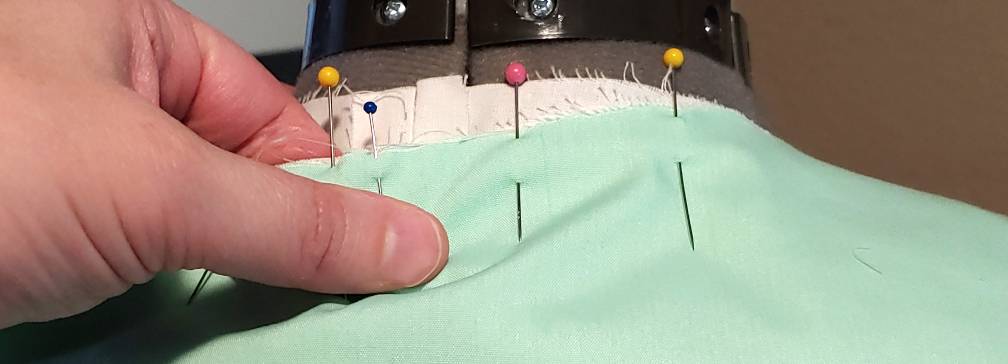
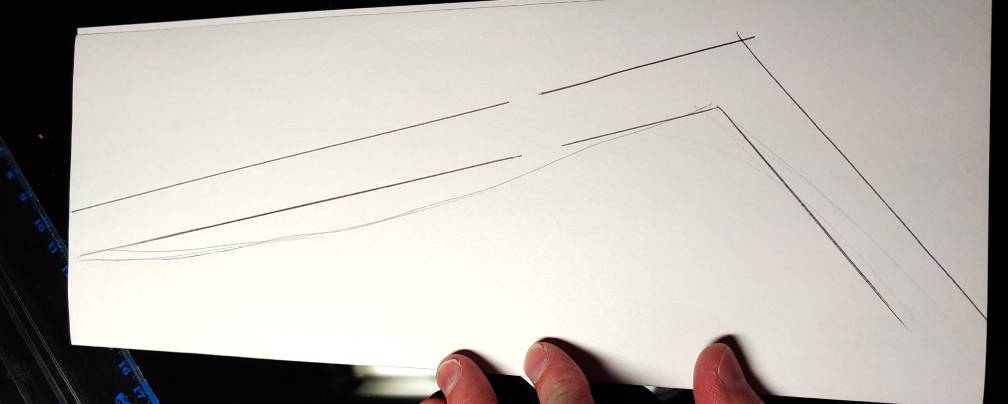
Smooth the collar out flat over the shoulders, bringing the points of the collar to meet at the center front opening. Pin the collar down to the shirt, making sure all the layers are smooth when you do this. My photos came out blurry, so here’s a non-blurry doodle of how to do this:
Now that all the layers are pinned, you can optionally baste the layers together before sewing a straight stitch along the neckline at a 5/8″ seam allowance using thread that matches your collar. If you want to use an optional yoke, simply baste the pieces together and hop to the next section. I recommend using a yoke since it’ll make the inside of your collar look much cleaner and more uniform.

Optional yoke
If you do not want the inside of your collar showing, you can add an optional yoke on the inside. You can use the lining of your shirt to do this as well, but the easiest method is to just use your collar pattern piece! Cut a singular collar piece out of your sailor collar pattern in the same color as your shirt. Add some extra room at the bottom points of the collar to give yourself more fabric to work with.
With the shirt inside out, place the yoke collar over the sailor collar and pin the layers together. the wrong side of the yoke fabric should be facing the right side of the collar with the stripes on it. This sandwiches the sailor collar in between the yoke and the shirt.
Sew a straight stitch at 5/8″ seam allowance to secure all the layers together.
Finishing the collar
Trim the excess shirt off the neckline and optionally pink the edges. Along the curve of the neck, clip the curve so the collar sits evenly along your neck.
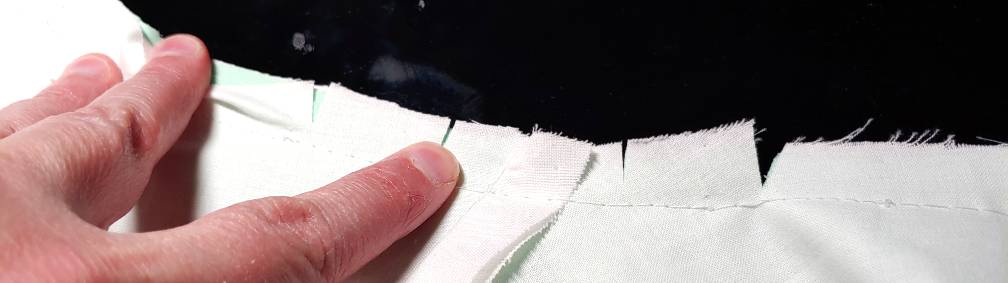
Flip the shirt right-side out and fold the neckline down toward the inside of the fabric, using the stitch along the collar as a guideline where to fold. Iron the collar flat.
To fully secure the collar, stitch along the shirt just under the collar in the same color thread as the shirt to keep the neckline edge from flipping up.
Attach your sleeves like normal. Make sure your armhole seam is on the inside of the shirt. A reminder to always check when attaching sleeves.
Adding the zipper
Now it’s time to add the zipper! If you’ve added a separating zipper into a jacket or other garment before, this should feel familiar!
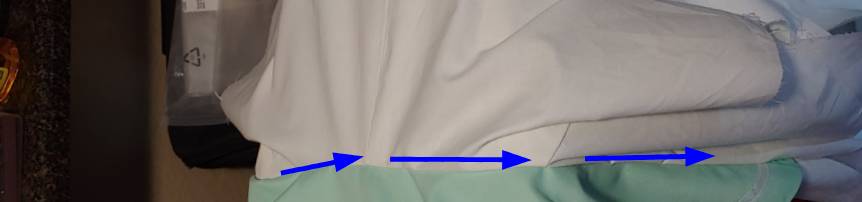
Pink the edge of the front center edge if desired. Fold the front edge over at approximately 1/2″ or so (it’s easier to measure 1/2″ instead of 5/8″ for your seam with a regular ruler! A sewing gauge will make this super easy) and iron flat to keep it in place while you work. Pin one half of the zipper to the front of the shirt, lining the bottom opening with the bottom of your shirt.
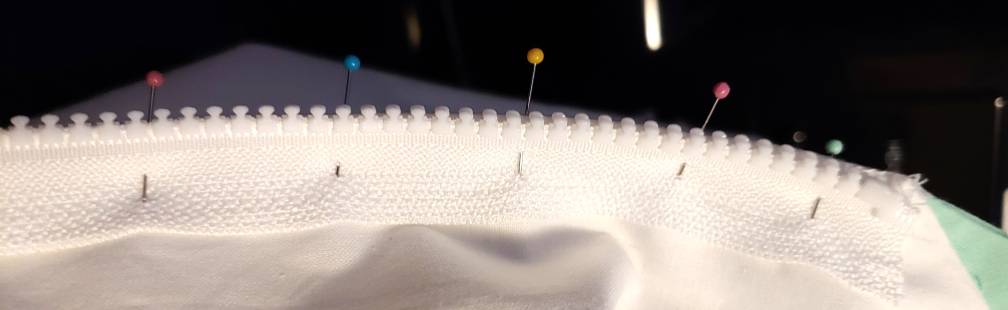
Trip the top of the zipper facing off if desired or if it sticks up over the top of the neckline. You’ll want to get the teeth close to the front hem without overlapping too much to hide the zipper as much as possible.

Sew the zipper down on this side.
Now for the other side, you’ll want to repeat the process. When pinning the other half of the zipper, double-check to make sure the front seam lines up at the collar. You want to make sure your collar is nice and even at the neck. You’ll also want to check the bottom edge to make sure that lines up too and you have a nice even shirt.
Once satisfied, sew the zipper down and you have a zipper shirt!
Adding a tie
Ohtori Academy’s tie is much closer to a tie, but this process can be used to add a more common style sailor collar tie as well.
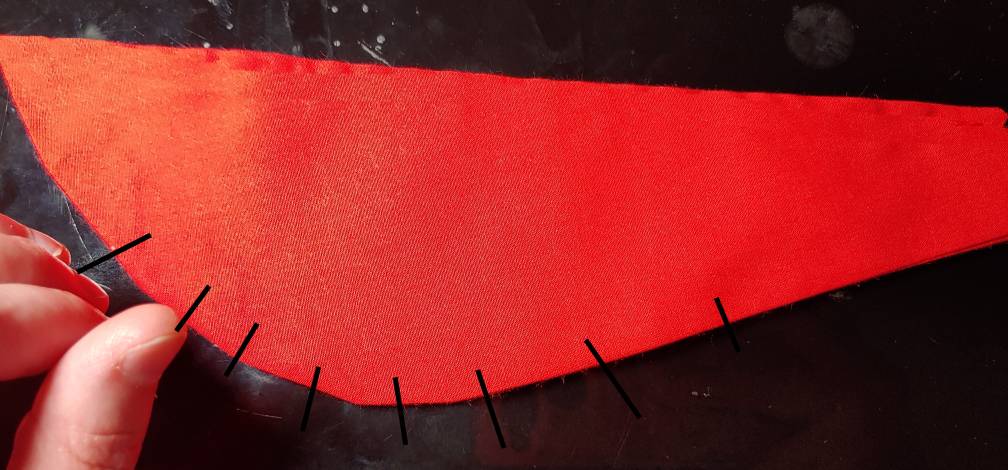
First, it’s time to make a pattern. Fold a piece of paper in half and sketch out the shape of the tie at the size you want. Ideally, the tie should cover most if not all of the zipper to create the illusion of a pull-over shirt. Make sure the top of the tie is a bit wider than what you want the final tie to look like. We’ll be scrunching it smaller later.

Using a ruler, add a 5/8″ seam allowance to the edges (except the top). If you do not have a tailor’s ruler, adding a 1/2″ seam allowance works just fine!
With the paper still folded, cut the tie out then unfold the piece of paper. For each tie you want, cut two pieces of fabric. For the double tie (which is pretty common for a lot of anime seifuku), you’ll want to cut out four pieces to make two ties. For the Ohtori Academy tie, I cut out two pieces as it’s a singular tie.
Ohtori Academy’s tie has a stripe through it, so if you need a stripe, now’s the time to add it. Pin a stripe of ribbon across the tie and carefully sew the edges down. If you need help with sewing the ribbon, you can check out my full tutorial about ribbon: Adding stripes and details with satin ribbon.

At this point also, if you need a very stiff tie, iron interfacing to the wrong side of one of the tie pieces, doesn’t matter which one. You can use the tie pattern to cut your interfacing.
Now that all the prep work is done, it’s time to sew the ties together. Sew a straight stitch along all edges except for the top at 5/8″ or 1/2″ seam allowance, whichever you added during drafting. Clip the corners and curves to reduce bulk inside the tie.
Turn the tie right-side out, pushing all the fabric through the top hole. Using your point turner, smooth out any corners and edges, and iron the tie flat.
Pin the tie to the front of the shirt at the base of the neckline. Take another piece of paper and hold it up against the collar to trace the drape of the neck scarf. You can make it more like an actual scarf, but faking it is much easier.
When holding the paper up, you should hold it to the base of the collar, unlike what I have here. This ended up too short so I had to adjust later on (I’ll tell you how I fixed mine in case you mess up too!).
Add seam allowance to the edges of this scarf much like you did for the front tie then cut out 4 copies of this pattern, 2 for each side. For each side, sew the two pieces wrong-sides together, leaving the neckline open. This makes flipping and straightening the scarf much easier.
Once sewn, clip the curve on the outside seam and flip right-side out. Use the point turner to push the curve out and iron flat.
For the neckline, turn the top edge on both layers in towards the center then iron flat. Add a straight stitch along this edge to keep the layers from moving. Repeat for both scarf pieces.
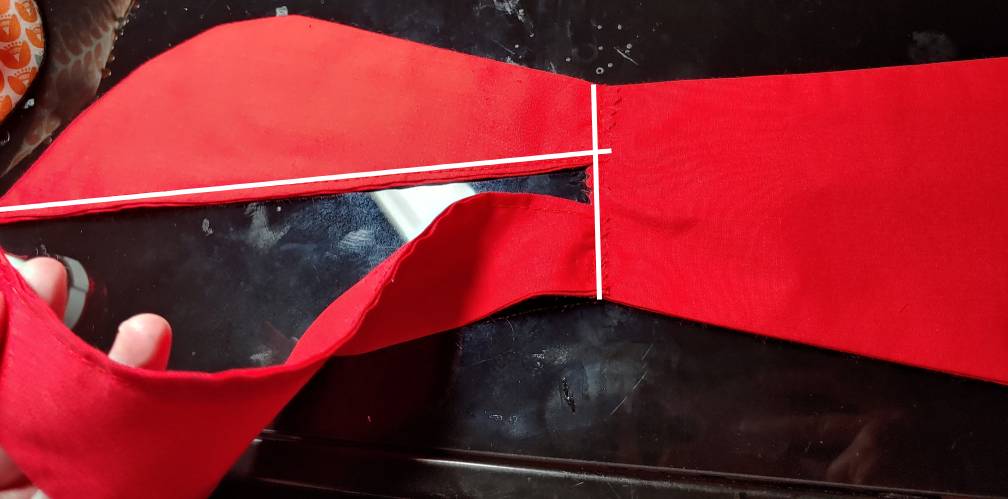
Optionally pink bott the scarf bottom and tie top to prevent fraying. Match the bottom of the scarf to the top of the tie. Sew the scarf behind the tie.
Thread a hand needle, and do a few loose stitches along the top of the tie. Pull the thread to draw the tie together to look like it’s a tied scarf.

Last we need the tie-tie? A tie for a tie. It’s the wrap that goes around the scarf and the tie in the front center. This tie-tie will cover the seams where you connected all the pieces together and further help hide the zipper underneath.
You can use bias tape or wide ribbon, but as the Ohtori Academy tie uses a rather large tie-tie, I’m going to make this one rather meaty. You can use the same technique for any size tie-tie you’d like.
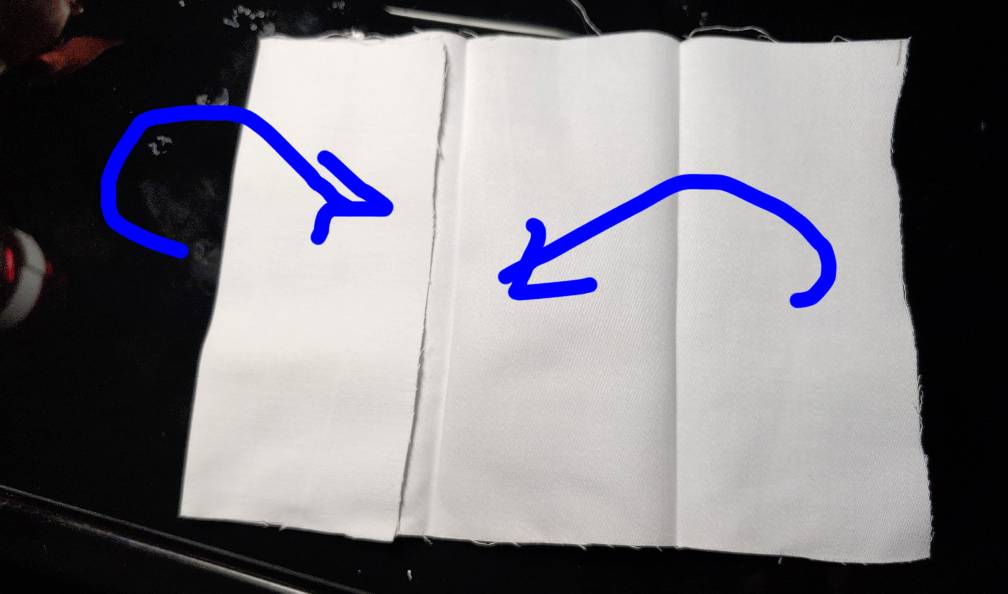
Determine the size of the tie-tie you want and then quadruple. For mine, I used a 2″ tie, so my fabric was 8″ wide. Cut a strip of fabric out at that width a few inches long. You can trim it down later. But to start, we’re going to essentially make double-fold bias tape to make a nice smooth tie-tie.
Start by folding your tie-tie fabric in half and ironing a crease. Now open up the half and fold either side in half, meeting at the center crease, and ironing those edges. Finish up by folding the fabric sandwich back over at the center crease and give it a firm iron.
Use a small straight stitch and stitch up the sides of your folds using matching thread to keep the double-fold tie-tie from untying on your cosplay.
Place the tie-tie around the center of your tie along the seam line and pin the two sides together in the back of your tie. It should be tight enough that the tie-tie doesn’t slip but loose enough that you can flip it right-side out later. Stitch the tie-tie by hand only to itself and not to the tie. Stitching on a machine is difficult with the bulk, so by hand is recommended.

Cut the excess off the tie-tie using scissors or pinking sheers. Carefully tuck the loose ends inside the tie-tie, flipping it right-side out and hiding the back of the tie-tie.
If you notice the tie-tie is slipping, tack the tie-tie to the back of the tie using a few tack stitches by hand.
Attaching the tie set
At this point, it’s a tie set. We have too many words. Regardless, ideally, you could sew some ribbon or bias tape to the tie set and have it snap or velcro in the back underneath the sailor collar.
But more likely you’re like me and the final tie didn’t actually end up large enough to make that work. It happens to the best of us. So we’ll fake it til it looks right.
The entire tie set is held on by a set of snaps hidden underneath the collar and holding the tie set in place. Because I also didn’t want the collar to go flapping when it caught a breeze, I added a second set of snaps underneath the tie set, attaching that to the shirt itself.

To create this chain of snaps, start by sewing one side of the snap on the front-facing side of the tie set near the edge of the tie. Hold the tie set up to the shirt where you want to attach the tie set underneath the collar. Mine sits nearly 1″ under the collar at the end.
With a pencil, lightly mark where the snaps sit along the collar. Sew the snaps to the collar but only the bottom layer. To do this, you can pull the two layers apart with your fingers and sew the snap with a whip stitch. Snap the tie together and make sure it sits how you want it.
Now optionally you can add the second set of snaps to prevent a flappy collar. Unsnap the tie set from the collar. On the back of the tie set, sew a snap that’s near the previous snaps but not in the same position. Sewing two snaps on top of each other is kind of a pain, so staggering them just a bit makes sewing much easier.
Snap the tie set back to the collar and lightly mark with a pencil where the tie set snaps meet the shirt. Remove the tie set and sew the snaps at your mark to complete the set. Snap everything together to make sure that the tie, collar, and shirt all sit nice and evenly. You can always readjust if something is slightly crooked.
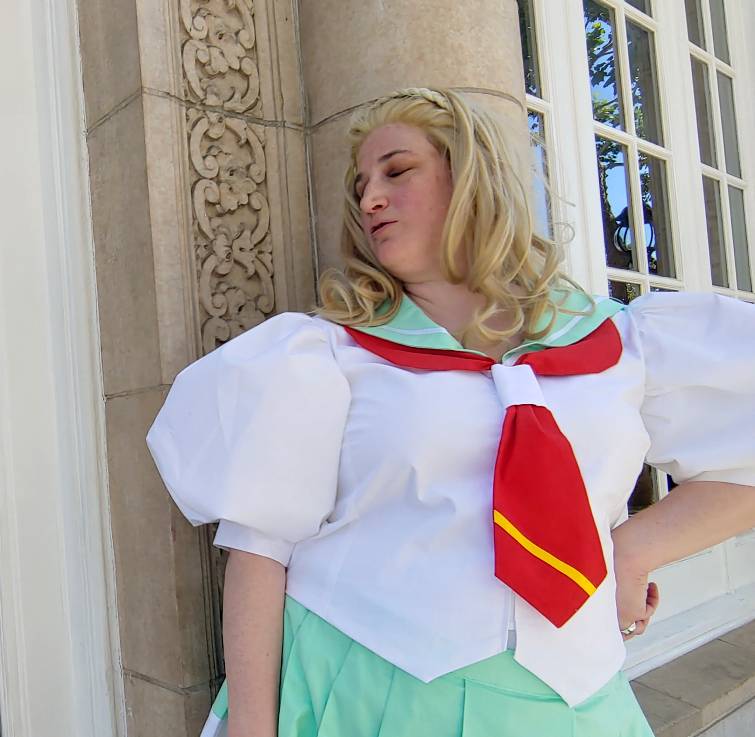
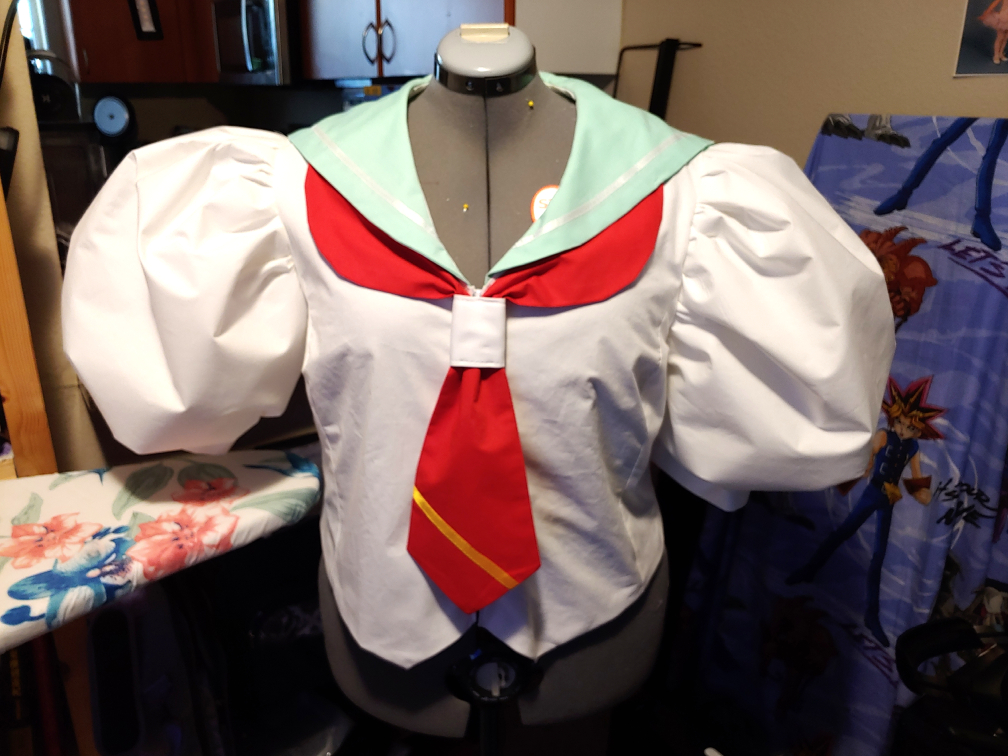
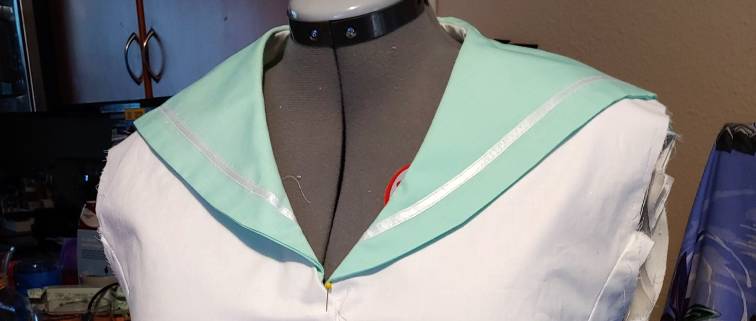
And there you have it! How to turn your favorite dress shirt pattern into a sailor-collared seifuku! This works for all sorts of styles, including the giant puffy-sleeved Ohtori seifuku I’ve made here. I plan on using this for a few more in the future as it’s so easy to get dressed and fits me perfectly. So go feel glamorous with your perfectly tailored seifuku!
Let me know what seifuku you make with this tutorial! I’d love to see all the styles. @ me on social media so I can admire your work!
