When I set out to make a transformation dress, I wanted it to not be obvious it was a transformation dress. There aren’t a lot of tutorials floating around, and none for making a short transformation dress that transforms into an equally short dress.
Transformation dresses work by concealing the inside dress completely inside the outer dress (and sometimes cloaks!). The shirt is torn away either by velcro, snaps, or a cord and falls down under a longer skirt.
However, that doesn’t work when the concealed dress is also short. The torn-away top of the transformation dress has nowhere to hide and so it’s visible underneath the concealed skirt.
So cue the tear-away dress. This dress is actually two pieces – a tear-away shirt and a fully stationary skirt – plus a jacket to hide the velcro along the seams to complete the illusion.
When I revealed this in a video, no one knew what the dress’s “secret” was, and now you can be in on the secret too.
This works best when you have a jacket or the like to hide the seams plus a skirt that is slightly longer for the revealed dress underneath.
Skill level: intermediate
Cost: moderate. Depends on how much fabric you need for the outer dress
Materials:
- Skirt pattern (shorter than the concealed dress skirt)
- Shirt or top pattern. Shirt needs to have short sleeves, body extending past the waist, and have some tailoring to it.
- Enough fabric to make the skirt pattern at normal size
- Enough fabric to make the jacket and shirt 1 size larger than normal
- Muslin or scrap fabric to make the shirt 1x larger than normal. For patterning.
- Velcro
Supplies:
- Sewing machine with standard needle and matching thread
- Hand sewing needle (optional to hide stitches in the collar)
- Stick pins
- Pens/pencils to mark patterns as needed
- Tailor’s ruler or clear ruler
- Seam ripper
- Fabric scissors
- Serger, overlock stitch, or bias tape to prevent fraying at the velcro seams. The first two are highly recommended. Pinking shears may not be enough for the stress of a velcro seam.
- Iron with an ironing board, pad, or thick towel
What works best for the concealed dress?

Designing the concealed dress is almost as important as designing the transformation dress on top. The dress needs to be relatively lightweight and able to be squished without damaging the fabric. The dress should also be free of things that catch on each other like sequins or appliques. Some are fine, as your movement will smooth the skirt out, but an entirely sequined dress will catch during the big reveal.
Smooth fabrics are also good. Cotton, dress fabrics like taffeta or satins (nice satins, cheap ones will crinkle), and other similar fabrics should work great.
If your dress has anything which hangs down from the skirt’s edge, it’ll conceal the transformation even more. Just make sure it won’t get tangled with itself.
Patterning
Patterning ensures you can stuff the full dress underneath the tear-away shirt and hold it there. This step also helps if you want to modify the pattern further to create designs or tailor it even more. You do not need to sew the velcro into the pattern. You can use safety pins or straight pins instead. All of my photos will have the velcro sewn in for testing.
Patterning the body
When patterning the body, there are a few things to keep in mind
- There is no need for a front or back closure
- The closures for the shirt will be on the side
- You can have a collar in this pattern but it cannot be a standing collar
- The pattern will likely need to be 1 size larger than normal (if not more. depends on skirt bulk)
To remove the front or back closure, Cut the pattern out as normal at 1x larger size than you would normally wear and sew the closure shut using a standard 5/8″ seam allowance.
Next, sew up any darts as the pattern instructs. Leave the side and shoulder seams open. The velcro will go here in the final version of the tear-away shirt. Now, it’s time to roll up the skirt.
Place the hidden dress on the dress form and pad it up with a bra as needed to get accurate sizing. Roll up the skirt. You’ll likely have more rolling in the front to account for a bust. Tuck the skirt underneath the bust and pin it in place. The back can sit higher since you don’t have to worry about a bust in the way.
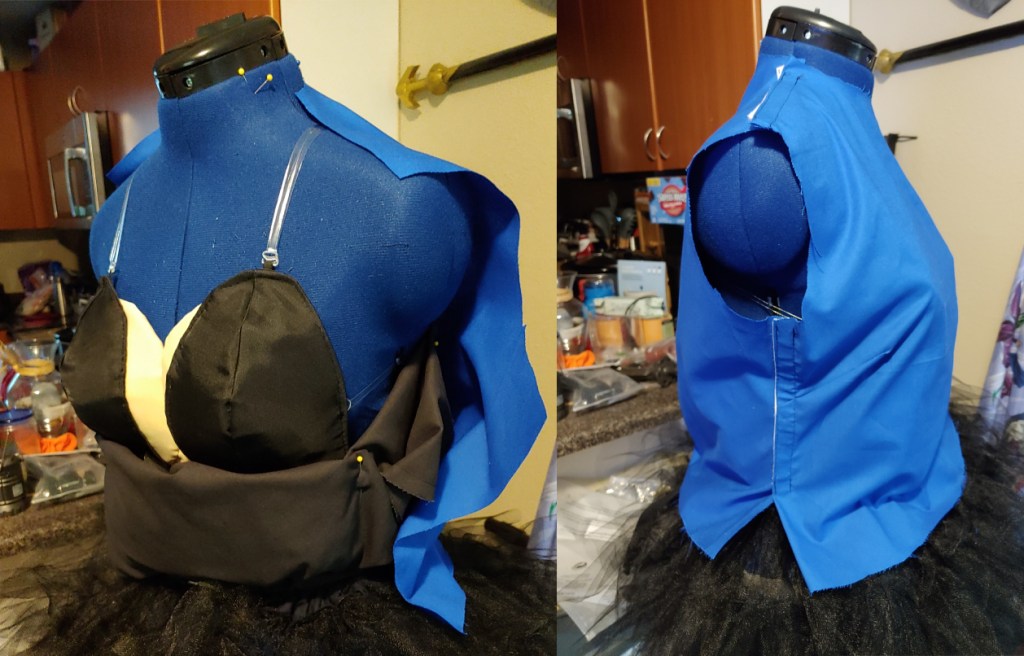
Place the front and back pieces of the shirt on the dress form, overlapping them by about 1″ and pinning them in place. You can also sew velcro along the shoulder and side seams. Place the velcro flush against the raw edge and sew them down. The back should have the rough velcro facing up while the front has the soft velcro facing down. We’ll go into this in more detail with the final construction.
The shirt should sit comfortably against the body. Add any darts into the body to shape it as needed or take in any seam lines to make the shirt fit snugly. The shirt shouldn’t be so tight you can tell something is underneath it but so loose it looks baggy and doesn’t hold the shirt inside. The waist is the important part as that is what traps the skirt underneath.
Add any color blocking or pattern notes at this time as well. For Rue, I created a low-cut vest pattern and a v-shaped collar into the shirt. When I cut these out later, I added seam allowance and sewed the vest and shirt pieces together to make a singular solid shirt.
Adding sleeves
While you could keep the shirt sleeveless underneath, adding the sleeves help complete the illusion that this is just an ordinary dress, nothing unusual about it.
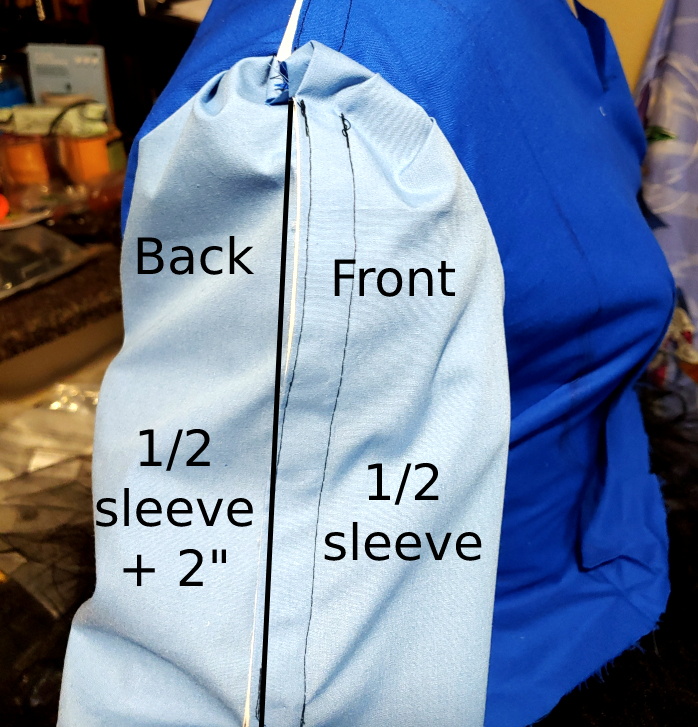
Sleeves are a little trickier, as they are not 100% equal on the front and back of a shirt. So we have to fake it to make a sleeve split up the center.
Fold your sleeve pattern in half.
The front sleeve will be exactly half the sleeve pattern.
The back sleeve will be that half plus about 1-2″. I found 2″ to be the most comfortable for getting the velcro on and allowing for the most movement for your arm.
Cut out one sleeve pair (you only need one pair for testing a pattern), labeling which piece is front and back. Sew the front piece to the front of the shirt with the back piece to the back. Pin the sleeves together at the gap, overlapping about an inch to allow for velcro placement later.
Adding a collar
You can have a collar in a tear-away dress! The best type of collar for the job is one that sits flush against the body and is one singular piece. Multi-part or standing collars are difficult as they do not work with velcro along the neckline.
If your pattern has a collar already matching your neckline, you’re pretty much good to go. but if you need one yourself, it’s time to make a simple collar.
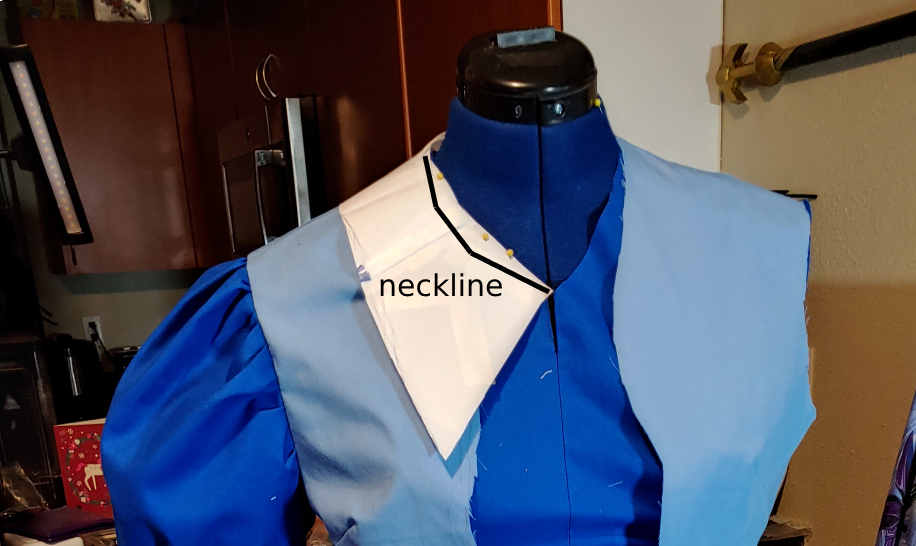
For a collar pattern, you want the collar to sit slightly higher than the neckline will. This means that the neckline will sit hidden underneath the collar, so if you shift, it doesn’t show at all. And shirts do shift on bodies because bodies move!
Once patterned, add 1-2″ at the front to allow for extra fabric as needed. I found the collar pattern to be too short the first time, so extra is good!
Final pieces
Once you’re satisfied with the fit and positioning, it’s time to pull everything apart with a seam ripper (aside from the center back or front closure seams). Label all your pieces with a pen. Remove any velcro pieces and set them aside for later. If you added darts, mark those on the pattern as well.
Sewing the two halves
Now’s the fun part. It’s time to assemble the outfit. Cut out your front and back pieces, and let’s get sewing.
Connect your front sleeves to the front shirt and the back sleeves to the back shirt. Finish the raw edges along the shoulders and side seams with your method of choice. I finished mine off with a 4-strand serged stitch. Wrapping bias tape around the edges works as well. These seams will be hidden, but they need to withstand yanking when the shirt is pulled apart.

Iron the bottom edge of the sleeve up and stitch the cuff down flat, making sure the front and back halves of the sleeve match up. I used the serged stitch as a guide to ensure both sides were even.
Sewing the collar
Sew the collar itself normally. Add light interfacing to preserve the shape, sew the right sides together, clip the corners as needed, then flip it right-side out. You can optionally pink or serge the raw edges to prevent fraying. You will be pulling on the collar during the transformation, so it is recommended to finish your edge here.
Take the back shirt. Lay the underside of the collar on the right side of the shirt, matching the collar’s center to the shirt’s center. Sew the two pieces together. Flip the collar inward towards the wrong side of the shirt and iron it down flat. Use a stay stitch to keep the collar flipped downward (but only sew through the shirt and the top edge of the collar)

Once the collar is secured to the shirt, iron the rest of the seam down to form a hem along the unattached section of the collar. To make the hem invisible, take a hand-sewing needle and use a blind stitch (stitch only in the lower layers and not the topmost) stitches to keep it secure. If you do not care about hiding stitches, use a machine to stitch the hem down for you.
This is not a typical way to attach a collar, but with this particular method, the collar will appear to lay flat against your body and hide the velcro underneath. It also makes the collar very easy to grab and remove during the transformation.
Finishing the neckline
Regardless of having a collar or not, you need a finished neckline. Fold the neckline down, using the iron to smooth it out and make it lay flat. The standard hem allowance is 5/8″ but your hem allowance may be larger or smaller depending on your pattern.
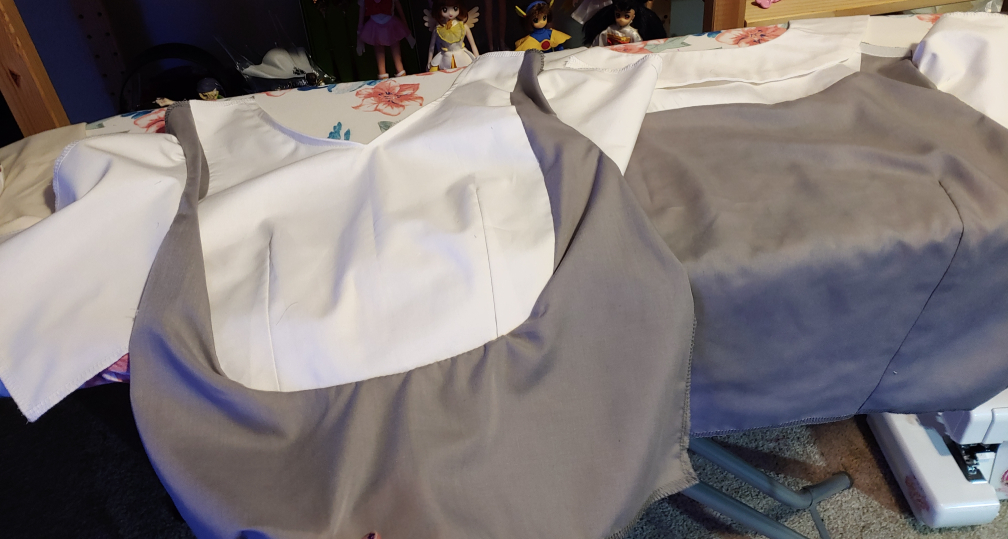
Finished pieces
Here are the two finished pieces for Rue, front and back. The edges are all serged to keep them from fraying and the collar is attached only to the back part. As she wears a vest, I split the front and back up into two pieces and sewed the two colors together. By sewing everything together, it makes the transformation and tear-away much easier to perform without worrying about layers of shirt or vest in the process.
Now it’s time to make transformation magic happen.
Adding velcro
The magic of this transformation build is the velcro. Velcro is strong enough to withstand movement and stick together, but also not too strong that it cannot be yanked during the tear-away transformation. You have a small edge to grip and pull, and that edge is hidden by the jacket worn over it. Velcro is also relatively cheap and easier to handle than laces.
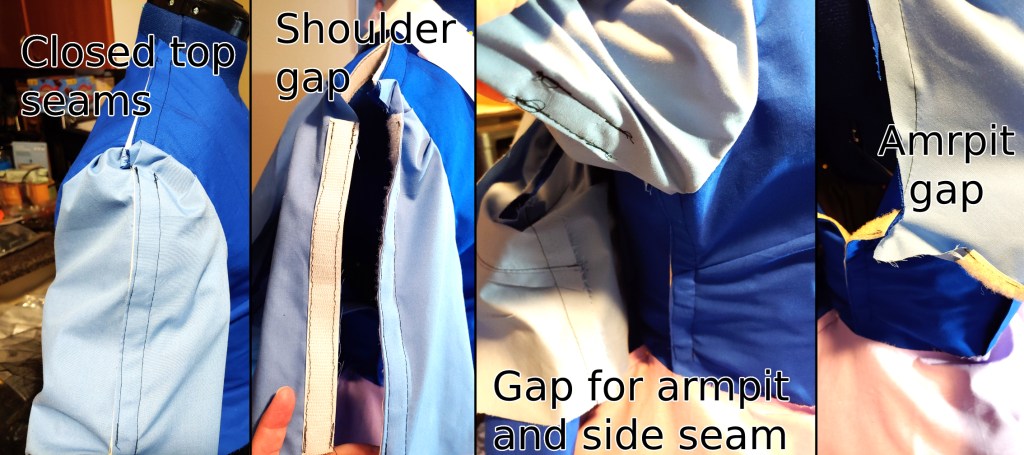
To hide the velcro from the front, even when the jacket is removed, the velcro is placed in a specific location to complete the illusion. Start with the shoulder seam, as that’s the shortest and easiest to work with.
Cut a piece of velcro long enough to reach from the sleeve seam to nearly the neckline, leaving yourself a small bit of room no longer than 1/2″ from the neckline. If you have a collar, this gap will be hidden. If you do not, you may want to take the velcro close to the neckline. Velcro is itchy so make sure the edges won’t scratch you while wearing it.

Start with the backside, placing the rough velcro flush against the edge on the right side of the fabric. Pin and sew it.
For the front side, fold the fabric back towards the wrong side of the fabric then pin the velcro over that fold. Make sure that the edge of the velcro sits flush against the edge of the fabric. Pin and sew down using a sewing machine. As the stitches will be visible along the shoulder, you can use multiple colors of thread to match your fabric and hide the stitches as much as possible. For Rue, I sewed in both white and gray to match the fabric.
The other seams require gaps to ensure you don’t jab yourself in the armpit with velcro or hinder your movements.
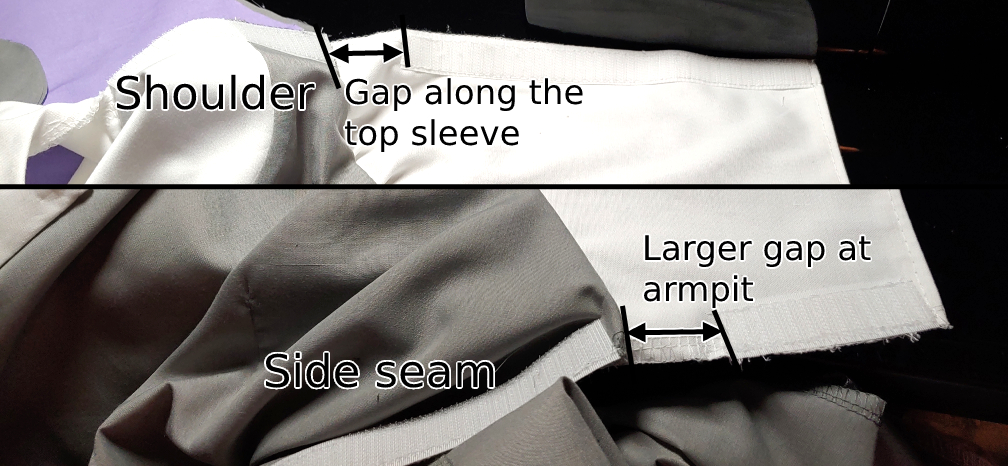
Add a small gap along the top of the sleeve, approximately 1/2″, to allow for movement of your arm. A solid piece of velcro here could hinder and dig into your shoulder.
Add a small gap on the side seam, about 1/4 – 1/2″, below the sleeve seam. This prevents any jabbing in your armpit as you shift and move in the shirt.
Add a larger gap at the armpit along the sleeve, about 1″ or so, to ensure that when you put your arms down, the velcro doesn’t go right into the armpit and scratch at you. No one wants a scratchy armpit.
All of these velcro placements are sewn exactly like the shoulder seam before, with the rough pieces placed on the right side of the back piece and the soft velcro placed on a fold on the front piece. The velcro should be placed in the same direction and manner for all pieces of velcro else it will be incredibly difficult to pull the shirt off.
Velcro collar
Collar velcro is actually much easier than you think. A full strip of velcro is difficult due to the curve of a collar and you also really don’t want velcro scratching against your neck. You only need a small square of velcro to make this work.
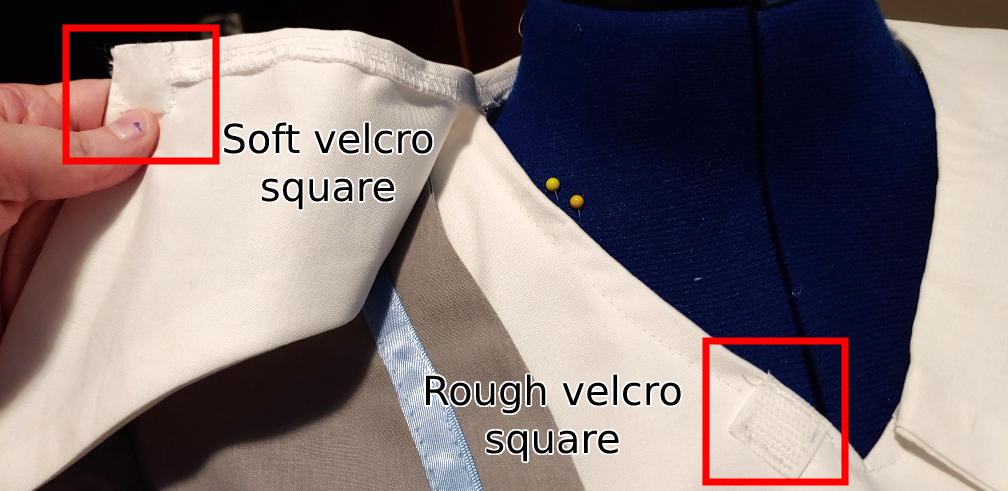
Take a small square and place the soft fuzzy side against the underside of the collar, sewing it down with a whip stitch to keep it invisible from the outside.
Lay the collar flat against the neckline in a comfortable position and lightly mark where the velcro sits on the neckline with a pencil. The neckline will dip beneath the collar so mark it in the closest location the collar sits without tugging on it. Sew the rough velcro square to the neckline using a sewing machine or a hand-sewing needle.
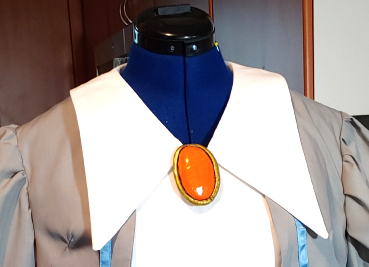
There may be a gap in the collar pieces. Pin a brooch or decoration in the center to conceal the gap as needed for your cosplay. If you pin or fix something to the neckline, make sure it is lightweight and will not break when you tear the shirt apart. For placement, ensure that the decoration does not hinder your hands and you can still reach the collar. You can pull at the collar itself instead of the velcro piece during the transformation.
Tucking everything up
And that’s it. That’s how you make a tear-away transformation shirt. Simply add a skirt and jacket to your liking and prepare to wow people with your transformation.
So how easy is it to tuck the skirt underneath? You need to hide it, right? It’s actually simpler than it seems, taking me less than 3 minutes to complete all the tucking, but you will need a buddy to help you out with this.
Put the outer skirt on first with any petticoats or hoops underneath. In this case, the gray skirt for Rue.
Next dress in the concealed dress, in this case, the black corseted dress for Kraehe.
Velcro the shoulder and both sleeve seams first.
Now time for the tuck. The front part of the skirt should be folded and rolled as flat as possible, tucked underneath the bust line. Match the side seams of the skirt with the side velcro. You’ll likely only get one half of the skirt to stay at a time, so work in sections.
Now shove the skirt up as flat as possible across the back. Because the jacket will hide most of this, simple folds and a roll or two will generally work here.
Once the side is settled, velcro up the side. Repeat for both sides.
Now to complete the illusion, fold the bottom edge down underneath the concealed skirt. This will hide any raw edges and any puffiness of the concealed skirt, making the tear-away shirt appear to simply be looser and hanging down.
You’re all tucked up and ready to wow the crowd with your transformation!

I hope you all enjoyed this tutorial on a short transformation dress to another short dress. There are so few transformation tutorials out there, but we need to entertain our inner magical girl and make things transform! There are so many more methods out there, several I want to try myself, but for now, let’s make things tear away and create magic!
Now go create! Make some cool tear-away transformation dresses! @ me on social media so I can admire your work and see what magic you choose to make!

[…] Halloween look showcased the power of costume transformation, transcending gender and age norms. Her portrayal of diverse characters fostered inclusivity, […]
LikeLike