Scalloped hems are pretty. They look like a row of petals or scallops next to each other and can be found in all sorts of locations. Bustline hems, bottom of a skirt, crisscrossed accents. But when you first make a scalloped hem, you might have a problem. You might get bunches in those scallops or in the angle. There are a few tricks you can use to avoid bunches and get the nicest scalloped hem for your cosplay.
This method works best with lined garments, but the lining doesn’t have to be the same color. As no stitches are on the outside, they can be two different colors.
Skill level: late beginner? If you learned how to sew a curve, you’re good. If not, here’s some practice for you!
Cost: variable. Depends on how much fabrics you need.
Materials:
- Something small and round. I used the bottom of a paint bottle
- A pencil
- Sewing machine with a universal needle
- Thread that matches your lightest color fabric
- Point turner (crease turner, corner pusher, whatever you’d like to call it) or something flat like a piece of cardboard or the edge of a ruler
- Steam iron with ironing board or thick towel
- Fabric scissors
- Two layers to sew together
What fabric works best?
As with a number of decorative techniques, some fabrics work better than others. In the case of scallops, some fabrics work, and others don’t work at all.
Your best fabrics for this technique will be middle-weight woven fabrics. Cotton, broadcloth, linen, sateen, polycotton, and even pure polyester will work. Slick fabrics may give you trouble due to slippery feet, but synthetics like taffeta, heavy synthetic silks like shantung, and other fancy fabrics may work given they can handle some steam heat. The trick to this method is the ability to steam press your fabric into place.
Lightweight silky fabrics, sheers, spandex, and similar fabrics don’t have enough weight for the curves, and sheers will show the inner workings of your fabric. I don’t recommend satins either, as this stuff will skid all over the place when you try to sew curves.
Heavier-weight fabrics like brocade or similar synthetics might work, but do a test before you tear into the good fabric. Make sure it is heat tolerant!
Drawing the scallops
To make even scallops, you’ll need to draw them first. While you could make a pattern out of paper, the easiest way is to find something round to trace. This traced line will serve as your sewing line.
When choosing your object, wider objects will be easier to sew for beginners and smaller objects will be harder to sew. You’ll likely want to stay at least a few inches in diameter as very small curves are difficult to sew on a machine even for advanced sewists. So pick something that feels doable. If you aren’t sure, you can try this process out on test fabric to see how easy it is to sew the curves you’ve drawn. This is also a good way to practice if you haven’t sewn a lot of curves yet!
Place your object on the fabric where you want the hem to be. If it’s near the edge of the fabric, place it about 1/4″ away from the edge to give yourself enough room to sew. Trace half of your object to make a half circle facing toward the fabric’s edge.

Now that you have the first scallop made, move the object next to it and trace a half circle again. Continue this process until you have a row of scallops to cover the whole scalloped hem.

Sewing the scallops
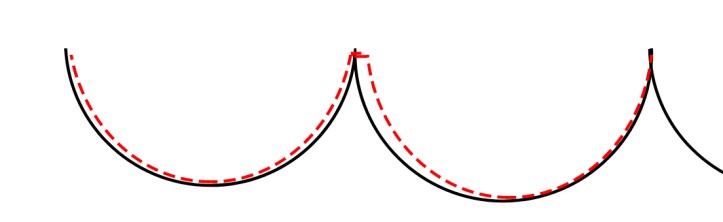
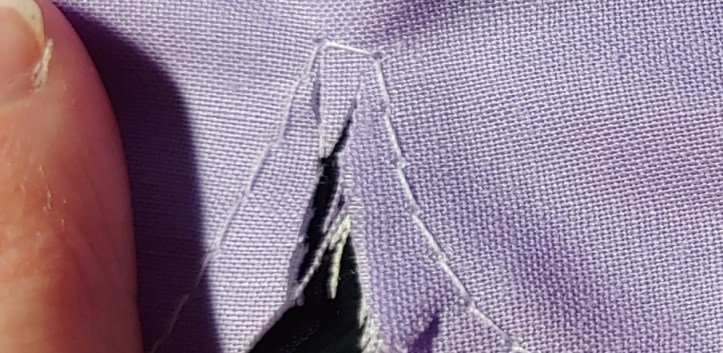
It’s time to sew the scallops. Pin the lining and outside fabric with wrong sides together if you haven’t done so already. Now it seems like you can just sew along the scallops you drew but this produces a problem. The sharp corners between the scallops bunch up when you turn them right-side out. No matter how you clip the corners, the fabric bunches.
But hope isn’t lost. Let me tell you my secret. Instead of sewing sharp corners between the scallops, you sew a singular flat stitch.

To create the flat side, sew the scallop by following the line up to where the sharp corner would be. Drop the needle to the lowest position and lift the foot, turning the fabric sideways. Drop the foot and manually turn the hand wheel of the sewing machine to make one full stitch. Just one. Once the needle has returned to the lowest position, pick the foot up, turn the fabric, and continue stitching the scallop.
When you continue down the scallop at this point, you’ll be off from your drawing. Don’t sweat it. Just continue downward and meet up with your line at the curve then continue to follow the line from there. This ensures this nice gap you’ve just created doesn’t bunch up as you go back to meet the line once again.
Continue with this process until you’ve sewn your entire line of scallops.
Turning the scallops right-side out
With the scallops sewn, you can’t leave the hem inside out, so it’s time to turn everything right-side out. If you turn it now, you’ll end up with bunches in the scallops and the single flat stitches will be stretched and bunched. We want a nice scallop so we need to prepare the seam first.
Start with trimming the edges around your stitches. Leave about a pinky’s width next to the stitch, which is around 1/4″ or so. If you trim too close to the stitches, the fibers may pull apart and you get raw edges poking through your pretty scallops.
The trimmed edges don’t have to be pretty. Mine are pretty crooked. But as long as there’s enough seam allowance here, your scallop should be good to turn. When you get to the narrow gap, cut part ways in with a straight snip.
Next is time to clip the curve. Clipping allows the fabric to cross over itself or spread apart to meet the demands of a curve.
Clipping is simply taking a pair of sharp scissors and cutting into the fabric towards the seam, making sure not to cut the actual stitches. As scallops are tight curves, we need to clip quite a bit to make the curve sit properly.
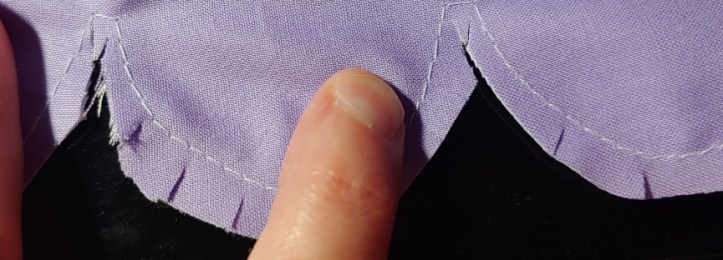
In addition to clipping the curve, you’ll need to clip the flat stitch. This will allow it to turn properly and not bunch at the top. To do this, create a triangle with the flat stitch, making small clips towards the corners where you turned your stitch.
With all your corners and curves clipped, turn the fabric right-side out and give it a shake. Slip your hand inside and push the scallops out with a finger. Once you’ve pushed the scallops out, lay the fabric on something flat. It’s time to use your point turner tool.

A point turner is a useful little plastic tool that helps you smooth out seams from the inside. This is especially helpful when working with curves like scallops or corner angles. This works better than a pen as it is less likely to push between the stitches and poke out the other side.
If you don’t have a point turner, you can use something flat like thin cardboard from a food box or a ruler to do much the same thing. You want that point at the end to push and smooth the fabric out before you iron it down.
To use your point turner, slip it inside the fabric and use the side and tip of it to smooth out the seams along the scallops. You don’t have to use force, just push it gently against the seam, and it’ll start to unbunch. Use the tool to smooth them out afterward to make sure the seam allowance is sitting flatly inside the scallop.

This process ensures the two layers are even and smooth, which is particularly important when the lining is a different color.
Once the scallops have been smoothed out, take your steam iron and iron the scallops flat. If they shift a bit, set the iron aside and use the turner to push the seam back outward before ironing again.
When ironing the corner of the scallop, smooth it out a little with your fingers if you notice any bunches or creases forming. You can roll your finger over it and the clipped fabric should settle into place.
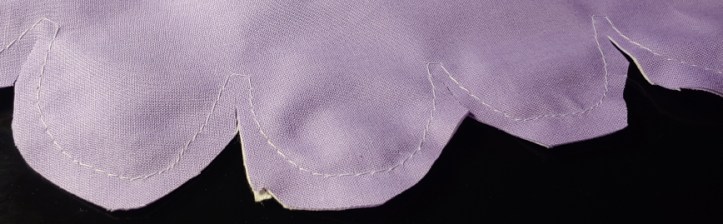
Once all your scallops have been pressed, finish off the other seams as needed. Add a waistband, finish a bustline, or whatever your pattern needs, you now have a decorative scalloped hem!
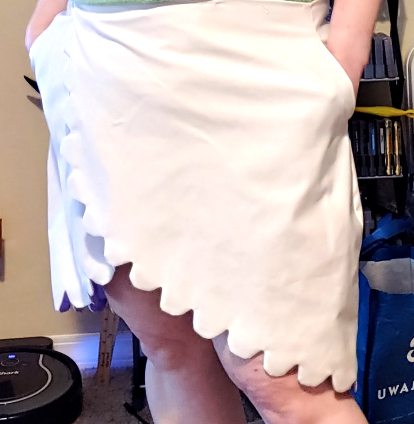
I hope you find this technique helpful! There are so many scalloped hems of all sizes in cosplay (and in fashion!) and they sure look cool when they sit flat. If a few are crooked, don’t worry too much. You can always iron it out again as needed. You’re good to go as long as the scallop is flat with no bunches!
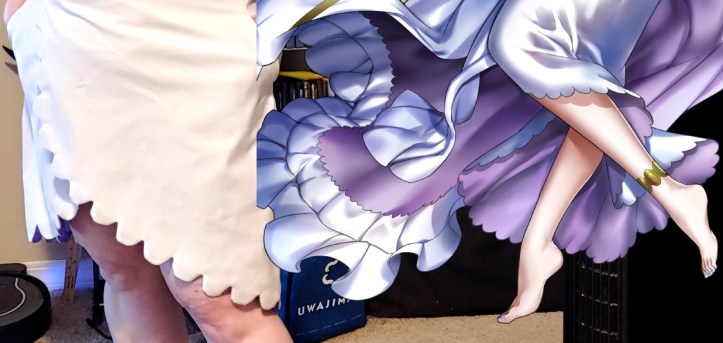
I finished my scalloped skirt off with a nice waistband, back zipper, and of course, pockets! Let me know what you use your scallops for. @ me on social media so I can admire your work!
