Defying gravity is quite the feat. It takes a whole support structure that works underneath it, and last week, we made the base structure. This week, let’s talk about what you see on the outside: the skirt and how to make it as big and bouncy as possible.

The skirt is where the bulk of the weight for this build comes in, especially if you have two super full skirts like May does. But the beauty of the basque is that it can handle the weight and you won’t have to worry about it slipping down.
If you haven’t made a basque yet, check out Gravity-defying skirts pt1: making a basque waistband first! Have a skirt already attached? Time to make it float with Gravity-defying skirts pt 3: the hoop.
Your skirt may be simpler than May’s or it may be even more ornate and involve rhinestones or sequins or fancy overlays. Either way, the technique is the same. Prepare to sew through a lot of fabric, and let’s get started!
Skill level: advanced
Cost: moderate
Skirt materials
- Double circle skirt pattern. You can use a circle skirt calculator to create one (just double your waist size) or find a premade. I used McCall’s M7455 for May’s skirt.
- Enough fabric to complete your skirt
- Enough fabric or accents to make a waistband to cover the skirt’s edges
- Horsehair braid about 1-2″ wide. You will need a lot. I used nearly 9 yds for both layers
Other materials
- Pens and pencils for marking placement
- Large straight pins
- Universal and heavy-duty sewing machine needles
- Thread to match. Make sure it is good, strong thread
- Paper for patterning. Can be printer paper
- Printer for printing templates
- Ruler. Recommended to have a tailor’s ruler or a clear ruler
- Pencils and pens
- Dress form or body double (highly recommended)
- Fabric scissors
- Scissors for paper (don’t dull your fabric scissors!)
- 3 slider clasps or hook and eye pairs
Planning the skirt
Gravity-defying skirts must adhere to con rules: you must fit through doorways. While you could flip the skirt up, to get through doors, you still want to be able to fit on the con floor. This skirt is also a double-circle skirt, so there’s a lot of fabric involved in this. If you have two layers, both lined, this is a lot of weight.
A good length for the skirt is about 9-10″. It seems really short for a normal skirt, but when you draw it up to suspend it, it’s actually quite large. Any larger and the weight of the fabric can start pulling the cage down, you won’t fit into any seats at panels, and you’ll probably find yourself at a loss of where to put your hands.
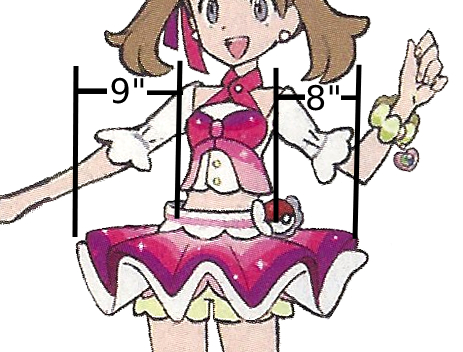
The measurements for May’s layered skirt are as follows:
- White lower skirt: 9″
- Gradient upper skirt: 8″
For her skirt, I used McCall’s M7455 as the pattern (this is a go-to for skirts and magical girl cosplay), breaking it up using a technique I recently posted about, How to make colorful rainbow and gradient skirts.
If you’re using a circle skirt calculator, you can set the length or do the math to adjust it yourself. When using a premade pattern as I did, you’ll need to mark a shorter length. That gradient article goes over how to shorten a skirt pattern if you’ve never done this before. When shortening, make sure to leave the appropriate seam allowance at the bottom of the skirt.
Making an extremely full skirt

One of the big features of a gravity-defying skirt is how full it is. Like ridiculously full. If you simply sewed a double circle skirt to the basque and the hoop, it’s not going to have that wave-like structure unless you give it structure. And that’s where the horsehair comes in.
The thicker the horsehair, the more structure it will have. However, as this skirt is relatively short, going over 2″ may have too much structure, and you’ll find it difficult to manipulate and attach to the support basque. The 2″ horsehair goes a long way, and I only used it on the white lower layer. The upper rainbow layer only has ½” horsehair in the bottom seam as the white layer fully supports the structure.
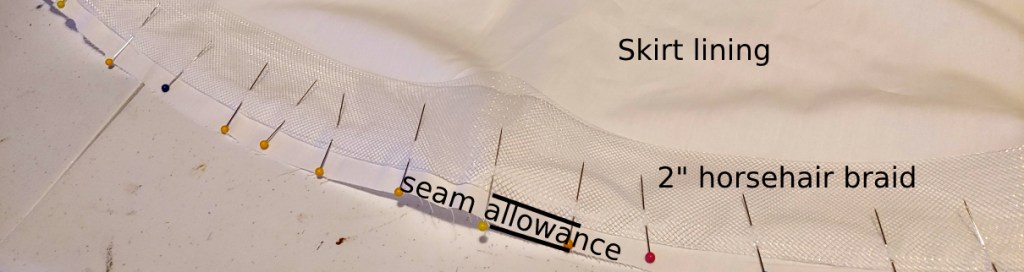
With such a full skirt, you’ll likely also want to line it. The big waves will allow for a pretty good view into the underside of the skirt, so unless you’re rolling the horsehair into the hem, you want to sew it into the lining instead. As horsehair is very stiff, sew it into the lining layer before you attach the lining to the main skirt, leaving at least a seam allowance’s width at the edge.
Before adding the horsehair braid, sew the back seam of the skirt, leaving about a 5″ gap to give yourself room to shimmy in and out of the skirt. Iron the seam open. When adding the horsehair, crisscross over the seam in the back. This will prevent the skirt from caving in on itself at the seam.
Once you’ve sewn the horsehair braid into the lining, sew the lining with the main skirt as normal and iron the skirt seam flat. Repeat this for the second skirt, if you have one.
Sewing the skirt to the basque
Now that you have a skirt and a basque, it’s time to connect the two. And first, it’s planning time. Since the waist of the skirt is about 2x times your actual waist, pleating works best to get the skirt to sit right and get that anime-perfected wave shape. Box pleats are optimal for this, but you’ll need to know where to actually pleat.
Creating a template

Take a clean screenshot or concept art of the skirt you want to make. For May, one of the best references was a screenshot from the animated promo video. It gave me a clear image of how the skirt sat when idle (a lot of her artwork had her jumping) and where the pleats sat on her body.
Now it’s time to count. May’s pleats sit open on the sides, so each side counted for half a pleat. Then the rest was simply counting to a total of 4 pleats on the front and 4 on the back (since the skirt is symmetrical).
Now for some absolutely crazy math. Yes, you can use a calculator. You will also need an image-editing app with a ruler and guidelines. If you don’t have one, I recommend using Photopea. It’s free! You could honestly do this with some calculations and a tape measure, but I found this method more accurate in placement.
Start first by getting a skirt placement measurement. For maximum support and to make the skirt appear to be floating in the correct place, the skirt should sit at 3″ below the top of the basque. This is right in the middle of it. Measure this section with a tape measure.
Let’s say this measurement is 35″.
I need 8 pleats total so that’s 35/8 which is 4.25″ width per pleat.
Go to your photo editing app and create a canvas the width of the pleat by 3″ high and create guidelines at the halfway point both vertically and horizontally. Use this guideline to create an even triangle. You’ll end up with something kind of like this:

Fill the triangle in and expand your canvas large enough to fit at least two triangles but small enough you can print it. For this size, I could fit 3 triangles on letter-size paper. Copy the triangle across the page, matching them up at the bottom corner.

Print out enough copies of these triangles to match the number of pleats you need. Tape the pages together at the bottom corner of the triangle then cut off the white sections so only the black and a strip of white below it remains.
Now flip it upside down and cut slits in the center of the triangles much like when making the pattern for the basque. It’s time to use the pattern to mark the placement of the pleats.
With the triangles pointing downward, match the point up with the bottom seam line or the bottom edge. Match the start of your triangle strip with the back seam of the basque. Work your way around the basque, pinning at the sides and front for stability. Fold the paper and tape the triangles shut much like when making the basque pattern.

Once the pattern is snug against the basque, take a pencil and lightly trace the triangles. The main point you want to mark is the top crook of the triangle, though I traced the whole triangle anyway.
Adding the skirt
Before you sew the skirt to the basque, if you have a bunch of layered skirts or even just a single lining, you want to keep it from slipping as you work. Pin all the layers together and sew a stay stitch along the top edge.
With the layers sewn together, it’s time to pin the fabric to the basque. Start at the back seam of the basque and of the skirt. Take a few inches in from the back seam of the skirt and pin the top of the skirt to the triangle on the back. Do the same on both sides of the seam, letting the extra fabric hang for now.
On the opposite side, if you don’t have a front seam, pull the fabric away from the dress form and find the point where it bends at its furthest. Pin that point to the front triangle on the basque.
If you don’t have side seams, repeat the same process, finding the bend in the fabric at its farthest point then pin that point to the side triangles.
Repeat for the other triangles and you’ll get something kind of like this.

For May’s skirt, I ended up dropping it slightly below the top of the triangles to give more space for a very large waistband, but that makes it easy to see for all these steps. You may have it slightly dropped like mine or may have the skirt match up with the triangles.
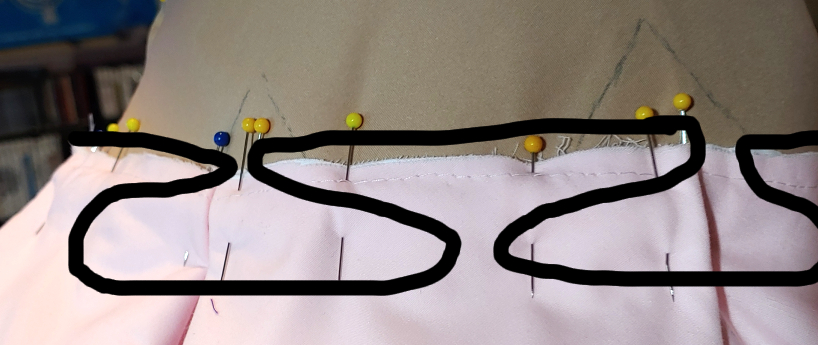
Now time to make the pleats. Box pleats look kind of like a folded box when you’re making them. Work in sections, one at a time, to make and pin your box pleats down to the basque.
Pull the section out and find that crook at the farthest point again. Push that point down towards the fabric and fold the sides underneath what you’re holding. This is going to make a sort of boxy shape. Make sure the fold of the pleat sits at the top of the triangle.

Once you’ve made the box sit flat against the basque, pin it down. While the pleats lay flat, they have this sort of squiggly box shape to them underneath:
The back of the skirt follows the same principle, though instead of pleating across a flat section, you are pleating across an opening. It’s easiest to visualize with this image:
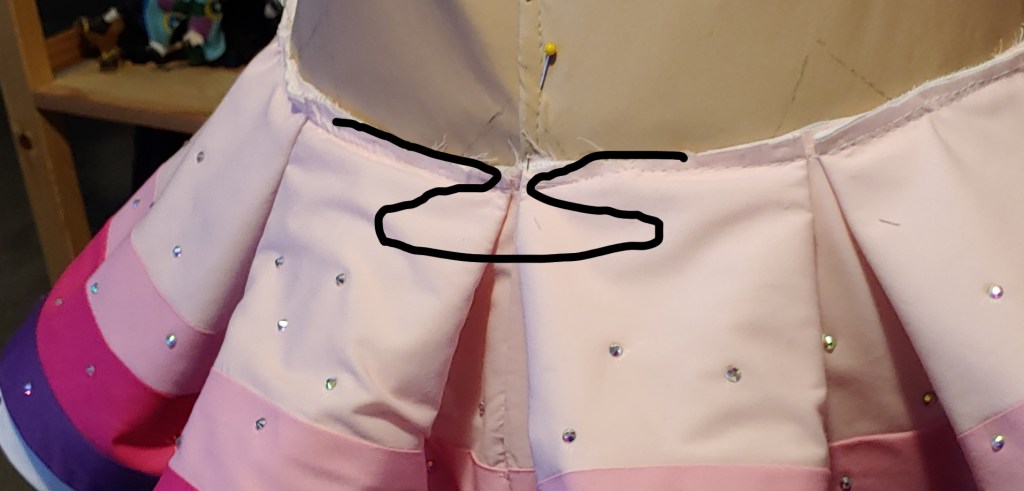
The pleats meet up at the back seam where the top of the triangle sits. The fabric is spread and pleated with the back seam hidden in the pleat fold. This makes the back seam less visible when wearing it.
Now, this is the hard part. You have to sew this skirt down. What makes it hard is how thick the fabric is, especially if you have two fully lined skirts. I used a leather needle to get through all the layers. Just take your time and carefully sew the skirt to the basque. If the machine complains, manually turn the flywheel and advance the stitch by hand.
Adding the waistband
Since the top of the skirt is raw, you need a waistband to hide it. You can use muslin or paper to create a waistband. May’s waistband is pretty wide, so I used several inches of muslin to create the base pattern. As the bottom section was scalloped petals, I extended the pattern down pretty far. If it’s just a simple waistband, you’ll want to keep it as close to the top of the skirt as possible to give you the most room for the cage you’re adding next.

When working with a pattern, you may need to create even deeper pleats than what you used for the basque itself. You have extra fabric in the way with the fullness of the skirt.
After cutting and creating your waistband, it’s time to sew it down. Be mindful of your sewing needle as once again, you’re sewing through a ton of layers. If you have a floating waistband like May, you can get away with sewing the waistband just above the skirt’s top edge so your machine doesn’t cry at you.
Make sure to not sew too far down the waist of the skirt. The cage will be sitting directly underneath the sewn waist and supported by the bottom half of the basque, so you want to leave as much room as possible.
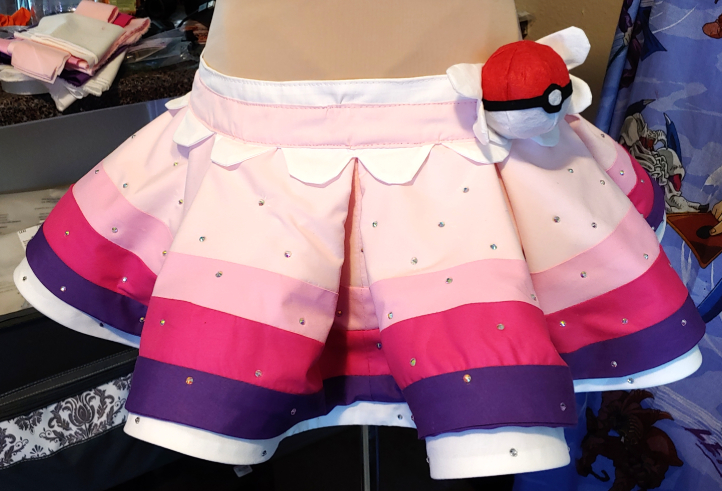
Embellishing
Now’s your chance to embellish. This includes adding things like rhinestones or belt accessories. It’s much easier to do this now while you can spread the fabric out on a table as a cage will make things a bit more difficult. The cage will be removable, but why not just save some trouble and go for it now! Much easier.

Adding clasps
Now you have a fully full skirt with all the shiny accents and a finished waistband, it’s time to finish off the back with some clasps. The slider buckles or hooks and eyes are optimal for a basque as they don’t risk popping up with strain or weight. These types of clasps are used in ballet pancake tutus for much the same reason.
You’ll want to add clasps in at least three areas:
- top of the basque
- on the waistband
- about halfway between these two points
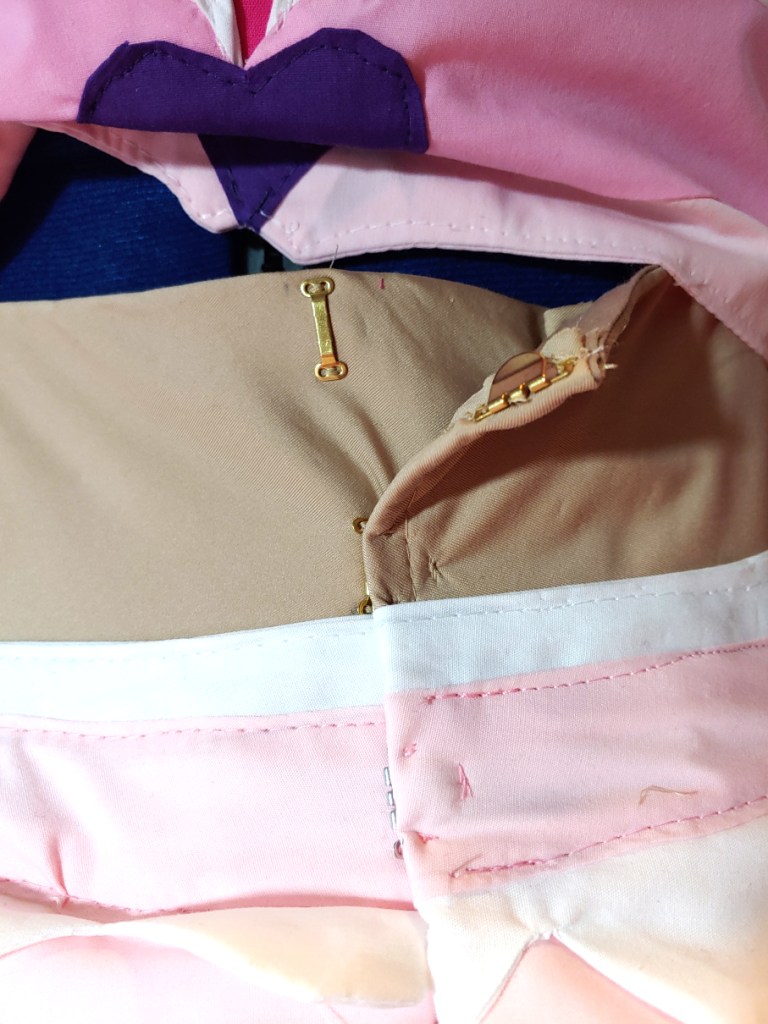
That third point was at the top of the waistband for me since May’s waistband was so large. To locate the location for the bar of the clasp, pull the basque tight against your body or dress form. Mark approximately where the fabric overlaps with a pencil.
You want this point to be pretty tight. It might be a little bit of a tight squeeze to initially buckle it, but as it is a slider or a hook, it will settle down a bit looser when the hook settles in the eye or the slider in the bar. If the basque is too loose, it will start to slight down your hips. If it is too tight, it will be uncomfortable. But fortunately, they’re just sliders. You can reposition the bar as needed.
Sew the big slider or the hook to the side that sits on top while the eye or the bar goes on the side sitting on the bottom. This hides the clasp as much as possible while offering the greatest amount of support.
You don’t necessarily need to sew anything into the opening of the skirt. With the weight of the folds, it tends to stay shut. If you want to secure it, you can use a few snaps to keep it in place.
One step closer to making the gravity-defying skirt actually defy gravity! Only one more step to go and the skirt will be suspended like magic. For now, work on those double circle skirts and get them sewn to the basque, making sure your whole build is nice and snug to support the final structure we’ll be adding next week.
Let me know how your project is going! @ me on social media so I can admire your progress!
