Defying gravity is fun, and in our journey to make a suspended skirt, we have finally reached the point of defiance. It’s time to make that skirt float outwards in full fluffy skirt form. With the foundation and structure from previous tutorials in this series, we’ve gone from creating the support structure to adding the pretty skirts on the outside.
Now we need: the cage.
The cage is the underlying support structure needed to defy gravity. Without it, you’ll have a very nice full skirt and supportive basque, but the skirt doesn’t quite stay upright. This cage needs to handle a con, allow you to fit through doorways, and be transportable.
So it’s time to make a removable support structure! It’ll pack up nicely for storage in your suitcase and in your closet, and if you don’t want to wear the cage, you can simply unsnap it and wear the rest of the structure without it.
Looking for the rest of this series? Check out these articles:
- Gravity-defying skirts pt1: making a basque waistband
- Gravity-defying skirts pt2: planning and attaching the skirt
Skill level: advanced
Cost: moderate
Cage materials
- Steel hoop boning. Should be springy, and white spring boning works pretty well. I stole mine out of a cheap lolita cage. You can also use ballet hoop kits.
- Wire cutters to cut hoops to size. If you pilfer a premade cage, you can skip this.
- Plastic steel boning covers x 2. They should be open on both sides so you can thread the boning through them.
- Bias tape or ribbon for casing
- Bias tape or herringbone ribbon for support
- Strong snaps, at least 16 pairs
- Mat with measurements marked in a grid (recommended)
Other materials
- Pens and pencils for marking placement
- Large straight pins
- Hand sewing needle
- Thread to match. Make sure it is good, strong thread
- Dress form or body double (highly recommended)
- Fabric scissors
Creating a cage
Time for the magic of this whole rig. Let’s create a cage. You need steel boning to do this as polyester boning isn’t strong enough for something this large. I had trouble finding a steel kit, so I simply bought a cheap cage off Amazon and stole the wire out of it.
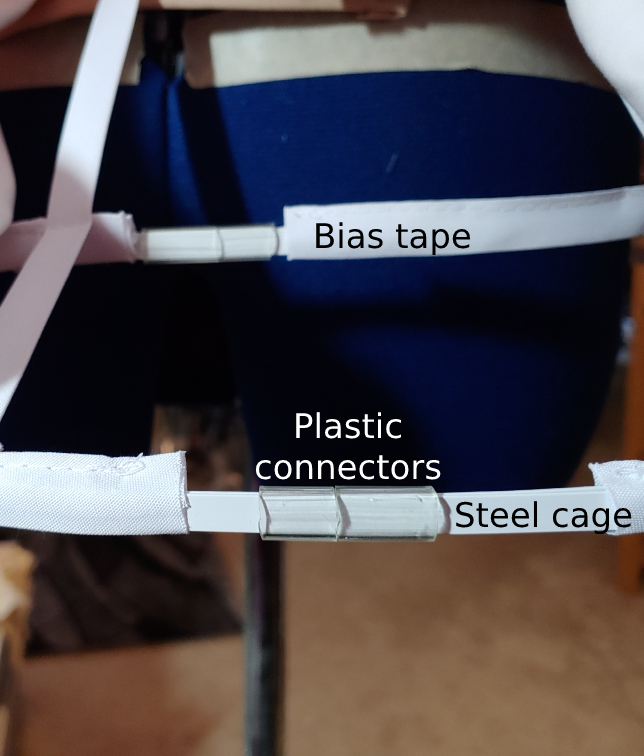
If you cut your own boning, you’ll want something lightweight like white steel boning (nylon-coated spring steel boning) or something like a kit to make a pancake tutu. You’ll also want plastic or metal sliders that you can slip the boning into to complete the hoop. I could not find a proper name for them, but I found them when I looked up hoop steel connectors. You may be able to also do this with some heavy tape.
Creating the hoops
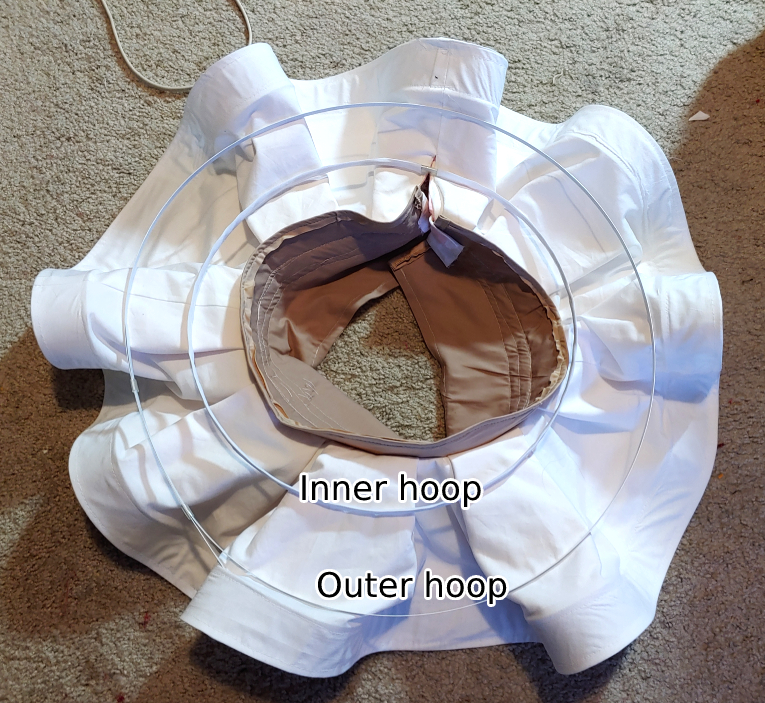
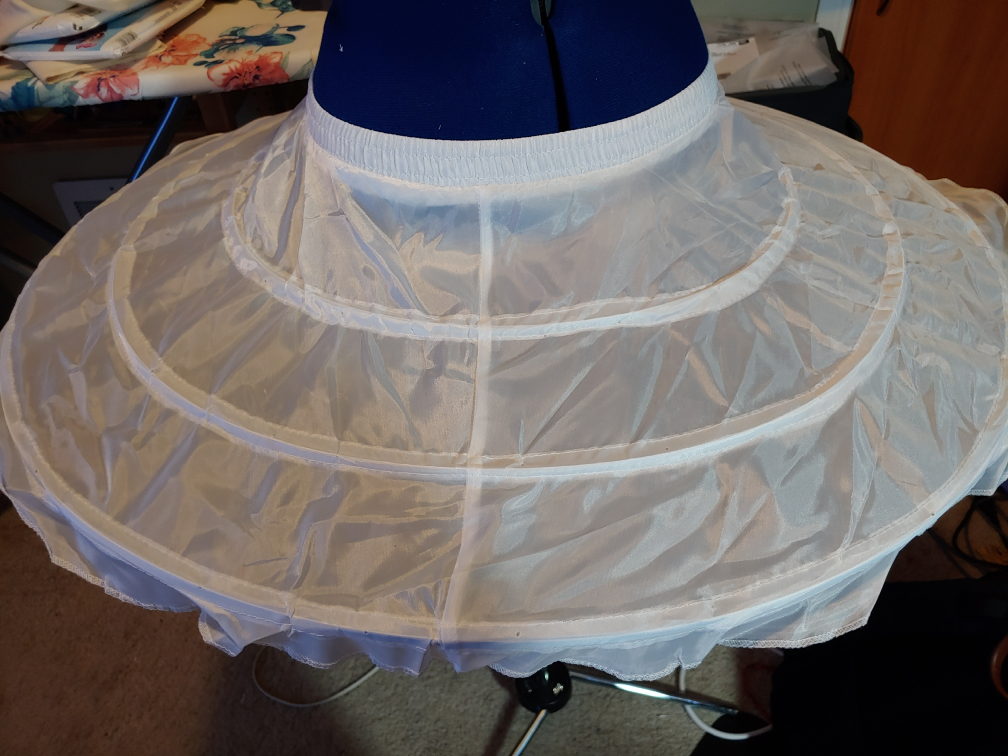
Now it’s time to plan the size of your hoops. With such a short skirt, you only need two of them to support the structure. To plan the size, the easiest way is to flip the skirt structure upside down and place the hoops on top.
The first hoop should be relatively close to the basque. This will serve as the first point of support. Mine was about 2-3″ away from the basque.
Your outer hoop should be near the outside of the skirt but not so far that the skirt isn’t supported. My outer hoop was about 2″ from the edge so that the skirt would have some room for movement but wouldn’t fall off the hoop constantly.
Once you have the approximate length, trim the hoop boning as needed. If you’re working with precut boning, you can either trim the boning or tuck it into the casing.

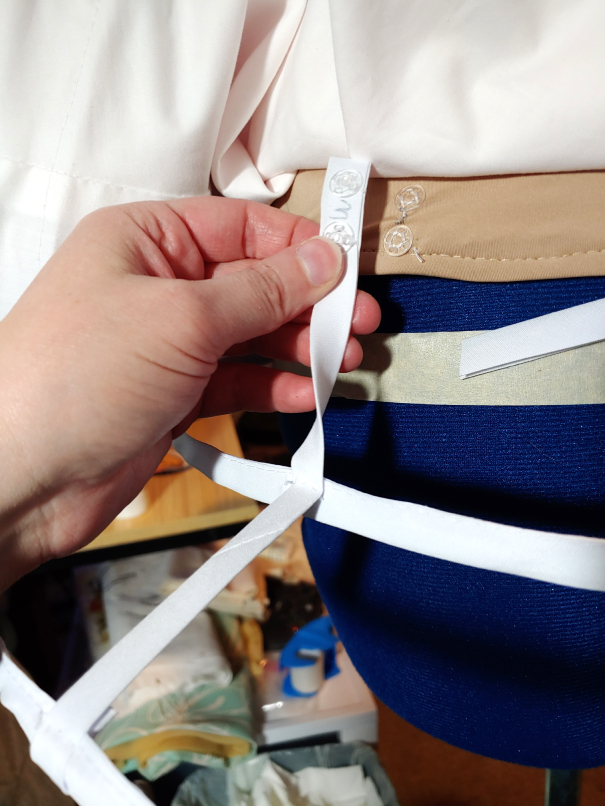
If your boning is not cased, you’ll need to make some. The support structure will slide around if you don’t have anything to bind it to. Create a casing by sewing folded bias tape or folded ribbon together then slip the boning into the casing. You will need to leave enough room for the hoop closure in the back as it won’t really fit into the boning properly.
You can sew it apart from the boning right on your machine or be crazy like me and just sew it onto the boning with the hoop attached. It doesn’t really matter which method you use, but use whatever suits you (or your madness, in my case).
Sew casing for both hoops then slide the boning inside and reattach the hoop connector to finish off your loop. Flip your skirt upside down once again and tighten or loosen the hoops as needed so they match their positions on the skirt.
Connecting the hoops
Unfortunately, hoops don’t float. If they did, we wouldn’t need sewing to defy gravity. But since we do, it’s time to connect those hoops together. This is where having a grid board will come in handy. I’m using a cardboard pinboard, but really anything with a grid will do.
Lay the two hoops out on the board, using the grid to align the inner hoop to the center as closely as possible. Using bias tape or herringbone tape, start creating spokes. You’ll need about 8 spokes to fully support the skirt and keep it from wobbling back and forth like a bowl full of Jell-O.

Start near the back of the hoop and shift just slightly to either side to avoid trying to loop around the hoop connectors. Leaving them open will allow for slight adjustments with the hoop if you don’t like exactly where it sits when attached to the skirt.
To maximize support, loop the bias tape around the outer hoop while sewing the tape on top of the inner hoop. By looping, you can avoid the weight of the skirt pulling your whole structure out by the stitches.
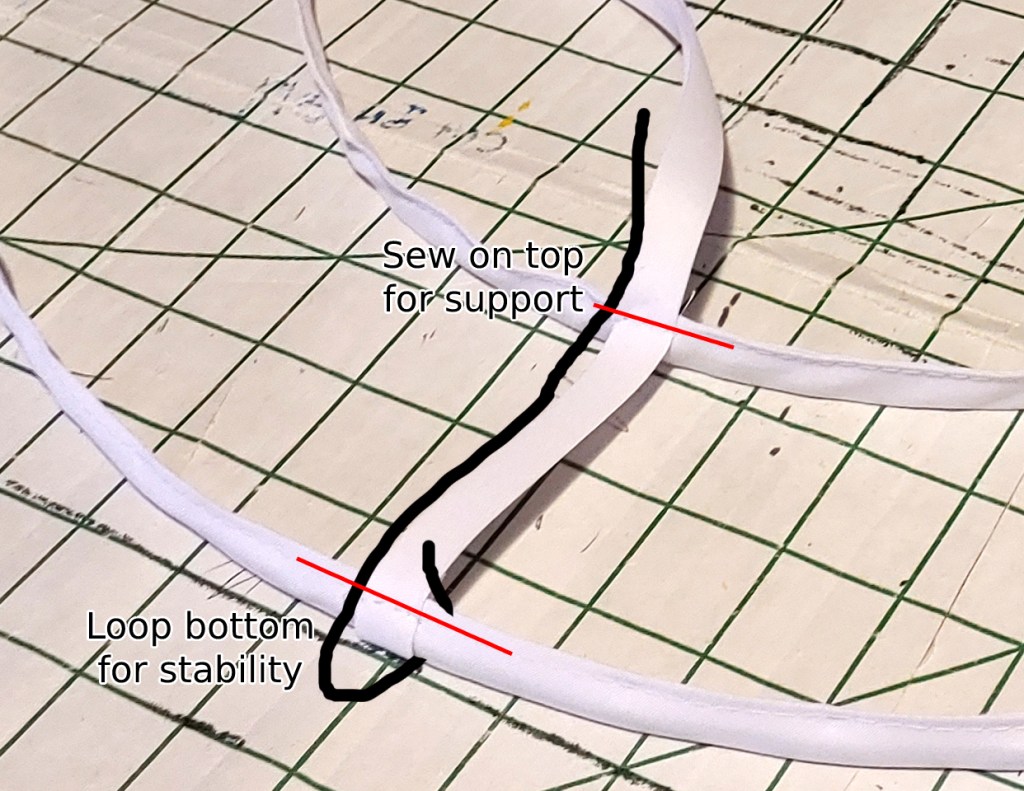
Hand sew the supporting structure together. When you move to the next spoke on the wheel, instead of having to readjust the hoops each time, rotate the grid mat if you can.
Leave a bunch of extra room with the bias tape spokes at the center of your hoops just to make sure you have enough when attaching. You can cut it off once the snaps are in place.
Joining the hoop and the basque
Now the final part of this journey. Adding a removable hoop.
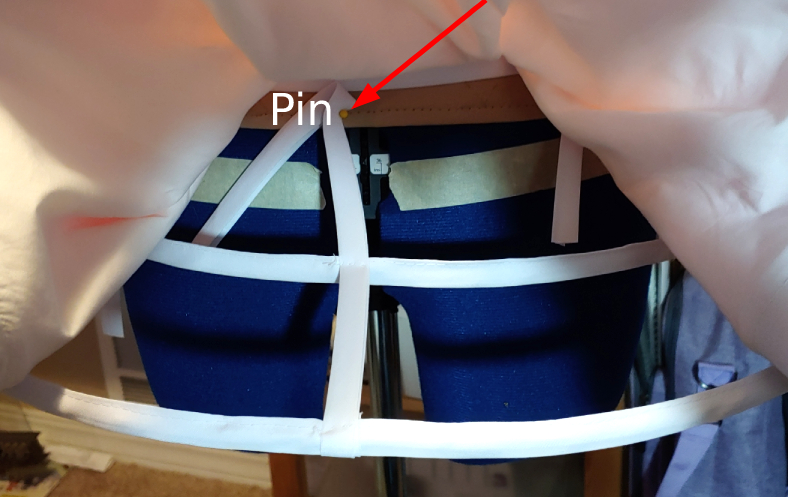
Slip the hoop over the dress form or through the feet and let it drop to the floor, then place the skirt on the dress form, closing the back clasps. Now lift the skirt and pin it upward on the dress form to keep it out of the way. Make sure the back of the basque isn’t trying to separate as there are no clasps on this section. You can pin it shut as needed.
Now it’s time to pin and pin a lot.
Start with opposite sides. I started with the front and back to make sure I got the placement right with the back opening. Eyeball it or use a ruler to get the hoop equidistant from the dress form and pin the two sides down to the basque. Pin it with the bias tape facing upward. You’ll be sewing the snaps in this direction so gravity doesn’t yank them open.
Now pin all the remaining bias tape spokes until you’ve worked your way completely around the hoop. Unpin the skirt and straighten it out on the hoop. The hoop will fall downward just slightly but will still provide enough support to keep it upright. If you don’t like where the hoop is sitting or part of it is uneven, repin that section and double-check with the skirt again.
Once you’re satisfied, it’s time to sew the snaps. You want strong snaps. I use clear plastic snaps that are surprisingly strong, but metal snaps will work fine as well. Anything that can sustain and support a bit of weight.
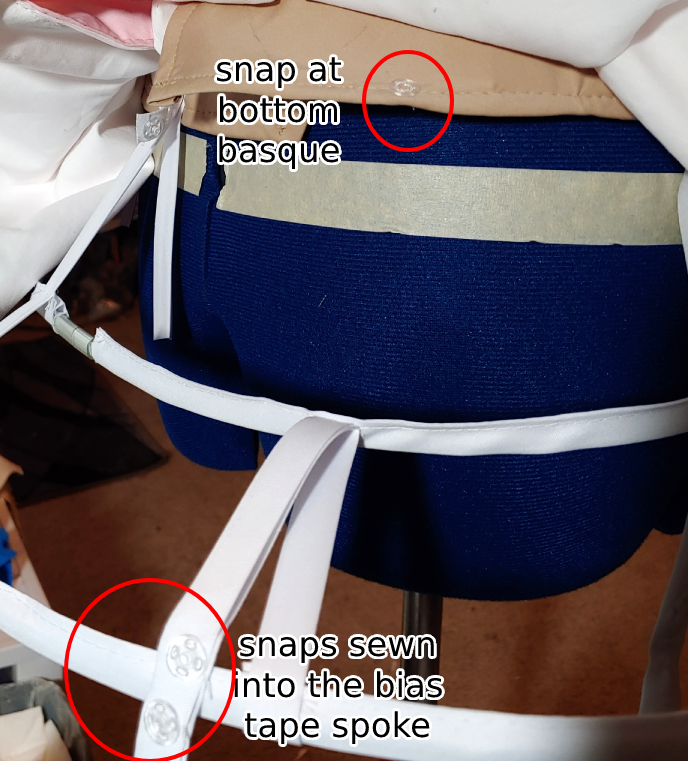
Start at one of the bias tape spokes. Any will do. Mark where the bias tape is sitting on the basque with a pencil. Mark the bias tape where it meets the bottom of the basque.
Remove the pin and sew a pair of snaps, one on top of the other, to the bias tape, leaving a little room at the top to prevent fraying. The lower snap should sit on top of the pencil line. You’ll be sewing this one into the bottom of the basque.
Clip the bias tape a little above the top snap, giving yourself a small allowance at the top so the top snap doesn’t rip right out of the bias tape.
On the basque, sew the lower snap right above the bottom edge at the line you drew with a pencil. Snap the bias tape into the basque then make a mark where the upper snap should sit with a pencil. Unsnap the bias tape then sew the upper snap to the basque.
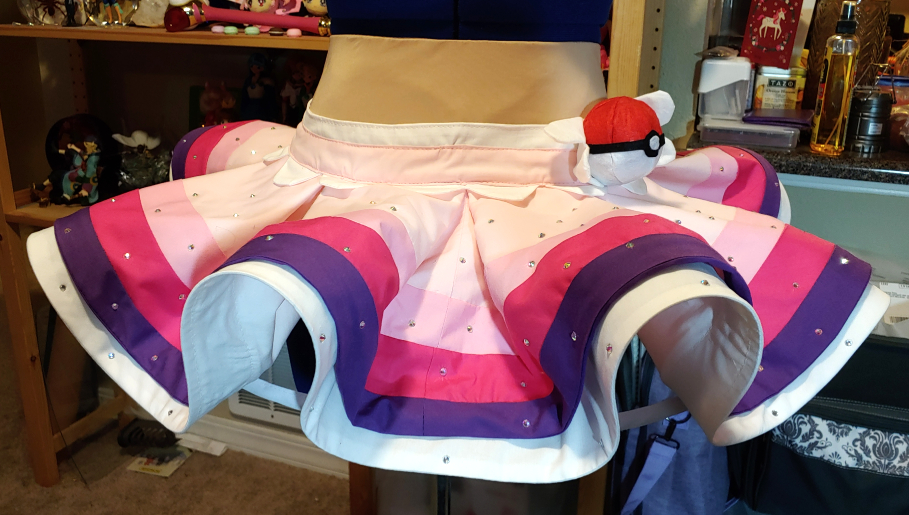
Repeat this process for the entire structure, and now you have a fully removable hoop structure that disconnects from the skirt and basque using strong snaps.
Congratulations! You made it to the end of this series! You now have defied gravity and made a springy full anime and game skirt that really shouldn’t be physically possible. But with the magic of steel and support, it totally is. I hope this helps you on your journey to defy gravity as well, whether it be with May from Pokemon or someone else who decides that physics don’t exist today.
Let me know what you make with this tutorial series! @ me on social media so I can admire your gravity-defying work.
