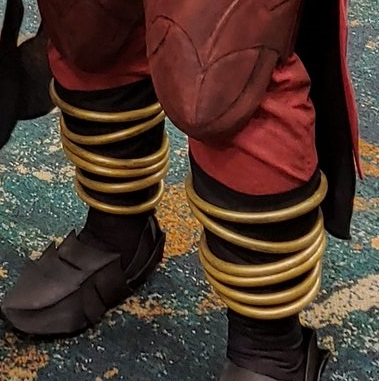
Round jewelry can be a strange thing to construct. Ringed leg bands, bracelets, even armbands. Walmart used to have plastic bracelets you can paint, but they stopped selling them.
And what happens if you need large leg bands or stacked rings? What materials can you use?
Plastic tubing is amazing for jewelry and accessories! I’ve used it for one jewelry-heavy Final Fantasy costume and I am definitely looking at using it for various others that need round bangles. You can paint it with acrylics, glue it with superglue, and even jab a sewing needle through it to sew it to fabric. It’s also incredibly cheap and easy to find.

I’ve used two types of tubing so far in cosplay, though I’d imagine there are other tubes you could use. They simply need to be flexible plastic tubes. For bracelets and thinner accessories, I use oxygen tubes. For large bangles, leg bands, and other accessories, I use aquarium tubing, the type you use to clean fish tanks. You can find both online or at specialty stores (like a pet store for the aquarium tubing) and at pretty long lengths, making this a budget-friendly project.
Skill level: beginner-friendly
Cost: relatively budget-friendly
Materials:
- enough plastic tubing to create your accessories. If you’re not sure, get extra
- 220 grit sandpaper
- paint primer. ** see note
- black acrylic paint
- metallic acrylic paint in the color of your choice
- gloss sealant. DecoArt is my personal favorite. Find it at JoAnn with a coupon.
- Paint brushes and makeup wedges (old socks and paint sponges also work)
- superglue if you plan on gluing the tube together (note: you cannot glue ends). I recommend Gorilla Glue 10s super glue.
- heavy hand-sewing needle, thimble, and invisible thread if you’re sewing the tube to fabric
** For primer, the type will depend on how you plan on painting the tubing. If you’re bending the tube after painting, use a flexible primer such as flexbond. If you’re bending the tube before painting, any primer like mod podge or even school glue will do.
Gluing the tubes

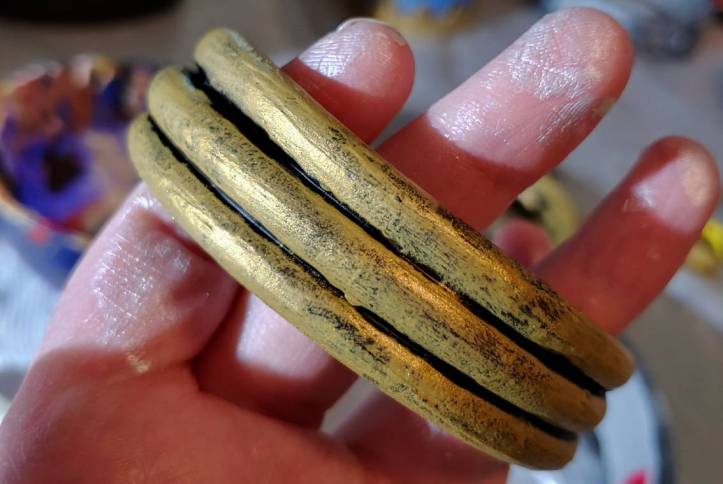
If you’re making stacked rings, gluing works great to connect it all together. This bracelet was one single piece of tube wound in a circle then glued together.
It is important to note, you cannot glue the tube end-to-end. There isn’t enough surface area for the glue to adhere to and the bracelet will just pop apart. But if you plan on winding the bracelet, there are tricks to hiding the tails and keeping the bracelet from uncurling.
A safety note. Working with superglue for long periods of time will leave your throat feeling sticky. If you need to glue a lot of coils, spread it out over a few days! Please don’t make yourself sick.
First, you’ll need to determine the diameter of your jewelry. Tubing does not have any give. It’s like slipping a wooden bracelet on, so you’ll need to make sure to leave enough room to slip it over hands and feet and be able to get it back off once the day is over. You can use a piece of foam, a strip of poster board, or something similar to make your estimates on size. It’ll need to be something solid that holds its shape, so a tape measure wouldn’t quite work.

Once you have the size you want, tape your template together.
Leave about a 1″ tail in the tubing before you start winding the first layer around the template.
Once the coil begins to circle in on itself, draw a line of glue along the lower tube. You only need a thin line as superglue expands when two surfaces are pressed together.
Because superglue does require pressing to set, work a small section at a time, pressing the tubing together for about 30s or so. While the glue does say 10s, plastics seem to take just a bit longer to actually adhere. Continue coiling until you’ve made all the rings you want. The top tail isn’t glued down but leave about a 1″ tail before snipping the rest of the tube.

Next, you’ll need to secure the tails. The tails themselves are glued to the inside of the coils, one on top of the other. They cannot be bent inward at 90° then glued as it is plastic tubing. It isn’t that flexible, and the tails will just pop back out and not stick.
By gluing them one on top of the other, curled slightly inward, you can glue the tails together as well as to the coils to ensure the bracelet doesn’t come unwound.
Once you’ve finished gluing, tie the coils with a string or twine and let them sit overnight. While superglue is quick to dry, it needs about 24 hours to fully cure. Since we’ll be putting some stress on the coils while working, you want to make sure your glue doesn’t come apart in the process.
Preparing the tubes
Whether you glued the tubes together in coils or have free-standing tubes, you’ll need to prepare the surface. If you’ve ever tried to paint plastic, you’ve likely had the same sort of headache I’ve dealt with before. Plastic is often quite smooth and paint does not like to adhere to smooth surfaces. It needs a tooth to stick to, and to make that tooth, we use sandpaper.
Plastics such as tubing are actually quite delicate. Rough low-grit sandpaper will tear the plastic and create puckers, but too high a grit, and you won’t create any teeth. The 220 range is rather effective when working with plastics. You’ll want the sandpaper that comes in sheets at the hardware store. It’s often called wet-dry or dry sandpaper and is usually found in the sanding section of the store with Dremels, drills, and saws. This sort of sandpaper is used for work by hand, which is exactly what we’re doing.
A quick safety tip before starting. This process creates plastic dust. While it doesn’t get everywhere like foam dust or sawdust, you still don’t want to go sniff it or get it on your carpet. Work over a cleanable surface, outside, or over a trash can.
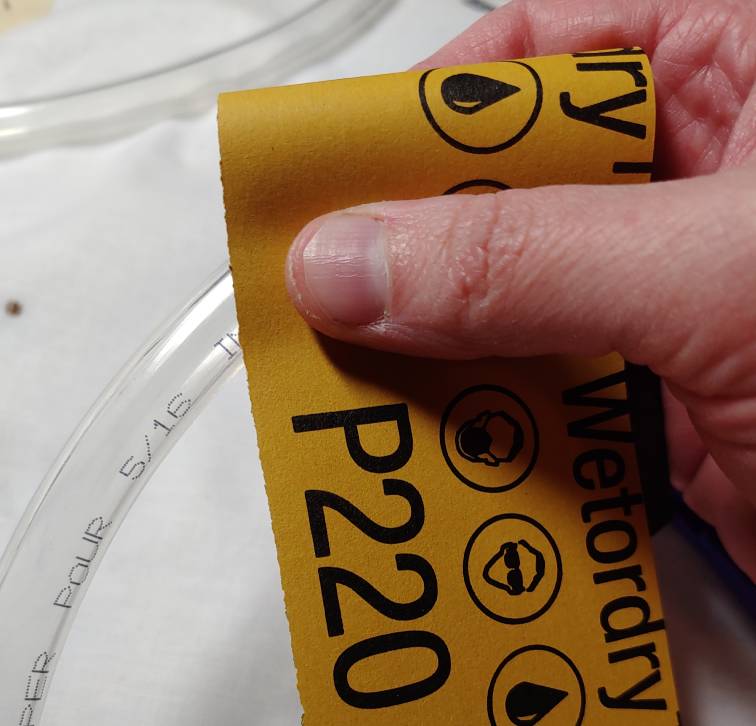
To start, cut a strip from the sandpaper sheets wide enough that you can press your fingers against it. Fold the paper around the tube and start scuffing by rubbing the sandpaper back and forth along the tube. Keep scuffing and scuffing until the tube looks milky and scratched.
As you move along the tube, you’ll need to check on the status of your sandpaper. If it starts looking white-ish, like you’ve rubbed the color of your paper, move to a different section of the strip. Once you’ve worn your strip out, discard it and cut a new one. Depending on the size of your project, you may use several sheets of sandpaper to properly scuff up all the tubing.
Once the tubes are sufficiently scuffed, it’s time to prime.
Priming

Even with the tooth you’ve created, paint still hates plastic. With all types of primer, whether it’s flexible or not, it will absolutely fight you during this step. But we can fight back with primer.
When priming, you want to do one side at a time. Loose tubes tend to wiggle, and coiled tubes require you to have some sort of grip on them to properly prime. Work sections at a time. Until you’ve primed both sides and all sections of the tubing you wish to paint.
You may notice that the primer seems to tear, especially on the first coat. This is due to the plastic not having enough of a tooth for the primer to adhere to. This is unfortunately a side effect of the sanding process, as you can’t really get every inch of the tube properly scuffed. And to handle this tearing, you’ll want multiple coats of primer. I find about 3 coats are sufficient to fully coat the plastic tube and prevent the paint from tearing.
Base coat
You may have noticed my bracelets at the top of the article have a speckled, weathered look to them. This is an effect you can do if you want to make your bracelets look more metallic and less like metallic-painted plastic. This effect is all due to a base coat.
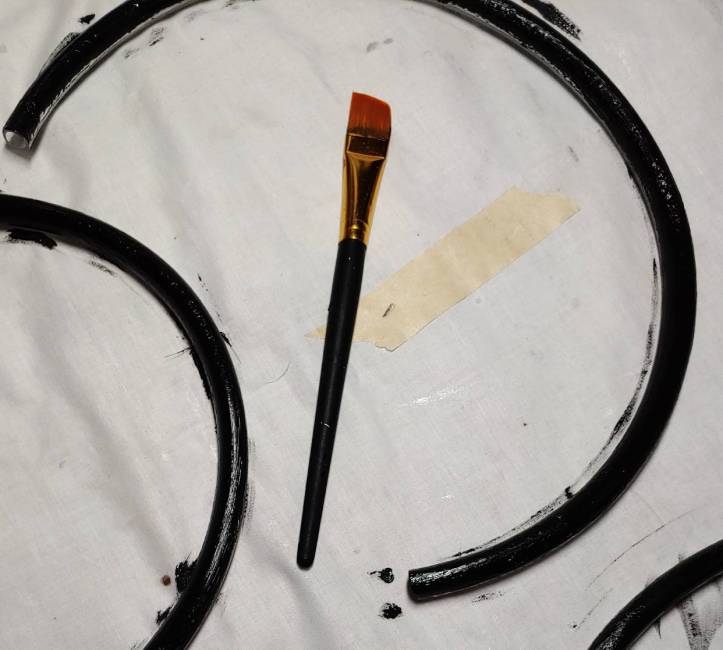
A white base coat will appear brilliant and tends to look fake, but a black coat will give it a more weathered and natural look when you put the metallic paint on top.
If you want this more weathered look, paint the entire tube black. If you want a plasticky, anime look, paint the entire tube white. Make sure to cover the entire tube on all sides, leaving no gaps. You may have to rotate the tubes or coils in your hands to catch the light and double-check that no spots have been missed.
Painting
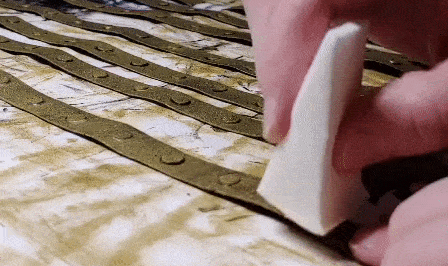
Next is the painting stage! To paint the tubing, I used the same method I described in Painting weathered metal with a makeup wedge. For this method, you need a makeup wedge sponge.

Pour some of the metallic paint into the bowl. Dip the flat square end of the makeup sponge into the paint then wipe the excess off on the side of the dish. This leaves you with a thin layer of paint on the sponge.
Now dab and dab some more. Dab the sponge on the plastic repeatedly until you get decent coverage. The more weathered look you want, the more black you want to show through. If you want it less weathered and looking more like metal, cover the area a bit more. Do a few layers of dabbing to add more paint to the tubes.

Move along the tubing and work in sections. You’ll want to move quickly as if you overlap a dried section with a wet section, it tends to stand out as too thick when dried. So make sure to finish a side of the tube before setting it down to dry.
When you notice the sponge putting less and less paint on the tube, dip it into the bowl, wipe off the excess, and dab some more.
Because this process leaves a thin layer of paint, make sure the paint is completely dry before flipping it over to work on the other side. If you don’t, it will dry against your paint mat or the fabric then rip off once you lift the tube up.
Once you’ve fully painted your tubes, it’s time to finish and make the tube truly shine.
Finishing
Paint in general is terrible at cons. One bump and you’ve scuffed off your hard work. So using a finisher will help protect your work. And with thin paint like with the sponge dabbing, you definitely don’t want that coming off at the con or on you.
Since the sponge paint is super thin, you don’t want to use a paintbrush to put the finisher on. That will pull the metallic layer clean off even when dry. Instead, you need another sponge!
Pour some finisher into your bowl and dab the square end of the sponge into it. You can wipe some of the excess off on the side of the bowl, but unlike when painting, you want your sponge to be pretty saturated here. Take the sponge and rub it across the tube. Work in sections, much like before, rubbing the gloss finisher across the entire length.
You’ll want two layers of gloss finisher to ensure you protect your hard work. Once it’s dry, you’ll notice how nice and shiny this finisher makes your project.
Sewing tubing
If you didn’t glue your tubing together, you may end up sewing it instead. This is good for attaching to fabric and making the tube look like a singular ring. For this process, you’ll need a heavy hand sewing needle, some invisible thread, and a thimble.
First, mark out where you want the tube to sit on the fabric in pencil or chalk. It’s easier to lay this out ahead of time instead of guestimate and have to redo the entire tube when things get crooked or go awry.
Once you have the markings, lay one open end of the tube flat against the seam where you want to hide where you’ve connected the ends. it could be along the inner side of your leg, which is often where zippers and snaps are used to hide closures. For my project, I put the closure in the back since I knew the long tunic would hide it.

Regardless of where you chose to place the closure, it’s time to start sewing. Start at the opening of the tube and do a few quick staystitches into the tube opening to ensure the end stays put while you work.
Now it’s time to sew the tube. Use a whip or a basting stitch for this process. Pull the needle up through the fabric and carefully spear the needle through the bottom of the tube using the thimble to push it through. The closer to the bottom of the tube next to the fabric, the easier it will be to hide the stitching. Continue around the whole length of the tube, keeping the angle of the stitch underneath the fabric.
Sewing TUBES next to each other
If you have tubes close together, a straight spear across the tube won’t really work. Spearing through that much plastic, no matter how good your thimble is, is incredibly difficult. You’ll find yourself struggling to pull the needle out. Instead, you’ll need to change your angle when working with tubes together.

The easiest way to do this is in two steps. First, sew the 1st tube as instructed in the section above. This makes a stable base for the other tubes to lean against. Next, is to sew the 2nd, 3rd, etc tubes at an angle, spearing the side of the tube and exiting near the bottom of the tube and through the fabric. Despite the angle, the tubes lean against the first tube and stabilize. They don’t roll at all.
Finishing the tube ring
Last comes the hard part. How do you get the tubes to make a full ring if you cannot glue them? Sewing, of course! Since you’re using invisible thread, it hides the stitches and makes it look like the tubes are held together with a glued seam. I recommend trying this on spare tubes first before using this on your final work. It took me a good few tries to get this to work right.

The trick is a zigzag stitch. I tried a few different types of zigzags, and the one that works best is to alternate stitches on the inside and outside, kind of like your patching two sides of fabric together. It’s like a whip stitch but with a plastic tube.
While making the stitch, keep the sides separate so you can get the needle in then back out. You’ll need to be able to squeeze your fingers inside just enough to grab the needle. Pull the needle out of the tube, then maneuver it back inside the tube to spear back outside. It takes a bit of practice to get the maneuvering and not accidentally spear yourself or the tube.
Once you’ve made the zigzag, start at the end sewn to the fabric, and pull the stitches tight. Work around the tube and pull each of the stitches until the tube closes shut. Make sure not to pull too tightly else the tube will begin to pucker.
Once you’ve tightened all the stitches, tie the loose end off on the fabric, under the tube, or next to it to hide your knot.
Repeat for all your tubes and there you go! You have sewn rings!
I hope this helps give you ideas of how to make ring-like jewelry and accessories with relatively simple materials. Tubing makes excellent con-safe rings that are easier to work with than trying to bend foam dowels around small circles. It’s a cool technique I plan to use wherever I need coiled bracelets and ring bands.
If you use this technique, let me know! @ me on social media and show me what you’ve made!
