Bruno Bucciarati has very large and noticeable clips in his hair at the edge of his bangs. They seem to vary in size depending on the manga frame or who the key artist was that day in the anime, but when it comes to cosplay, sometimes bigger is a little better. They’re more noticeable in photos, and honestly with the curves of the clips, larger was easier to build.

I’ve included my own pattern with this project. You can work with that one or make your own. My pattern features curved segments to match the animator’s references.
This tutorial also uses paper mache to strengthen the base of the clip. If you haven’t worked with paper mache, you can check out my crash course here: Paper mache for props and accessories.
Skill level: beginner-friendly
Cost: budget-friendly
Materials:
- 1 small food box. I used a taco box
- 1 small sheet of craft foam/foamies
- 2 small alligator clips. The kind with teeth work great.
- Small amount of uncoated newsprint. Leftover newspaper, newsprint from a sketchpad, weekly ad for groceries. Any kind of newsprint as long as it’s not glossy
- Small cut of thin black elastic. 1/4″ is preferable. You can find it in the sewing aisle.
Supplies:
- Mod podge or white school glue for paper mache mixture
- Small bowl not used for food. You don’t want to do crafts in your food bowl.
- Towel. Your fingers will get messy.
- Something to protect your table like a tablecloth or scrap cloth
- Pens for marking
- Masking tape or painter’s tape
- High temp hot glue gun and glue sticks
- Acrylic paint – black and metallic gold. Can also use spray paint. If you’re doing one of his alternate colors, change the gold to whichever color matches
- Paintbrush or a makeup wedge
- Glossy varnish. Use glossy Mod Podge or your favorite varnish. I use DecoArt gloss
- A means to print the pattern out. If you don’t have a printer, check out your local library to see if they have free printing.
Pattern:
This pattern can be printed on regular letter or A4 paper. Make sure not to scale or fit to page when printing.
Making the base
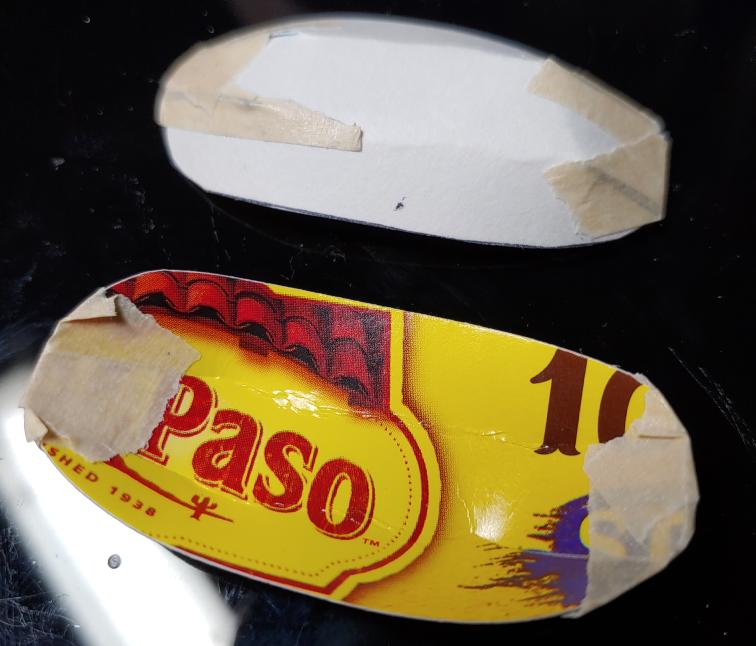
To make sturdy clips, you need a sturdy base. And surprisingly a regular food box works great for this. I used a taco box for this project, but you can use a cereal box, pasta box, or even the box your nuggies came in. You want a box that’s clean, not creased, isn’t glossy, and large enough that the base pattern fits without overlapping a seam in the box.
Cut two of the base pattern piece out of a food box of your choice with a pair of scissors (not your fabric scissors please). For each piece, bend the box next to the triangular cuts to push the two edges of the triangle together. If the box fights you, gently crease the box with your fingers and try again. You want the edges to press together and not overlap. Tape them together with a piece of masking tape.
Repeat this for all triangular cutouts and you’ll have two half egg shapes.
Don’t worry about labeling which side is which just yet. The paper mache will cover any of your markings.
Paper mache time
While the food box is pretty strong in this shape itself, we want it stronger to handle clips and conventions. And masking tape will lose its stickiness after some time, so we want to secure those angles.
If you haven’t worked with paper mache, I have a primer that will go over all the basics: Paper mache for props and accessories. I strongly recommend Mod Podge for this as it takes the guesswork out of the glue ratios. It’s much cheaper to get a bottle from the craft store or Walmart as online charges way too much.
Cover your table and let’s get started. As this is a small project, you’ll want short thinner strips to be able to contour around the edges. Start by gluing each individual piece on the food box, leaving some of the paper to hang over the edges. The order that you do these pieces doesn’t matter, but I started at the middle and worked my way around the curved edges.
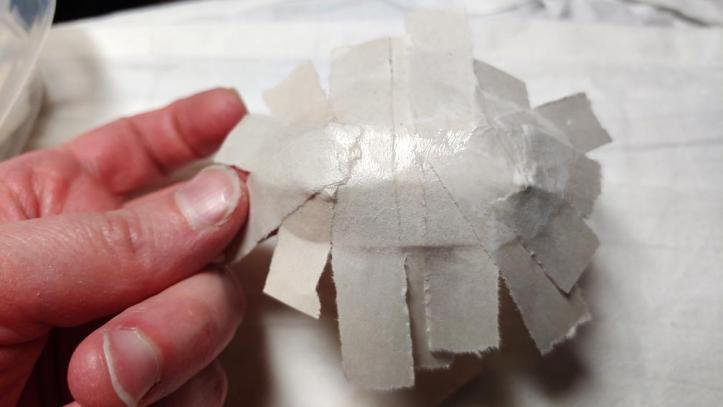
Once the clip is covered, let it sit paper-side up on the table for a few minutes until it feels dry to the touch. Work on the second clip in the meantime and cover that one too.
Once the first clip is dry to the touch, flip it over. Fold the paper strips over the edge and glue them down with the Mod Podge or glue mixture. Start with whichever strips you started with on the top. For mine, I started in the middle so I glued them down first.
For the strips around the curved edge, you can approach it a few ways.
One method is to take a pair of scissors and cut the strip in half up to the edge before wrapping and gluing the strip down.
The method I used is to glue the whole strip down. This will cause a bit of the strip to stick out from the edge. Push that sticking-out part down and glue it to the underside of the clip like a little triangle fold. The fold will be on the underside and not visible in the end.
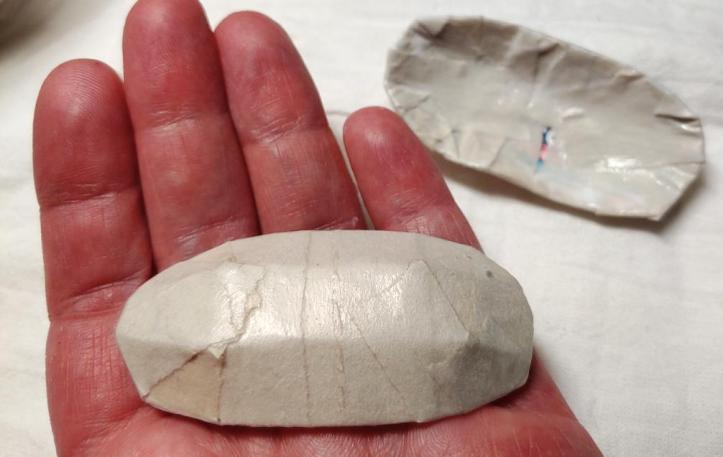
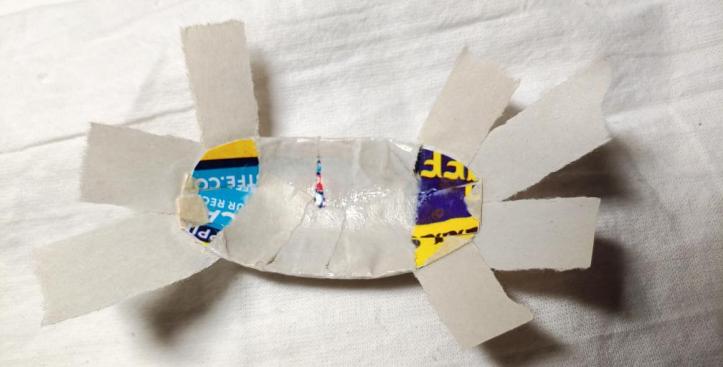
Let the paper mache dry fully overnight. I recommend propping them up on something or using a cookie rack that you don’t actually use for food (don’t mix crafts and food) to allow for air flow over both sides of the hair clip.
Adding the top details
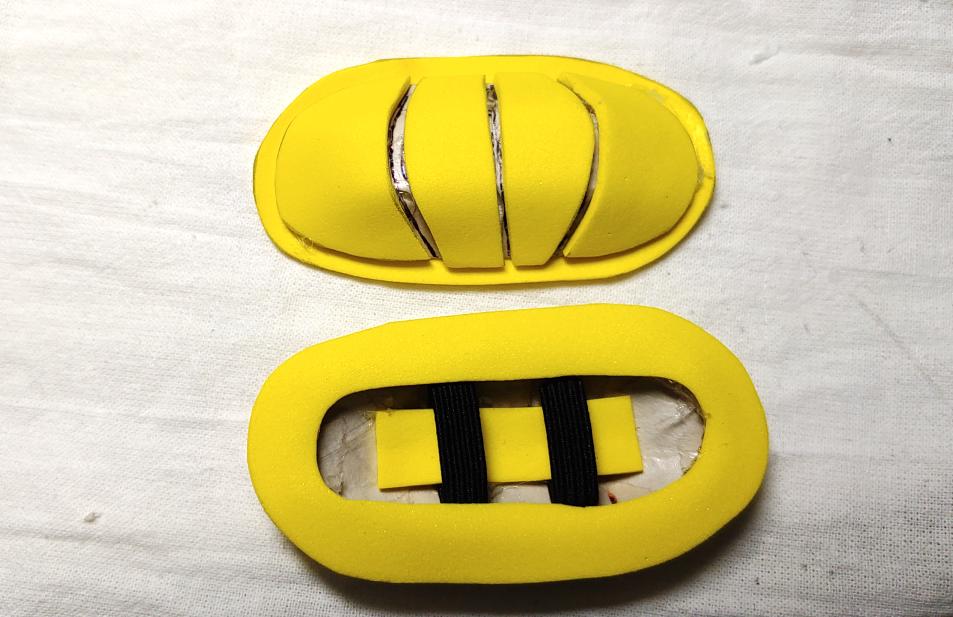
While you could leave it as is and paint the details on, adding the foam sections makes it really stand out and gives it volume like the clips are in the anime.
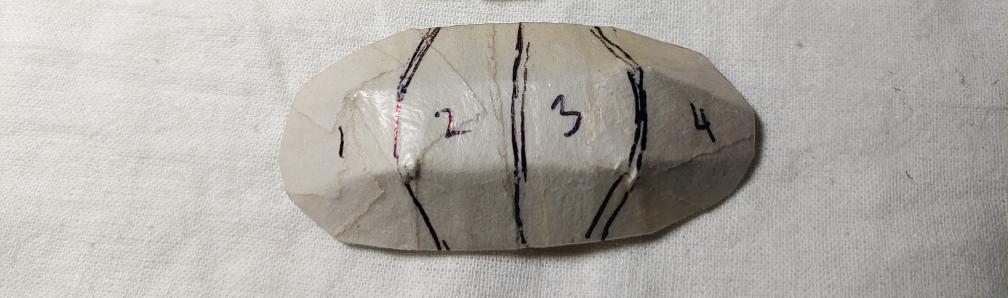
Cut the “top detail” pattern pieces out then trace these pieces onto foam. You want two sets of these pieces, one set for each clip. Make sure to number the pieces so you can keep track of which is which. the sections are curved in the center as this is how the animator’s reference showed them to be. You can create your own non-curved pieces if you desire.
To make sure your top details are glued on straight, you’ll want to number each section on the clip itself with a pen. For the pattern, #4 is on the side where the two dart lines are closer together and #1 has dart lines that are more spread out. Fill in #2 and #3 in between in numerical order.
Warm up the glue gun. It’s time to add the details. You can start with any piece order you like. Glue the numbered-side down with a little bit of hot glue near the edge of the foam. You want the numbered-side down as the writing can show in the final version because the pen indents the foam just a bit.
After it’s cooled just a little bit, you can press down on the piece a little bit to secure it as need be. Don’t do this right after gluing as you can feel the heat through the foam and can burn your fingers.
Repeat this for all sections.

Adding the bottom details
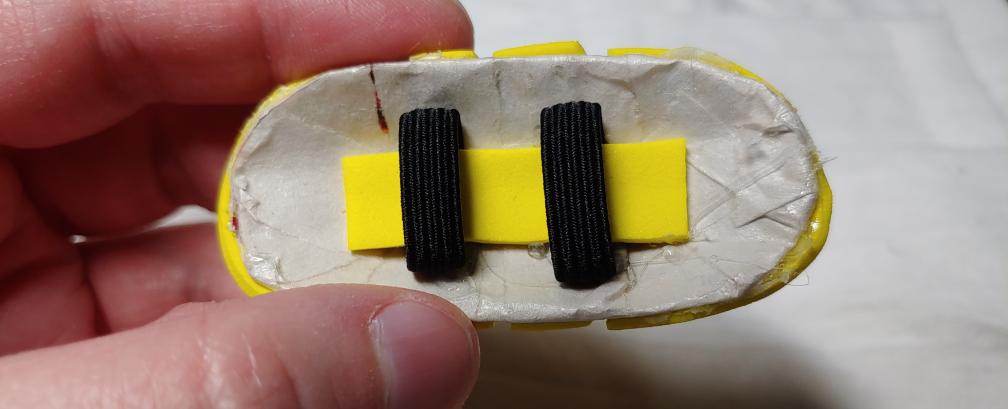
The hair clips have a noticeable lip at the base and we still need a way to attach this to the wig. We’ll actually start with the attachments as it’s easier to work with those first before adding the lip around them.
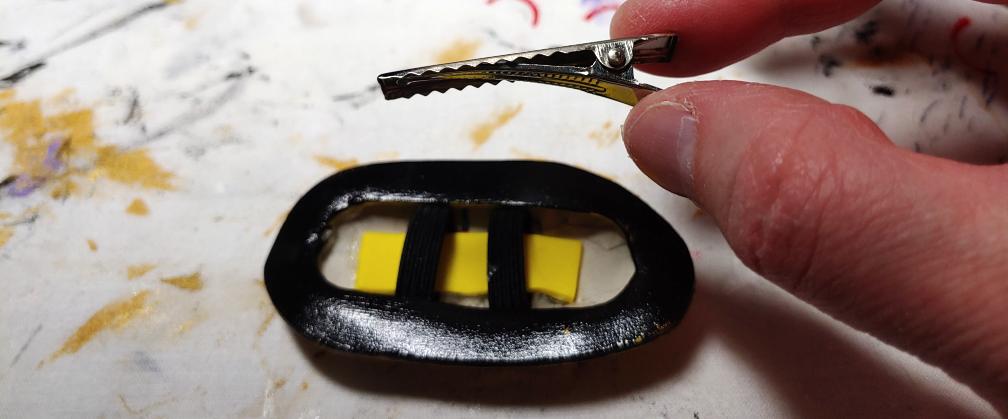
For this, you’ll need two small loops of thin elastic. These little loops shouldn’t be wider than the clip itself when looped and the ends should be able to overlap just slightly. Mine are looped pretty tightly and only take up about 3/4 of the width of the hair clip.
These loops should be glued near the center of the hair clip at about sections 2 and 3 from the top details. You want two loops to stabilize the clip and keep it from wiggling around when you’re wearing it. When gluing the loops down, do not touch the elastic as you risk burning your fingers. Instead use the back of a paintbrush, a comb, or something similar to press down on the elastic to make sure it is securely glued to the back of the hair clip.

Don’t worry if the glue seeps out the sides of the elastic. The backside won’t be seen anyway.
To fully secure the loops, add a small thin strip of foam inside the loops and glue it to the back of the hair clip. This ensures you won’t lose a loop or clip while at a convention or taking the clips on and off your wig.
Like with the loops, you don’t want to touch the hot foam. As this foam isn’t visible when worn, you can press on it with a paintbrush or comb or the like and not worry about denting the foam as you work.
Next is the lip on the edge of the hair clips. Cut two of the “band” pieces from the pattern out of foam, making sure to cut the inside oval out too to make a misshapen donut. The band overlaps the edge and crosses over into the underside a bit as hot glue is very bad at gluing tiny edges to something. It’s easier to glue the whole clip down onto the band.
Place the clip down on the band. It should have an even lip on all sides of the clip. With a pen, lightly trace the shape of the clip as close to the edge as possible. With the extra width from the top details, you may have to angle your pen to get underneath. Remove the clip and add glue to the inside of that traced edge then stick the clip down at your traced edge and press for just a few seconds.
If any glue seeps out from underneath the clip, wait until the glue has cooled a bit before attempting to pick it off the foam. Rubbing alcohol can loosen up the glue and make it easy to remove.
Painting
Before you can start painting, you’ll need to seal the foam. Foam itself is porous so the paint won’t be even unless we give it a good base to stick to. Paper mache glue and Mod Podge both are really good bases to seal your foam.
Paint a layer of sealant on the foam, making sure to get into those little crevices to seal the edges there too. Let the layer dry about 15 minutes or so then paint a second layer, letting that dry too. Flip the clip over and paint the bottom of the lip with the same process.
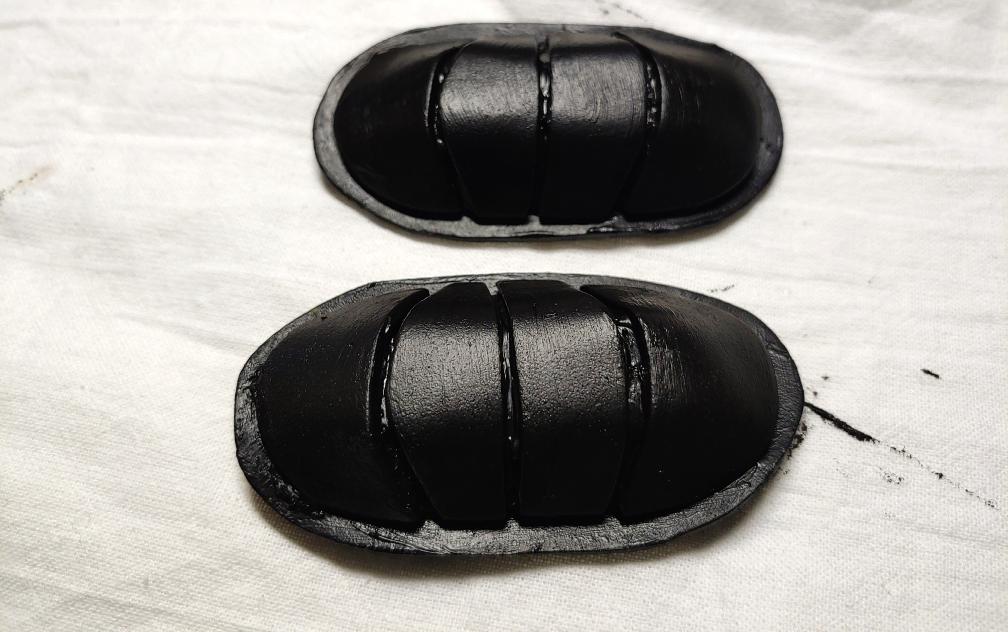
Now paint it black. Both the top side and the bottom of the band, making sure to get all the small foam edges and completely cover it. This black base layer is going to give you that cool line effect in between the raised foam sections to make it look more like it’s drawn in the anime. You want to paint the bottom of the band as well so that any foam colors won’t peek out when you’re wearing the clips.
Let the paint dry completely between each coat and before flipping the clips upside down. Once everything is dry, it’s time to make them shine.
There are a number of methods out there to make paint look shiny and metallic. My preferred method is using a makeup wedge or an old sock to remove the brush texture and stipple the paint on top. I detail the whole method here: Painting weathered metal with a makeup wedge.
Normally I use this method to make something weathered, but in Bucciarati’s case, he keeps his accessories very shiny. So if using this method, add two coats or more of paint using the wedge. Make sure to let the paint fully dry before adding the second coat else you’ll pull your hard work right off. This method paints with a very thin layer of paint.

Two coats will make the clip very shiny and vibrant. The wedge technique also will leave the black visible between the raised foam pieces. If you do happen to get any gold in the black channels, take a very small paint brush and carefully paint the black back in.
Regardless of which method you use, you want to seal your hard work. Conventions are very rough on any accessory, and you don’t want your paint chipping or rubbing off onto your cosplay (especially not with how much white Bucciarati wears in his standard outfit).
You want two coats of your varnish of choice. I personally use DecoArt gloss varnish, but you can use glossy Mod Podge, spray varnish, or anything else that can protect your precious work. Make sure that your varnish completely dries before adding a second layer and flipping them over to varnish the backside of the band.
If you used the makeup wedge method, you cannot apply varnish with a brush as the bristles will drag your metallic paint away. Instead rub the varnish on with a makeup wedge. Make sure to apply at least two coats, letting each coat dry before applying the next.

The varnish holds true and protects your paint job as these clips have already survived one con and a flight to get there.
Adding the clip to the clip
The final step is to add the clip to the clip so you can clip it to the wig! You want a short alligator clip with teeth. Mine is about 1 1/2″ so anything around that should be good. It needs to fit inside the hair clip fully. Any part that sticks out will cause the hair clip to also stick out from your head.
Flip your hair clip over. You’ll want the flat side of the alligator clip facing up so that the clip sits as flat as possible against your head when worn.
Open the alligator clip and slide it inside the loops. The clip shouldn’t tuck underneath the band as you won’t be able to open the alligator clip. If it does, your clip is too long!
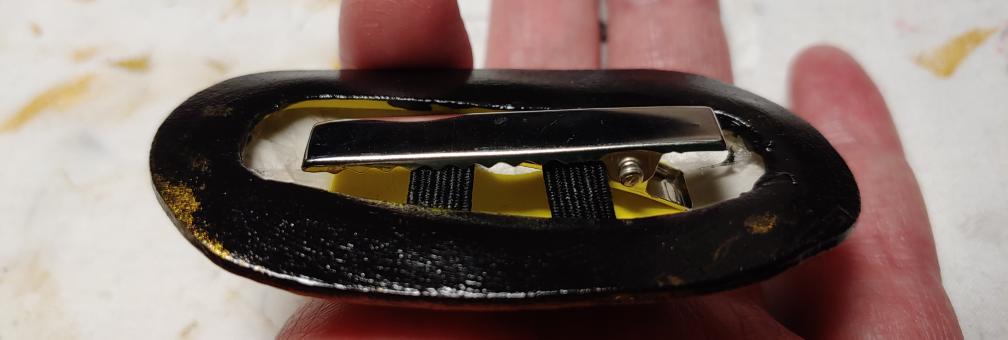
When clipping the hair clips to the wig or your hair, you won’t be able to get your fingers inside to operate the alligator clips. Instead press on the flat side of the alligator clip and the top side of the hair clip. Because the base is paper mache and cardboard, you can press on the top without damaging the structure and operate the hair clip as you would a very large barrette.
Now you have some cool custom Bucciarati hair clips! Enjoy!
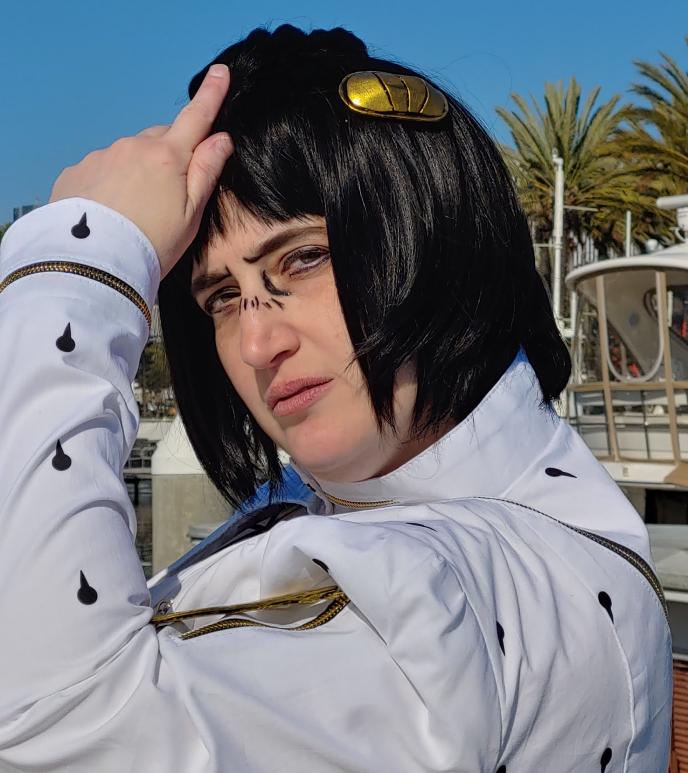
I hope you enjoyed this tutorial on how to make your own custom hair clips! They’re large and really pop in photos. They’re also pretty hard to lose in your suitcase. I keep mine in a small baggie in my wig so I never lose track of it.
They’re durable, uniquely yours, and budget-friendly! You can paint them any color you like for any of his alternate colors. I’m considering the blue manga version myself.
Let me see your Bucciarati clips! @ me on social media so I can admire your work and we can JoJo together!

Looks so real! I would’ve never guessed that it is paper
LikeLike