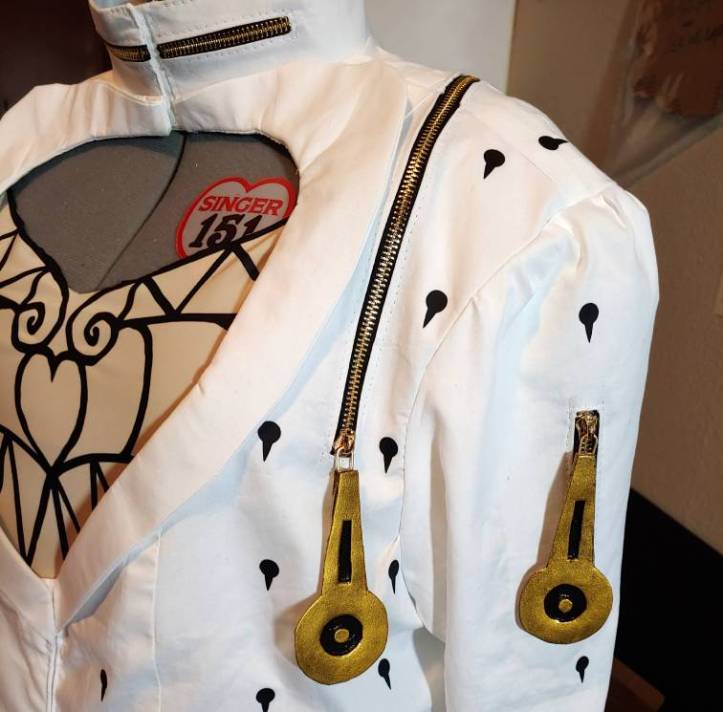
Metal zippers just look cool and come in some very striking metallic colors, usually gold and silver, but I’ve also seen metallic rainbow as well. Bruno Bucciarati was the first time I had encountered the metal zipper. His jacket featured several metallic gold zipper accents on the sleeves, collar, and shoulders, and metal zippers make the cosplay truly shine.
Metal zippers have a bit of a challenge if you’ve never worked with them before. The big two are that you cannot cut or sew metal! You’ll break your tools right away. Instead, you’ll need to modify the zippers to work with them. These techniques can work with both zipper tape and premade zippers.
These techniques do require a lot of hand strength, so if you have any problems with your hands, arms, or shoulders, make sure to take breaks when modifying zippers!
Alright, let’s get started.
Skill level: Intermediate
Budget: Moderate. If you have all the tools, it’s pretty budget-friendly to modify more zippers
Materials:
- Zipper tape with pull sliders OR a manufactured zipper
- Zipper stops (required unless you’re doing some kind of fully enclosed zipper)
Tools:
- Needlenose pliers (2 if you are removing the zipper pull tabs)
- Needle and polyester thread
- Fabric scissors
- Ruler
Optional goodies:
- Removable replacement zipper pulls
- Contrast zipper pull sliders
About metal zippers
Your average zipper in the sewing notion section at the store is likely going to be a coil zipper. While coil zippers may feel like metal, they’re actually plastic teeth, usually coiled nylon or other synthetic materials. You can cut these with scissors and even sew across them.
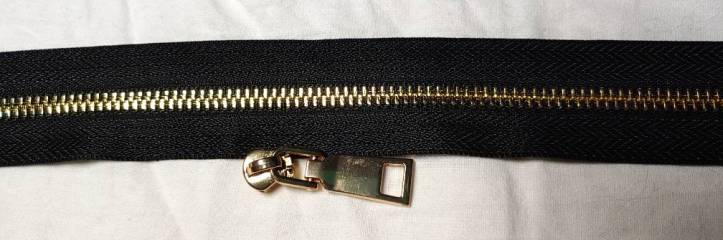
Metal zippers are actually much older than coil zippers but they’re still around and you can still buy them online pretty easily. They tend to be metallic colors since coil zippers don’t do metallic very well. You can buy them as zipper tape, which is just a long roll of zipper with a baggie of pulls, and this is the cheapest option when working with zippers. You might be able to find them as premade zippers, but more likely you’re going to find them in gramma’s old sewing basket. I have several I inherited from my gramma for pants and dress closures.
Metal zippers are a little unusual as they don’t always come on polyester tape like coiled zippers do. The ones shown here will have the polyester type, but others may have soft cotton twill tape. My older zippers almost exclusively have twill tape. There’s not really a difference when sewing, but if you plan on burning the edge of your tape with a lighter to prevent fraying, make sure it’s polyester.
Replacing the pull tab
Bruno’s jacket has remarkably large, stylized pull tabs. I wanted to replace the tabs that came with the zipper pull with removable ones so I could build and paint new pull tabs directly on the tab itself without risking damaging the jacket with paint. I also wanted them removable for spot-cleaning the cosplay. This may not be for every project, but it’s a good thing to know if you do need stylized pull tabs for your cosplay or just want to replace them with a different design.
Now honestly I don’t know the proper names for the parts of a zipper pull. Every sewing site I looked at had a different name. So for here, the tab is the part that you pull with your fingers and the slider is the part that slides along the zipper teeth.
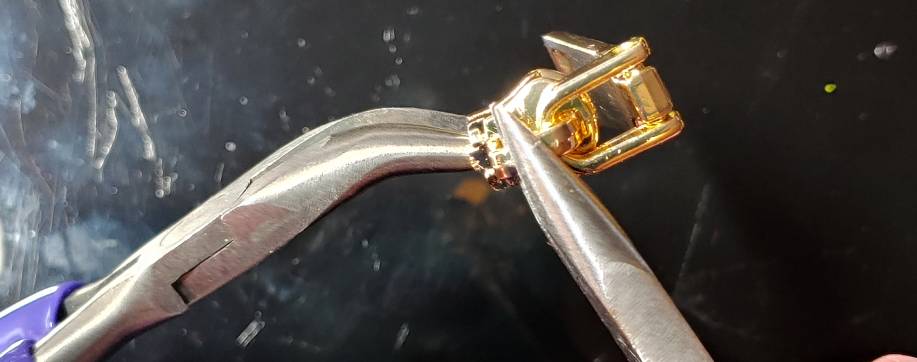
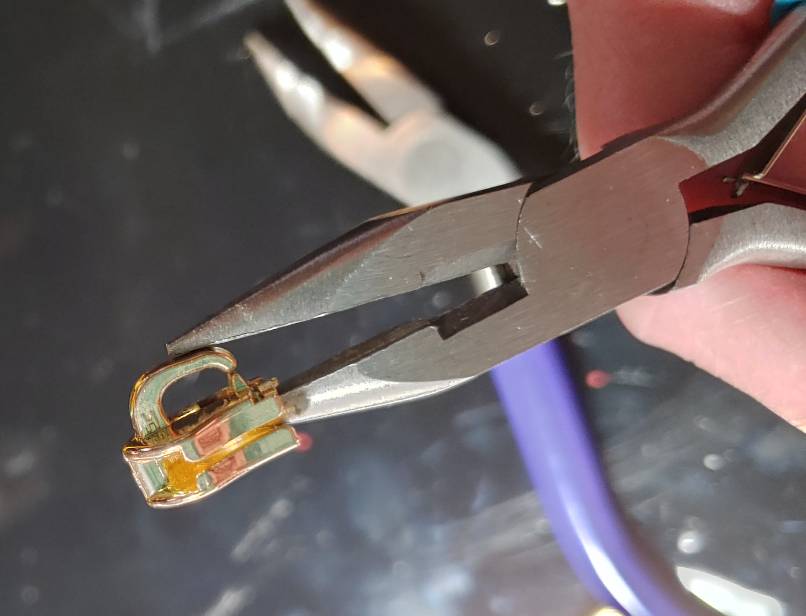
You will need two pairs of pliers for this. I recommend one be curved needle nose pliers as it just felt better to grip with. This process is surprisingly delicate so make sure to do this slowly and gently. I broke several pulls until I got this down.
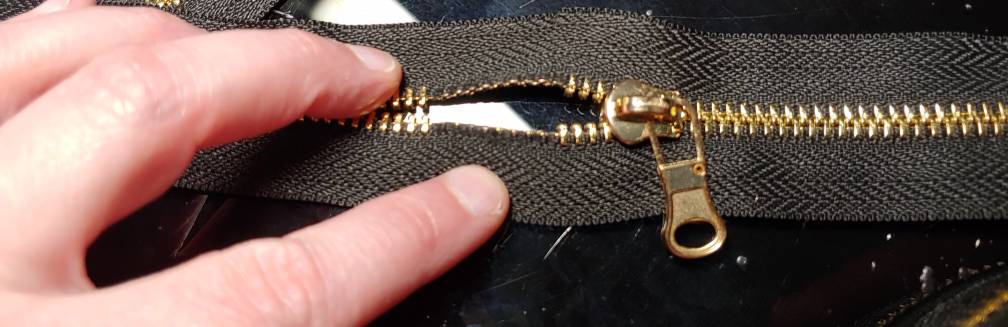
Make sure the pull tab is at the top of your slider and out of the way of your work. Grip the slider with your curved pliers. Since you don’t want to bend the slider itself, stick one side of the pliers inside the slider. I found it easiest to stick the pliers inside and on the back of the slider for the best grip.
Take your flat pliers and grip the bar holding the tab firmly. Now carefully and slowly pull the bar towards you. During this process, you may need to open the flat pliers and reposition them closer to the tab to ensure you’re bending the bar and not snapping it in half. It doesn’t need to be far, just enough to wiggle the current tab off.
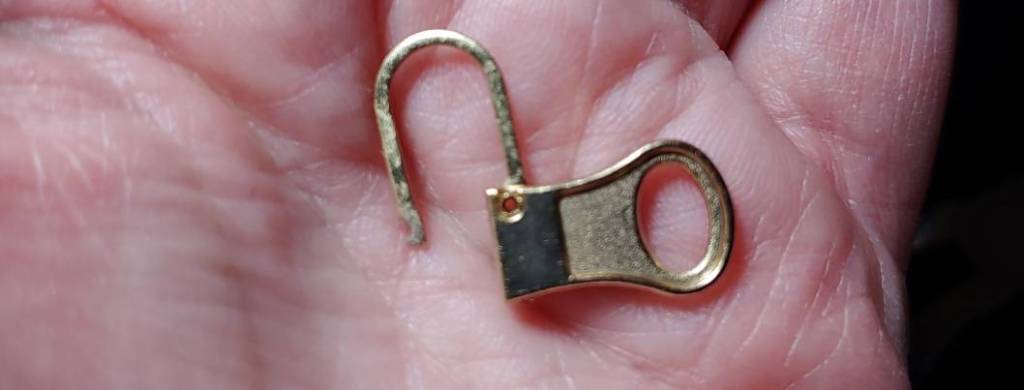
Once you remove the tab, you want your replacement. You can buy pull tabs or zipper repair kits that come with replacement tabs. For Bruno, I wanted a removable one. These can come hinged like the one pictured below or with a lever that opens the pull tab. I liked the hinged ones because I didn’t have to worry about hiding a lever in the finished giant zipper pulls.
If you are using a removable replacement, you can set it aside. Otherwise, slide your new pull tab onto the bar and hang it over the top of the slider. You’ll need only your flat pair of pliers for this.
Much like when removing the pull tab, you don’t want to crush the slider itself. Insert the pliers inside the slider with the other side on top of the bar. Gently push the bar down to meet the slider.
Once it’s closed, if you have a removable pull tab, hook it on the bar as you’ll need it to pull some teeth next.
Pulling teeth
For any zipper modification, you’ll need to remove the zipper teeth so you can cut or sew the zipper. This part will be the most strenuous work, so make sure to take your time when doing this. To pull teeth, you’ll need your needle-nose pliers. I found the flat kind worked best for this process.
Pulling the bottom teeth
If you’re using zipper tape, gently pull the teeth apart with your hands. This side of the zipper tape will become the bottom of your zipper.
If you’re using a premade, mark how much you want to shorten the zipper with a pen or chalk. Slide the zipper pull up near the top of the zipper and pull the bottom of the zipper open with your hands near your marked line.
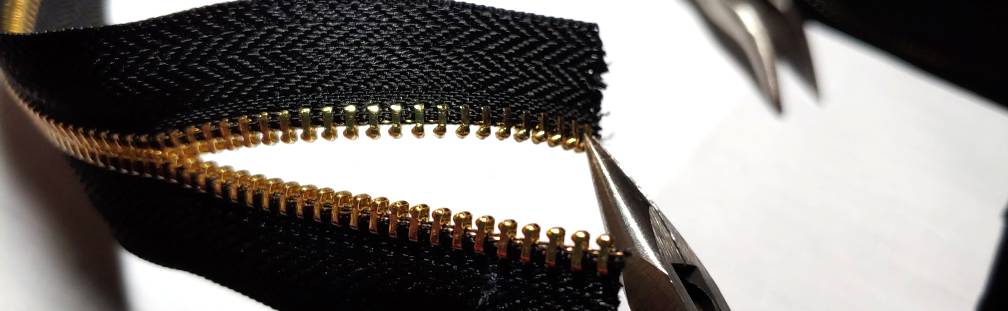
For both kinds of zippers, you’ll want to pull about 1/2″ of teeth up to your mark or from the bottom of the tape. Work one side at a time. There are a few ways to pull teeth, but this is the method I used to pull a lot of zipper tape for Bruno’s jacket.
Turn your pliers sideways and grip the tooth itself that is hanging over the edge of the tape. Grip the sides of the tooth rather than squeezing the top and bottom against the tape. With the tape in your other hand, pull the tooth out and away from the tape. I find that giving it a slight twist tends to free the tooth more easily, especially that stubborn first tooth.
If you lose your grip on the tooth, just grip it and pull again. Some teeth are more stubborn than others and may take a few pulls to come loose. I definitely had to repeatedly grip and pull a few teeth during this process. Just make sure you have room and don’t accidentally elbow someone or a wall if you lose your grip.
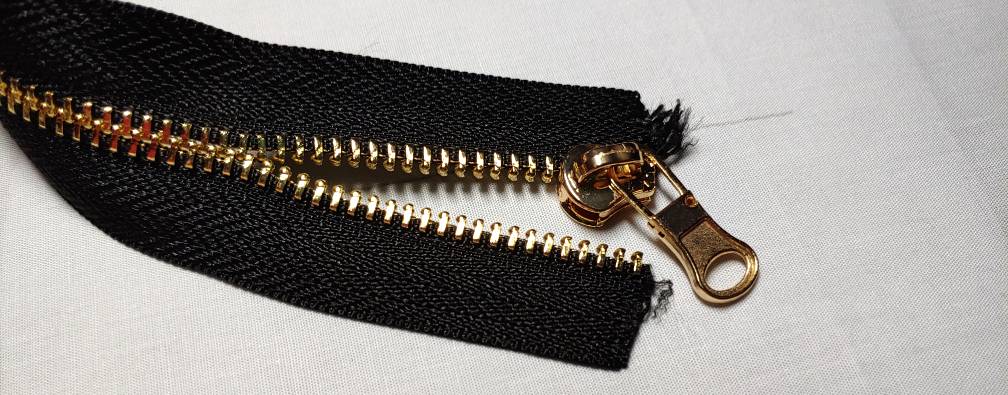
Continue pulling teeth up this side until you’ve reached your line or pulled about 1/2″ worth of teeth. You can approximate. This 1/2″ gives you a place to sew your teeth shut or add a stopper later.
Now you want to close the zipper. Unfortunately, we can’t press the zipper teeth back together with our fingers, so we need to use the zipper pull and correct the direction of the teeth. If you’re using a premade zipper, pull the pull slider completely off the bottom of the tape. Trim the extra zipper tape off, leaving that half an inch or so of toothless tape still attached.
Insert the zipper teeth into the pull slider. Pull the teeth apart a bit with your hands to separate them. Insert the teeth into the slider one side at a time with the bigger side of the slider facing the teeth. Once the two sides are inserted evenly, pull the zipper by the tab.
Pulling the top teeth
If you’re working with zipper tape, you’ll need to pull the top teeth as well so you can cut and sew the zipper and make it the correct length. So more pulling!
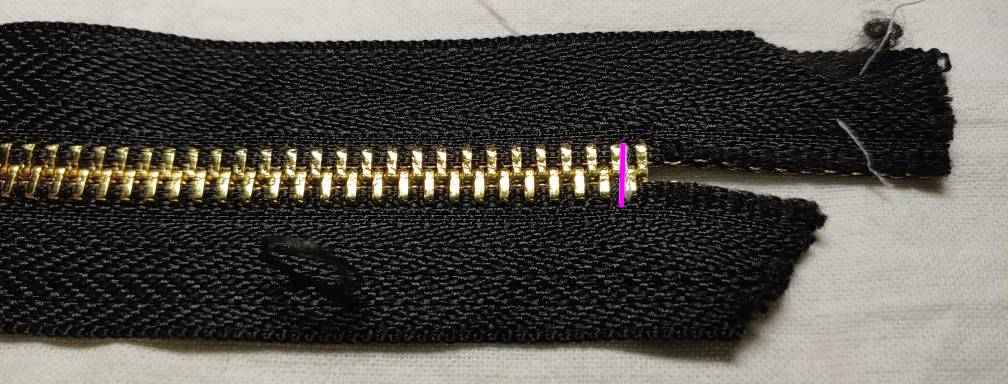
Measure the tape from the bottom tooth up to determine how long your zipper should be. You can also pin the zipper to your cosplay or whatever you happen to be making to determine the length. Mark the top tooth of the zipper.
Pull the zipper head up to your line then back down towards the bottom to open the teeth. Right above your line, pick a side and grip the first tooth with your pliers. The other teeth will push out of the way naturally as the tape bends.
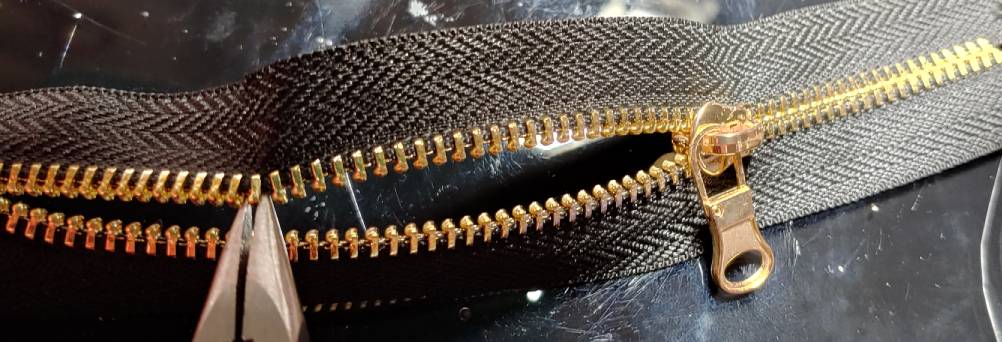
Much like with the bottom teeth, the first tooth will be the hardest to pull. It may take a few tries to get this one out. I found a slight twist with the pull was pretty effective here to get that stubborn first tooth out.
Pull out about 1/2″ worth of teeth then a bit beyond that. This gives you more room to cut the tape and leaves a few fewer teeth to pull out the next time you make a new zipper.
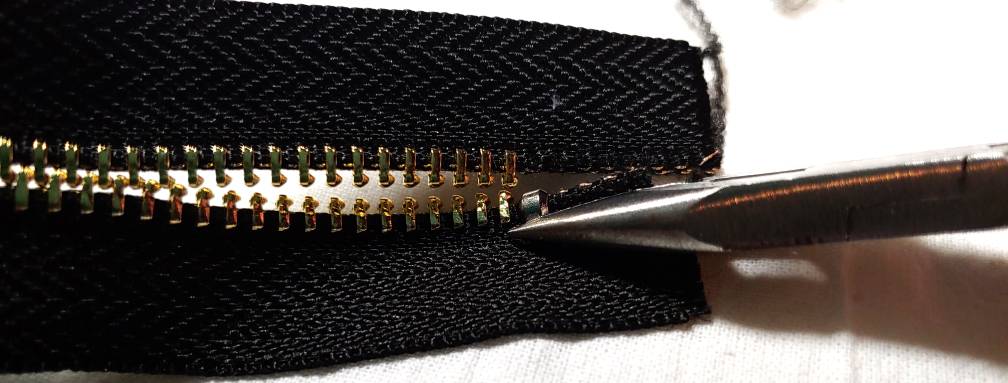
Pull the zipper pull up to nearly the top, leaving a few teeth above the top of the slider. Take a pair of fabric scissors and cut the tape at about 1/2″ above the top teeth.
If you accidentally slide the pull off the teeth, you can’t push it back down from the top. You’ll need to reinsert the pull at the bottom of the tape much like you did after pulling the teeth at the bottom.
Adding stops
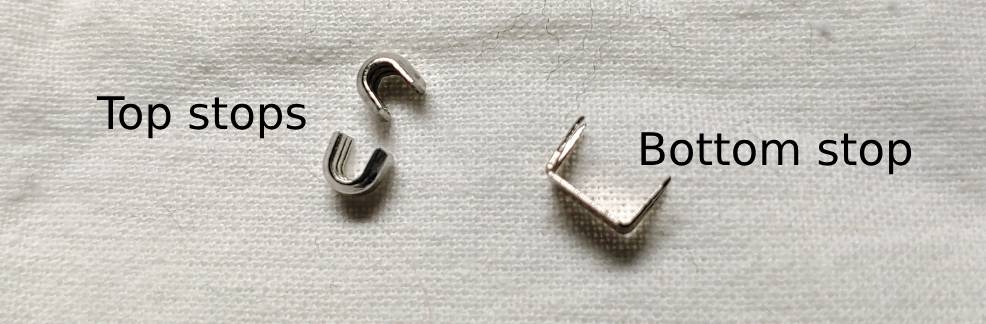
Stops do exactly what they say: stop the zipper pull from being pulled off the zipper. Your zipper tape might come with stops, but you can also buy them separately in large packs. There are two types of stops:
- Top stops, a pair of stops at the top of the zipper that stops you from pulling the slider off the top of the teeth when you zip the zipper all the way up. They have a C-shape.
- Bottom stop, a single stop that straddles the teeth and stops you from pulling the slider off the bottom when you unzip all the way. Kind of looks like a staple.
For most projects, you’ll want at least the top stops. The bottom stop can be replaced with thread if you want to temporarily tack your bottom stop before sewing with a machine. For Bruno’s jacket, no stops were used as the zippers are purely ornamental. The sliders are sewn in place with the same technique used to tack a bottom stop.
There are more techniques for making stops other than what’s listed here. These are some of the simpler, more easily accessible methods that you can use to add stops to your zipper and not accidentally yank your slider off the teeth.
Here’s how you add each kind of stop. Make sure your slider is installed before doing this.
Top stops
For the top stops, you’ll want to work one stop at a time. Slide the C-shaped stop over the tape just above the top tooth. With a pair of pliers, pinch the ends of the stop shut. You can use special pliers for this which makes this easier, but a pair of needlenose and some hand strength can do it too.
Repeat this process on both sides of the tape.
Bottom stop (metal)
The bottom stop looks kind of like a wide staple. The prongs of the staple should straddle the two sides of the tape just below the last zipper tooth. The large body of the stop should be on the same side of the zipper as your pull tab.
To add the stop, ensure that the zipper is closed and the slider is moved up toward the top. Hold the tape with one hand, pushing the prongs through the tape with the other. They’re pretty pointy, so they should slip in pretty easily. Once in, flip the zipper over and press the prongs down toward the center with a pair of pliers.

When sewing with a zipper stop, make sure not to sew over the stop else you’ll break the needle. You can’t sew through metal!
Bottom stop (sewn)
If you want to tack the bottom of the zipper before sewing it in place or don’t have/want to use a metal stop, then a little bit of thread will do the trick. If the thread matches the tape, it’s nearly invisible and blends in with the rest of the zipper. This is my preferred method for a bottom stop as I worry about accidentally sewing over a metal stop.
For this, you’ll need a hand-sewing needle and some standard polyester thread. You’ll want to do a few stitches over the bottom two teeth or right above them. I usually do right above them.
Metal zipper tape is pretty thick near the teeth, so likely you’re going to have to sew outside the teeth and cross over them. I couldn’t get my needle into the tape in between the teeth without difficulty, so I just sewed outside them. As long as the thread matches the tape, it’s barely visible at all.

And there you have it, the basics of modifying a metal zipper! When installing it, make sure to use a zipper foot to prevent accidentally sewing over the teeth or stops and breaking your needle. I hope you enjoyed this little tutorial and it gets you started on modifying zippers for whatever your project demands.
Let me know what projects you use this tutorial for. @ me on social media so I can admire your modified zippers.
