I love spandex. It’s not exactly a secret as I use as much spandex in my cosplays as I do cotton and synthetic silks. But one thing I’m repeatedly asked when I post my spandex cosplays is “How the heck do you color block?”

Spandex and knit fabrics aren’t exactly mysterious fabrics. You can find patterns and books all about them and how to work with them. The problem is? None of these are geared toward cosplay.
So let’s talk briefly about how to create your own color-blocked cosplay using spandex and knit, including the basics on how to draft your own custom pattern.
Skill level: Advanced
Cost: Upper-end of moderate. I recommend shopping sales or wholesale if you plan to have a lot of colors.
Common materials:
- Stretchy fabric. 4-way stretch is going to make color blocking the easiest. Knits, spandex, and jersey work great. On a budget? try looking for jersey bedsheets at the thrift store
- Stretchy scrap fabric or cheap stretchy fabric to make your color blocks. I use leftover scraps from previous projects. The stretch type (2-way or 4-way) must match your pattern and the fabric you’re cutting your final color blocks out of
- Stretchy patterns. A good place to start before color blocking
Common supplies
- Sewing machine with a stretch or knit needle for basting
- A serger or overlocker. This is a must as color-blocking puts pressure on the seams
- A tailor’s ruler (highly recommended for even seam allowances) or a clear ruler
- Pens and pencils for marking patterns and seams
- Straight pins of various sizes. The smaller your color block, the smaller pins you need
What can you color block?
Honestly anything from shirts and pants all the way down to gloves can be color blocked. The smaller you get, the more control you will need to have with your sewing machine and serger (and that serger foot is hard to see around, so it takes a lot of trust in your skills as a sewist to sew small color blocks but you can do it with practice!)
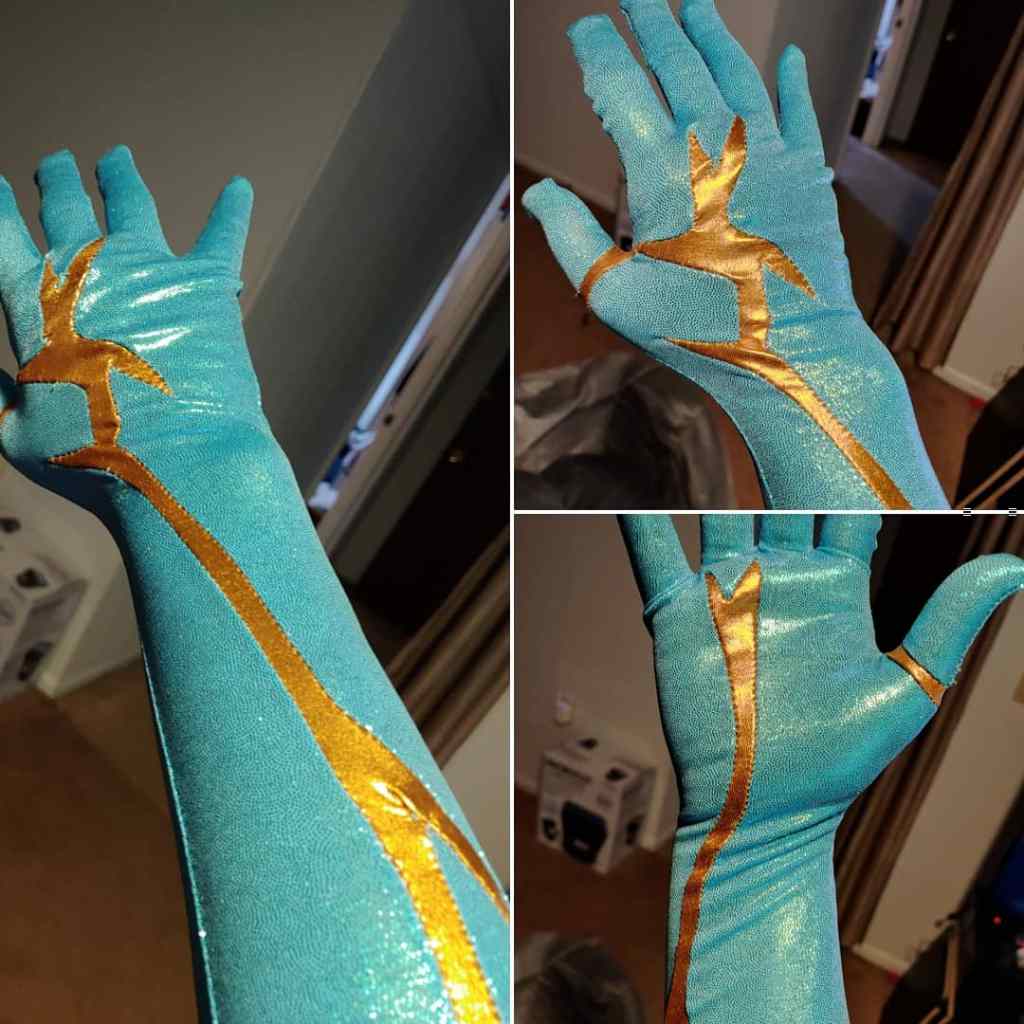
Color blocking is pretty useful for a wide variety of projects. You can block color into larger patterns, like side panels or racer stripes, but that’s just the start. Color-blocking techniques can also be used to add veins of color into sleeves or gloves or giant heart patterns on the back of shirts. I’ve even used color blocking to serge giant hand prints into a shirt to make them look like body paint.
If you need a splash of stretchy color, there’s a good chance you can color block it.

Color blocking does have its limits, however. Color blocking small letters, sharp curves, tight corners, and thumbs on a glove will give you difficulty. For letters, I recommend stretch HTV, but tighter designs are possible with a thin 3-strand narrow stitch and a steady hand. For thumbs, no matter how much you try, you cannot serge a thumb (I have tried). You will need to stitch this using a straight stitch on your sewing machine or by hand.
What size stitches do you use?
The types of stitches with your serger you use will depend upon where the color blocking actually is and what size it is.
In general, you’ll want to follow the stitch strength rule. 4-strand stitches are used for seams that bear weight such as long vertical racer stripes, major seams for sides and sleeves, and for larger designs. If it can be pulled, you’ll probably want to use the larger stitch. You can also use this as a default size for larger designs since it’s easiest to measure and see.
3-strand narrow stitches are very small, about 1/8″ wide, and are good for complicated designs, smaller designs like with gloves, or with color blocks that don’t have a lot of pressure on the seams.
For the most part, you can get away with 4-strand stitches unless there are small designs or a lot of curves or angles. 3-strand stitches are easier to curve and easier to trim on angles due to their smaller width so a wider stitch won’t be as easy to sew. When first starting out, I definitely recommend sticking with the wider 4-strand stitch until you get used to the technique.
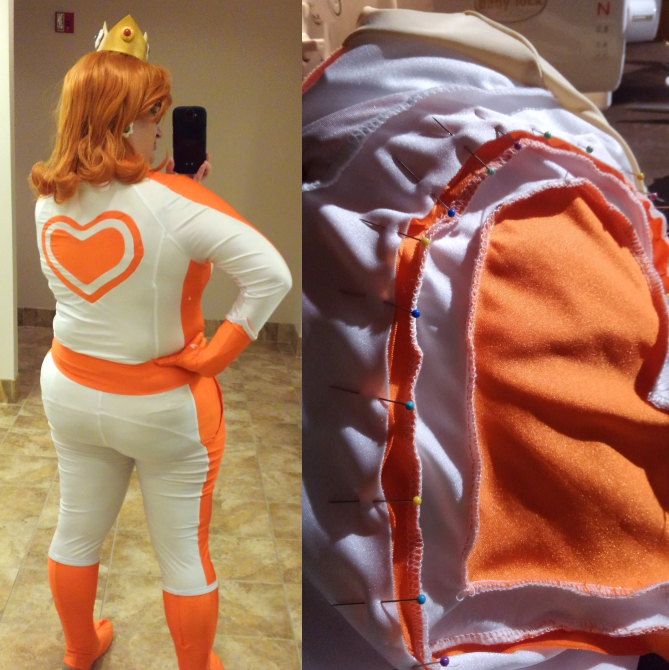
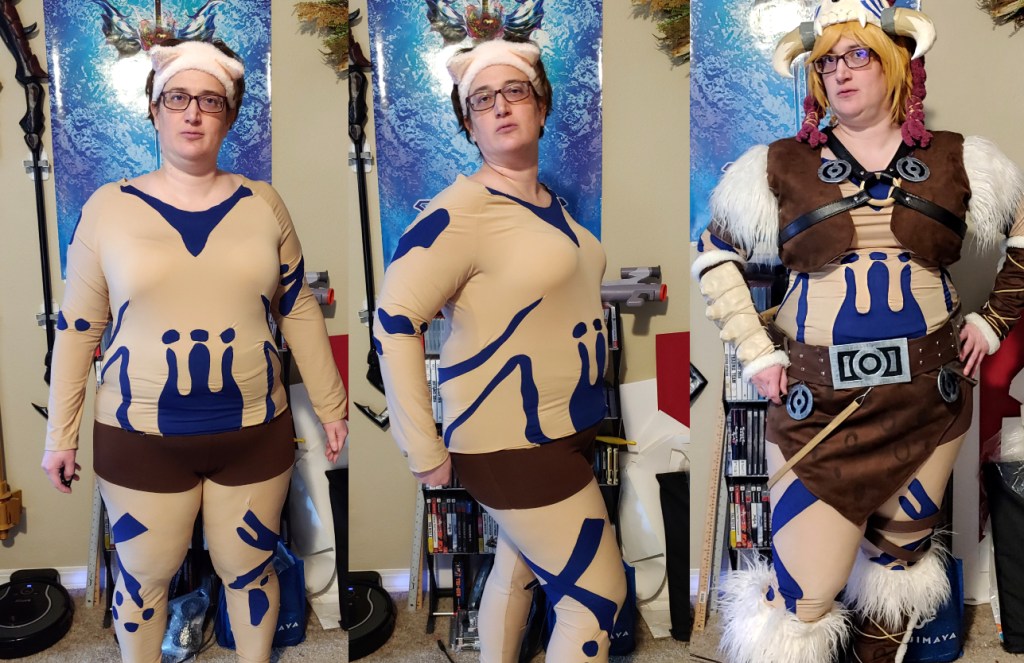
For Daisy’s racing gear pictured above, I used a narrow 3-strand stitch for the heart design on the back while the rest of the seams use a wide 4-strand stitch. This outfit is tight, and I have no desire to pop a seam in this.
When planning out a color-blocked outfit, make sure to consider the size of your stitches as well. This will affect how you set up your machine and how much seam allowance you add to your designs.
Getting started
Before cutting any fabric out, you’ll want to plan out what color blocks you need. Look for art book scans, animation design sheets (settei), design sketches, and even screenshots or turn-arounds of the 3D models for games. If I can’t find any good design sheets, I like to sketch mine out using references.

Sometimes you may have to alter the design a bit to fit realistic proportions. For Kohga, his legs are incredibly short, so I had to lengthen the leg designs to fit my actual legs. When you have to alter the designs, you can use reference points like knees or hips to align the design to your body. Since I had to lengthen the legs, I made sure that the shin wraps lasted my entire shin and used the knee as a focal point since he has distinctive knee designs. This helped me line up all the designs on my body properly.
After you’ve planned out where you want the color blocking, it’s time to pick out a base pattern. You don’t need to design the pattern from scratch every time. I keep a collection of basic patterns of shirts, pants, gloves, and bodysuits that I use as bases for all my color blocking.
When considering what to use for your base pattern, you’ll want to consider a few things
- placement of seam lines along the body
- For shirts, where do the shoulder seams sit? Do you want raglan sleeves or a regular shoulder?
- Do you want a shirt and pants or a single bodysuit? Where do you put the zipper?
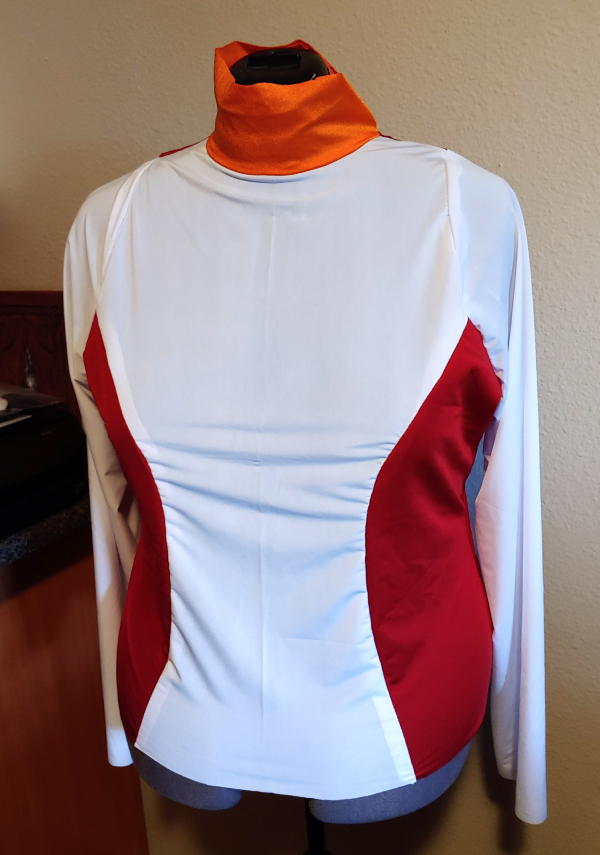
While picking out gloves can be easy, shirts, pants, and bodysuits require more consideration. This base will form the shape of your pattern. For Kohga, I went with a shirt with regular sleeves and a princess seam plus yoga pants. For Princess Daisy, I used a raglan shirt with princess seams and pants that had pockets so I could put my phone somewhere. I find princess seams are very flattering on a number of body types, so they’re a good starting point if you’re not sure.
Once you’ve picked out your pattern, use scrap fabric and sew the pattern up according to the pattern’s instructions. Don’t serge the seams as you’ll be taking the garment apart later to make a final pattern for your cosplay. With this mock-up, it’s time to create some color blocks.
Creating the color blocks
Making the color blocks is where all your planning comes into play. It’s time to draw the actual seam lines for your cosplay and plan out where they will actually sit. You can alter seam lines, create distinctive shapes or stripes or wraps, and even add things like pockets or collars.
Where to draw your seams honestly is wherever it looks right. For the most part, stretchy fabric is pretty forgiving since it stretches and hugs the body. Just mind the seam lines in your original pattern so that the cosplay doesn’t bunch or stretch strangely. If you plan on moving the seamlines of your original garment, do so slightly so that it doesn’t alter the fit of the garment.
The more color blocks you add, the more you will need to pay attention to the original seamlines and how the garment fits. You can color block across a seam line to create a new block, such as the gray shoulder section in Kohga’s shirt. The shape stays the same but there is no seam in the middle of the gray shoulder. Avoid doing this over a curved bust line if possible as the shape may not stay.

You can honestly add as many blocks as you want into a garment, turn yourself into a stained glass glitter wonder if your heart desired. As long as the pieces are large enough to stitch, you can color block it.
Since each project will be different, let’s talk about the different methods of getting color blocks mapped out.
Draw on yourself
One method is to wear the piece and draw it on while wearing it. I’ve drawn on myself for multiple projects. This is a useful method when working with pants, boots, and gloves, though reasonably less effective when it comes to shirts (unless you are good at drawing in a mirror, which I am very much not). This method also isn’t good for drawing on your back, though you can always have someone draw on you.
When drawing on yourself, make sure not to use a permanent marker. You’ll get some really funky lines drawn on your skin for about a week. Instead, a ball-point pen will generally do the trick. Spandex works best when it comes to lines, but a good pen will mark on jersey and knits as well.
Depending on how flexible you are, you can get some good rotations on the leg to draw designs all around, but you may have to connect the lines on the back if you aren’t. Hands are easy to rotate and get designs all the way around while working.
Drawing on a dress form or a table
If you can’t draw on yourself or need a better view of your drawings, then drawing on a dress form or a table works great. This works for all kinds of garment pieces, especially shirts and backs that are hard to see on yourself.
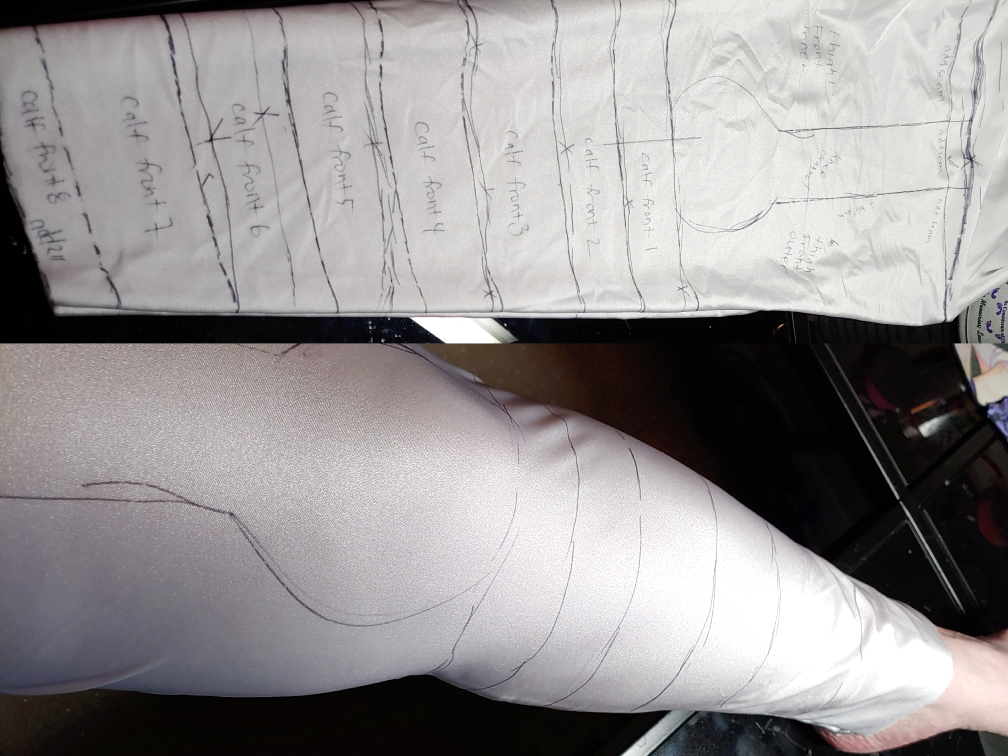
When you draw on a table or a form, you need to mark key locations on your garment. This can include points like knees, hips, bustline, elbows, and exact shoulder placement. I don’t know about you, but I can’t tell you where my knee sits in a pair of pants. But I can if I mark it first. Pull the garment on and lightly mark the key points you need before pulling it off and placing it on the table.
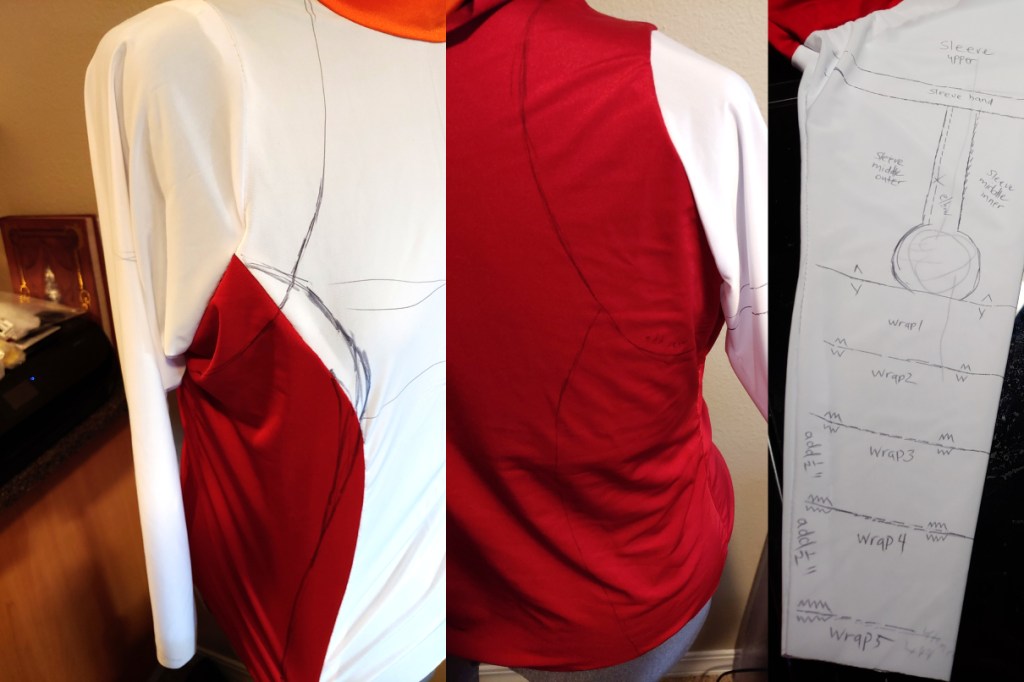
Now it’s time to place your garment on the table or on a dress form and start drawing to your heart’s content. This could be as simple as drawing a large heart on your back or creating a large number of color blocks and wrapped patterns like with Kohga.
With flat surfaces like a table, you can use rulers and templates like a cup for round shapes to create your patterns. With a ruler, you can also make sure your stripes are even and not crooked.
Finishing up your pattern
Once you’ve finished drawing your pattern, make sure to label each piece because you probably won’t remember which one goes where and in what order. I sure won’t! You can stack them in a layer, but if you drop that stack, you need to know where each piece fits and in what order. If you sew them in the wrong order or place, you may end up with an ill-fitting garment.
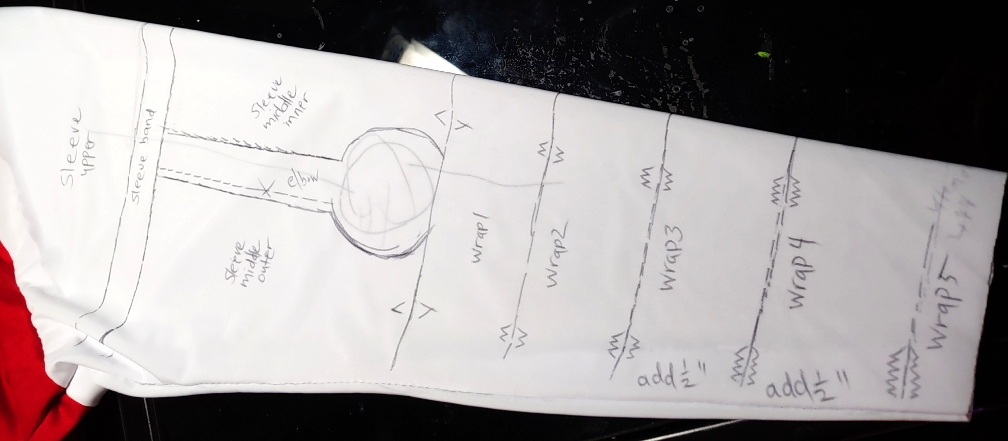
If your color blocks are unusual shapes or it’s hard to tell up from left by the shape, mark the grainline and make sure it matches the grain where you cut the fabric originally. An up arrow running parallel to the grain is a standard marking for grainlines in patterns. We’ll talk a bit more about grains in the next section.
Now it’s time to cut that pattern out. If you’ve made new seam lines, simply cut along the edges. You can also pull the sewn seams carefully using a seam ripper. Label any seams you’ve ripped so you know not to add a seam allowance along those edges.
I recommend sorting your color-blocked pieces, especially if you have a lot of pieces to deal with like I did with Kohga. He had probably 30 pieces between the pants and shirt, so I sorted them out by color to make it easier to find pieces when cutting. If you have larger pieces, you may not need to sort them (but I still recommend it).
Cutting out the color blocks
It’s time to get those color blocks colorful. Since your blocks are (probably) sorted by color and (hopefully) labeled, it’s time to lay out each fabric color and cut out its matching pieces. When laying out your blocks, there are a few things to pay attention to – grain lines and seam allowance. Let’s talk about grain lines first.
Grain lines

If you’ve played with stretchy fabrics before, you’ve probably noticed that the grain often is stretchier than the crossgrain. With 2-way stretch fabrics, the crossgrain generally isn’t stretchy. I recommend playing with 4-way stretch fabrics when making your own color-blocked patterns, but you still must pay attention to grain line.
In general, you’ll find most things stretch up and down the grain. Sleeves go lengthwise up the grain. Pants and the body of shirts do as well. Collars and waistbands will generally stretch long across the crossgrain. There are variations to this (and you can refer to your pattern’s original grainline arrows for reference) but this is a general rule to follow.
If your grainlines are incorrect, your garment will not stretch properly and it’ll start bunching, so make sure to watch those lines!
If you have strangely-shaped blocks or pieces where you cannot tell where the grainline is, mark it on your pattern piece with an up arrow running parallel to the grain. This will ensure your grain is always in the right location and the finished piece stretches properly.
Seam allowances
Alright, let’s get a bit mathy and technical. If you sew without seam allowances, the garment will also bunch and likely be too tight. So we need to add them where you didn’t mark one was already included. This is where planning your stitch width comes into play and will determine how wide your seam allowances are going to be.

For most seams, you’re probably using a 4-strand wide stitch, which is approximately 1/4″ wide. You can mark a 1/4″ wide seam allowance or if you don’t feel comfortable with that small of a width in your sewing machine, use a 1/2″ seam allowance and let the serger trim off the excess.
If you have sharp angles or detailed curves, you’re probably planning on using a 3-strand stitch, which is approximately 1/8″ wide. You’ll need a smaller seam allowance at 1/8″ to get those tight curves matching up just right when assembling the pieces.
A tailor’s ruler will be your friend in adding all those seam allowances, especially if you have as many pieces as Kohga had. Make sure to remember which allowance you added or mark it on your pattern pieces so you don’t forget. You’ll need to remember this when sewing it together.
Sewing the color blocks
Okay, the moment of truth. It’s time to block those colors!

Now this part may seem the most intimidating, and I honestly felt this way the first time I did blocking. However, the trick to keeping yourself from getting overwhelmed, especially when a lot of blocks are involved, is to take it one section at a time. Sew the body from the center out. Work the sleeves from shoulder to cuff. Sew the pants one section at a time. Whatever is needed to keep the project from feeling crazy. To make it easier on yourself, separate your pieces into those sections so you know what you need where.
For each color block, I recommend doing the following:
- pin, make sure the edges and pieces line up. clip curves as needed. I recommend using little pins as they bunch the fabric the least.
- stay-stitch with the sewing machine at your seam allowance
- serge along your stay-stitch, removing excess fabric

By stay-stitching first, you save yourself the risk of fabric slipping or details not lining up. This also helps with placing curves or complex shapes. You can’t serge over pins, so stay-stitching becomes crucial.
When you serge, modern sergers often have little notches on the foot to indicate where the needles meet the fabric. If you line up your stay-stitches with your matching needle (left needle for a 4-strand, right needle for a narrow 3-strand), your seams will be perfect every time.
Let’s talk about a few techniques for working with tricky details and shapes
Angles and corners
There’s a good chance you’ll encounter a corner with your color blocking ways. While you can drop a needle and turn the fabric with a regular sewing machine, you can’t do that with a serger. A serger can only go one way: forward. So you have to do angles and corners in segments.
When sewing a corner with a serger, serge up to the point where you’d turn the corner with your sewing machine. Finish off the edge by stitching to the edge and past it so you have thread tails. Clip the threads to get them out of the way. Place the next segment onto the serger and then sew that up, finishing off the edge. Repeat for any more corners.

This works for inside and outside corners. For inside ones, you will likely need to pull the fabric off to the side by folding it and stitching off the edge of the fabric. You may not be able to get into the tiniest corners, but the stay stitching will make sure those corners stay nice and snug.
Curves
Curves will take the most practice, though if you’ve serged an armhole or a neck, then you have a bit of practice.
With large curves, you can work pretty much like you do with a sewing machine, using both hands to manipulate the fabric and make a curve. You may need to use the right hand to control the fabric along the edge and ensure the stay-stitches stay in the right place.
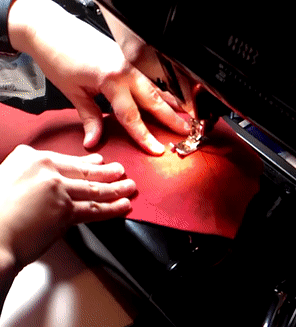
But that covers larger curves like shoulder seams, princess seams, and giant heart cutouts. When you get to smaller curves, your technique has to change a bit. You need both hands to completely control small bits of fabric underneath a large serger foot. It’s not as bad as it sounds though. It takes some practice, but it is doable. Here’s how I get small circles and even handprints to serge.
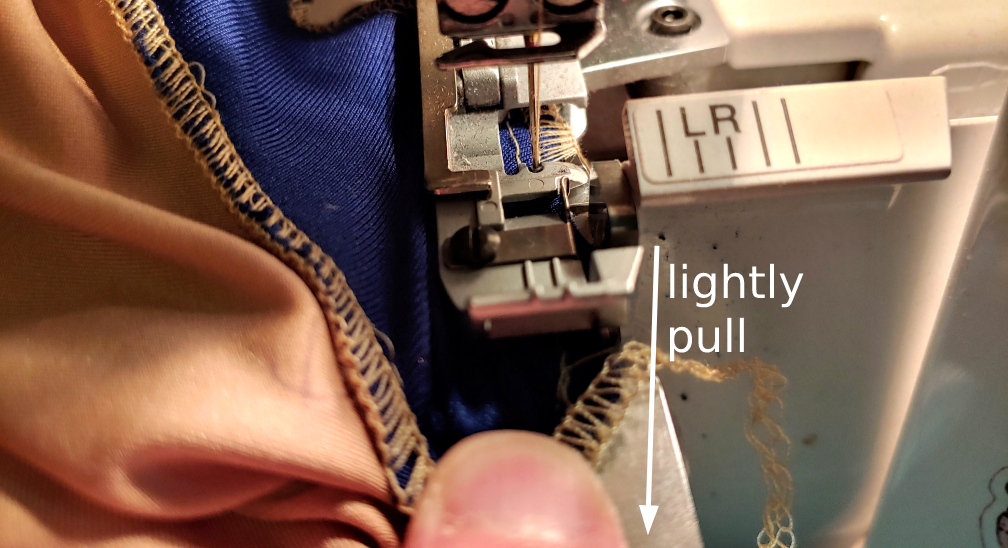
This is a technique I learned when applying elastic to a sleeveless armhole to get it to sit right against a larger chest. When serging, lightly pull the fabric towards you. This stretches out the fabric slightly and makes the stitches sit more closely together. Because they’re closer, you can create small turns of the fabric by careful pulling. You will need to serge slowly when doing this.
If your fabric has very tight turns, do the serges in segments much like sewing a corner. This is especially useful for circles.
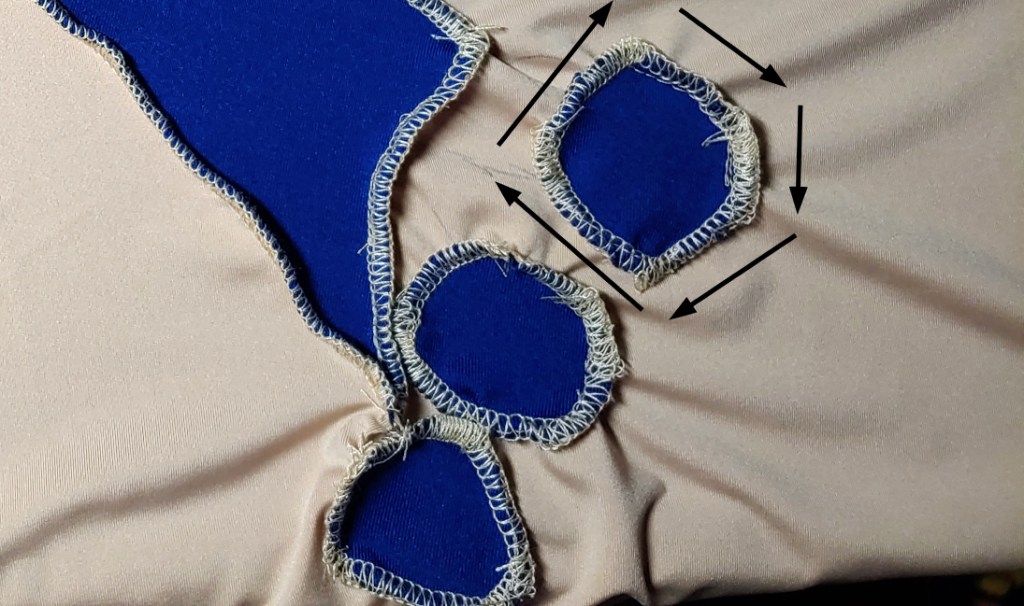
If you feel like you can’t turn fast enough, use segments! It looks the same on the outside!
Matching edges
If you’ve gotten this far, you’ve likely matched edges before (even in non-stretchy materials). But this is still something important and to be mindful of when sewing your designs. Matching edges tends to show up when sewing up side seams.

Stay-stitching becomes incredibly important when matching up designs along an edge so if something slips, you don’t find yourself carefully picking at a serged stitch with a seam ripper. Pinning and stay-stitching will save your designs here!
Now you have the basics, go color-block to your heart’s content.
I hope you enjoyed this primer on color blocking and making your own blocked patterns. Color blocking seems a bit intimidating at first, but by making a pattern and planning all the blocks out, it takes out all the guesswork. Once you try the technique out and get some practice, you can do all sorts of cool designs with it, everything from your own shirt designs down to body paint shirts and fake tattoos.
Give it a try! Let me know what sort of color blocking you decide to do. @ me on social media so I can admire your hard work!
