If you have a modern sewing machine, you might have a one-step buttonhole stitch option. It seems intimidating at first, but once you’ve sewn a few buttonholes, it’s a fun and useful option for cosplay and sewing in general.
If you’re like me, you’ve probably avoided this option, possibly for years. I used everything from snaps to clasps and buckles to avoid making a buttonhole. I had no idea how to set it up or how to make it work. It seemed like some kind of wild magic even though I had a regular mechanical sewing machine. But really, it’s a series of very simple sensors and a specialized foot that make a buttonhole super easy.
So let’s talk about how the buttonhole option works and how to use it. This post covers how to work with it on a mechanical sewing machine though a computerized one likely works very similarly. I use a Janome HD-3000BE machine.
Skill level: beginner-friendly
Supplies:
- A sewing machine with a single-step buttonhole option
- A buttonhole foot
- A button
- Polyester thread
- A sewing needle to match your chosen fabric
- Some scrap fabric. Middleweight fabric works best
- A pen or pencil to mark buttonhole placement
- Seam ripper
- Embroidery scissors (optional)
What does the single-step buttonhole option look like?
Unless you happen to read the machine’s manual (which I did not of course), you might not realize you have a single step buttonhole option.
When you look at the stitches on your machine, look for something that looks like a buttonhole. It generally seems to be located at the start or end of your stitch dial. Mine is a horizontal dial and it’s located at the lefthand side. If you have a rotating dial, it may be shown anywhere on it. Either way, it’s going to look like a buttonhole and might be labeled with BH.

So what does this all mean? Let’s talk about it.
The buttonhole stitch at the top has the stitches numbered. This is the order that the machine makes these stitches so you know where to put the buttonhole foot and can get the proper placement every time. The transition between these stitches is automatic and you don’t need to do any of it yourself.
The bottom indicator is a reset indicator, which your machine may or may not have. If it has one, this indicator means that you need to reset the buttonhole stitch process before starting on your next buttonhole. In other words, once you complete a buttonhole stitch, move the stitch selector in the direction specified (in my case, to stitch #1) then move it back to the buttonhole stitch. This resets the mechanism that creates the buttonhole back to stitch 1 listed on the buttonhole stitch icon. If you don’t reset, the stitch will just sew a bunch of zigzags in place and not go anywhere, so make sure to reset if it tells you to!
The buttonhole foot and mechanism
The magic of this entire process is the buttonhole foot. It likely came with your machine as a snap-on foot and you probably dropped it in the tool tray like I did and forgot about it for a year. It’s a weird-looking funky adjustable foot, so let’s talk about how this foot works.
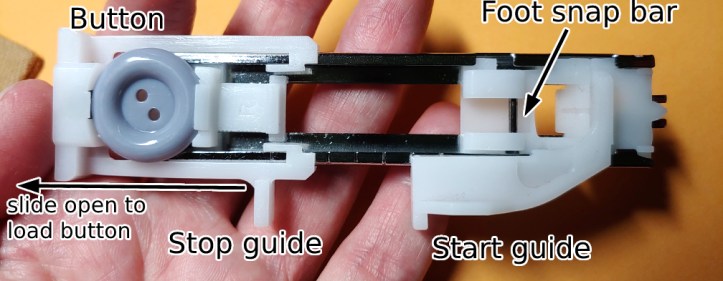
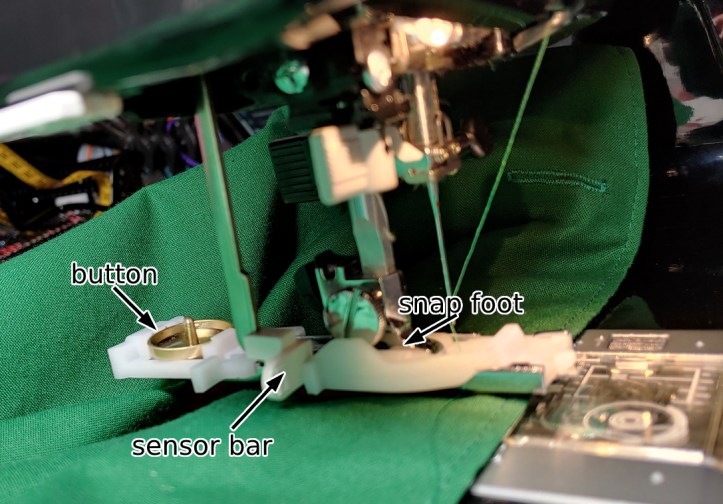
The magic of the foot is all the guides and tabs. The foot uses a button held in the back of the foot as a guide for how long a buttonhole should be made. The tabs on the side hit a small sensor bar that pulls down from the machine and tells the machine exactly when to change stitches.
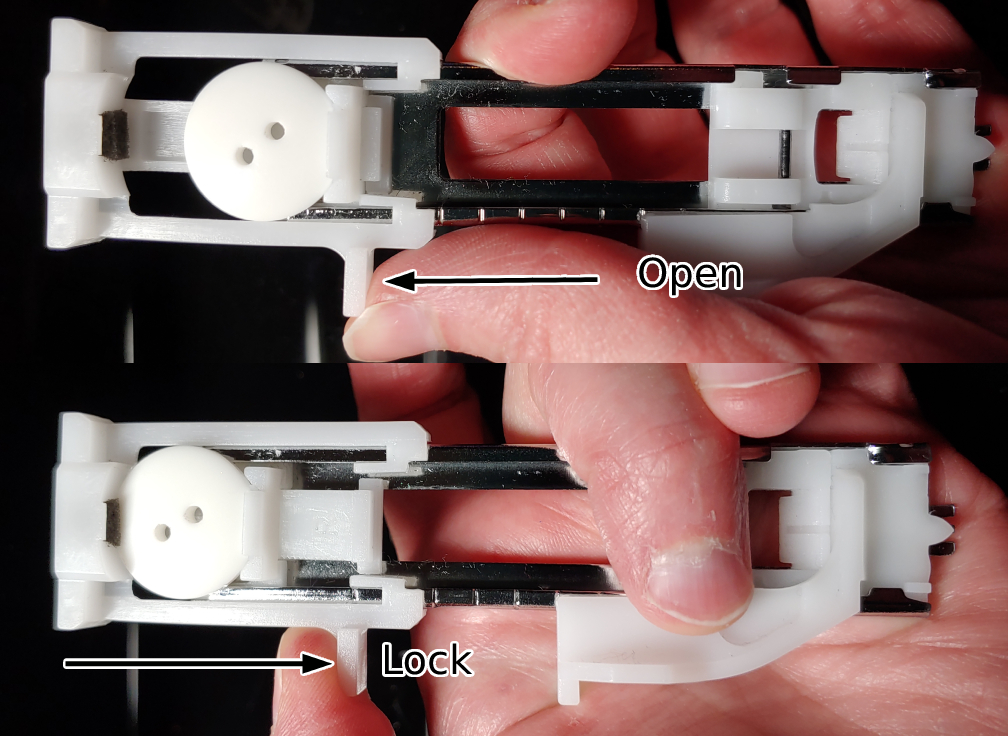
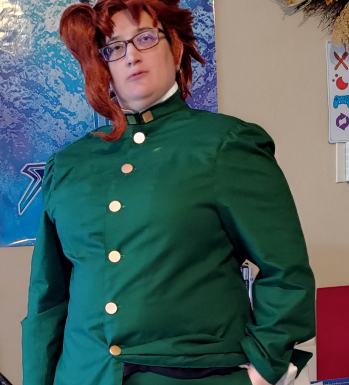
The back portion of the buttonhole foot slides upward so you can place a buttonhole inside and lock it down into place. You want to use the button you plan to sew on your cosplay so the hole is exactly the right size. You can keep the button locked into the foot for as many buttonholes as you want to make. I did that for Kakyoin’s jacket where I sewed 6 identical buttonholes using a single button locked in the foot.
The sensor bar starts at the start guide at the bottom of the foot near where it snaps onto the machine. As the machine sews up the side, it continues sewing until it bumps up against the stop guide, then sews back down until it hits the start guide. The actual foot moves with the fabric, and you can see that mechanism by sliding the base of the foot back and forth in your hands.
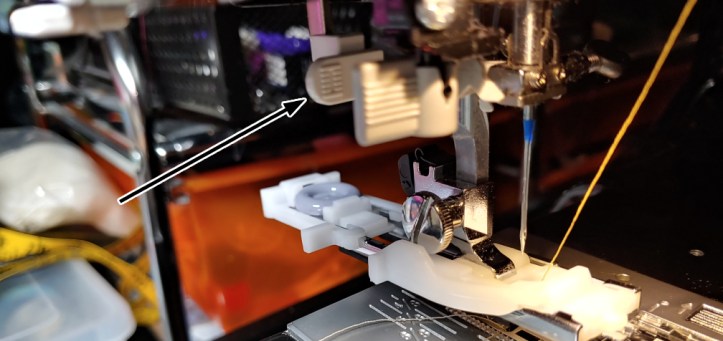
When looking at your machine, you might miss the sensor bar at first. It’s tucked up inside behind the needle and foot shaft. It might be visibly blocked behind the needle threader. If you feel behind the shaft usually along the left side, you’ll feel a ridged plastic tab up behind it. This tab can be pulled down to meet the foot. It’s easiest to pull the sensor bar down after you’ve attached your foot to the machine just so you don’t have to maneuver the foot around it.
How to sew a buttonhole
Now we’ve got all the mechanisms explained, let’s actually sew a buttonhole! Let’s start with some prep work.
Marking your buttonhole
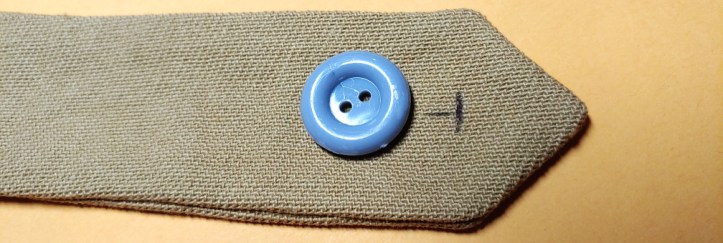
First, you need to know where you’re going to put a buttonhole and choose the size of the matching button. If you’re using a commercial pattern, the buttonhole is likely already marked with a ┠ ━ ┤ symbol. Transfer that symbol onto your fabric lightly with a pencil.
But if you’re using your own pattern, you may need to guestimate where to put the buttonhole. For something as simple as a pocket button or a pants button, guessing can be pretty simple as seeing where the button should sit when the fabric overlaps. Zip up the pants zipper or close the front of the jacket to see where the two sides of the fabric overlap one another. You can do the same by closing pockets or lining up the edge of a button next to a seam.
I tend to only mark the edge of the buttonhole next to a seam or an edge as I don’t always know how long a buttonhole will be. Also if I start at the edge, I always know the buttonhole will be completely on the fabric and won’t suddenly spill off over the seam.
If you’re marking buttons on the front of a jacket, use a ruler to evenly space them out and mark where each button should sit.
Next you need to choose your button. Commercial patterns will tell you what size to get generally, but if you’re winging it or making your own, I generally go with whatever looks right. Most buttons are usually around 1/2″ to 3/4″ but suit buttons and jacket buttons may vary greatly in size.
Prepping the machine
After you’ve marked your buttonholes, it’s time to prep the machine. For buttonholes, you don’t need a special needle. Simply use the type that matches your fabric, such as denim for jeans and universal for cotton fabric.
Insert the needle into your machine and thread it with regular polyester thread.
Take your buttonhole foot and slide the top portion up, inserting the button into slot at the top. Press the top of the buttonhole foot back to lock the button into place.
Remove the regular foot from the machine (press the little lever on the back or side to release it from the snap) and set the foot aside or in your tool tray. Snap the buttonhole foot in its place.
Once the foot is in place, pull the sensor bar down to meet the foot.
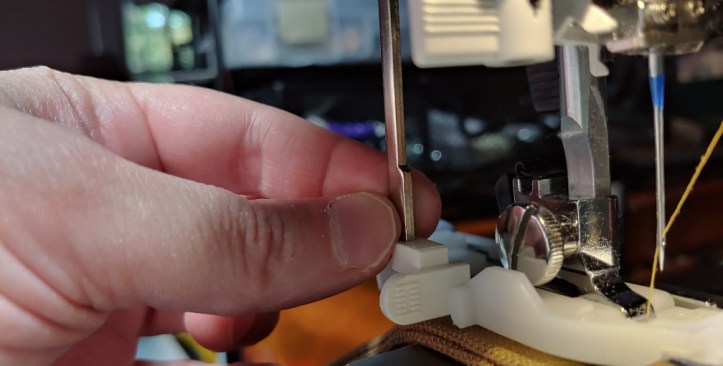
Additionally, you can pull the thread down through the foot. Turn the handwheel so the needle does a full rotation down and up. Take a small pair of scissors or tweezers, reach underneath the buttonhole foot, hook the thread around the scissors or tweezers, and pull the thread out to the side.
Next you need to configure your stitch length. Buttonholes require a zigzag stitch with no length. Generally, you can put the zigzag width at max size to get the most strength out of your buttonhole.
My Janome uses sliders to set the width and length, so yours might look different. here’s how I set mine:
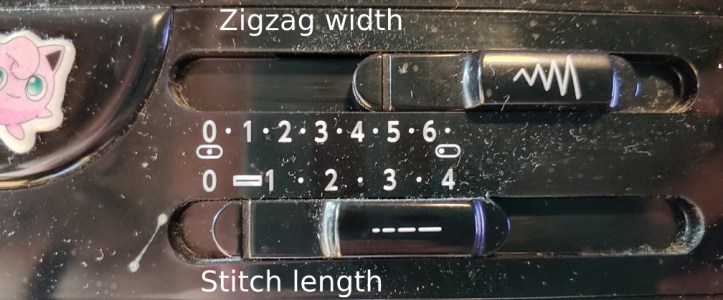
My stitch length selector has a buttonhole marking, so I set mine there. If you don’t have it, your stitch length can be set to 0.
Sewing the buttonhole
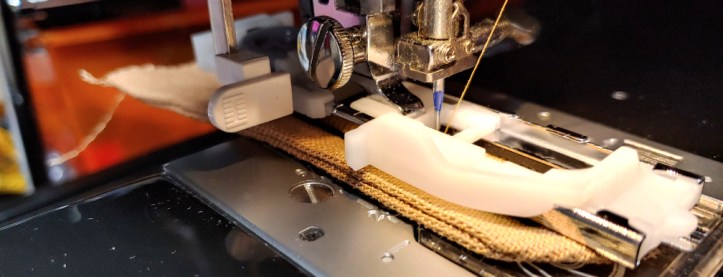
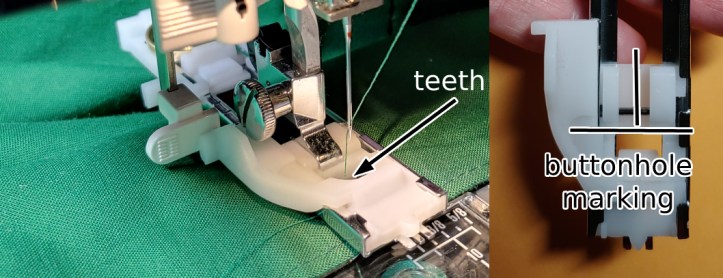
Time for the magic to happen. Pull your fabric up underneath the buttonhole foot. If you look into the gap where the needle threads through the buttonhole foot, you’ll notice three teeth sitting at the top side. These teeth help the fabric move back and forth. These teeth also help you line up your buttonhole perfectly.
Lower the presser foot and start aligning the buttonhole marking to the teeth. Set the teeth right behind your horizontal button line and line up the middle tooth with the vertical bar.
If you have a particularly large outfit like a jacket, prop the bulk of the fabric up on the table behind your machine so the foot will be able to move freely. If you don’t have a lot of space, you may need to hold the fabric on the back to keep the foot from tugging.
With the presser foot down and aligned, press on the foot pedal. You do not need to hold or guide the fabric. The buttonhole foot will move the fabric for you thanks to the teeth. As the machine moves through the stitches, you’ll likely hear a clunk each time the internal mechanisms shift the needle position and type of stitch used. This is normal. Just let the machine clunk as it works.
Once the stitch reaches the end of the buttonhole, it will repeatedly zigzag back and forth and not move any further. At this point, it’s safe to lift the presser foot, pull the fabric, cut the thread, and reset your buttonhole stitch for the next one.
You can do multiple buttonholes with one singular button loaded onto your buttonhole foot as long as they’re all the same size. I did this for the front of my gakuran jacket. Just make sure to reset after each buttonhole is done if your machine requires it else you’ll end up with a bunch of zigzags and no buttonhole.
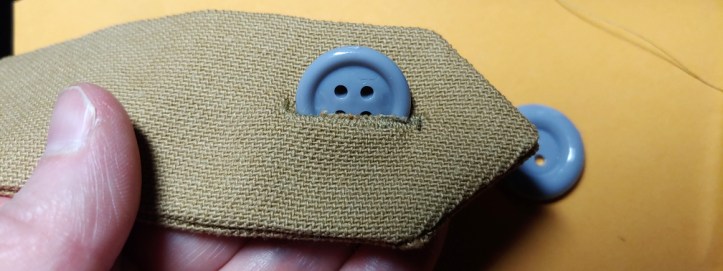
Cutting the buttonhole open
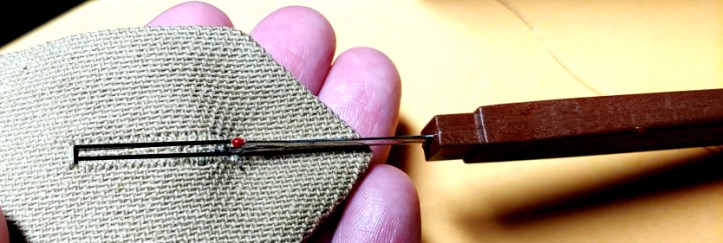
You may have noticed that so far, there’s no actual hole! It’s just a stitch, so we need to make a hole! Start by pushing a seam ripper through the fabric on the inside of the buttonhole stitch on one end. It doesn’t matter which end you choose.
Now technically., you can use the seam ripper to open the entire middle section by ripping the threads. I’ve never actually gotten it to work. If you can’t get it to work either, small embroidery scissors are great! Insert the scissors into the hole you’ve created with the seam ripper and carefully cut small cuts at a time up the middle of the buttonhole stitch. Be careful not to cut any stitches and only cut the fabric.
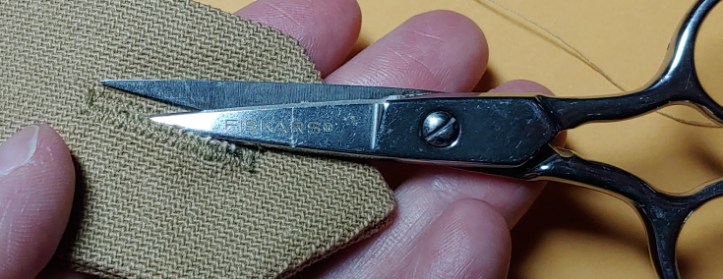
Cut the entire length of the inside of the buttonhole, clipping any loose threads as you go. And now you have a nice buttonhole!
Placing the button
If you’ve used a pattern, likely the button placement is already marked for you. But what about if you don’t have a pattern? The easiest way is to use the buttonhole itself!
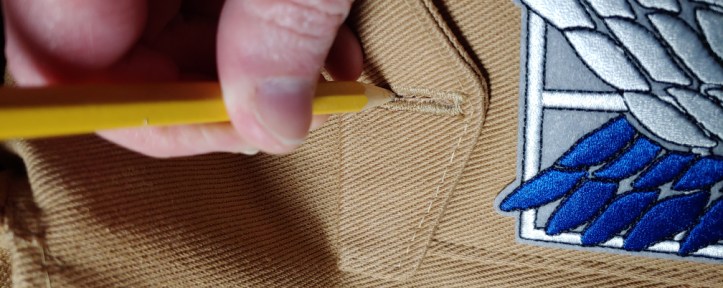
Close your garment where the buttonhole would meet the button. This means closing up a pocket, closing up the front of a jacket, or even placing a shoulder tab along a shoulder seam. Pin the garment in place if it’s large or if it’s small, you can hold everything in place while you work. Here, I’m closing the pocket with my hand and marking the buttonhole lightly with a pencil.
Once you have all your buttonholes marked, it’s time to add the buttons. For things that don’t have a lot of tension like a pocket or a shoulder tab, you can place the button in the center right over the line.
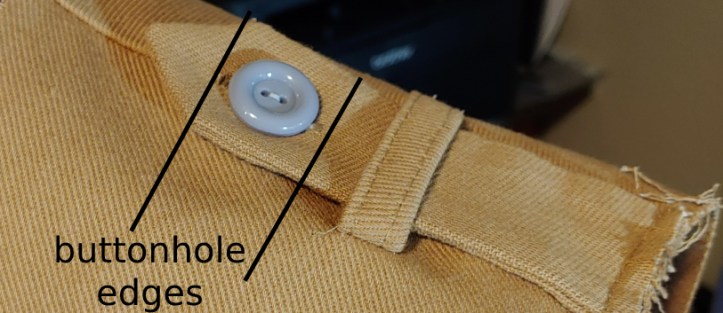
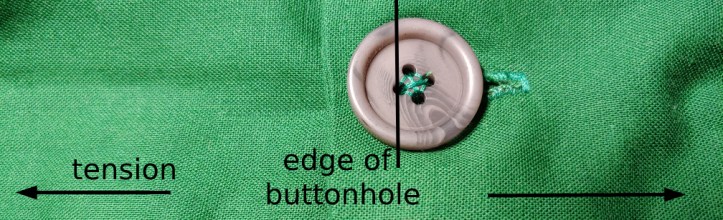
For something with a lot of tension like a jacket or pants button, the button may be placed on the side opposite of the seam. When the button is pushed through the buttonhole, it will appear to be closest to the seam edge of the buttonhole.
The placement isn’t the edge of the button but the edge of the button stitches. Because the fabric is pulling in either direction, the button will tend to sit on the side of the buttonhole, pulled to where the button’s stitches sit.
Placement for a button with tension can be tricky, but it’s just stitched down. You can always move it if the garment doesn’t fit properly. And if you aren’t sure, just stick the button down in the center!
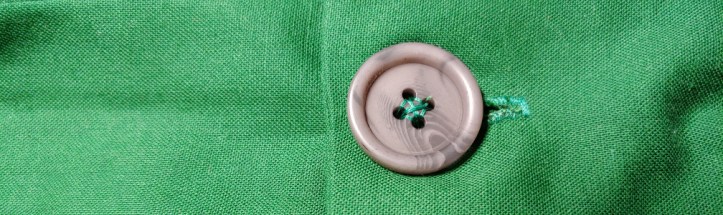
And now you have real working buttonholes!
I hope you enjoyed this primer about working with a buttonhole foot and making your own buttonholes! It’s not as scary and intimidating to work with once you know the secrets to how a buttonhole foot actually works. You’ll be on your way to making many buttonholes in no time. Just start practicing with scrap fabric until you feel more comfortable with the hole process.
It’s great to have working buttonholes and buttons. They really add some professional-looking finish to your cosplays (and work great for pants. I kept popping the stitches on my slider buckles after a full day at a con!). I hope you enjoy the buttonhole now too!
Let me know how your buttonhole process goes! @ me on social media so I can admire your work!
