Every so often you find an anime or game character that has excessively large puffy sleeves. The problem is, sleeves that size really shouldn’t be feasibly possible by real-world physics. However, we can trick physics into working for us instead of against us.
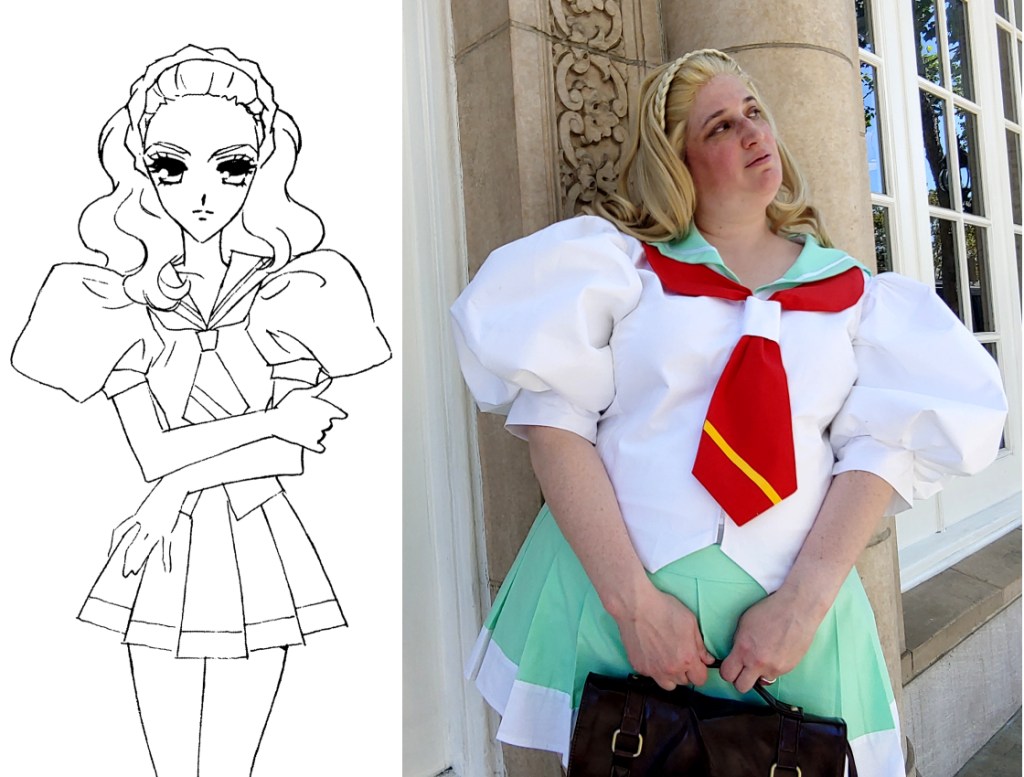
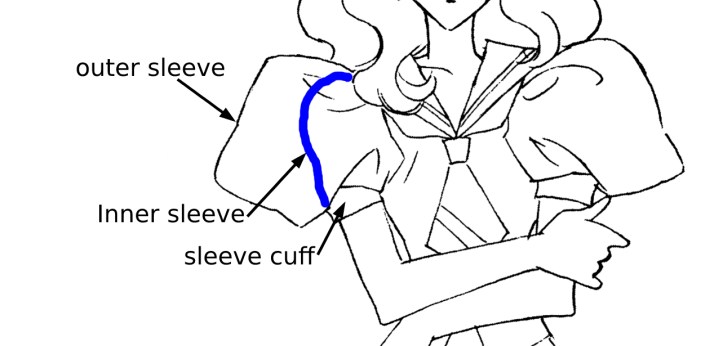
Utena is definitely one of many shows that really leaned into the giant puffy sleeves in their designs. When I wanted to make the Ohtori Academy uniform, I had to conquer the sleeve. I’ve seen a number of tutorials showing how to make puff sleeves this large, but that’s not really feasible for storage or travel. So once again, it’s time to cheat with a few basic materials.
This tutorial covers the materials and techniques you need to make your own puffy sleeves plus how to draft something this large. These sleeves can be squashed and collapsed in a suitcase, can bump into things, and can easily be pulled back into shape with a simple pinch. It’ll have people guessing how you defied structural physics!
Skill level: late beginner
Budget: relatively budget-friendly!
Materials:
- Basic sleeve pattern. You can borrow one from a dress shirt or any commercial pattern
- About 1.5 – 2y or so of sleeve fabric
- A roll of fusible lightweight interfacing
- About 1 – 1.5y of petticoat netting. The stiffer the better. Tulle does not have the structural strength to handle sleeves this size, so it must be netting.
- Muslin or scrap fabric, about 1y or so to cover the base sleeve + the test pattern
Tools and resources:
- Pens for drawing your pattern
- Ruler. Clear is recommended
- Fabric scissors
- Straight pins or fabric clips
- Iron and ironing board (or equivalent ironing pad or thick towel)
- Sewing machine, standard universal needle, and matching thread
- Hand sewing needle with contrasting thread (used for gathering)
Choosing a sleeve pattern
Before you start, you need to choose a base pattern. Your base pattern can really be from a wide variety of commercial or home patterns, but not all sleeves are created equal. Your sleeve should have at least the following qualities:
- Is one singular piece
- Has a rounded cap
- Is made for non-stretchy fabric
- Matches well enough to the armhole of the shirt you’re using
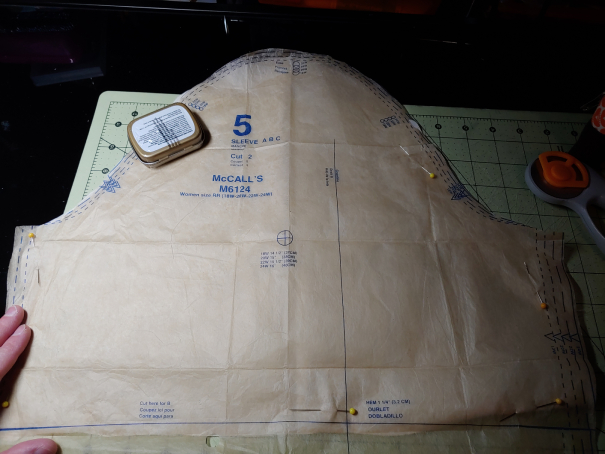
As I was constructing the rest of the cosplay out of a dress shirt pattern, I used the matching sleeve in the pattern packet. Whatever sleeve pattern you pick, it will be used not only as the large pattern base but also as the small inner sleeve that supports the structure.
Creating the large puff pattern
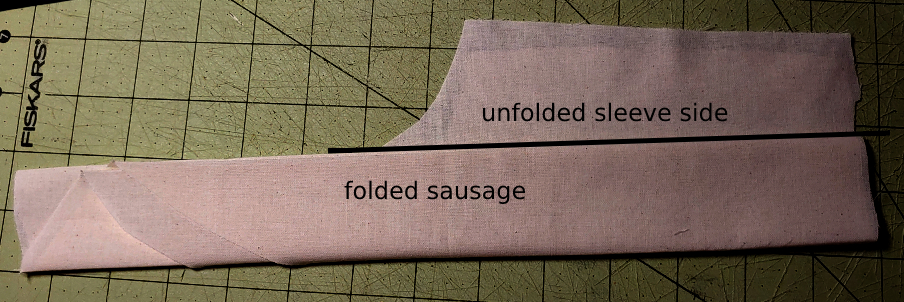
Once you’ve chosen your sleeve pattern, cut one sleeve out using the muslin following the pattern markings. With the fabric on your work table, we’re going to make a folded sausage.
First, fold the sleeve pattern in half.
Next fold the sleeve again, stopping right where the top of the sleeve curves and starts to flatten at the side seam.
Fold it one more time.
You’ll get something like this, disgustingly darkened to make it more visible:
Now iron the folds flat to crease the fabric. When you open the fabric up, you’ll get something like this:
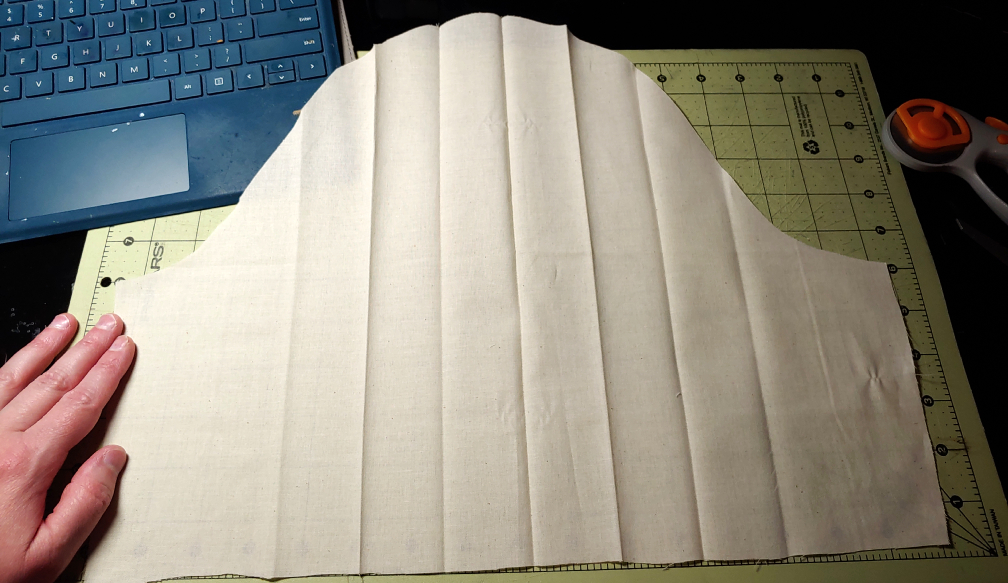
With the sleeve now pleated, cut the center fold. Pick one half of the sleeve then set the other half to the side. To make the pattern drafting simpler, we’ll only be using half a sleeve and mirror it to make a full sleeve.
We are essentially going to do this, as shown in a very old tailoring book from Wikimedia Commons, but folded in half to make drafting an even sleeve easier:
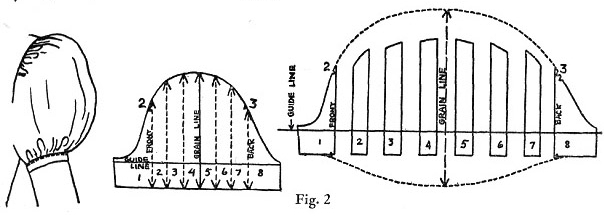
For one-half of the sleeve, cut along the fold lines to separate the sleeve into 4 pieces then set them aside. Take your scrap fabric and fold it half lengthwise. A few inches above the bottom, draw a straight line across the fabric to use as your baseline. Make sure this is several inches taller than your longest strip sitting on the baseline.
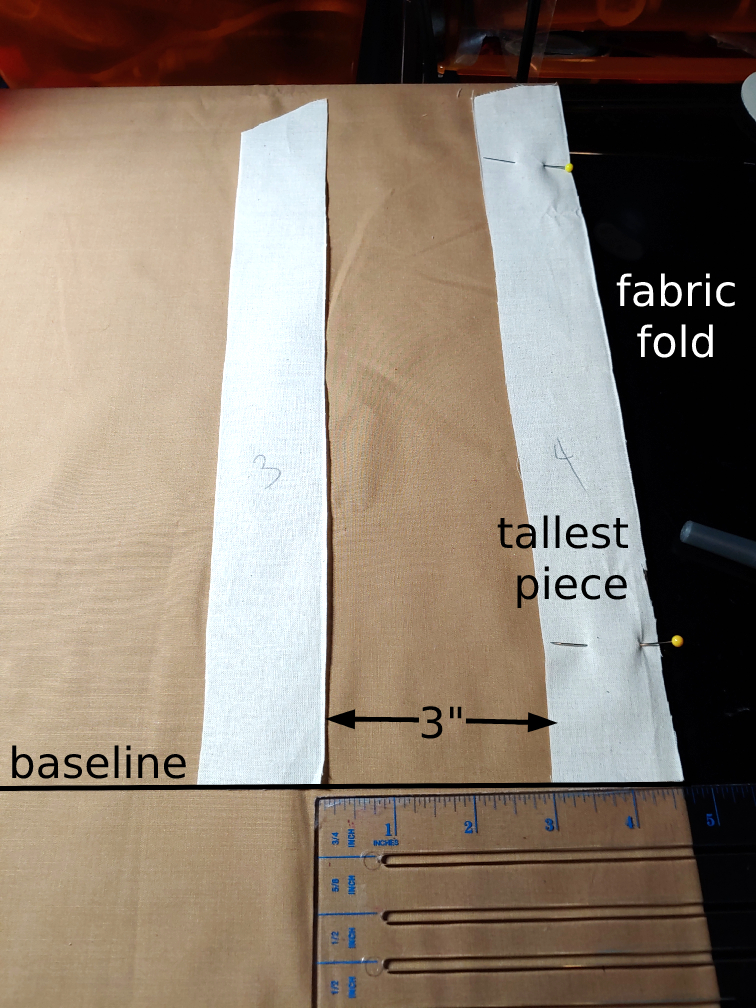
Take the tallest sleeve strip and place it flush against the fold with the flat bottom side sitting on the baseline. Make sure the peak of the sleeve strip is facing the fold. Pin the strip down to the scrap fabric. Just a few pins to hold it in place will do.
Now to place the other strips. The further you space these strips out, the bigger the sleeve will be and the more fabric required. To make the giant Utena puff sleeves, I placed the strips 3″ apart and these sleeves are massive.
You likely don’t want to go larger than 3-4″ as the sleeves will be completely unruly at that point and may be too heavy for the structure underneath to properly support it. You will also find yourself having trouble with doorways if the sleeves are too big. These sleeves with a 3″ distance between the strips had me scuttling through smaller doorways sideways so I didn’t bump the doorframe.
Whichever measurement you choose, take your ruler and measure the distance between the tallest strip and the next one. Once the strip is in the proper place, pin it down and repeat until you’ve placed all 4 sleeve strips.
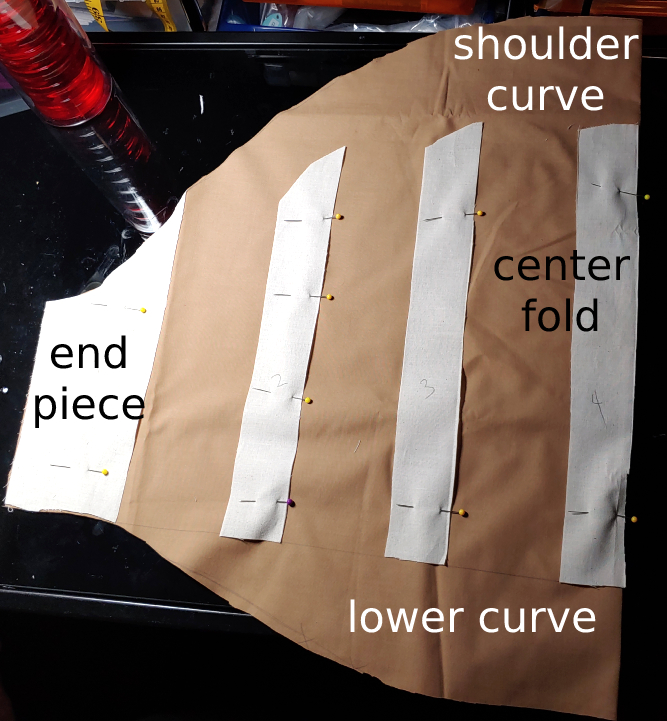
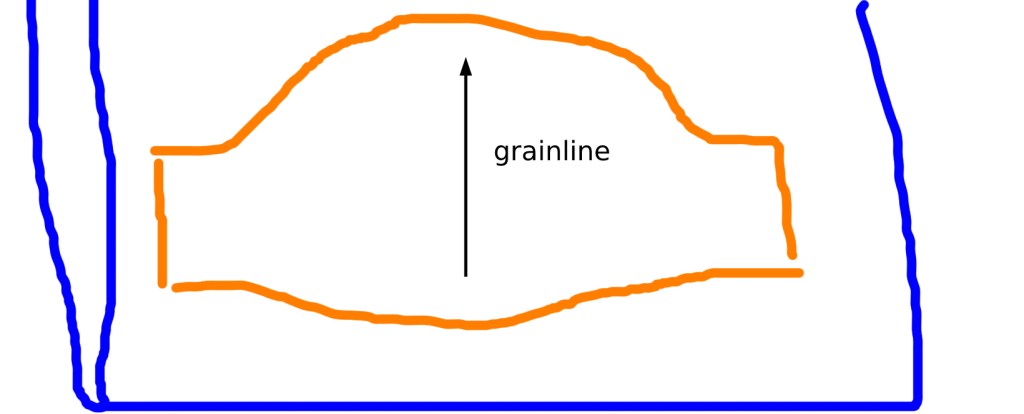
Now it’s time to draw the curves. The top shoulder curve is very drastic and tall. The greater the width between the pieces, the more drastic your curves will be. Use the end piece as your guide while drawing the upper curve.
If you’re not sure how to draw the curves, use your original sleeve pattern as a guide, the one you used to cut out your original pattern. You can see how the curve is shaped. This larger curve will be a bit more drastic, but it serves as a good guide on what a shoulder curve looks like.
You can use a french curve or a tailor’s curve to make the curves, but honestly, you can just eyeball it and as long as it looks close to a proper curve, it’s good enough. These curves will be gathered before being sewn into a seam, so slight wavering isn’t a big deal.
Once you’re satisfied with the curves, cut the giant sleeve out and unpin the strips. Iron the sleeve pattern flat.
Testing out the pattern
As always, it’s a good idea to test out the pattern and see what it looks like. It’s going to be a bit floppy since there’s nothing inside, but it’ll give you a rough idea of how big this sleeve will be. Start by sewing up the side seam and then it’s time to gather the shoulder curve.
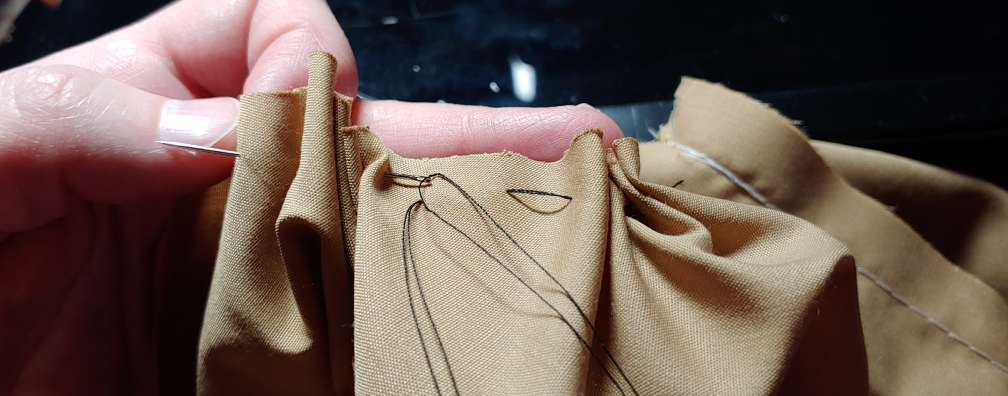
There are multiple ways of gathering, everything from pulling a bobbin thread to using a pull cord. But honestly? I found the easiest way to gather something this big is with a good old hand needle and thread. Saves your fingers from tugging sharp bobbin thread!
Take a long cut of thread and thread your needle. I recommend doubling up on the thread, knotting the two tails together to knot your thread. We’ll be tugging on the thread and having to rethread the needle when the tail slips is kind of a pain.
Start your stitch a few inches from where the shoulder curve takes a sharp turn towards the top of the sleeve. Usually about 3-4 fingers from that point is good. Weave the needle back and forth to make a loose straight stitch then push the fabric down to make a gather.
Keep making the loose stitch gathers until you get around 3-4 fingers from the sharp curve on the other side of the sleeve. Don’t knot it. Leave it loose. This gather stitch is temporary, and if you look at it, it’s way too small to be a proper armhole.
Repeat the same process with the gather stitching on the bottom curve. You’ll want a second needle for this since you don’t want to clip the top one.
Once you have both curves gathered, loosen the bunches on the shoulder curve. You can push the bunches apart with your fingers, pushing them towards the needle and away from the knot. If you loosen them too much, you can always pull the needle and tighten the bunches again.
Once you’ve loosened the curve, pin it to your dress form or to the shoulder of your shirt and take a look at how large the seam is. Pull the sleeve near the top to get a good guestimate. It’s not the best, as the fully interfaced sleeve has more structure, but it gives you an idea of what you’re working with.
Once you’re satisfied with how it looks, unpin the sleeve. Clip the two gathering stitches at the knot and simply pull the thread out by the needle. Rip the side seam and it’s time to create the real thing.
Cutting the pattern
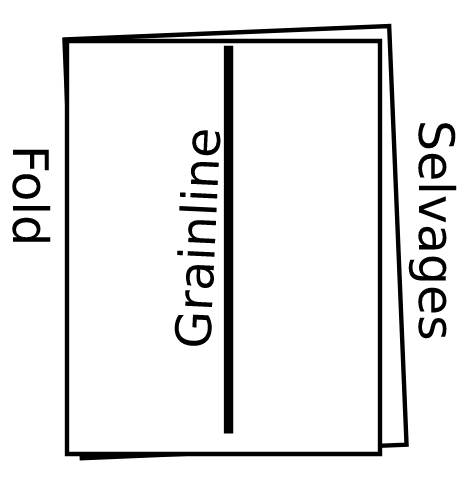
Now it’s time to put your hard work to the final test. This sleeve pattern is going to be massive so cutting it on the fold may be difficult. Open the folded fabric and instead fold it like a hot dog. You want to match the selvages together so you can keep the grainlines in the same direction. This gives you a larger canvas to work with.
Next lay the netting on top. Fold this too, but unlike woven fabric, netting does not have a grainline. Fold it however it fits with your pattern.
Lastly, lay the pattern you made on top, matching the side seams to the selvages.
Once you’ve placed everything, pin it in place and cut it out with scissors or a cutting wheel.
Next cut out the interfacing. Your sleeve is likely wider than standard interfacing width. This means you’ll need to cut out the interfacing in pieces, overlapping in the center. Due to the width of the sleeve, it’s easier to cut it out horizontally with your pattern, overlapping slightly on the sleeve.
Unroll your interfacing and lay it over the sleeve, unroll it some more and fold it in half over the sleeve pattern. Cut the edge then do the same for the lower half of the sleeve pattern. You get something like this and can cut both sleeves’ worth of interfacing at the same time
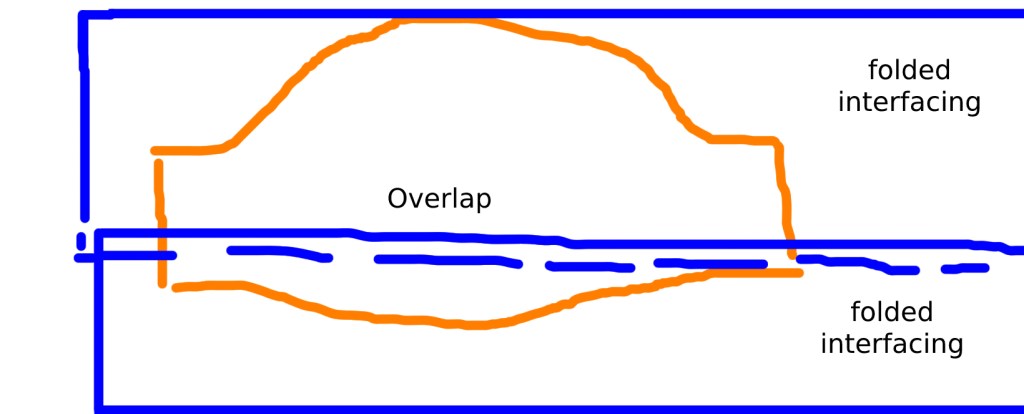
Once you’ve placed both folded interfacing pieces, pin the interfacing to your pattern and cut the interfacing out with scissors or a cutting wheel. Set the netting aside, and fuse the interfacing to your sleeve fabric. Fuse one sleeve at a time, fusing one interfacing piece at a time.
So for example, for each sleeve, fuse first the top piece then fuse the bottom piece. If you are using patterned fabric, fuse the interfacing to the wrong side of the fabric. If you’re using solid-colored quilting cotton, it does not matter which side of the sleeve you fuse the interfacing to as long as each sleeve is properly interfaced.
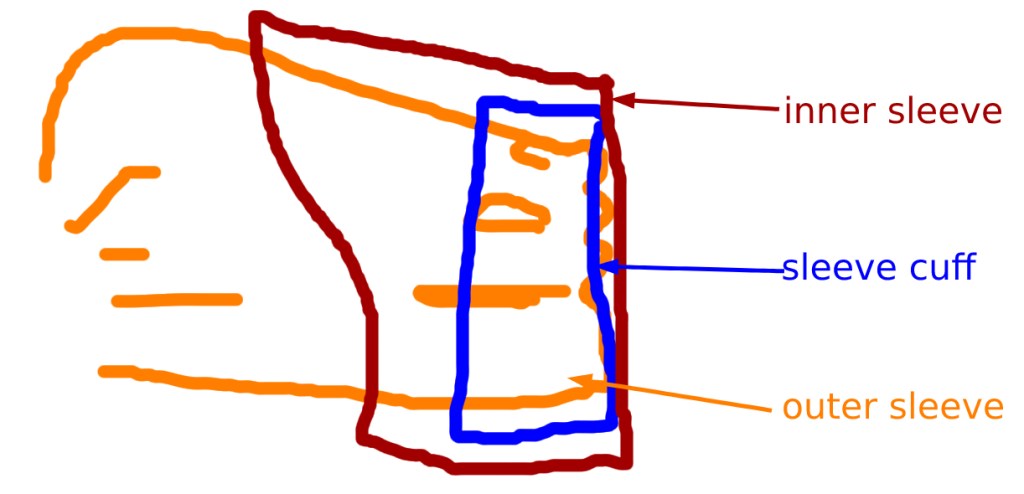
Lastly cut out the original sleeve pattern. The one you used to make your sleeve pattern at the start of this article. This will serve as the inner sleeve. This sleeve is used for internal support and to prevent the massive sleeve from caving in on itself.
Sewing the sleeve together
Now it’s time to assemble your hard work. The sleeve itself consists of several parts to support the large outer sleeve. Here’s the structure of the sleeve:
Additionally, you can add a sleeve cuff or decorations depending on the design for your cosplay. This decoration will need to be added during the construction process. The section is labeled below so you won’t miss it. Let’s start with the outer sleeve first. Repeat this entire process for both sleeves.
Prepping the outer sleeve
This step is optional but it will make the next section easier. And I like easy. It’s time to make a basting stitch. Basting, if you’re not familiar with it, is the process of temporarily sewing things down so they don’t slip when you’re working with them.
Pin the netting to the wrong side of the outer sleeve (against the interfacing). Sew along the shoulder curve and the lower curve with a simple straight stitch close to the edge. Removing the basting stitches will be difficult with tight gathers, so basting in the seam allowance means they won’t be visible in the final sleeve.
Attaching the outer sleeve
The first is to attach the giant sleeve monster. Sew up the side seam and iron it open. Make sure to iron on the outside of the sleeve as a steam iron can potentially melt the netting if directly applied to it.
With the sleeve assembled, it’s time to use the same gathering method as before. Flip the sleeve right-side out and thread your hand sewing needle. It’s time to create gathers. You’ll want to use a contrasting thread so it’s easier to clip the tail after sewing the sleeve into the garment’s body.

Start your stitch a few fingers away from the side seam. Weave the needle in and out of the fabric closer to the edge. Gathers with the netting and the interfacing will try to resist you but push the gathers down the thread anyway. Keep gathering until you reach the other side, a few fingers away from the side seam.
Much like before, the gathers will be too tight for a proper armhole. But unlike the test sleeve, we have a real armhole to match this sleeve to. Leave the needle hanging with the thread still attached. Do not knot the end of your gather.
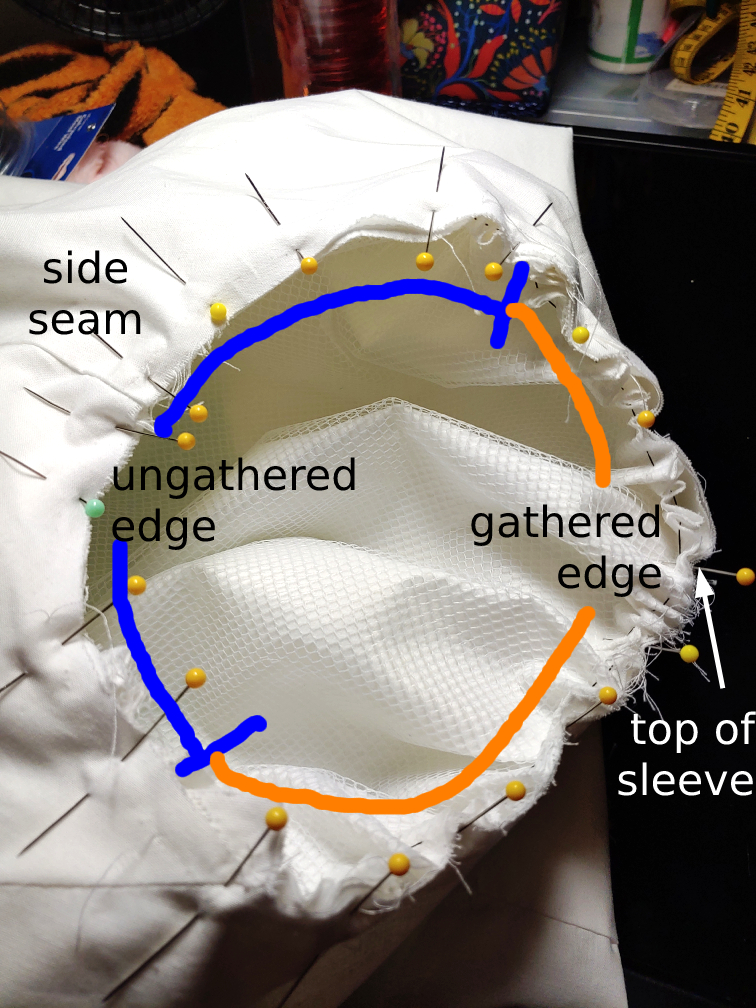
Take the body of the cosplay and flip it inside out. Match the sleeve side seam to the body’s side seam and pin them together. Pin along the ungathered section of the sleeve to keep the sleeve from moving while you’re working with it.
Loosen the gathered edge, matching it with the armhole. Start with the knotted side of the thread and push the fabric towards the needle.
When the sleeve is close in size to the armhole, start pinning at the knot side and move around the armhole. You may need to regather as needed near the needle side of the thread as the netting will attempt to push the gather out.
Once you have the whole armhole pinned, sew the sleeve at 5/8″ seam allowance. While the fabric is stiff, it should go underneath the sewing machine foot just fine. If it has any trouble, gently coax the fabric along with your hands (don’t yank it) then continue sewing.
Once the stitch is complete, clip the knot of your hand-sewn thread and pull the needle to remove the gathering thread.
Making a sleeve cuff
Many giant puffy sleeves have cuffs hanging out from the bottom. You want this cuff to be loose enough to not constrain movement or bunch the inner sleeve but tight enough that it doesn’t look silly. Instead of guestimating, you can use the bottom of the inner sleeve pattern to determine the width of the sleeve cuff.

Match the sleeve pattern to your fabric and draw a straight line down on both sides of the sleeve pattern. This will give you your sleeve width.
A good guestimate for a sleeve cuff is about 3-4″ tall. This accounts for a 5/8″ seam allowance plus folding the cuff in half to hide any raw edges. The sleeve cuff I used in my Utena cosplay was 4″ tall.
Once you’ve drawn out your rectangle, cut it out and sew up the side seam. Iron the side seam open and flat. Fold the cuff in half with the wrong sides together and iron it flat. You’ll get something that looks like this:

Sewing the bottom seam
This is the biggest bunch of seams that you’ll have to sew. Literally. We’re going to make a sandwich to layer all the different sleeve pieces together to make a finished bottom seam with no visible raw edges.
Start by sewing the side seam of the inner sleeve and iron the seam open. Flip the inner sleeve inside out.
Use your hand sewing needle to gather the lower curve on the large outer sleeve, starting a few fingers away from the side seam and working your way around the curve. End the gather a few fingers from the side seam on the other side, leaving the needle to hang still attached to the thread. Keep the sleeve right-side out.
Here’s the sandwich we’ll be making:
The easiest way is to work outside in.
If you have a sleeve cuff, with the inner sleeve turned wrong side out, pin the sleeve cuff to the right side of the inner sleeve, matching the side seams together. The sleeve cuff does not really have a right or wrong side as the cuff is folded in half to hide all raw edges. Baste the two together by sewing in the seam allowance.
Now time to attach the outer sleeve. You’ll have to squish the outer sleeve a bit as it is so much larger than the inner sleeve. With the right side out, slide the outer sleeve inside the other two to make the bottom of the sandwich. Pin the outer sleeve to the inner sleeve/cuff at the side seam and pin along the ungathered edge.
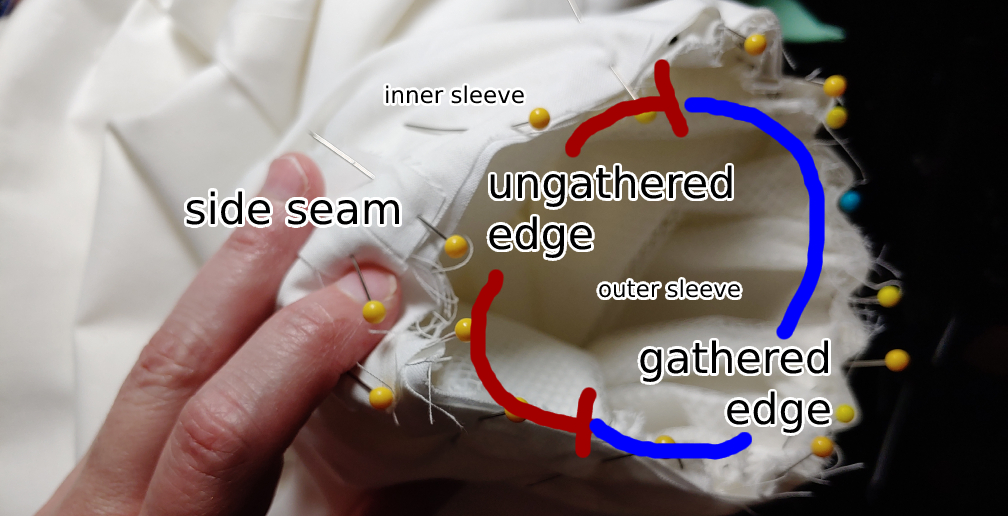
Much like with the shoulder seam, start loosening the gathers just a little, starting with the knot side of the thread and moving towards the needle. When you get the two sleeves close in size, start pinning the gathered edge to the inner sleeve sandwich and gather the needle side of the thread as needed.
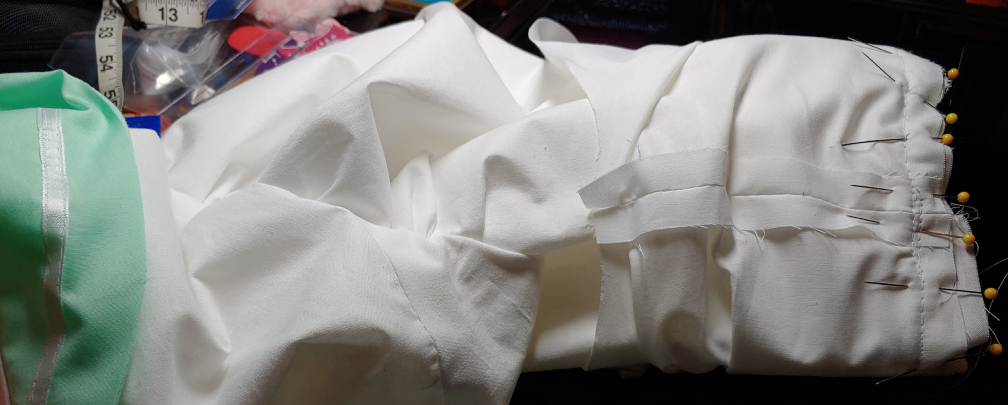
Once everything is pinned, sew it down. Clip the knot of your hand-sewn thread and pull with the needle to remove your gathering stitch.
Finishing the shoulder seam
We’re not quite done yet. As it currently is, you have a raw inner sleeve on the outside of your sleeve, and that’s not quite right. First, pull the inner sleeve down, flipping it into the inner sleeve and pushing it towards the shoulder seam. Straighten out the sleeve cuff as needed.
The inner sleeve is used for stability, to hold the large size of the outer sleeve, and to keep you from rubbing your arm against the rough netting. So we can’t quite leave it hanging out. Instead, it’ll be attached to the body of the cosplay at the shoulder seam.

Match the side seam of the inner sleeve to the side seam of the body. Pin the two seams together and pin about halfway up both sides.
If the sleeve pattern requires gathering, use the hand needle and thread to make gentle gathers. Unlike the large outer sleeve, the inner sleeve only needs small gathers to fit in the armhole.
Once the armhole is pinned, sew the inner sleeve to the body. You can sew along your initial seam made with the outer sleeve or just do the easy way and sew inside the seam allowance. Either way, attach the sleeve and finish off the shoulder.
Optionally, you can seal the shoulder seam, and if you’re not wearing a shirt underneath, I highly recommend this. Netting is scratchy and it’ll scratch at your shoulder the whole day at the con. It won’t really do much more than feeling uncomfortable, maybe leave a rubbing mark, but sealing the seam will be the most comfortable.

The easiest method is to run it through a serger or an overlocker.
If you don’t have a serger or a machine with an overlock, pinking shears unfortunately won’t do the trick. We want to prevent scratchiness, not fraying (though fraying is also a pain, but not our main problem).
Instead, you’ll want to sandwich the seam between bias tape or ribbon. Straddle the bias tape over the seam or fold the ribbon in half over it and pin it down on the seam. Sew the edge of the bias tape or ribbon inside the seam allowance for the shoulder seam to seal the edge and protect your shoulder.
And that finishes off the sleeve. Repeat for the other sleeve!
Puffing out the sleeve
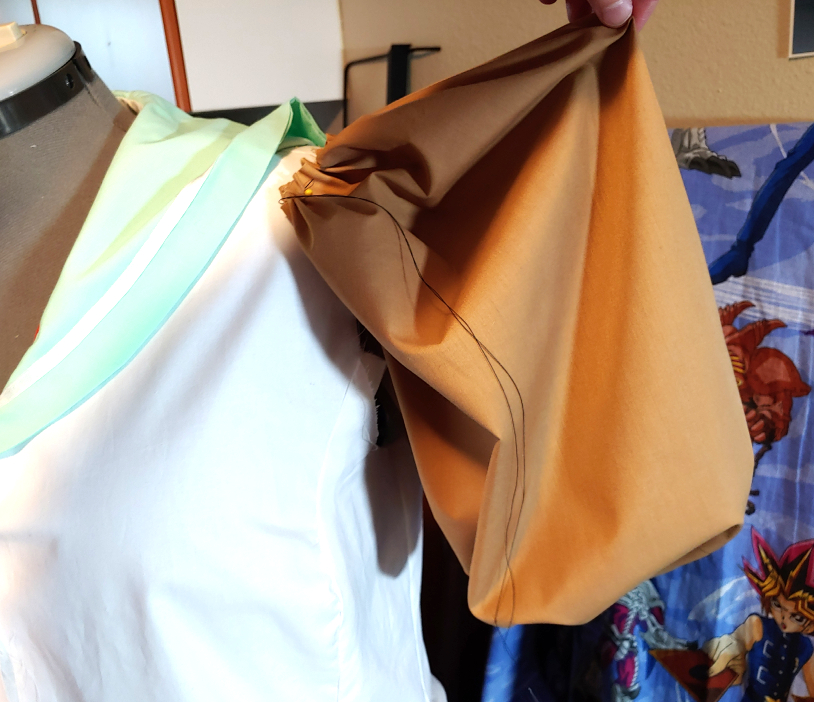
You’ll bump these sleeves a lot at a con (or squash them in a suitcase). It’s inevitable. I had to scuttle through doors sideways with my sleeves just to keep from hitting the doorframe with them. Or maybe you just finished the sleeves and want to show off your hard giant puffy work. It seems like it would be difficult to push out with the inner sleeve, but it’s actually pretty simple. Give it a pinch.

Pinch a part of the sleeve and pull it outward. Do this in a few places to pull the sleeve completely out. With how much interfacing is on the inside, that’s all you really need. The sleeve will stay in place until you inevitably bump into something and have to pinch it again!
When storing your massive sleeves, give them a little room and store them partially puffed up. Storing them completely flat may create creases in the sleeve and there’s no real good way to iron them out.
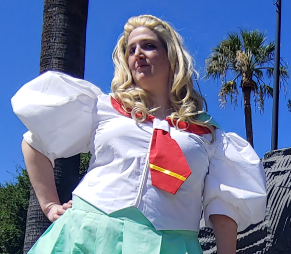
I hope you found this tutorial helpful! Now you too can defy gravity and make amazing anime and video game puffy sleeves that are easy to wear and are lightweight! They travel pretty well and can be puffed up to full size with just a few pinches. You might have to scuttle through doors sideways, but it’s totally worth it.
Let me know what giant puffy sleeves you choose to make. @ me on social media so I can admire your work!

super helpful ! Thank you for taking the time to write this article and include pics! I’m using.your advice on a wedding dress with puff sleeves that need to hold the puff.
LikeLike
I’m so glad to hear that and I’m glad I could help with your puff sleeves!
LikeLike