EVA foam is a cool medium for making props. You can make all sorts of things out of it, everything from swords to shields, and yes, even wood. But how do you make weathered wood out of foam and make it believable? How can you do this with a small budget and small space?
Turns out, you can do it with very few supplies and right in a small space such as an apartment. You will need an outdoor space during the construction of your prop as foam dust and contact cement are toxic indoors, but the painting and design can be done on a desk indoors with no ventilation or special tools required.
This method requires very few tools and only enough painting experience to know how to use a paintbrush. And the result looks like variegated, weathered wood with paint that appears to be chipping. But no matter how much it looks weathered, it’s still 100% con safe and friendly to have indoors.
This article will cover the detailing and painting. Construction is up to you! Whatever you’d like to make! Just bring a prop and let’s make it look like old wood. It is recommended to try this out on scrap foam to see how you like the technique before weathering your final prop.
Skill level: Beginner-intermediate depending on detailing
Cost: budget-friendly for paint and detail supplies
Supply list:
- Small knife such as an x-acto knife with replacement blades
- Ruler
- Permanent marker
- Brush-on foam primer of your choice. Flexbond, wood glue, mod podge. Wood usually isn’t intended to be flexible, so take your pick.
- Wide paintbrush
- Makeup wedge sponges
- Black acrylic paint
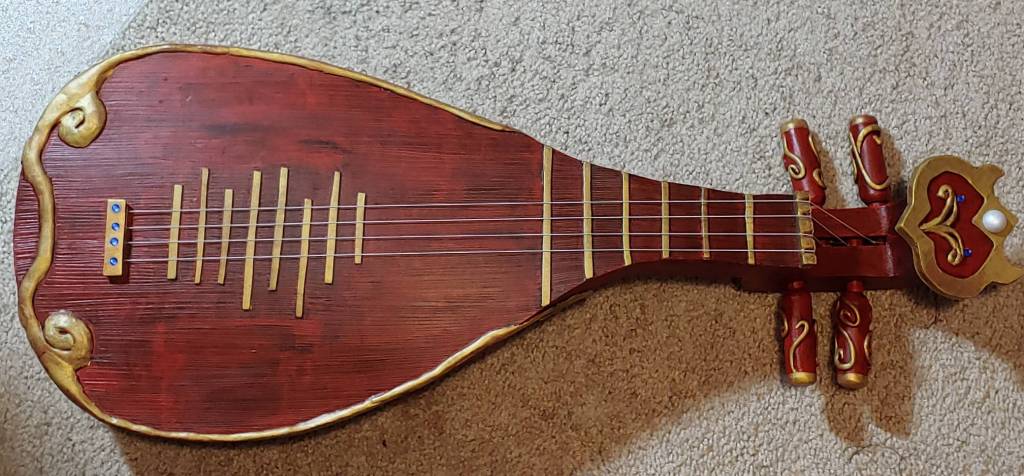
- Main color acrylic paint. It needs to be bright. For the pipa, I used bright cadmium red
- Contrast color acrylic paint (optional for contrasts). Also make this bright. Metallics work really nicely for contrast. For the pipa, I used brilliant gold
- Masking tape (optional for contrast colors)
- Matte sealant. I personally like DecoArt Super Matte sealant
Prep work

Before you can do the painting and detailing, you’ll need to complete construction completely. The entire prop should be assembled, glued, and sanded to give you a nice working surface. It is recommended to use a thicker foam, around 6mm or thicker to ensure the wood grain doesn’t cut right through the foam and reach the inside of the prop.
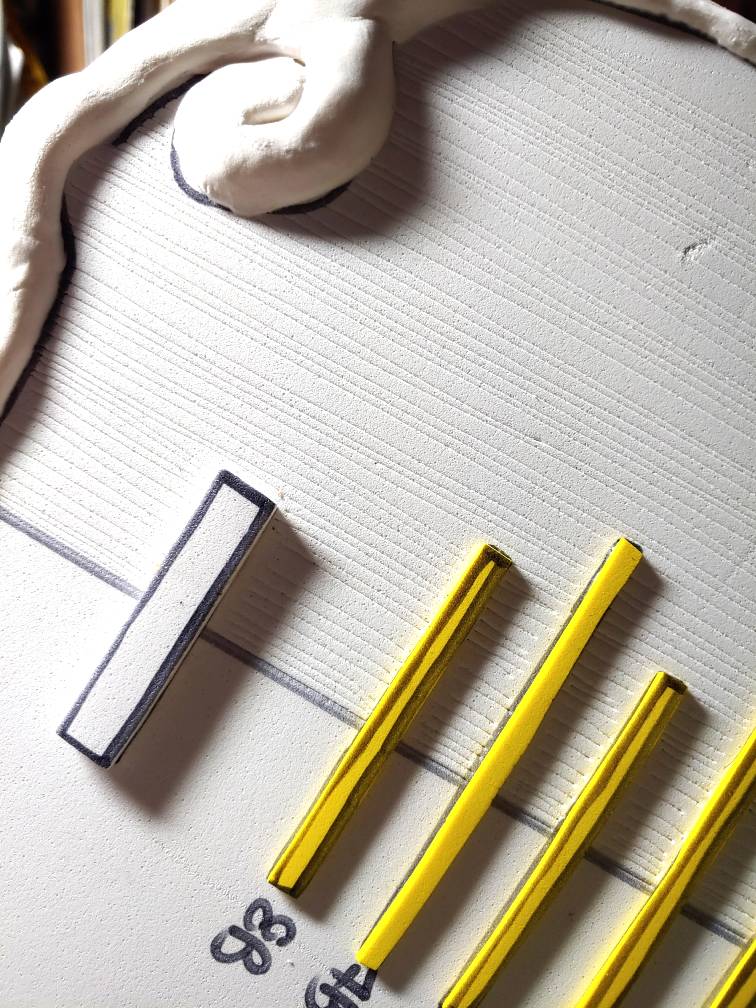
In addition to construction, add all the details you want to be painted and weathered. This includes foam accents and any foam clay. These details don’t need to have any woodgrain if you don’t want to, but it’s much easier to paint everything in one sweep when possible.
Next, you’ll want some guiding marks. Woodgrain generally goes top to bottom, especially on things like instruments or staffs. Grain isn’t always straight and even, but knowing the orientation of the grainline ensures that it doesn’t end up going diagonal or sideways the more grain you add.
The easiest place to mark is the center, especially if your prop has a curve on the edges. Take a ruler and draw a line lightly with a permanent marker. Don’t press too hard else it will dent the foam. The line just needs to be dark enough to see while you’re working. Do this for all sides of the prop you want to weather.
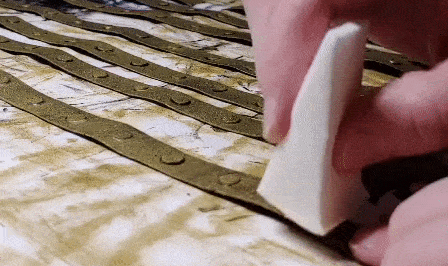
Carving the woodgrain
Now it’s time to make the grain. The grain is made with a series of shallow cuts using an x-acto or small sharp knife up and down the body of your prop. The cuts are generally vertical but uneven to make it look more like a natural wood pattern.
A word of safety: x-acto knives are very sharp and make papercut-like cuts. Try to avoid your fingers.
Start at your centerline you drew with the marker. It’s easier to start at the center and move outward, especially when there are curves on your prop. Make sure you aren’t covering your work with your hand, so you may need to flip the prop upside down on your desk while working. You’ll need to see your carvings to know where to make the next one.
When cutting, hold the knife vertically and not at an angle. Take your cuts slowly. There’s no need to rush.
As you move along the prop, vary the width between the cuts. Woodgrain is uneven, so adding that variance adds to the realism that it is, in fact, wood. Some cuts will be closer together and others will be spread apart. As with any lines made without a ruler, some will start to waver. This adds to the natural look of wood, but make sure it doesn’t wave so much that your lines turn sideways.
Flat surfaces will be the easiest to work with. Even things like the head of a large hammer fall into the easy category. You can work around any details and simply continue your line on the other side. But what happens if your prop has a curve to the surface like the back of an instrument or a bump or bulge? You’ll need to work a bit differently around curves.
The bottom of my pipa is curved, as most instruments are, and there are other props that may also fall into this category. Start off with making straight lines but when you hit a curve, angle it outward, marked in red. The red line closest to the center will parallel the centerline drawn in marker, but the other lines will start mirroring the shape of the edge of the prop. If the prop is rounded on the edges, the outside red lines likely will start curving too.
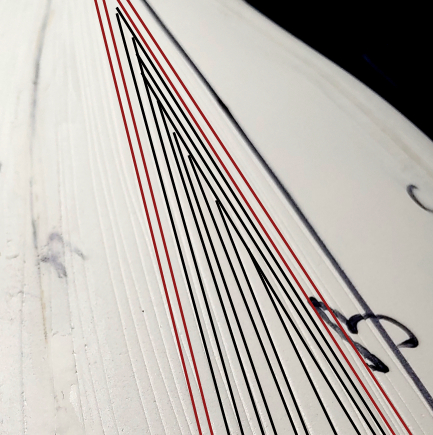
Now it’s time to draw the inside lines, marked in black. Instead of starting at the top of a prop like with the red lines, the first black lines will stem out of the red lines. These black lines follow closely with the shape of the red lines and are varied in width to make the wood grain more natural.
The other black lines will stem out of black lines instead of the red ones. Keep stemming out more black lines until you’ve covered the entire gap between the red lines. This makes a triangle shape and looks like you carved through solid wood through the grain. It looks a bit strange unpainted, but when painted and weathered, it looks more realistic.
Priming and base paint
Once you’re satisfied, it’s time to prime. Foam is porous. Paint likes to seep into it, and that gets pretty nasty. You’ll want to use a primer to prep your surface for painting. Because of all the wood grain you carved into the prop, you’ll want a brush-on primer since a spray primer might pool into the grooves and cover them up.
When you’re brushing the primer on, make sure to cover the entire prop on all sides. Follow the wood grain when you’re priming. If you notice the primer start to pool, take your paintbrush and drag the bristles along the groove. It doesn’t need to be a dry paintbrush, but make sure you don’t have a lot of primer on it already, and the paintbrush will pick up the primer and distribute it more evenly. Don’t worry about brush strokes, since that will add to the natural roughness of the wood.
After brushing on 2-3 layers of primer, it’s time to add the base paint. Paint the entire prop black, all the details, the body, and the woodgrain. All of it. Everything you want weathered. Using a black base coat gives the topcoats a more dirty look that weathered wood tends to get. Using white will make the topcoat look too bright. This step also covers any markings or oddly colored foam you used during the construction and carving process.
Make sure the entire prop is covered with the black paint and that the paint hasn’t pooled in any of the grooves and it’s time to weather the topcoat.
Painting the wood
Your wood color should be bright when it comes out of the bottle. And I mean stock bright. It’s going to look bright when you stick it in your paint dish and somewhat bright when you start painting the prop. But the base coat will darken it immensely when dried. The wood color of my pipa is bright stock red, but when the paint dries, it appears darker and weathered because of the black coat underneath.

Color paint is thin by nature, and we’re going to take full advantage of this to make the weathered look.
Take a wide paintbrush and dip it into the paint. You only want a little bit of paint on the brush, just enough to spread a thin layer of paint onto the prop. Then start painting. Your paint strokes should follow the direction of the wood grain.
If you got too much of the paint on the brush and dropped a glob onto the prop, use your brush and spread it out, careful to mop up any paint pooling into the woodgrain cuts like you did with the primer.
As you work, you’ll notice a variegated look as the black peeks through the paint where it’s thinner. If the black is too jarring, paint over it with a thin layer of paint. But for more woodsy colors like reds and browns, leaving that variegated look adds to the weathered appearance. The outer layer of paint is worn away. The wood is yielding to the weather around it. It’s those darker patches that make it look like it’s been through an ordeal and that’s exactly what weathered wood needs.
Cover your entire prop, including the contrast accents. To make the contrast paint look like it’s worn and possibly chipping, you’ll want the base wood color peeking through. If you notice any uneven spots you’re not happy with, just paint it over with black and paint a light layer of wood color on top of it. This also works for any spot color in case the paint is scuffed before you could seal it.
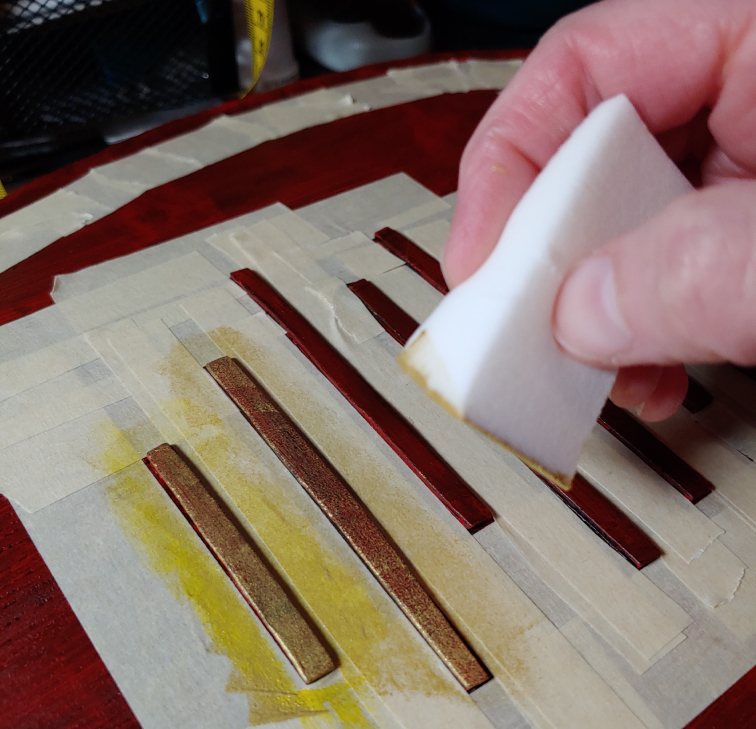
Masking the details

To prep the prop for weathered details, you’ll want to mask off sections of the prop you don’t want to be painted with masking or painter’s tape. This prevents having to paint your work over and over again as you constantly attempt to correct errant paint marks. Too much work.
When masking, generally leaving about the tape’s width around an accent is enough to keep the rest of your work paint-free. My prop’s body is pretty large with smaller details, so the gaps between the details are left untaped. No need to do extra work. We’re trying to make this easier on ourselves after all. Straight lines like with the pipa’s face are the easiest, just pieces of tape wedged between the bars until covering up any surface that needs protecting.

But sometimes there are smaller details or ones that need special tape, like the pipa’s face or the curled accents on the back. For this, you’ll need to cut smaller pieces or just tear them off, sticking them down into the area you want to protect until you’ve covered it all. You can use tweezers or your nail to pick up the small pieces of tape once you’re done.
Weathered accents
Painting weathered accents uses the technique I talked about in Painting weathered metal with a makeup wedge. For this, you’ll need a makeup wedge and a bowl for your paint. This method works better with some paints than others. I found that my yellows do a terrible job with this method, but most other colors are just fine. And since I needed yellow, I went with worn-off gold paint for the pipa.
To paint with a makeup sponge, you need a very thin layer of paint on the square end of the sponge. And then you dab. You don’t brush with a sponge else you lose that weathered effect a sponge can give you. Instead, you lightly dab the paint onto the surface and let the sponge do the magic of making it look weathered.
Since the paint is meant to look worn, one layer should do. Make sure to even out the paint by dabbing the sponge and removing any hard edges caused by the edge of the sponge.

If you’re using a thinner paint or something like white, you may need to do more than one layer to get enough color to be noticeable. If you want the accents to be a bit brighter, you’ll need more layers as well. The black and the wood color will darken your accent coat substantially, but that does add to the weathered, chipped look.
Repeat this for all the accents on your prop until you’ve covered all of them. If you plan on doing multiple accent colors that are right next to each other, you’ll need to mask each section individually. When masking paint added with a makeup sponge, be delicate as the paint layer is extremely thin.
Once you’ve added all your accent colors, carefully remove the tape. Don’t rip it off, as you’ll take all your hard work with it. Be gentle. You may have to do some spot touchups as masking tape can be rude and take the paint off angles and edges.
Sealing
After doing any painting, you need to seal it. This protects your work and ensures that the paint doesn’t actually chip off or worse, end up rubbing off on your cosplay. Remember how I’ve said each layer is very thin? It’s very easy to rub these layers off and you don’t want a paintless prop halfway through the con.
To seal the wood, you want to make it believable that it’s wood. To do this, avoid gloss sealant. It’ll make it look too new and ruin the entire weathered look. Instead, you want a matte sealant. The more matte the better. Even the most matte will have some amount of shine to it, just by the nature of what sealant is, but the more matte, the less of an unnatural shine you’ll have on your ‘wooden’ surface.
Because the paint is thin, you can’t use a brush to apply sealant. Instead, you need another makeup sponge, a clean one you haven’t used for paint.
You’ll want a generous amount of sealant on your sponge so when you rub it onto the finished paint, it spreads evenly. A bit of paint will come off and be absorbed into the sponge, but it won’t be enough that it’ll ruin your paint job.
Give your prop 2-3 coats of sealant then add any accents, and admire your work!

I hope this helps to make weathered wood props with very basic, indoor materials. You can make all sorts of wooden, weathered things with this method that will fool people into believing it might actually be old weathered wood. Old instruments, wooden doors, hammers, staffs. Just don’t go use it in combat in LARP, please. It’s not that real.
If you use this tutorial, let me know! @ me on social media so I can see your work! I’d love to see what you make with this method.
