Sometimes a hem is just irregular. It’s not a straight edge, zigzag, or even a scallop. It just borders the weird. I come across them every so often in cosplay designs, especially those that lean towards adventurer or barbarian designs. Sometimes you’ll see them at the edges of scarves too.
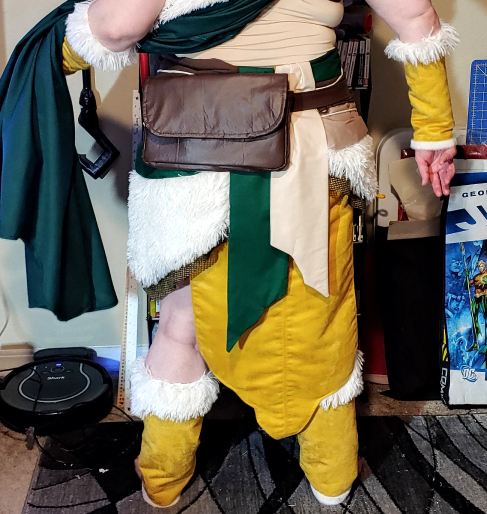
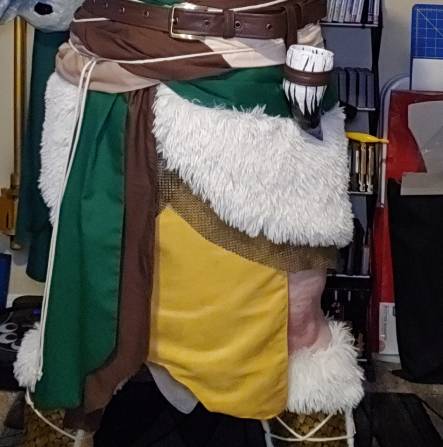
My Barbarian Bowser look is just covered in them, everything from the cape to the skirt and belt tails. It really gives them a more natural look to the edge as well as a more haphazard and rugged you really need for a barbarian look. But how do you get that rough edge properly hemmed?
Irregular hems are kind of a hodgepodge of techniques. They combine a bunch of different hemming and edging techniques in a very haphazard way, so if you’ve done a few hems, some of these techniques might seem familiar. This technique works great for lined hems. It is possible to do them raw, but that won’t be covered here.
Let’s get started and dive into the irregularity.
Skill level: intermediate
Typical supplies:
- Outer fabric + lining fabric
- Sewing machine with polyester thread
- Sewing needle that matches your fabric type and weight
- Sewing pins
- Pens and pencils for marking
- Fabric scissors
- Iron (if your fabric can be ironed)
Planning your irregular hem
Before you trim the fabric and sew an irregular hem, you’ll want to sketch it out on your fabric. To start, cut your fabric with a straight or curved hem depending on your pattern. So say you’re making a skirt with an irregular crooked hem. Cut the skirt as if you’re hemming it with a flat edge along the bottom.
Once cut, sew the garment normally but do not hem it or sew the lining to it. You will want to sew the lining separately to close the seams. So once all the seams are sewn, you’ll have two identical garments unhemmed. For mine, I was sewing a battle skirt with slits up the sides. I cut the skirt to a normal long length which reached the floor and sewed up the side seams and the center back, leaving a gap for the zipper later. I did this for both the suede outside fabric and the muslin lining fabric.
With a pen or pencil, sketch out the hem. Since this is an irregular hem, you can add squiggles and curves to your heart’s content but make sure the squiggles aren’t too complex for what you can sew. I wanted something that looked really haphazard, so I added a lot of curves to my design.
Draw on the wrong side of the fabric and make sure not to use a marker as those bleed into the fibers. This line will be the raw edge of your fabric, and your stitch lines will be slightly higher. So make sure to make it a bit longer than the final hem you want. You can draw on either the outer fabric or the lining fabric. It doesn’t make a difference in the end.
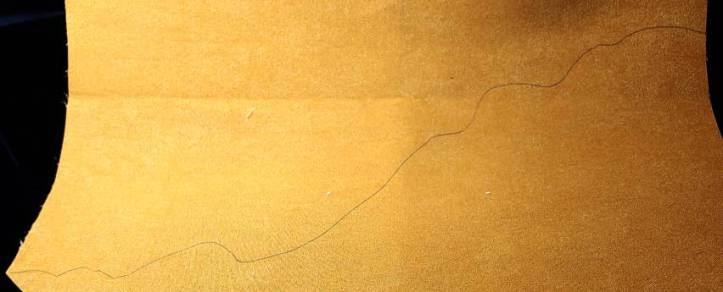
Once satisfied with your design, cut the fabric at the pen line. I find it much easier to sew with the edge cut instead of lining my stitches up near the pen line. You may find it easier to leave it as it is. It’s up to you!
Sewing the hem
Before you sew the hem, you’ll need to match the outer fabric with the lining fabric, right sides together. If you didn’t cut the hem, as long as you sewed the pieces the same for both fabrics, they’ll match up. Pin along the sketched line so your fabric does not move when you sew.
But chances are, you end up with a piece or two crooked at the bottom (which happens all the time) or you cut the bottom off the irregular hem sketch. The best way to match up the two pieces is from the top instead. For my skirt, I matched the waistband up for both the outer and lining fabric then pinned along the irregular edge.

If you have a particularly long piece or don’t have a table long enough to deal with the garment, Stick a large piece of cardboard inside so you can smooth the fabric out and pin it without worrying you’ll pin the other side to this one.
Once pinned, it’s time to sew! Sew with around a 1/2″ to 5/8″ standard seam allowance at the edge. This gives you enough time to turn curves and corners and not get too close to the edge. Use a thread that’s close or matching your fabric so that it won’t show through if you have thinner fabrics.
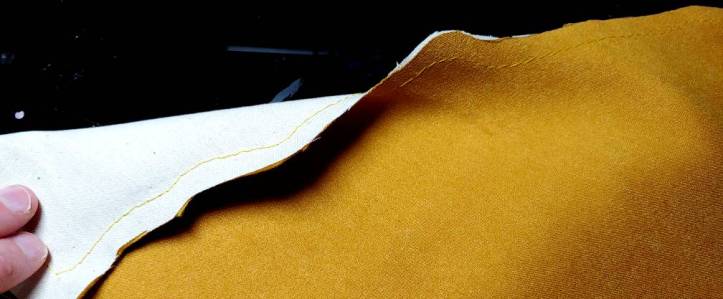
Once the seam is sewn, trim both layers to your drawn line.
Trimming excess fabric
Before you can flip the fabric right-side out, you’ll need to reduce the amount of fabric being pushed into corners and curves and give the fabric more room to move around wide corners and angles through clipping.
Here are the various types of clipping that you may use with an irregular hem:
Corners
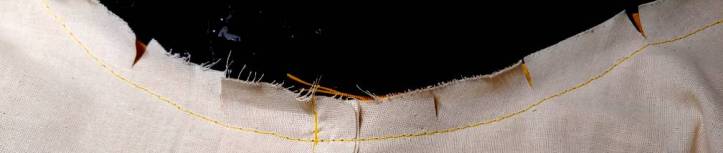
To reduce the fabric bulk shoved into a corner, trim the fabric down at an angle toward the corner stitch. Leave a little bit of room, about 1/8″ or so, on the corner itself so the fabric fibers don’t fray and you find your corner collapsing in on itself.

Outer curve
An outer curve curves outward away from the stitches. Much like the corner, when you flip the fabric right side out, you’ll be shoving more fabric inside the curve than can reasonably fit. To trim the excess fabric, cut small triangles into the edge of the fabric, bringing the triangle close to the stitch line. Like with the corner, do not clip exactly to the stitch line or through it.
With sharper curves, your triangles will be closer together than with more gentle curves. It’s more of an art than a science in determining how far apart your triangles should be. When you flip the fabric right side out and you find the curve not sitting flat, simply flip the fabric back inside and cut a few more triangles as needed.
Inner curve
An inner curve curves towards your stitch line. instead of pushing more fabric into the curve, you’ll be spreading the fabric out. While cottons have minimal stretch, it doesn’t always like to stretch over curves, and without clipping, your curve may sag or even bunch awkwardly.
To clip an inner curve, simply clip lines into the edge perpendicular to your stitch line. This allows the fabric to spread apart when curving instead of bunching. Like with the outer curve, this is more of an art than a science. You may need to add more clips as needed.
Seams are particularly difficult to clip through so it’s best to clip on either side of the seam and its seam allowance when possible
Finishing the irregular hem
It’s time to flip your hem right-side out. Unlike straight or angled hems, you’ll need to push those little curved pockets and juts out to fully show off this hem you’ve sewn. You can use a plastic point-turner (I call it a corner pusher), a credit card, or plastic chopsticks. Avoid using a pen or pencil as the point is too sharp and will poke through your stitches.
If your fabric is able to be ironed (both outer and inner fabric), use heat and steam (if possible for your fabric type) to gently press the hem into place. If you have delicate fabrics, make sure to use a press cloth or parchment paper to protect your fabric and your iron.
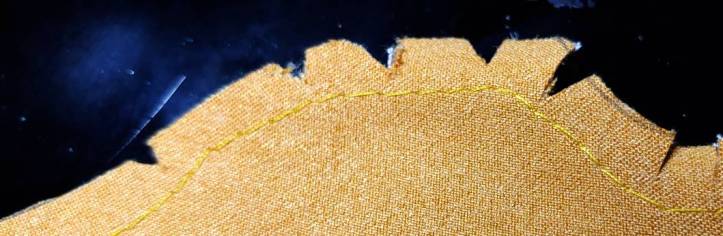
In some cases, you may be working with a particularly stubborn fabric that doesn’t take to ironing or a fabric that cannot be ironed at all, or perhaps want the look of a nice stitched edge. In this case, add a top stitch that follows the curves and turns of your hem. With stubborn fabric, pin the hem flat before stitching to ensure the hem doesn’t wiggle around while you’re working.

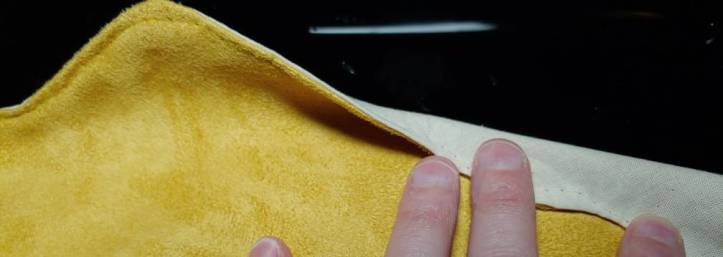
If you have a different color for your outer layer and for the lining, stitch with a different top thread and bobbin thread. Make sure that the colors match which side you’re feeding the fabric through. For my battle skirt, the top thread was golden yellow with the bobbin a light cream. The fabric is fed through the machine with the yellow side up and the resulting stitches are nearly invisible along the fabric’s edge.
Once you finish stitching or pressing, you’re done! You’ve sewn an irregular hem!
I hope you enjoyed this tutorial on how to make irregular hems! It’s a great way to add some cool edging details to your next cosplay or ren faire look. It works great for adventurer and barbarian types or could be good for the next irregular hem skirt you wear out and about. It’s up to you what you do with your new hemming knowledge.
Let me know what you use this tutorial to make. @ me on social media so I can admire your work!

[…] choice for our wardrobes. The long sleeves and midi length offer full coverage, while the irregular double-layered hem adds a subtle feminine flair that elevates the overall look. Additionally, the roomy fit means we […]
LikeLike