Real chainmaille involves linking a bunch of rings in a pattern. My hands won’t handle that much ring-bending magic. So when a friend suggested using shelf liner to make chainmaille, I had to try it out.
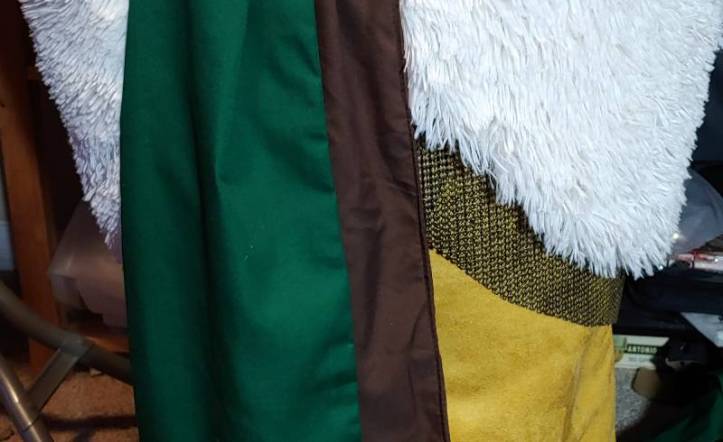
The result is a lightweight, easy-on-the-hands, budget-friendly chainmaille-like fabric perfect for cosplay. This likely won’t work for a full maille shirt or bra, but it works great for accents and details. I’ve used it on skirts and sleeves so far and will use this same technique for maille in the future.
Cost: budget-friendly
Skill level: beginner-friendly
Materials:
- Black rubber shelf liner. Get this at a physical store as online will generally overcharge you. Black will make your maille look weathered when you paint it
- Metallic paint. I used brilliant gold for mine
- Clear gloss varnish. You can use glossy Mod Podge for a budget option
Supplies:
- Scissors (not fabric scissors since the rubber might dull them)
- A foam makeup wedge
- Small bowl for paint
- Fabric or plastic cover for the surface of your table
- Hand sewing needle, standard sharp
- Polyester thread that matches your maille color or whatever you’re attaching the maille to
Which shelf liner works?
If you go down the kitchen aisle, you’ll probably see a few kinds. The kind that you want has a rubbery texture and has little holes in it. This stuff is used to keep the stuff on your shelf from slipping and falling.
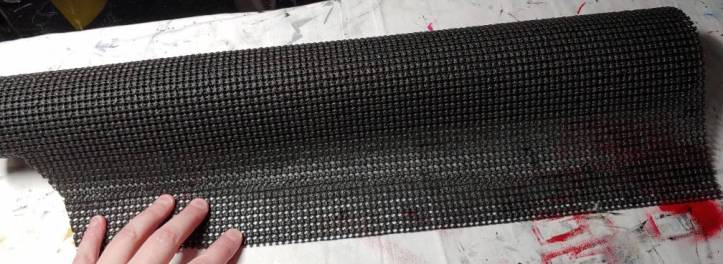
Shelf liner typically comes in a few widths. If you’re doing a few accents, you can likely get away with the smaller rolls. For my barbarian Bowser cosplay, I got the super wide one for about $7. I needed the width to span the whole length of a fur wrap around my waist. Despite making several huge pieces of maille along the skirt and a few along the shoulder, I still have more than half a roll left, so you’ll get some good mileage out of a roll.
Despite having a rubbery texture, shelf liner takes to paint very easily. You can cut it with standard scissors (don’t use your fabric scissors as this probably will dull them) and sew them with a regular sewing needle without a thimble.
Planning out the maille
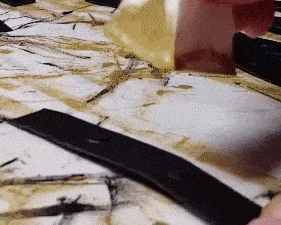
While you could paint the entire roll, that’s a lot of extra work you don’t need to do. Instead, it’s a good idea to plan out where you want this maille and in what shape. Shelf liner doesn’t have the best flexibility so make sure it doesn’t impede your movements. You can still sit and stand in it just fine when it’s around your waist, but you don’t want it riding up your thighs or hindering the movement of your shoulders.
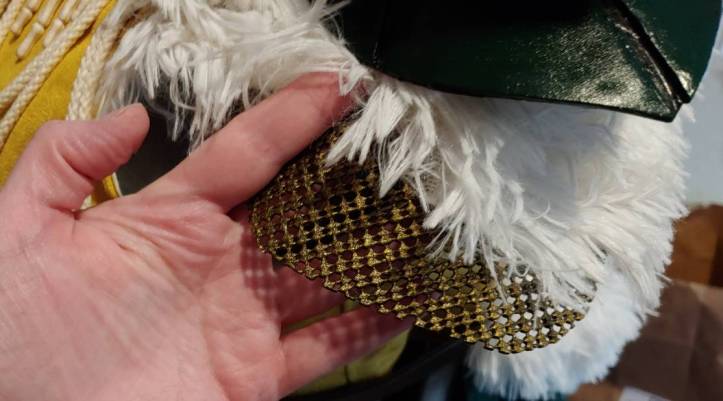
For my barbarian Bowser, I knew I wanted this underneath a fur wrap I’d already made. The maille needed to be seen underneath it when worn too. So the maille needed to follow the contours of the fur wrap but be far enough away from the furry edges to be properly seen. The width of my wide roll was just wide enough to make this happen.
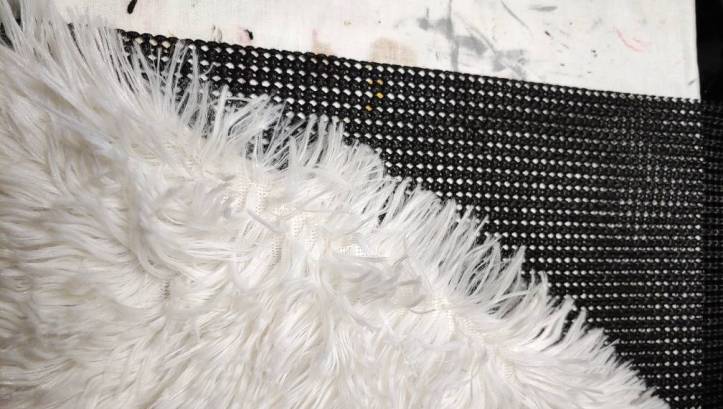
Once you know your requirements, you can use the sleeve, bottom of a shirt, fur wrap, or whatever you want the maille to sit under as a guide. Cut the shelf liner a few inches past the edge of your object so the maille will be clearly visible underneath the object. It’s always good to have extra since you can trim it later.
For the wrap, I made the maille the entire height of the wrap plus the extra length to ensure it was visible beneath the fluffy fur. If the wrap flipped up, it would look like the maille was fully underneath the fur. For sleeves or edges or other shapes, you may get away with just adding the maille into the hem itself. It will depend on the project you’re working on.
Painting
Now to make this shelf liner truly shine with some paint. Lay a protective covering over your table and lay your shelf liner out flat. If you’ve been to my other painting tutorials, you’ll probably recognize that my favorite technique is painting with a makeup wedge. You can paint with foam brushes, old socks, and other fun things, but I find that the good old makeup wedge gives you a great weathered look.
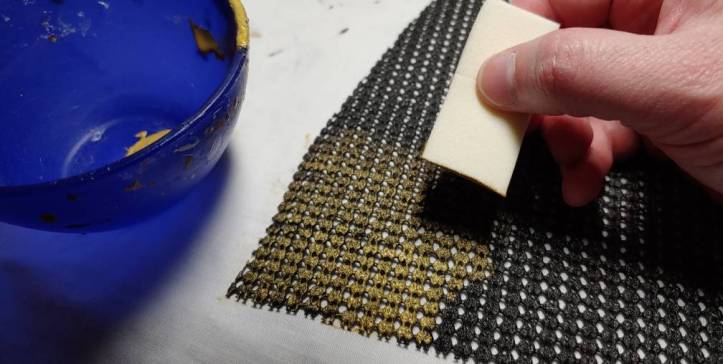
Paintbrushes cannot properly apply paint to shelf liner, so you’ll want one of the foamy or old sock options. I detail a lot of the technique over at Painting weathered metal with a makeup wedge, but let’s talk about some of the specifics for shelf liner since it’s an unusual material.
Shelf liner takes quite a bit of paint to be noticeable but if you put too much on, your paint will start seeping through the holes and it’ll look more solid than maille once you’re done.
Dip the wedge into the paint and wipe most of it off on the side of the bowl so that the wedge is completely covered on the flat side. Then dab. Dab dab dab dab dab. You don’t need to dab hard, just enough to transfer the paint to the shelf liner.
Since shelf liner is a paint-thirsty material, you’ll need to go back to your bowl frequently and reapply paint to the bottom of your sponge. I recommend working along the shelf liner from your indominant hand towards the dominant one so you don’t accidentally lean on your work. I paint with my right hand, so I paint left to right.
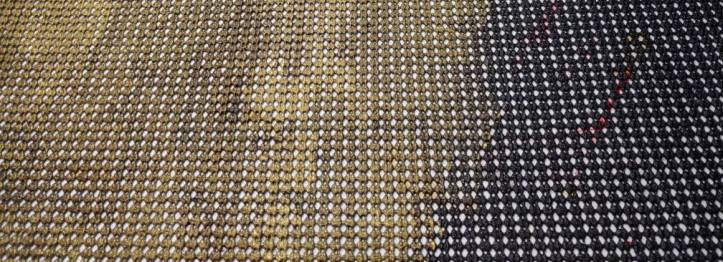
While painting, you’ll likely get some variation in the intensity of your paint. This is due to the paint on the sponge thinning a bit as you work. I recommend leaving the variation in as it makes the maille look more weathered and more believable. If you don’t want the variation, simply dab over the other sections once dry to cover up the differences.
Once you’ve painted one side, leave it to dry for a few minutes. Despite requiring quite a bit of paint, the shelf liner actually dries pretty quickly.
Once dry, flip the shelf liner over. Since we’re faking maille and pretending the shelf liner is something completely different, we need to complete the illusion that this is indeed metal and not rubber liner. One flip of the wind and your entire cover is blown. So let’s fix that.

Repeat the same process and paint the entire back of the shelf liner, letting it completely dry.
To finish off the paint job, we’ll need to seal it. Now I’m not sure how much paint will rub off shelf liner, but given how thin the paint is with the sponge technique, I’m not going to let it rub against my white fur accents to find out. So let’s seal everything to be safe.
Sealing protects your paint job and protects other parts of your cosplay from getting paint smudged all over it. Put a lot of glossy varnish into your bowl and get a new wedge. Dip the wedge into the bowl and wipe only a little bit off on the edge of the bowl. Now dab the varnish on.
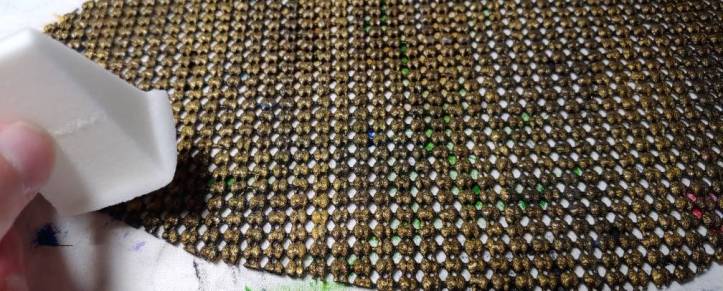
During this process, you really won’t see what you have and have not varnished yet. It all just looks the same as the shelf liner slurps up the varnish. So to keep track of where you are, use a finger on your free hand to keep track of which row you’ve varnished. I recommend using the rows of the shelf liner circles, going bottom to top, to make it easy to keep track of where you currently are.
Let the varnish dry for a few minutes then apply another coat. Two coats should be enough, but you can always add a third. This ensures your paint is fully protected and you haven’t missed a spot.
Repeat this for the other side.
Sewing the maille
The easiest way to attach the maille to your cosplay is to simply sew it with a straight stitch and a hand needle. You can use stick pins to keep the maille in place and not move as needed.
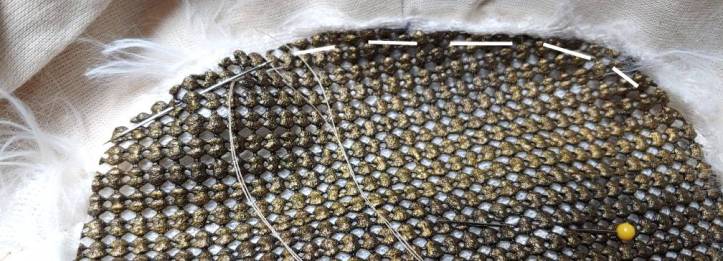
Your stitches can be haphazard as long as they keep the maille in place. Sewing shelf liner is definitely more of an art than a science, to be honest. It’s easiest to sew in the holes, but if you accidentally spear the liner itself, a sharp needle should pull through it just fine.
You can additionally tack down any details to the maille, you can use a tacking stitch to keep it in place. For my sleeve maille, I tacked the fur down to it so the fur would stay in place and not wiggle all over the place.
Now go add all your details and enjoy your budget-friendly maille!
I hope you enjoyed this fun little tutorial on how to create chainmaille out of shelf liner. It’s a budget-friendly, easy-on-the-hands way to add maille to your cosplay. I ended up liking the technique so much, I added even more maille into my design.
Let me know what you make with this tutorial. @ me on social media so I can admire your work!
